nodejs MongoDB 索引 和 explain 的使用(11)
Posted 柳帅
tags:
篇首语:本文由小常识网(cha138.com)小编为大家整理,主要介绍了nodejs MongoDB 索引 和 explain 的使用(11)相关的知识,希望对你有一定的参考价值。
目录
一、索引基础
二、唯一索引
三、索引的一些参数.
四、使用 explain
五、 explain executionStats 查询具体的执行时间
一、索引基础
索引是对数据库表中的一列或者多列的值进行排序的一种结构,可以让我们查询数据变得更快.
创建索引
db.user.ensureIndex({"name":1}) // 给user表 "username" 设置索引
获取当前集合的索引
db.user.getIndexes()
删除索引的命令
db.user.dropIndex({"name":1})
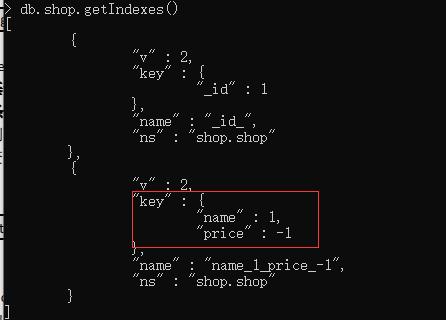
创建复合索引
在 MongoDB 中,我们同样可以创建复合索引,如:
数字 1 表示 username 键的索引按升序存储, -1 表示 age 键的索引按照降序方式存储。
db.shop.ensureIndex({"name":1, "price":-1})

该索引被创建后,基于 name和 price的查询将会用到该索引,或者是基于 username
的查询也会用到该索引, 但是只是基于 age 的查询将不会用到该复合索引。因此可以说,
如果想用到复合索引,必须在查询条件中包含复合索引中的前 N 个索引列。然而如果查询
条件中的键值顺序和复合索引中的创建顺序不一致的话, MongoDB 可以智能的帮助我们调
整该顺序,以便使复合索引可以为查询所用。如:
db.shop.find({"price": 30, "name": "stephen"}) // 命中索引
对于上面示例中的查询条件, MongoDB 在检索之前将会动态的调整查询条件文档的顺
序,以使该查询可以用到刚刚创建的复合索引。
对于上面创建的索引, MongoDB 都会根据索引的 keyname 和索引方向为新创建的索引
自动分配一个索引名, 下面的命令可以在创建索引时为其指定索引名,如:
db.shop.ensureIndex({"name":1},{"name":"userindex"}) // 制定索引名 userindex
随着集合的增长,需要针对查询中大量的排序做索引。如果没有对索引的键调用 sort,
MongoDB 需要将所有数据提取到内存并排序。因此在做无索引排序时,如果数据量过大以
致无法在内存中进行排序,此时 MongoDB 将会报错 .
二、唯一索引
在缺省情况下创建的索引均不是唯一索引。下面的示例将创建唯一索引,如:
db.user.ensureIndex({"userid":1},{"unique":true}) //创建唯一索引
如果再次插入 userid 重复的文档时, MongoDB 将报错,以提示插入重复键,如:
db.user.insert({"userid":5})
db.user.insert({"userid":5})
报错信息: 唯一索引不能重复
E11000 duplicate key error index: user.user.$userid_1 dup key: { : 5.0 }
如果插入的文档中不包含 userid 键,那么该文档中该键的值为 null,如果多次插入类似
的文档, MongoDB 将会报出同样的错误,如:
db.user.insert({"userid1":5})
db.user.insert({"userid1":5})
报错信息: 唯一索引不能为 null
E11000 duplicate key error index: user.user.$userid_1 dup key: { : null }
如果在创建唯一索引时已经存在了重复项,我们可以通过下面的命令帮助我们在创建唯
一索引时消除重复文档,仅保留发现的第一个文档,如:
db.user.dropIndex({"userid":1})
插入测试数据,以保证集合中有重复键存在。
db.user.remove()
db.user.insert({"userid":5})
db.user.insert({"userid":5})
重新创建唯一索引
db.user.ensureIndex({"userid":1},{"unique":true }}

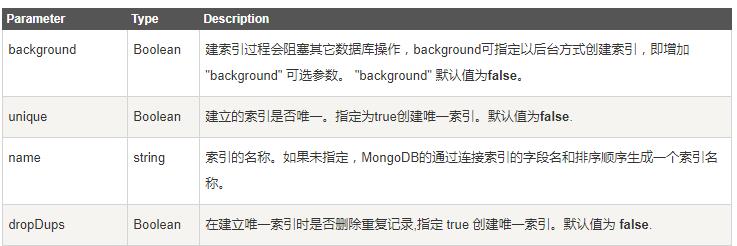
三 索引的一些参数

mongo 后台建立索引
db.user.ensureIndex({"username":1},{"background":true})
四、使用 explain
explain 是非常有用的工具,会帮助你获得查询方面诸多有用的信息。只要对游标调用
该方法,就可以得到查询细节。 explain 会返回一个文档,而不是游标本身。如:

explain 会返回查询使用的索引情况,耗时和扫描文档数的统计信息。
五、 explain executionStats 查询具体的执行时间
语法:
db.tablename.find().explain( "executionStats" )
关注输出的如下数值: explain.executionStats.executionTimeMillis
构建大量数据:
for (var i =1;i<1000000;i++){db.user.insert({"name":"zhangsan"+i,"age":"5",\'num\':i})}
不加索引,查询时间
{
    ...
        },
        "executionStats" : {
                "executionSuccess" : true,
                "nReturned" : 1,
                "executionTimeMillis" : 695,
               ...
}
添加索引,查询时间
{
    ...
        },
        "executionStats" : {
                "executionSuccess" : true,
                "nReturned" : 1,
                "executionTimeMillis" : 88,
               ...
}
以上是关于nodejs MongoDB 索引 和 explain 的使用(11)的主要内容,如果未能解决你的问题,请参考以下文章