vue+webpack+element-ui项目打包优化速度与app.jsvendor.js打包后文件过大
Posted lzweb
tags:
篇首语:本文由小常识网(cha138.com)小编为大家整理,主要介绍了vue+webpack+element-ui项目打包优化速度与app.jsvendor.js打包后文件过大相关的知识,希望对你有一定的参考价值。
---恢复内容开始---
从开通博客到现在也没写什么东西,最近几天一直在研究vue+webpack+element-ui项目打包速度优化,想把这几天的成果记录下来,可能对前端牛人来说我这技术比较菜,但还是希望给有需要的朋友提供一下方便。
一开始项目部署到线上后第一次访问首页的时间是7、8秒的样子,页面加载太慢了自己都接受不了何况用户。
主要是从一下几步来优化的:
1、vue路由的加载方式
import Home from ‘@/components/Index‘
改为
const Index = resolve => require([‘@/components/Index‘], resolve)
上面那种普通的加载方式的缺点是把所有的路由打包在一个js文件里面页面多的话这个文件会非常大加载的很慢。
下面这种方式是按需加载在访问的时候只加载相关的路由,又被叫做(懒加载)
2、第三方依赖包的引入
main.js
import Vue from ‘vue‘
import router from ‘./router‘
import Element from ‘element-ui‘
import echarts from ‘echarts‘


Vue.use(Element)
Vue.prototype.echarts = echarts

new Vue({
  el: ‘#app‘,
  store,
  router,
  components: {App},
  template: ‘<App/>‘
})
这样引入依赖包会把所依赖的第三方包全都打包起来从而造成打包后的 app.js和vendor.js文件过大加载的很慢,把这种方式改为CDN引入。
首先把main.js种引入的第三方包注释掉,vue不用注释
import Vue from ‘vue‘
//import router from ‘./router‘
//import Element from ‘element-ui‘
//import echarts from ‘echarts‘


//Vue.use(Element)
//Vue.prototype.echarts = echarts

new Vue({
  el: ‘#app‘,
  store,
  router,
  components: {App},
  template: ‘<App/>‘
})
在webpack.base.conf.js中增加以下设置,这样就不会把依赖包打包到自己的项目里面了
module.exports = {

  externals: {
    ‘vue‘: ‘Vue‘,
    ‘element-ui‘: ‘ElementUI‘,
    ‘echarts‘: ‘echarts‘,
  }

}
然后在index.html中用CDN的方式引入
<!DOCTYPE html>
<html>
<head>
  <meta charset="utf-8">
  <meta name="viewport" content="width=device-width,initial-scale=1.0">
  <link rel="stylesheet" href="https://cdn.bootcss.com/element-ui/2.11.0/theme-chalk/index.css">
  <title></title>
</head>
<body>
<div id="app"></div>
  <script src="https://cdn.jsdelivr.net/npm/vue@2.5.2/dist/vue.js"></script>
  <script src="https://cdn.bootcss.com/vue-router/3.0.1/vue-router.min.js"></script>
  <script src="https://cdn.bootcss.com/element-ui/2.11.0/index.js"></script>
  <script src="https://cdn.bootcss.com/echarts/4.2.1/echarts.min.js"></script>
</body>
</html>
这样在打包的时候就不会把这些依赖包打包到里面,vendor.js有之前的2M多变成了200多K。
3、打包生成压缩包,同时不生成.amp文件
先安装 npm install --save-dev compression-webpack-plugin
找到config/index.js 修改productionSourceMap: false,默认是true修改为false这样打包的时候就不会生成.map文件
build: {
    // Template for index.html
    index: path.resolve(__dirname, ‘../dist/index.html‘),

    // Paths
    assetsRoot: path.resolve(__dirname, ‘../dist‘),
    assetsSubDirectory: ‘static‘,
    assetsPublicPath: ‘/‘,

    /**
     * Source Maps
     */

    productionSourceMap: false,
    // https://webpack.js.org/configuration/devtool/#production
    devtool: ‘#source-map‘,

    // Gzip off by default as many popular static hosts such as
    // Surge or Netlify already gzip all static assets for you.
    // Before setting to `true`, make sure to:
    // npm install --save-dev compression-webpack-plugin
    productionGzip: true,
    productionGzipExtensions: [‘js‘, ‘css‘],

    // Run the build command with an extra argument to
    // View the bundle analyzer report after build finishes:
    // `npm run build --report`
    // Set to `true` or `false` to always turn it on or off
    bundleAnalyzerReport: process.env.npm_config_report
  }
}
打包生成压缩包修改 productionGzip:true 默认是false 修改为true,修改完成后设置webpack.prod.conf.js, 这个设置在vue-lic 2.0以上版本中默认就已经设置好了,所以就不用
手动设置。
if (config.build.productionGzip) {
  const CompressionWebpackPlugin = require(‘compression-webpack-plugin‘)

  webpackConfig.plugins.push(
    new CompressionWebpackPlugin({
      asset: ‘[path].gz[query]‘,
      algorithm: ‘gzip‘,
      test: new RegExp(
        ‘\\.(‘ +
        config.build.productionGzipExtensions.join(‘|‘) +
        ‘)$‘
      ),
      threshold: 10240,
      minRatio: 0.8
    })
  )
}
npm run build 有可能会报错
ValidationError: Compression Plugin Invalid Options
options should NOT have additional properties
这个错误是compression-webpack-plugin的版本的问题,我安装的版本是 @1.0.0 可以成功打包
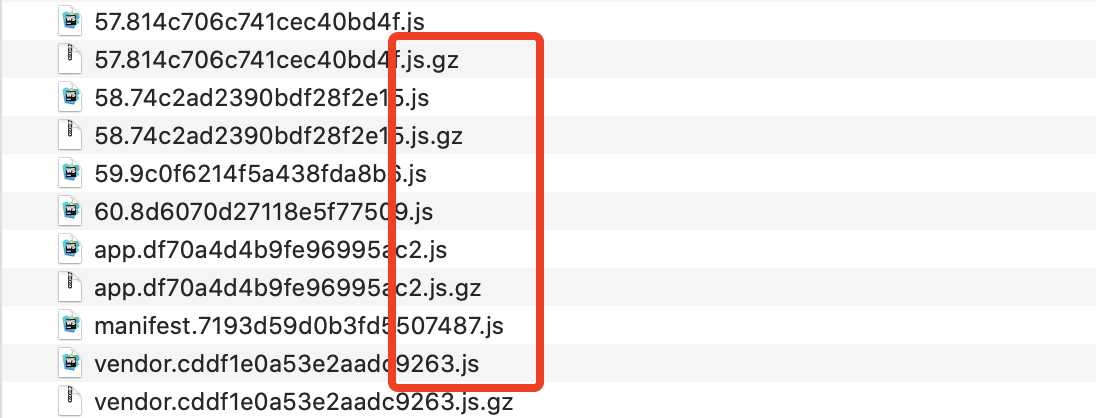
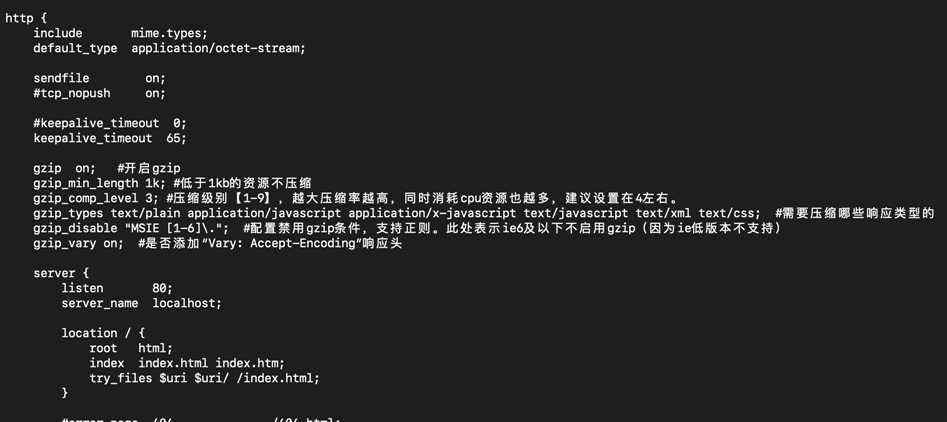
打包生成压缩包部署到线上需要后台的配合设置 nginx 开启:gzip
设置完以上及步骤后现在的速度保持在1s左右,打包后的js文件也变得很小了。

以上是我对项目速度优化的全部步骤希望对有需要的小伙伴们有所帮助!!
---恢复内容结束---
从开通博客到现在也没写什么东西,最近几天一直在研究vue+webpack+element-ui项目打包速度优化,想把这几天的成果记录下来,可能对前端牛人来说我这技术比较菜,但还是希望给有需要的朋友提供一下方便。
一开始项目部署到线上后第一次访问首页的时间是7、8秒的样子,页面加载太慢了自己都接受不了何况用户。
主要是从一下几步来优化的:
1、vue路由的加载方式
import Home from ‘@/components/Index‘
改为
const Index = resolve => require([‘@/components/Index‘], resolve)
上面那种普通的加载方式的缺点是把所有的路由打包在一个js文件里面页面多的话这个文件会非常大加载的很慢。
下面这种方式是按需加载在访问的时候只加载相关的路由,又被叫做(懒加载)
2、第三方依赖包的引入
main.js
import Vue from ‘vue‘
import router from ‘./router‘
import Element from ‘element-ui‘
import echarts from ‘echarts‘


Vue.use(Element)
Vue.prototype.echarts = echarts

new Vue({
  el: ‘#app‘,
  store,
  router,
  components: {App},
  template: ‘<App/>‘
})
这样引入依赖包会把所依赖的第三方包全都打包起来从而造成打包后的 app.js和vendor.js文件过大加载的很慢,把这种方式改为CDN引入。
首先把main.js种引入的第三方包注释掉,vue不用注释
import Vue from ‘vue‘
//import router from ‘./router‘
//import Element from ‘element-ui‘
//import echarts from ‘echarts‘


//Vue.use(Element)
//Vue.prototype.echarts = echarts

new Vue({
  el: ‘#app‘,
  store,
  router,
  components: {App},
  template: ‘<App/>‘
})
在index.html中用CDN的方式引入
<!DOCTYPE html>
<html>
<head>
  <meta charset="utf-8">
  <meta name="viewport" content="width=device-width,initial-scale=1.0">
  <link rel="stylesheet" href="https://cdn.bootcss.com/element-ui/2.11.0/theme-chalk/index.css">
  <title></title>
</head>
<body>
<div id="app"></div>
  <script src="https://cdn.jsdelivr.net/npm/vue@2.5.2/dist/vue.js"></script>
  <script src="https://cdn.bootcss.com/vue-router/3.0.1/vue-router.min.js"></script>
  <script src="https://cdn.bootcss.com/element-ui/2.11.0/index.js"></script>
  <script src="https://cdn.bootcss.com/echarts/4.2.1/echarts.min.js"></script>
</body>
</html>
这样在打包的时候就不会把这些依赖包打包到里面,vendor.js有之前的2M多变成了200多K。
3、打包生成压缩包,同时不生成.amp文件
先安装 npm install --save-dev compression-webpack-plugin
找到config/index.js 修改productionSourceMap: false,默认是true修改为false这样打包的时候就不会生成.map文件
build: {
    // Template for index.html
    index: path.resolve(__dirname, ‘../dist/index.html‘),

    // Paths
    assetsRoot: path.resolve(__dirname, ‘../dist‘),
    assetsSubDirectory: ‘static‘,
    assetsPublicPath: ‘/‘,

    /**
     * Source Maps
     */

    productionSourceMap: false,
    // https://webpack.js.org/configuration/devtool/#production
    devtool: ‘#source-map‘,

    // Gzip off by default as many popular static hosts such as
    // Surge or Netlify already gzip all static assets for you.
    // Before setting to `true`, make sure to:
    // npm install --save-dev compression-webpack-plugin
    productionGzip: true,
    productionGzipExtensions: [‘js‘, ‘css‘],

    // Run the build command with an extra argument to
    // View the bundle analyzer report after build finishes:
    // `npm run build --report`
    // Set to `true` or `false` to always turn it on or off
    bundleAnalyzerReport: process.env.npm_config_report
  }
}
打包生成压缩包修改 productionGzip:true 默认是false 修改为true,修改完成后设置webpack.prod.conf.js, 这个设置在vue-lic 2.0以上版本中默认就已经设置好了,所以就不用
手动设置。
if (config.build.productionGzip) {
  const CompressionWebpackPlugin = require(‘compression-webpack-plugin‘)

  webpackConfig.plugins.push(
    new CompressionWebpackPlugin({
      asset: ‘[path].gz[query]‘,
      algorithm: ‘gzip‘,
      test: new RegExp(
        ‘\\.(‘ +
        config.build.productionGzipExtensions.join(‘|‘) +
        ‘)$‘
      ),
      threshold: 10240,
      minRatio: 0.8
    })
  )
}
npm run build 有可能会报错
ValidationError: Compression Plugin Invalid Options
options should NOT have additional properties
这个错误是compression-webpack-plugin的版本的问题,我安装的版本是 @1.0.0 可以成功打包
打包生成压缩包部署到线上需要后台的配合设置 nginx 开启:gzip
设置完以上及步骤后现在的速度保持在1s左右,打包后的js文件也变得很小了。
以上是我对项目速度优化的全部步骤希望对有需要的小伙伴们有所帮助!!
以上是关于vue+webpack+element-ui项目打包优化速度与app.jsvendor.js打包后文件过大的主要内容,如果未能解决你的问题,请参考以下文章
vue2 + element-ui + axios 开源项目推荐