H.266/VVC-VTM代码学习27-VTM中编码器主函数逻辑
Posted liaojq2020
tags:
篇首语:本文由小常识网(cha138.com)小编为大家整理,主要介绍了H.266/VVC-VTM代码学习27-VTM中编码器主函数逻辑相关的知识,希望对你有一定的参考价值。
H.266/VVC专栏传送
上一篇:H.266/VVC-VTM代码学习26-VTM中RDcost的计算与λ的设定(二)
下一篇:持续创作中…
目录
前言
VTM是H.266/VVC视频编码标准的参考软件,研究VTM代码给研究人员解释了VVC编码标准的详细标准规范与细节。
本文是笔者对VTM代码的一点学习记录,成文于笔者刚开始接触VVC期间,期间很多概念和理论框架还很不成熟,若文中存在错误欢迎批评指正,也欢迎广大视频编码学习者沟通交流、共同进步。
VTM代码的下载及编译请参考博文:
【视频编码学习】H.266/VVC参考软件VTM配置运行(VTM-6.0版本)
一、简介
VTM编码器主函数即EncoderApp的encmain.cpp文件中main函数,该函数通过调用下层函数实现编码参数的读取和配置、逐帧进行编码、以及编码后的数据处理及信息输出的功能。
作为编码端最上层的实现,了解编码器主函数逻辑可以很好地帮助我们对编码端流程有宏观上的掌握。同时,大量在VTM上的研究工作需要对编码端进行修改,对编码器主函数流程的熟悉可以帮助我们更好地在有修改VTM代码需求时进行定位。
二、代码详解
int main(int argc, char *argv[])

  // print information
  // 打印编码信息(编码器版本平台等)
  fprintf(stdout, "\\n");
  fprintf(stdout, "VVCSoftware: VTM Encoder Version %s ", VTM_VERSION);
  fprintf(stdout, NVM_ONOS);
  fprintf(stdout, NVM_COMPILEDBY);
  fprintf(stdout, NVM_BITS);
#if ENABLE_SIMD_OPT
  std::string SIMD;
  df::program_options_lite::Options opts;
  opts.addOptions()("SIMD", SIMD, string(""), "")("c", df::program_options_lite::parseConfigFile, "");
  df::program_options_lite::SilentReporter err;
  df::program_options_lite::scanArgv(opts, argc, (const char **) argv, err);
  fprintf(stdout, "[SIMD=%s] ", read_x86_extension(SIMD));
#endif
#if ENABLE_TRACING
  fprintf(stdout, "[ENABLE_TRACING] ");
#endif
#if ENABLE_SPLIT_PARALLELISM
  fprintf(stdout, "[SPLIT_PARALLEL (%d jobs)]", PARL_SPLIT_MAX_NUM_JOBS);
#endif
#if ENABLE_SPLIT_PARALLELISM
  const char *waitPolicy = getenv("OMP_WAIT_POLICY");
  const char *maxThLim = getenv("OMP_THREAD_LIMIT");
  fprintf(stdout, waitPolicy ? "[OMP: WAIT_POLICY=%s," : "[OMP: WAIT_POLICY=,", waitPolicy);
  fprintf(stdout, maxThLim ? "THREAD_LIMIT=%s" : "THREAD_LIMIT=", maxThLim);
  fprintf(stdout, "]");
#endif
  fprintf(stdout, "\\n");

  std::fstream bitstream;
  EncLibCommon encLibCommon;

  std::vector<EncApp *> pcEncApp(1);
  bool resized = false;
  int layerIdx = 0;

  // 初始化rom.cpp中的一些全局变量
  initROM();
  TComHash::initBlockSizeToIndex();

  char **layerArgv = new char *[argc];

  // 遍历layers创建pcEncApp并初始化各个layer的参数
  do

    pcEncApp[layerIdx] = new EncApp(bitstream, &encLibCommon);
    // create application encoder class per layer
    pcEncApp[layerIdx]->create();

    // parse configuration per layer
    // 为当前遍历到的layer初始化配置
    try

      int j = 0;
      for (int i = 0; i < argc; i++)

        if (argv[i][0] == '-' && argv[i][1] == 'l')

          if (argc <= i + 1)

            THROW("Command line parsing error: missing parameter after -lx\\n");

          int numParams = 1;   // count how many parameters are consumed
          // check for long parameters, which start with "--"
          const std::string param = argv[i + 1];
          if (param.rfind("--", 0) != 0)

            // only short parameters have a second parameter for the value
            if (argc <= i + 2)

              THROW("Command line parsing error: missing parameter after -lx\\n");

            numParams++;

          // check if correct layer index
          if (argv[i][2] == std::to_string(layerIdx).c_str()[0])

            layerArgv[j] = argv[i + 1];
            if (numParams > 1)

              layerArgv[j + 1] = argv[i + 2];

            j += numParams;

          i += numParams;

        else

          layerArgv[j] = argv[i];
          j++;


      // 解析输入的参数
      if (!pcEncApp[layerIdx]->parseCfg(j, layerArgv))

        pcEncApp[layerIdx]->destroy();
        return 1;


    catch (df::program_options_lite::ParseFailure &e)

      std::cerr << "Error parsing option \\"" << e.arg << "\\" with argument \\"" << e.val << "\\"." << std::endl;
      return 1;


    pcEncApp[layerIdx]->createLib(layerIdx);

    if (!resized)

      pcEncApp.resize(pcEncApp[layerIdx]->getMaxLayers());
      resized = true;


    layerIdx++;
   while (layerIdx < pcEncApp.size());
  // 结束对各个layer的遍历初始化

  delete[] layerArgv;

  // 若上面的遍历过程中发现的layer数量超过一个
  if (layerIdx > 1)

    VPS *vps = pcEncApp[0]->getVPS();
    // check chroma format and bit-depth for dependent layers
    // 遍历layer检查chroma format和位深
    for (uint32_t i = 0; i < layerIdx; i++)

      int curLayerChromaFormatIdc = pcEncApp[i]->getChromaFormatIDC();
      int curLayerBitDepth = pcEncApp[i]->getBitDepth();
      for (uint32_t j = 0; j < layerIdx; j++)

        if (vps->getDirectRefLayerFlag(i, j))

          int refLayerChromaFormatIdcInVPS = pcEncApp[j]->getChromaFormatIDC();
          CHECK(curLayerChromaFormatIdc != refLayerChromaFormatIdcInVPS,
                "The chroma formats of the current layer and the reference layer are different");
          int refLayerBitDepthInVPS = pcEncApp[j]->getBitDepth();
          CHECK(curLayerBitDepth != refLayerBitDepthInVPS,
                "The bit-depth of the current layer and the reference layer are different");


#if PRINT_MACRO_VALUES
  printMacroSettings();
#endif
  // *********  从此处开始计算编码时间  *********
  // starting time
  // 记录开始编码的时间
  auto startTime = std::chrono::steady_clock::now();
  std::time_t startTime2 = std::chrono::system_clock::to_time_t(std::chrono::system_clock::now());
  // 向log中打印开始编码时间
  fprintf(stdout, " started @ %s", std::ctime(&startTime2));
  clock_t startClock = clock();

  // call encoding function per layer
  // eos
  bool eos = false;

  // 大循环直到编码完序列的所有帧才结束
  while (!eos)

    // read GOP
    // 编码前的预处理,主要作用有从输入视频中读取一帧,给帧分配缓存(存在EncLib的属性m_cListPic中),设置对应的CS
    // keepLoop用于记录当前GOP是否已经编码完,若编完则true,否则false,这里初始化为true
    bool keepLoop = true;
    // 小循环遍历当前GOP内的所有帧进行预处理
    while (keepLoop)

      for (auto &encApp: pcEncApp)

#ifndef _DEBUG
        try

#endif
          // 对当前GOP内的帧进行预处理的入口函数,keeploop是预处理函数的输出,若已处理完当前GOP所有帧则为true,否则为false
          keepLoop = encApp->encodePrep(eos);
#ifndef _DEBUG

        // 若预处理过程中出错则报错
        catch (Exception &e)

          std::cerr << e.what() << std::endl;
          return EXIT_FAILURE;

        // 内存出错则报错
        catch (const std::bad_alloc &e)

          std::cout << "Memory allocation failed: " << e.what() << std::endl;
          return EXIT_FAILURE;

#endif


    // encode GOP
    // 正式编码开始
    keepLoop = true;
    // 小循环遍历当前GOP内的所有帧进行编码
    while (keepLoop)

      for (auto &encApp: pcEncApp)

#ifndef _DEBUG
        try

#endif
          // 编码当前帧的入口函数,与预处理的函数一样,eeploop是输出,若已处理完当前GOP所有帧则为true,否则为false
          keepLoop = encApp->encode();
#ifndef _DEBUG

        // 若编码过程中出错则报错
        catch (Exception &e)

          std::cerr << e.what() << std::endl;
          return EXIT_FAILURE;

        // 内存出错则报错
        catch (const std::bad_alloc &e)

          std::cout << "Memory allocation failed: " << e.what() << std::endl;
          return EXIT_FAILURE;

#endif

    // 循环遍历编码完当前GOP所有帧
  // 循环遍历编码完当前序列所有GOP
  // 此时记录编码结束的时间
  // ending time
  clock_t endClock = clock();
  auto endTime = std::chrono::steady_clock::now();
  std::time_t endTime2 = std::chrono::system_clock::to_time_t(std::chrono::system_clock::now());
#if JVET_O0756_CALCULATE_HDRMETRICS
  auto metricTime = pcEncApp[0]->getMetricTime();

  for (int layerIdx = 1; layerIdx < pcEncApp.size(); layerIdx++)

    metricTime += pcEncApp[layerIdx]->getMetricTime();

  // 计算编码总时间
  auto totalTime = std::chrono::duration_cast<std::chrono::milliseconds>(endTime - startTime).count();
  auto encTime = std::chrono::duration_cast<std::chrono::milliseconds>(endTime - startTime - metricTime).count();
  auto metricTimeuser = std::chrono::duration_cast<std::chrono::milliseconds>(metricTime).count();
#else
  auto encTime = std::chrono::duration_cast<std::chrono::milliseconds>(endTime - startTime).count();
#endif
  // 对encApp进行销毁
  for (auto &encApp: pcEncApp)

    encApp->destroyLib();

    // destroy application encoder class per layer
    encApp->destroy();

    delete encApp;

  // 释放rom.cpp中定义的一些全局变量
  // destroy ROM
  destroyROM();

  pcEncApp.clear();

  // 输出编码结束时间
  printf("\\n finished @ %s", std::ctime(&endTime2));

#if JVET_O0756_CALCULATE_HDRMETRICS
  printf(" Encoding Time (Total Time): %12.3f ( %12.3f ) sec. [user] %12.3f ( %12.3f ) sec. [elapsed]\\n",
         ((endClock - startClock) * 1.0 / CLOCKS_PER_SEC) - (metricTimeuser / 1000.0),
         (endClock - startClock) * 1.0 / CLOCKS_PER_SEC, encTime / 1000.0, totalTime / 1000.0);
#else
  printf(" Total Time: %12.3f sec. [user] %12.3f sec. [elapsed]\\n", (endClock - startClock) * 1.0 / CLOCKS_PER_SEC,
         encTime / 1000.0);
#endif

  return 0;
三、流程分析
从代码详解可以总结出,VTM编码器主函数的逻辑主要包括以下几个部分:
- 打印编码器信息
- 初始化rom.cpp中的全局变量
- 初始化各个layer参数,并通过调用函数读取传入主函数的参数(包括配置文件名等)
- 记录编码开始时间
- 遍历各帧进行预编码encodePrep(即一些参数的设定、codingStruct的创建等)
- 遍历各帧进行编码encode
- 记录编码结束时间和编码总时间
- 销毁内存占用
上一篇:H.266/VVC-VTM代码学习26-VTM中RDcost的计算与λ的设定(二)
下一篇:持续创作中…
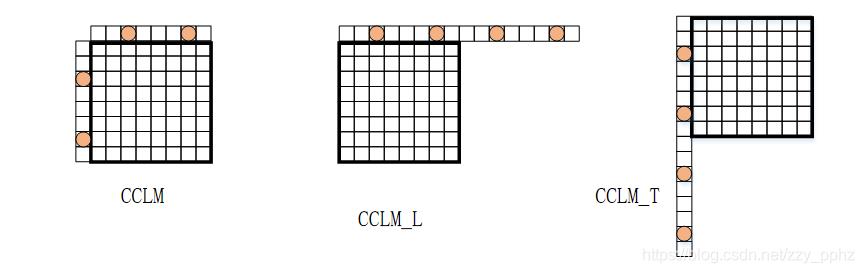
VTM10.0帧内之CCLM技术
为了减少分量间的冗余,提出分量间线性模型预测技术,基本思想是假设亮度分量和色度分量间存在某种线性关系,根据此线性关系实现亮度分量到色度分量的预测。

VVC中CCLM步骤如下:
1.使用特定位置的四个点。
- 对同位亮度块的 上述4个位置 以及 块内的所有 亮度样本进行下采样以获得和色度样本一一对应的亮度样本。以CCLM为例:
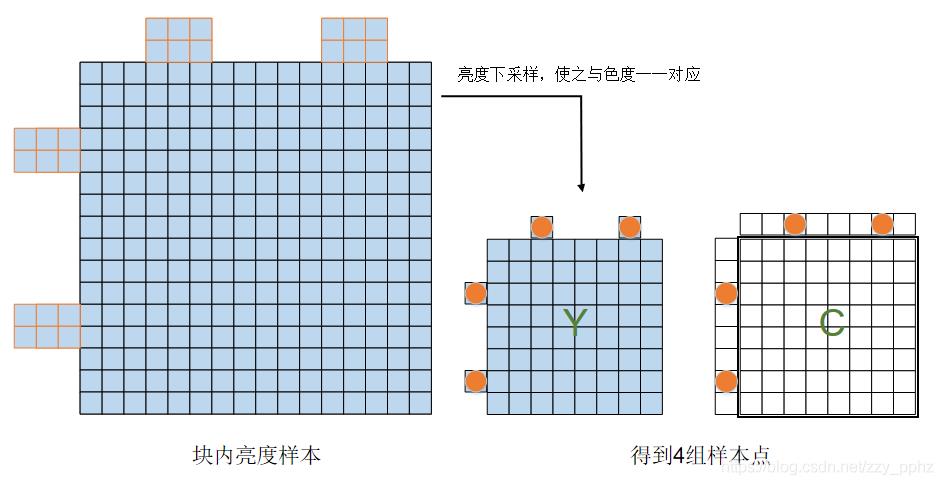
VTM10.0亮度下采样的代码:
用于生成包括参考像素和块内像素的下采样亮度值。
// LumaRecPixels   获得亮度的重建值
void IntraPrediction::xGetLumaRecPixels(const PredictionUnit &pu, CompArea chromaArea)
{
  int iDstStride
以上是关于H.266/VVC-VTM代码学习27-VTM中编码器主函数逻辑的主要内容,如果未能解决你的问题,请参考以下文章