手把手教你前后分离架构 SpringBoot连接数据库
Posted dehuisun
tags:
篇首语:本文由小常识网(cha138.com)小编为大家整理,主要介绍了手把手教你前后分离架构 SpringBoot连接数据库相关的知识,希望对你有一定的参考价值。
1、连接数据库
管理系统离不开关系数据库的支持, 数据库采用mysql数据库。
1.1、数据库创建
MySQL在5.5.3之后增加了utf8mb4的字符集,mb4就是most bytes 4的意思,专门用来兼容四字节的unicode。utf8mb4是utf8的超集,除了将编码改为utf8mb4外不需要做其他转换。 utf8mb4 是目前最大的一个字符编码,支持任意文字。
utf8mb4对应的排序字符集有utf8mb4_unicode_ci、utf8mb4_general_ci.
utf8mb4_unicode_ci是基于标准的Unicode来排序和比较,能够在各种语言之间精确排序.在特殊情况下,Unicode排序规则为了能够处理特殊字符的情况,实现了略微复杂的排序算法。
utf8mb4_general_ci没有实现Unicode排序规则,在遇到某些特殊语言或者字符集,排序结果可能不一致。
utf8mb4_unicode_ci 校对速度快,但准确度稍差。utf8_unicode_ci准确度高,但校对速度稍慢,两者都不区分大小写。通常情况下,新建数据库时一般选用 utf8mb4_general_ci 就可以了
//创建数据
CREATE DATABASE mir DEFAULT CHARACTER SET utf8mb4 COLLATE utf8mb4_unicode_ci;
//创建用户并授权
CREATE USER 'mir'@'%' IDENTIFIED BY '123456';
GRANT ALL PRIVILEGES ON mir.* TO 'mir'@'%';
FLUSH PRIVILEGES;
MySQL存储引擎
Innodb引擎:Innodb引擎提供了对数据库ACID事务的支持。并且还提供了行级锁和外键的约束。它的设计的目标就是处理大数据容量的数据库系统。
MyIASM引擎(原本Mysql的默认引擎):不提供事务的支持,也不支持行级锁和外键。
1.2、整合Mybaties-Plus
有很多持久层框架帮助我们更方便的操作数据库。常用的持久层框架有MyBatis 、hibernate等等。我们采用Mybatis-Plus作为系统持久层框架,Mybatis-Plus是一个Mybatis的增强工具,只是在Mybatis的基础上做了增强却不做改变,MyBatis-Plus支持所有Mybatis原生的特性,所以引入Mybatis-Plus不会对现有的Mybatis构架产生任何影响。Mybatis-Plus有依赖少、损耗小、预防Sql注入等诸多优点。
官网地址:安装 | MyBatis-Plus
1.2.2、依赖安装
<dependency>
     <groupId>com.baomidou</groupId>
     <artifactId>mybatis-plus-boot-starter</artifactId>
     <version>3.4.1</version>
</dependency>

<dependency>
    <groupId>mysql</groupId>
    <artifactId>mysql-connector-java</artifactId>
    <version>8.0.25</version>
</dependency>

<dependency>
    <groupId>com.alibaba</groupId>
    <artifactId>druid-spring-boot-starter</artifactId>
    <version>1.1.10</version>
</dependency>
1.2.2、添加配置
spring.datasource.type=com.alibaba.druid.pool.DruidDataSource
spring.datasource.driver-class-name= com.mysql.cj.jdbc.Driver
spring.datasource.url= jdbc:mysql://localhost:3306/mir
spring.datasource.username=mir
spring.datasource.password=123456
1.2.3、添加config配置
@Configuration
@MapperScan("com.example.*.mapper")
public class MyBatisPlusConfig
如果配置全局扫描可以在Mapper接口添加 @Mapper 注解。
1.2.4、代码生成器
手动参照数据库字段编写对象实体等字段,很麻烦而且容易出错,MyBatis-Plus 代码生成器可以快速生成 Entity、Mapper、Mapper XML、Service、Controller 等各个模块的代码,极大的提升了开发效率。
https://baomidou.com/pages/779a6e/#快速入门 参照官网
mybatis-plus-generator 3.5.1 及其以上版本可使用新版本代码生成器。
添加依赖
<dependency>
    <groupId>com.baomidou</groupId>
    <artifactId>mybatis-plus-generator</artifactId>
    <version>3.5.2</version>
</dependency>
<dependency>
    <groupId>org.freemarker</groupId>
    <artifactId>freemarker</artifactId>
    <version>2.3.31</version>
</dependency>
样例
public static void main(String[] args)
        String url = "jdbc:mysql://localhost:3306/mir";
        String username = "mir";
        String password = "123456";
        FastAutoGenerator.create(url, username, password)
            .globalConfig(builder ->
                builder.author("dehuisun") // 设置作者
                        .enableSwagger() // 开启 swagger 模式
                        .fileOverride() // 覆盖已生成文件
                        .outputDir("D://generator"); // 指定输出目录
            )
            .packageConfig(builder ->
                builder.parent("com.xgg") // 设置父包名
                        .moduleName("sys") // 设置父包模块名
                        .pathInfo(Collections.singletonMap(OutputFile.xml, "D://generator")); // 设置mapperXml生成路径
            )
            .strategyConfig(builder ->
                builder.addInclude("sys_user") // 设置需要生成的表名
                        .addTablePrefix("t_", "c_"); // 设置过滤表前缀
            )
            .templateEngine(new FreemarkerTemplateEngine()) // 使用Freemarker引擎模板,默认的是Velocity引擎模板
            .execute();
1.3、数据持久化规范
为了更好研发建议迭代系统,所以我们需要制定一些研发规范来帮助我们快速迭代。
1.3.1、数据库建表规范
为数据库表添加一些公共字段,比如deleted(逻辑删除标识)、create_time、update_time、create_by、update_by等等来实现数据添加变更记录、逻辑删除、乐观锁等业务需求。帮助我们实现数据恢复及数据修改回溯。
1.3.2、自动填充公共字段
业务表中有create_time、update_time、create_by、update_by这四个字段,create_time、update_time要自动填充为当前时间,create_by、update_by自动填充为当前登录的用户ID。
配置类
@Bean
    public OptimisticLockerInterceptor mybatisPlusInterceptor()
        return new OptimisticLockerInterceptor();


    @Bean
    public MetaObjectHandler metaObjectHandler()
        return new MetaObjectHandler()
            @Override
            public void insertFill(MetaObject metaObject)
                SysUser user = getUserId(metaObject);
                if (!Objects.isNull(user))
                    this.strictInsertFill(metaObject, "createBy", Long.class, user.getId());

                this.strictInsertFill(metaObject, "createTime", LocalDateTime.class, LocalDateTime.now());


            @Override
            public void updateFill(MetaObject metaObject)
                SysUser user = getUserId(metaObject);
                if (!Objects.isNull(user))
                    this.strictUpdateFill(metaObject, "updateBy", Long.class, user.getId());

                this.strictUpdateFill(metaObject, "updateTime", LocalDateTime.class, LocalDateTime.now());


            private SysUser getUserId(MetaObject metaObject)
                //自己认证框架获取登录用户的方法

        ;
1.3.3、逻辑删除
添加配置文件
mybatis-plus.global-config.db-config.logic-delete-field=deleted
mybatis-plus.global-config.db-config.logic-delete-value=1
mybatis-plus.global-config.db-config.logic-not-delete-value=0
实体注解
@TableLogic
private Integer deleted;
1.3.4抽象公共实体类
@Getter
public class BaseEntity
    @TableLogic
    private Integer deleted;

    @TableField(fill = FieldFill.INSERT)
    private Long createUserId;

    @TableField(fill = FieldFill.UPDATE)
    private Long updateUserId;

    @TableField(fill = FieldFill.INSERT)
    private LocalDateTime createTime;

    @TableField(fill = FieldFill.UPDATE)
private LocalDateTime updateTime;

@TableLogic
private Integer deleted;
公共实体类只添加getter方法,防止手动set赋值字段。
继承公共实体:
还有乐观锁等特性,可以后续根据需求来实现。
2、用户管理功能实现
2.1、后端实现
2.1.1 分层规范
系统参照阿里分层规范
• Web 层:controller层主要是对访问控制进行转发,各类基本参数校验,或者不复用的业务简单处理等。
• Service 层:相对具体的业务逻辑服务层。
• Manager 层:通用业务处理层,它有如下特征:
1) 对第三方平台封装的层,预处理返回结果及转化异常信息,适配上层接口。
2) 对 Service 层通用能力的下沉,如缓存方案、中间件通用处理。
3) 与 DAO 层交互,对多个 DAO 的组合复用。
• DAO 层:数据访问Mapper层,与底层 MySQL、Oracle、Hbase、OB 等进行数据交互。
2.1.2、创建用户表
CREATE TABLE `sys_user` (
  `id` BIGINT NOT NULL,
  `account` VARCHAR(50)  NOT NULL COMMENT '账号',
  `username` VARCHAR(240)  NOT NULL COMMENT '用户名',
  `password` VARCHAR(100)  NOT NULL COMMENT '密码',
  `salt` VARCHAR(64)  DEFAULT NULL COMMENT '盐',
  `email` VARCHAR(64)  DEFAULT NULL COMMENT '邮箱',
  `mobile` VARCHAR(64)  DEFAULT NULL COMMENT '手机号',
  `status` SMALLINT(6)  DEFAULT '0' COMMENT '状态(0:正常1:停用2:锁定)',
  `err_num` TINYINT DEFAULT NULL COMMENT '登录错误次数',
  `lock_time` DATETIME DEFAULT NULL COMMENT '锁定时间',
  `create_by` BIGINT UNSIGNED DEFAULT NULL COMMENT '创建者ID',
  `create_time` DATETIME DEFAULT NULL COMMENT '创建时间',
  `update_by` BIGINT UNSIGNED DEFAULT NULL COMMENT '修改人ID',
  `update_time` DATETIME DEFAULT NULL COMMENT '修改时间',
  `deleted` TINYINT DEFAULT '0' COMMENT '是否被删除(0:未删除,1:已删除)',
  PRIMARY KEY (`id`)
) ENGINE=INNODB DEFAULT CHARSET=utf8mb4 COMMENT='用户管理'
2.1.3、代码生成
生成的代码拷贝至项目
2.1.4、接口实现
@RestController
@Api(tags = "用户管理服务")
@RequestMapping("/sys/user")
public class UserController

    @Resource
    private IUserService userService;

    @GetMapping("/page")
    @ApiOperation(value = "用户列表分页查询")
    public Result<Page<UserVO>> getPageList(@Valid UserPageParam userParam)
        Page<User> page = new Page(userParam.getCurrent(), userParam.getSize());
        userService.pageList(page, userParam.getUsername());
        Page<UserVO> pageResult = CollectionUtils.page(page, UserVO.class);
        return Result.ok().info(pageResult);


    @ApiOperation("用户查询")
    @GetMapping("/id")
    @ApiImplicitParam(name = "id", value = "用户ID", required = true, paramType = "path", dataType = "Long")
    public Result<UserVO> getInfo(@PathVariable("id") Long id)
        User user = userService.getById(id);
        UserVO userVO = new UserVO();
        if(user!=null)
            BeanUtils.copyProperties(user, userVO);

        return Result.ok().info(userVO);


    @ApiOperation("用户删除")
    @DeleteMapping("/id")
    @ApiImplicitParam(name = "id", value = "用户ID", required = true, paramType = "path", dataType = "Long")
    public Result delete(@PathVariable Long id) throws Exception
//        User user = (User) SecurityUtils.getSubject().getPrincipal();
//        if (sysUser.getId().equals(id))
//            return Result.error().message("不能删除当前登录用户");
//
        userService.removeById(id);
        return Result.ok();


    @ApiOperation("用户新增")
    @PostMapping("")
    public Result save(@Validated(AddGroup.class) @RequestBody UserParam userParam)

        User sysUser = new User();
        sysUser.setAccount(userParam.getAccount());
        sysUser.setUsername(userParam.getUsername());
        List<User> list = userService.list(new QueryWrapper<>(sysUser));
        if (list!=null&&list.size() != 0)
            return Result.error().message("该账号已存在!");

        BeanUtils.copyProperties(userParam, sysUser);
        sysUser.setId(null);
        sysUser.setPassword(Constant.PASSWORD);

        userService.save(sysUser);
        return Result.ok();


    @ApiOperation("用户更新")
    @PutMapping("")
    public Result update(@Validated(UpdateGroup.class) @RequestBody UserParam userParam)

        User sysUser = new User();
        sysUser.setAccount(userParam.getAccount());
        sysUser.setUsername(userParam.getUsername());
        List<User> list = userService.list(new QueryWrapper<>(sysUser));
        if (list!=null&&list.size() != 0)
            return Result.error().message("该账号已存在!");


        sysUser = userService.getById(userParam.getId());
        BeanUtils.copyProperties(userParam, sysUser);
        userService.updateById(sysUser);
        return Result.ok();
接口实现参数校验(分组校验等多种方式)、统一返回、每层实体参数规划。用户实体继承公共参数。
2.1.5 解决精度丢失问题
@Configuration
@EnableWebMvc
public class JacksonConfig implements WebMvcConfigurer
    @Override
    public void configureMessageConverters(List<HttpMessageConverter<?>> converters)
        MappingJackson2HttpMessageConverter jackson2HttpMessageConverter = new MappingJackson2HttpMessageConverter();

        ObjectMapper objectMapper = new ObjectMapper();
        /**
         * 序列换成json时,将所有的long变成string
         * 因为js中得数字类型不能包含所有的java long值
         */
        SimpleModule simpleModule = new SimpleModule();
        simpleModule.addSerializer(Long.class, ToStringSerializer.instance);
        simpleModule.addSerializer(Long.TYPE, ToStringSerializer.instance);
        objectMapper.registerModule(simpleModule);
        jackson2HttpMessageConverter.setObjectMapper(objectMapper);
        converters.add(jackson2HttpMessageConverter);
2.1.6参数序列化问题
@JsonIgnoreProperties(ignoreUnknown = true)
2.2、前端实现
2.2.1实现列表和详情页
<template>
<div>
  <el-form :model="tableForm" ref="tableForm">
    <el-row :gutter="20" >
      <el-col :xs="24" :sm="6" >
        <el-form-item prop="classCode">
          <el-input v-model="tableForm.name" placeholder="姓名" maxlength="20" clearable></el-input>
        </el-form-item>
      </el-col>
      <el-col :xs="span:24,offset:0"  :sm="span:18,offset:0">
        <el-form-item style="float: right">
          <el-button type="primary"  @click="getTableData()" icon="el-icon-search">查询</el-button>
          <el-button type="default"  @click="resetForm('tableForm')" plain icon="el-icon-refresh-left">重置</el-button>
        </el-form-item>
      </el-col>
    </el-row>
  </el-form>
  <el-divider></el-divider>
  <el-row style="padding-bottom: 5px;">
    <el-col :span="24">
      <el-button type="primary" icon="el-icon-plus" @click="doEdit()">新增</el-button>
<!--      <el-button type="primary" icon="el-icon-plus" @click="doDrawer()">抽屉</el-button>-->
    </el-col>
  </el-row>
  <el-table
    header-cell-class-name="custom_table_header"
    :data="tableData.records"
    border
    v-loading="tableDataLoading"
    style="width: 100%">
    <el-table-column
      type="index"
      label="#"
      align="center"
      fixed="left"
      width="50">
    </el-table-column>
    <el-table-column prop="account" header-align="center" align="center" label="登录账号"></el-table-column>
    <el-table-column prop="username" header-align="center" align="center" label="用户名"></el-table-column>
    <el-table-column prop="mobile" header-align="center" align="center" label="手机号"></el-table-column>
    <el-table-column prop="email" header-align="center" align="center" label="邮箱"></el-table-column>
    <el-table-column prop="status" header-align="center" align="center" label="状态">
      <template slot-scope="scope">
        <el-tag v-if="scope.row.status === 0" >正常</el-tag>
        <el-tag v-else type="danger">禁用</el-tag>
      </template>
    </el-table-column>
    <el-table-column prop="createTime" header-align="center" align="center" width="200"
                     label="创建时间" :formatter="formatterDateTime"></el-table-column>
    <el-table-column fixed="right" header-align="center" align="center" width="120" label="操作">
      <template slot-scope="scope">
        <el-button type="text" @click="doEdit(scope.row.id)">编辑</el-button>
        <el-button type="text" @click="doDel(scope.row.id)">删除</el-button>
      </template>
    </el-table-column>
  </el-table>
  <el-pagination
    @size-change="sizeChangeHandle"
    @current-change="currentChangeHandle"
    :current-page="tableData.current"
    :page-sizes="[10, 20, 50, 100]"
    :page-size="tableData.size"
    :total="tableData.total"
    :layout="pageLayout">
  </el-pagination>
  <add-dialog ref="addDialog"  @refreshDataList="getTableData"></add-dialog>
  <add-drawer ref="addDrawer"  @refreshDataList="getTableData"></add-drawer>
</div>
</template>

<script>
import AddDialog from './user-addDialog'
import AddDrawer from './user-addDrawer'
import axios from 'axios'
import formartDateTime from '@/utils'
export default
  data()
    return
      tableForm:
        name: '',
        province: ''
      ,
      tableData:
        records: [],
        total: 0,
        size: 10,
        current: 1,
        pages: 1
      ,
      tableDataLoading: false,
      tableDataSelections: [],

  ,
  components:
    AddDialog,
    AddDrawer
  ,
  methods:
    // 获取数据列表
    getTableData()
      this.tableForm.current = this.tableData.current;
      this.tableForm.size = this.tableData.size;
      this.tableDataLoading = true;
      axios.get('http://127.0.0.1:8888/sys/user/page',
          params: this.tableForm
      ).then((data) =>
        if (data.success)
          this.tableData = data.info;
          this.tableDataLoading = false
         else
          this.$message.error(data.message)

      ).catch(() =>
          this.$message.error(this.tips.error);

      )
    ,
    // 每页数
    sizeChangeHandle(val)
      this.tableData.size = val;
      this.getTableData()
    ,
    // 当前页
    currentChangeHandle(val)
      this.tableData.current = val;
      this.getTableData()
    ,
    handleClick(row)
      console.log(row);
    ,
    onSubmit()
      console.log('submit!');
    ,
    doEdit(id)
      this.$nextTick(()=>
        this.$refs.addDialog.init(id);
        )
    ,
    // 删除
    doDel(id)
      this.$confirm(this.tips.isSure, this.tips.tips, ).then(() =>
        //防止表单重复提交
        this.$MessageBox.showLoading();
        axios.delete(`http://127.0.0.1:8888/sys/user/$id`
        ).then((data) =>
          this.$MessageBox.hideLoading();
          this.getTableData();
          if (data.success)
            this.$message.success(data.message)
           else
            this.$message.error(data.message)

        ).catch(() =>
          this.$MessageBox.hideLoading()
          this.$message.error(this.tips.error);
        )
      )
    ,
    doDrawer(id)
      this.$nextTick(()=>
        this.$refs.addDrawer.init(id);
      )
    ,
    //时间格式化
    formatterDateTime: function (row, column, cellValue, index)
      return formartDateTime(cellValue)
    ,
  ,
  activated()
    this.getTableData()
  ,
  computed:
    pageLayout()
      if (this.$store.state.common.clientType === 'phone') return 'total, sizes, prev, pager, next'
      return 'total, sizes, prev, pager, next, jumper'

  ,

</script>

<style scoped>

</style>
<template>
<div>
  <el-dialog title="" class="custom_dialog"
      :close-on-click-modal = "false"
     :visible.sync="visible">
    <div slot="title" class="dialog-title">
      <i class="el-icon-edit-outline"></i>
      <span class="title-text">用户维护</span>
    </div>
    <el-form :model="dataForm" :rules="dataRule" ref="dataForm" @keyup.enter.native="doSubmit()" :label-width="formLabelWidth">
      <el-form-item label="账号" prop="account">
        <el-input v-model="dataForm.account" autocomplete="off" ></el-input>
      </el-form-item>
      <el-form-item label="用户名" prop="username">
        <el-input v-model="dataForm.username" autocomplete="off"></el-input>
      </el-form-item>
      <el-form-item label="手机号" prop="mobile">
        <el-input v-model="dataForm.mobile" autocomplete="off"></el-input>
      </el-form-item>
      <el-form-item label="邮箱" prop="email">
        <el-input v-model="dataForm.email" autocomplete="off"></el-input>
      </el-form-item>
    </el-form>
    <div slot="footer" class="dialog-footer">
      <el-button @click="visible = false"><i class="el-icon-close"></i>取 消</el-button>
      <el-button type="primary" @click="doSubmit()"><i class="el-icon-check"></i>确 定</el-button>
    </div>
  </el-dialog>
</div>
</template>

<script>
import axios from "axios";
import isEmail, isMobile from '@/utils/validate'
export default
  data()
    var validateEmail = (rule, value, callback) =>
      if (value && !isEmail(value))
        callback(new Error('邮箱格式错误'))
       else
        callback()


    var validateMobile = (rule, value, callback) =>
      if (value && !isMobile(value))
        callback(new Error('手机号格式错误'))
       else
        callback()


    return
      visible: false,
      dataForm:
        id: '',
        account: '',
        username: '',
        email: '',
        mobile: '',
        status: ''
      ,
      formLabelWidth: '120px',
      dataRule:
        account: [
          required: true, message: '账号不能为空', trigger: 'blur',
           min: 3, max: 5, message: '账号长度在 3 到 10 个字符', trigger: 'blur'
        ],
        username: [
          required: true, message: '用户名不能为空', trigger: 'blur',
           min: 2, max: 5, message: '用户名长度在 2 到 5 个字符', trigger: 'blur'
        ],
        email: [
           required: true, message: '邮箱不能为空', trigger: 'blur' ,
          validator: validateEmail, trigger: 'blur'
        ],
        mobile: [
           required: true, message: '手机号不能为空', trigger: 'blur' ,
          validator: validateMobile, trigger: 'blur'
        ]

    ;
  ,
  methods:
    init(id)
      this.visible = true;
      this.dataForm.id = id || ''
      this.$nextTick(() =>
        this.$refs['dataForm'].resetFields()
      )
      if (this.dataForm.id)
        axios.get(`http://127.0.0.1:8888/sys/user/$this.dataForm.id`,
        ).then((data) =>
          if (data.success)
            this.dataForm = data.info;

        )

    ,
    doSubmit()
      this.$refs['dataForm'].validate((valid) =>
        if (valid)
          //防止表单重复提交
          this.$MessageBox.showLoading()
          if (this.dataForm.id)
            axios.put('http://127.0.0.1:8888/sys/user', this.dataForm
            ).then((data) =>
              this.$MessageBox.hideLoading()

              if (data.success)
                this.visible = false
                this.$emit('refreshDataList')
                this.$message.success(data.message)
               else
                this.$message.error(data.message)

            ).catch((data) =>
              this.$MessageBox.hideLoading()
              this.$message.error(this.tips.error);
            )
        else
          axios.post('http://127.0.0.1:8888/sys/user', this.dataForm
          ).then((data) =>
            this.$MessageBox.hideLoading()
            this.visible = false
            this.$emit('refreshDataList')
            if (data.success)
              this.$message.success(data.message)
             else
              this.$message.error(data.message)

          ).catch((data) =>
            this.$MessageBox.hideLoading()
            this.$message.error(this.tips.error);
          )


      )

  ,

;
</script>

<style scoped>

</style>
2.2.2添加路由
path: '/user', name: 'user', component: _import('sys/user-list'),meta: title:'用户管理',isTab:true,2.2.3、添加菜单
<el-menu-item index="1-4" @click="$router.push( name: 'user' )">用户管理</el-menu-item>2.2.4、添加常量类
tips.js
const error = "系统异常,请稍后重试"
export default
  error
Main.js
import tips from "@/constants/tips.js"
Vue.prototype.tips = tips
2.2.5、测试
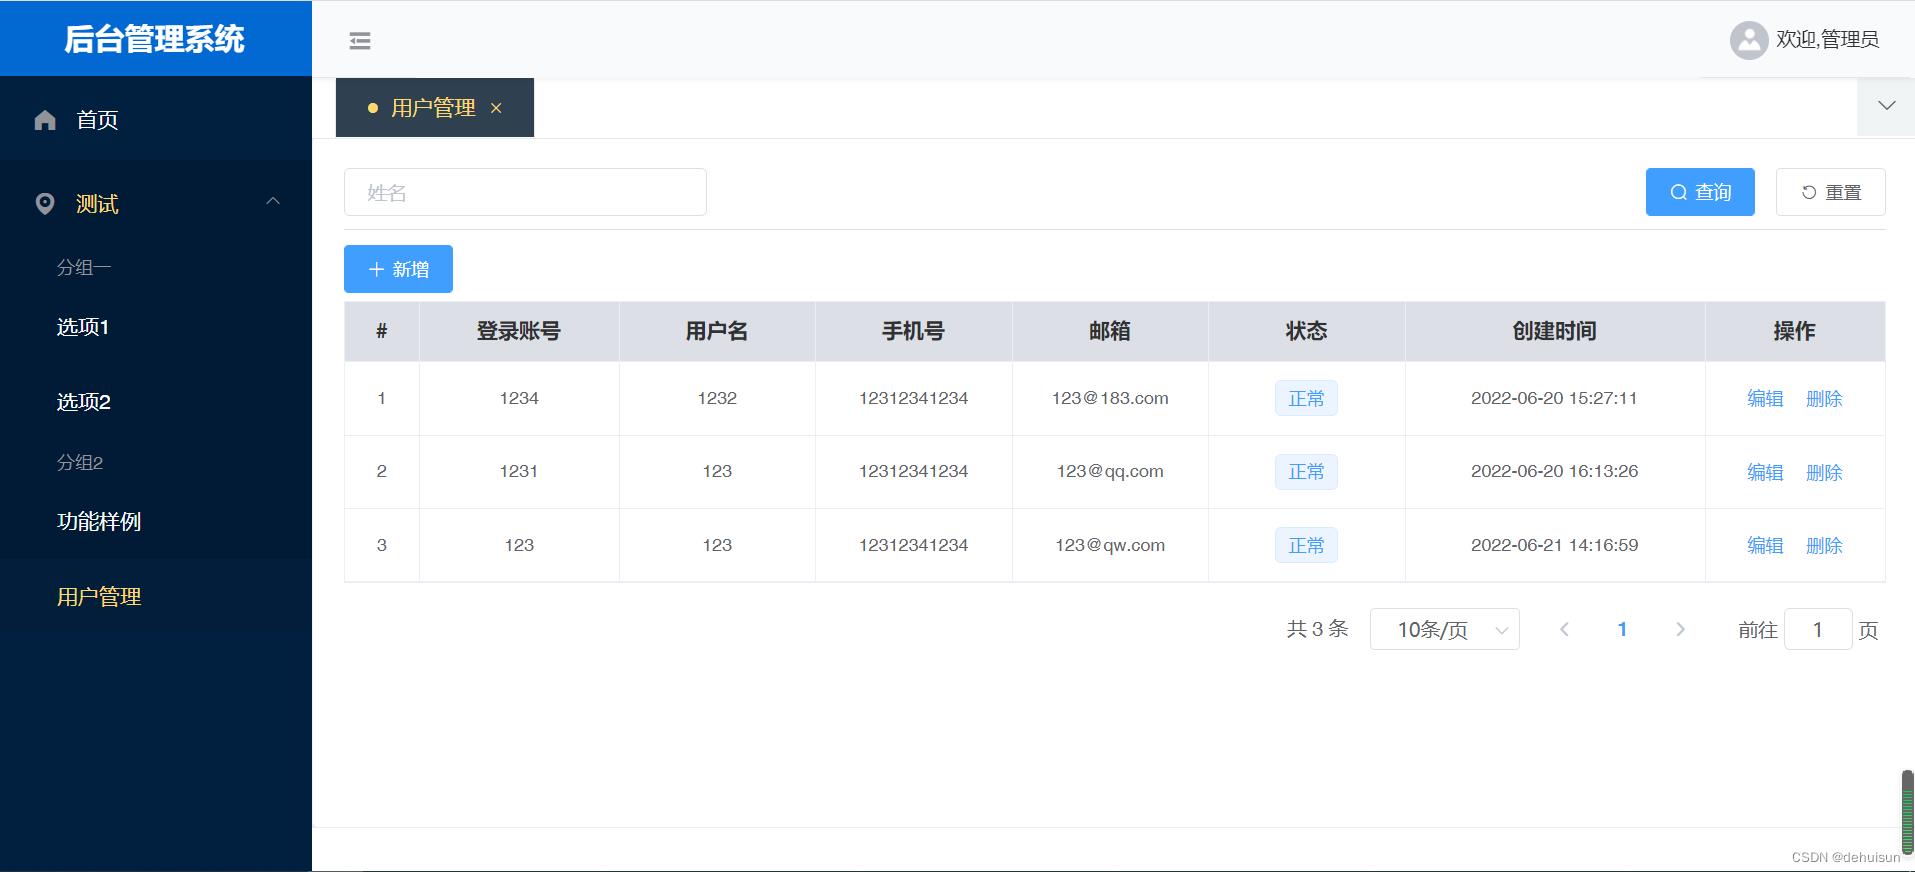
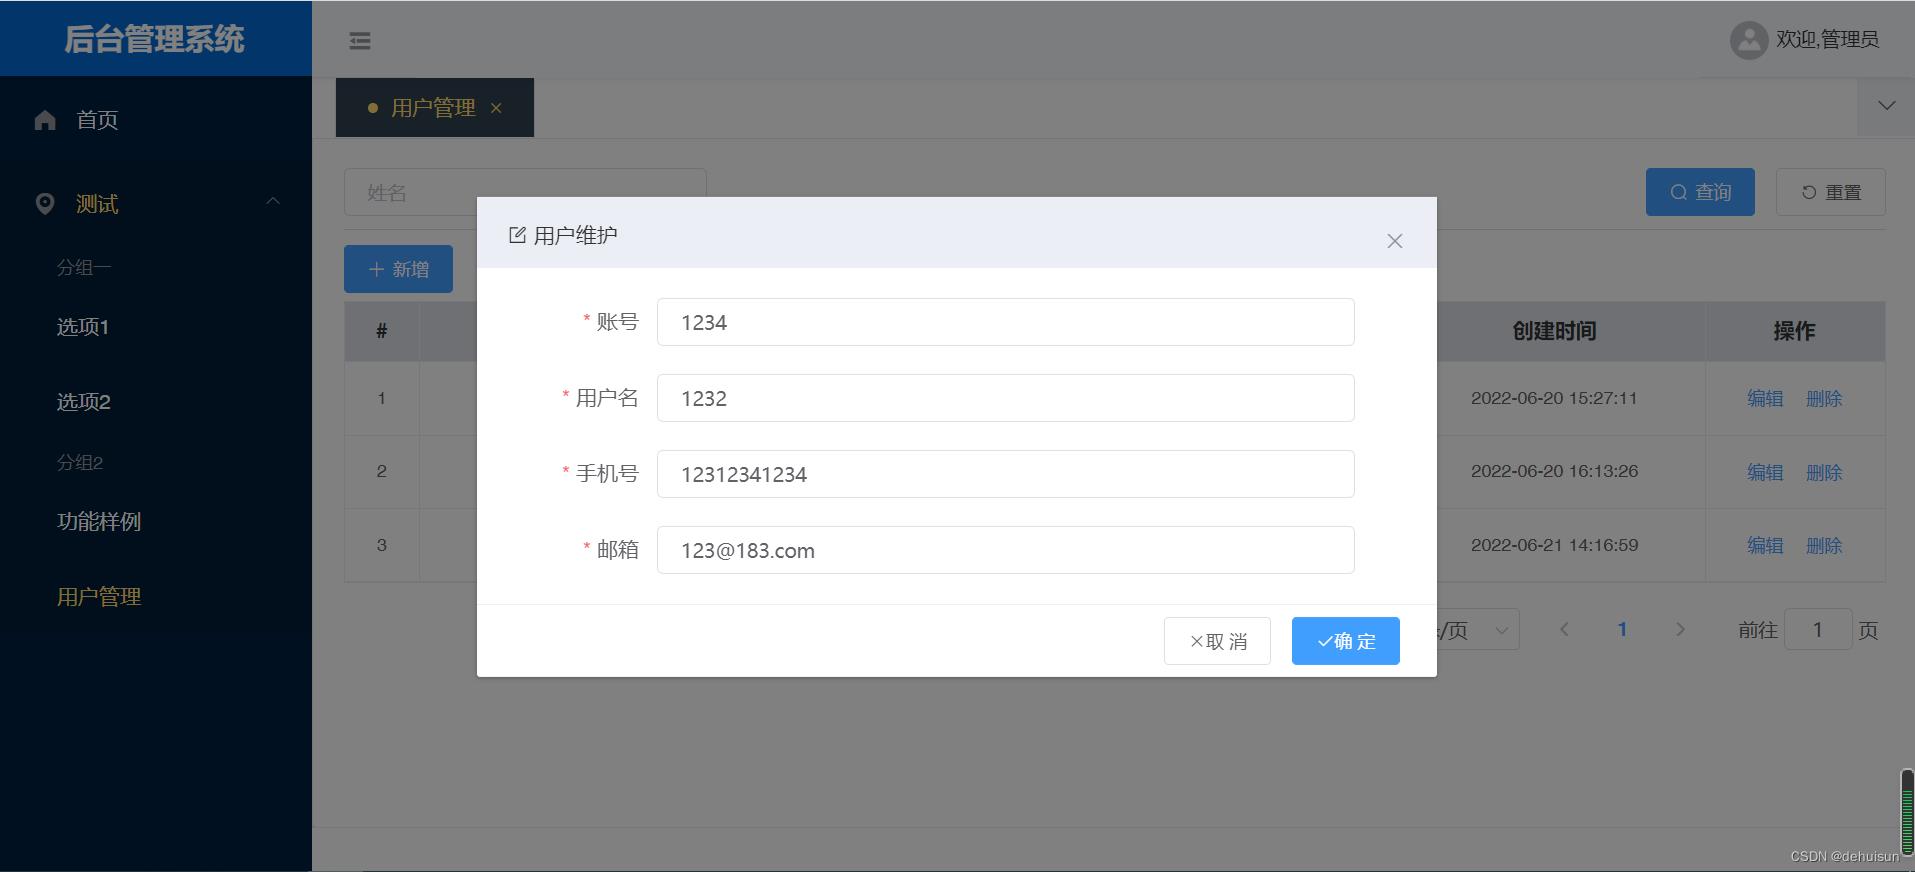

关注公众号”小猿架构“,发送 "前后分离架构" ,下载课程视频+课程源码+课件。
手把手教你搭建Spring Boot+Vue前后端分离
1 什么是前后端分离
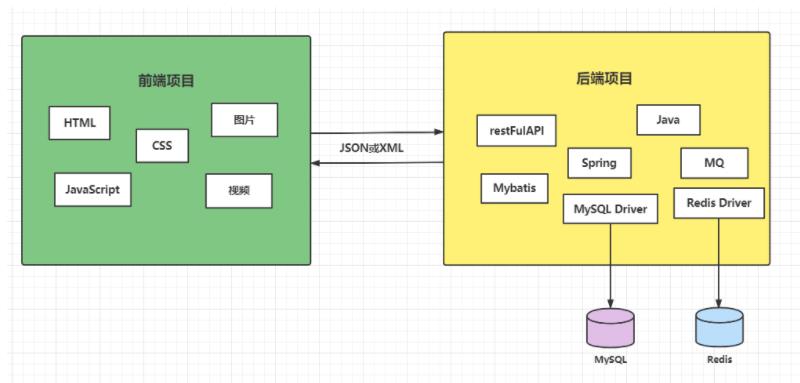
前后端分离是目前互联网开发中比较广泛使用的开发模式,主要是将前端和后端的项目业务进行分离,可以做到更好的解耦合,前后端之间的交互通过xml或json的方式,前端主要做用户界面的渲染,后端主要负责业务逻辑和数据的处理。
2 Spring Boot后端搭建
2.1 Mapper层
请参阅这篇文章https://blog.csdn.net/Mr_YanMingXin/article/details/118342143
此次项目的后端搭建就是在这个项目的基础上
2.2 Service层
接口:
/**
 * @author 17122
 */
public interface StudentService
    /**
     * 添加一个学生
     *
     * @param student
     * @return
     */
    public int saveStudent(Student student);

    /**
     * 根据ID查看一名学生
     *
     * @param id
     * @return
     */
    public Student findStudentById(Integer id);

    /**
     * 查询全部学生
     *
     * @return
     */
    public List<Student> findAllStudent();

    /**
     * 根据ID删除一个
     *
     * @param id
     * @return
     */
    public int removeStudentById(Integer id);

    /**
     * 根据ID修改
     *
     * @param student
     * @return
     */
    public int updateStudentById(Student student);
实现类:
/**
 * @author 17122
 */
@Service
public class StudentServiceImpl implements StudentService

    @Autowired
    private XmlStudentMapper xmlStudentMapper;

    @Override
    public int saveStudent(Student student)
        return xmlStudentMapper.saveStudent(student);


    @Override
    public Student findStudentById(Integer id)
        return xmlStudentMapper.findStudentById(id);


    @Override
    public List<Student> findAllStudent()
        return xmlStudentMapper.findAllStudent();


    @Override
    public int removeStudentById(Integer id)
        return xmlStudentMapper.removeStudentById(id);


    @Override
    public int updateStudentById(Student student)
        return xmlStudentMapper.updateStudentById(student);
2.3 Controller层
/**
 * @author 17122
 */
@RestController
@RequestMapping("/student")
public class StudentController

    @Autowired
    private StudentService studentService;

    /**
     * 添加学生
     *
     * @param student
     * @return
     */
    @PostMapping("/save")
    public int saveStudent(@RequestBody Student student)
        int result;
        try
            result = studentService.saveStudent(student);
         catch (Exception exception)
            return -1;

        return result;


    /**
     * 查看全部
     *
     * @return
     */
    @GetMapping("/findAll")
    public List<Student> findAll()
        return studentService.findAllStudent();


    /**
     * 根据ID查看
     *
     * @param id
     * @return
     */
    @GetMapping("/findById/id")
    public Student findById(@PathVariable("id") Integer id)
        return studentService.findStudentById(id);


    /**
     * 删除一个
     *
     * @param id
     * @return
     */
    @DeleteMapping("/remove/id")
    public int remove(@PathVariable("id") Integer id)
        return studentService.removeStudentById(id);


    /**
     * 修改学生信息
     *
     * @param student
     * @return
     */
    @PostMapping("/update")
    public int update(@RequestBody Student student)
        return studentService.updateStudentById(student);
2.4 配置类
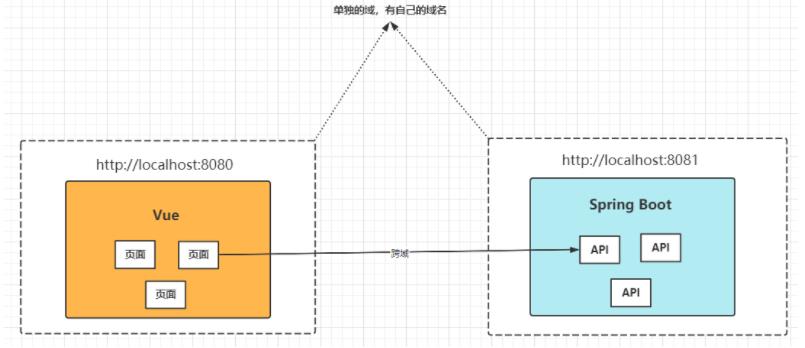
解决跨域请求
/**
 * @author 17122
 */
@Configuration
public class CorsConfig implements WebMvcConfigurer
    @Override
    public void addCorsMappings(CorsRegistry registry)
        registry.addMapping("/**")
                .allowedOriginPatterns("*")
                .allowedMethods("GET", "HEAD", "POST", "PUT", "DELETE", "OPTIONS")
                .allowCredentials(true)
                .maxAge(3600)
                .allowedHeaders("*");
图解跨域问题:
3 Vue前端搭建
3.1 新建Vue_cli2.x项目
3.2 引入路由
npm install vue-router --save
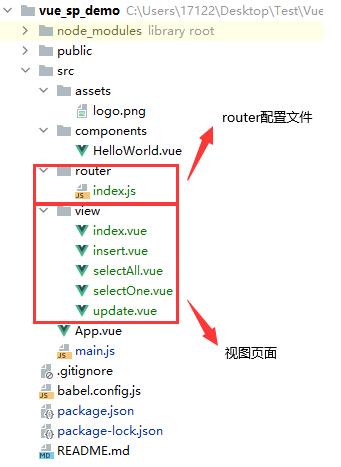
3.3 新建文件
3.4 配置和测试路由
main.js配置
import Vue from 'vue'
import App from './App.vue'
import router from './router'

Vue.config.productionTip = false

new Vue(
    render: h => h(App),
    router
).$mount('#app')
index.js
//注册路由
import Vue from 'vue';
import VueRouter from 'vue-router';
//引入路由
import index from '../view/index'
import update from "../view/update";
import selectAll from "../view/selectAll";
import selectOne from "../view/selectOne";
import insert from "../view/insert";

Vue.use(VueRouter);

const router = new VueRouter(
    routes: [

            name: "主页重定向",
            path: "/",
            redirect: "/index"
        ,
            name: "主页",
            path: "/index",
            component: index,
            children: [

                    name: "修改操作",
                    path: "/update",
                    component: update,
                ,
                    name: "查看全部",
                    path: "/selectAll",
                    component: selectAll,
                ,
                    name: "查看一个",
                    path: "/selectOne",
                    component: selectOne,
                ,
                    name: "添加一个",
                    path: "/insert",
                    component: insert,

            ]

    ]
)

export default router
App.vue
<template>
    <div id="app">
        <router-view/>
    </div>
</template>

<script>

export default
    name: 'App',

</script>
index.vue
<template>
    <div>
        <router-link to="update">update</router-link>
        <br>
        <router-link to="selectAll"> selectAll</router-link>
        <br>
        <router-link to="selectOne"> selectOne</router-link>
        <br>
        <router-link to="insert"> insert</router-link>
        <br>
        <br>
        <router-view></router-view>
    </div>
</template>

<script>
export default
    name: "index"

</script>

<style scoped>

</style>
insert.vue
<template>
    <div>
        insert
    </div>
</template>

<script>
export default
    name: "insert"

</script>

<style scoped>

</style>
selectOne.vue
<template>
    <div>
        selectOne
    </div>
</template>

<script>
export default
    name: "selectOne"

</script>

<style scoped>

</style>
selectAll.vue
<template>
    <div>
        selectAll
    </div>
</template>

<script>
export default
    name: "selectAll"

</script>

<style scoped>

</style>
update.vue
<template>
    <div>
        update
    </div>
</template>

<script>
export default
    name: "update"

</script>

<style scoped>

</style>
测试
启动项目
npm run serve
访问:http://localhost:8080/
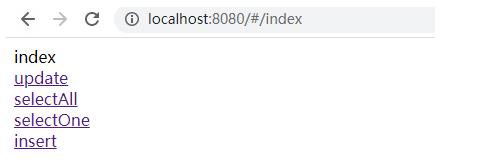
点击相关标签时会显示响应页面
3.5 引入Element UI
npm i element-ui -S
main.js
import Vue from 'vue'
import App from './App.vue'
import router from './router'
import ElementUI from 'element-ui'
import 'element-ui/lib/theme-chalk/index.css'

Vue.config.productionTip = false
Vue.use(ElementUI)
new Vue(
    render: h => h(App),
    router
).$mount('#app')
3.6 使用Element UI美化页面
index.vue
<template>
    <div>
        <el-menu class="el-menu-demo" mode="horizontal" :router="true">
            <el-menu-item index="/selectAll">全部学生</el-menu-item>
            <el-menu-item index="/insert">添加学生</el-menu-item>
            <el-menu-item index="/selectOne">查看学生</el-menu-item>
            <el-menu-item index="/update">修改学生</el-menu-item>
        </el-menu>
        <router-view></router-view>
    </div>
</template>

<script>
export default
    name: "index"

</script>

<style scoped>

</style>
insert.vue
<template>
    <div>
        <el-form :model="ruleForm" status-icon  label-width="100px" class="demo-ruleForm" style="margin-top:30px;width: 30%;">
            <el-form-item label="姓名" prop="pass">
                <el-input type="text" v-model="ruleForm.name" ></el-input>
            </el-form-item>
            <el-form-item label="年龄" prop="checkPass">
                <el-input type="text" v-model="ruleForm.age" ></el-input>
            </el-form-item>
            <el-form-item>
                <el-button type="primary" @click="submitForm('ruleForm')">提交</el-button>
            </el-form-item>
        </el-form>
    </div>
</template>

<script>
export default
    name: "insert",
    data()
        return
            ruleForm:
                name: '',
                age: ''

        ;
    ,
    methods:
        submitForm(formName)
            this.$refs[formName].validate((valid) =>
                if (valid)
                    alert('submit!');
                 else
                    console.log('error submit!!');
                    return false;

            );
        ,


</script>

<style scoped>

</style>
selectOne.vue
<template>
    <div>
        <el-form :model="ruleForm" status-icon label-width="100px" class="demo-ruleForm"
                 style="margin-top:30px;width: 30%;">
            <el-form-item label="ID" prop="pass">
                <el-input type="text" v-model="ruleForm.id"></el-input>
            </el-form-item>
            <el-form-item label="姓名" prop="pass">
                <el-input type="text" v-model="ruleForm.name"></el-input>
            </el-form-item>
            <el-form-item label="年龄" prop="checkPass"以上是关于手把手教你前后分离架构 SpringBoot连接数据库的主要内容,如果未能解决你的问题,请参考以下文章