前后端交互(小白教学)
Posted 吃橘子的Crow
tags:
篇首语:本文由小常识网(cha138.com)小编为大家整理,主要介绍了前后端交互(小白教学)相关的知识,希望对你有一定的参考价值。
-
在我们的印象中什么是前后端交互呢?
-
我们一个后端程序员为什么要去学习前端知识?
-
前后端交互到底是靠什么而进行关联的呢?
接下来我们带着这三个问题来阅读这边文章!!!
1.前后端交互
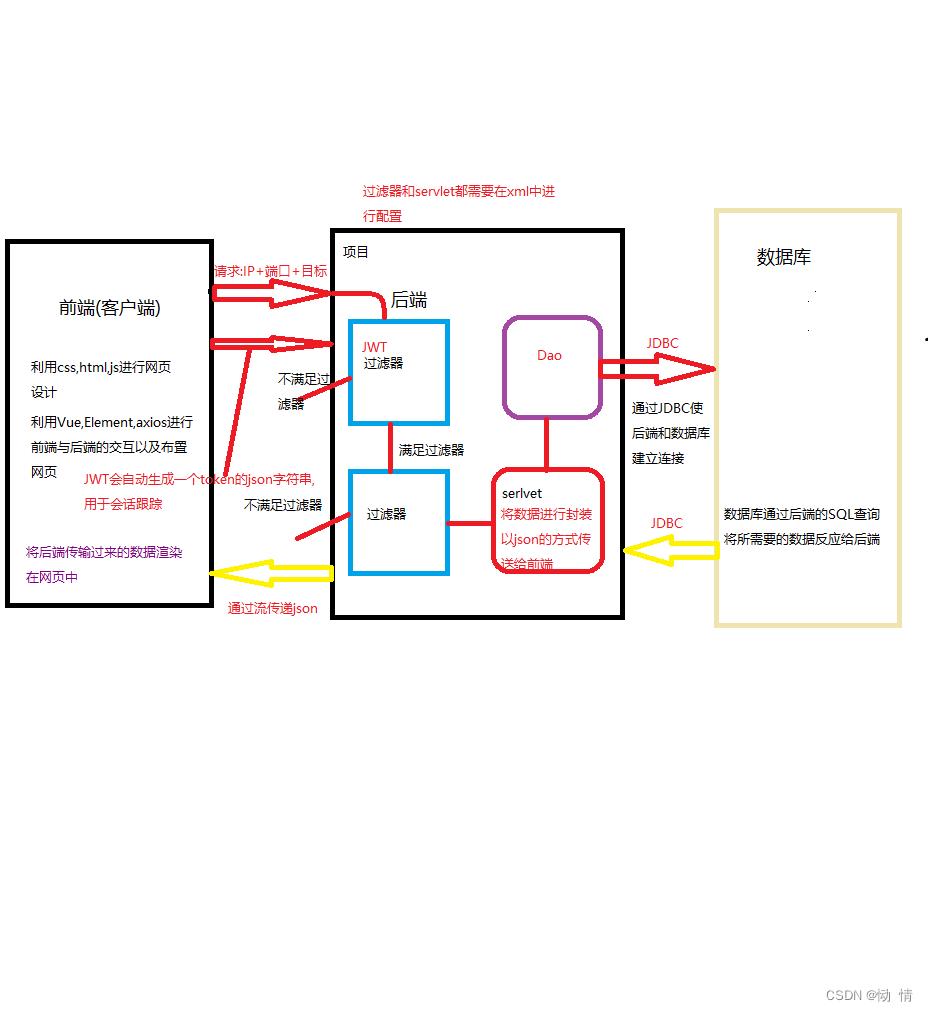
所谓前后端交互,即前后端交互为前端和后端的互动,也可以理解为数据交互,前端需要获取(GET)的数据获取上传(POST)的数据,要通过请求来完成的,前端发送请求,后端接收到请求后,便对数据库进行操作,返回前端所需要的数据,即完成一次前后的交互.具体流程看上图
在公司中不仅有后端工程师,还有前端工程师,后端人员学习前端的知识是为了更好的和前端工程师进行业务交流以及逻辑合同.
2.在html中创建项目
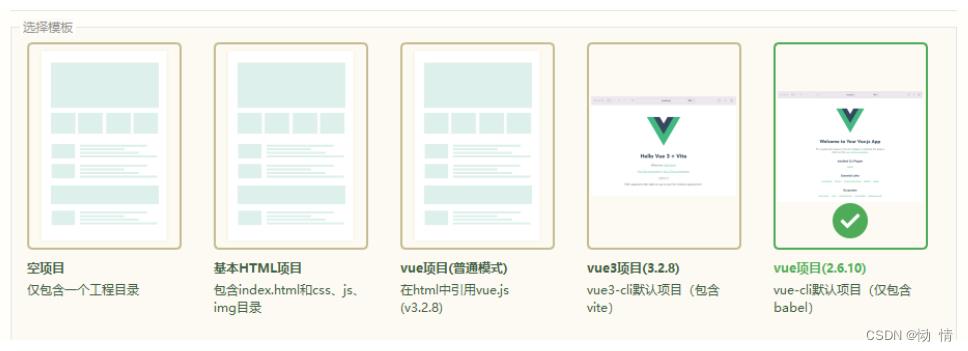
我们在普通项目中选择vue项目(2.6.10)进行项目创建(脚手架)
1.安装项目中所需要的组件
-
npm i vue-router@3.5.3 //路由管理器组件
1. 创建 router 目录js
创建 index.js 文件,在其中配置路由
import Vue from 'vue';
import router from 'vue-router';
/* 导入路由 */
import login from '../views/login';
/* 导入其他组件 */
import content from '../components/content';
/* 导入其他组件 */
Vue.use(router)
/* 定义组件路由 */
var rout = new router(
routes: [

path: '/index',
name: 'index',
component: index
,

path: '/content',
component: content

]
);
//导出路由对象
export default rout;-
npm i element-ui -S //桌面端组件库
在 main.js 中写入以下内容:
import ElementUI from 'element-ui';
import 'element-ui/lib/theme-chalk/index.css';
Vue.use(ElementUI);
new Vue(
render: h => h(App),
).$mount('#app');
- npm install axios //HTTP网络端的的请求库
在 main.js 中配置 axios
导入 axios
import axios from 'axios';
设置访问后台服务器地址
axios.defaults.baseURL="http://127.0.0.1:9999/api/";
将 axios 挂载到 vue 全局对象中,使用 this 可以直接访问
Vue.prototype.$http=axios;
2.配置文件
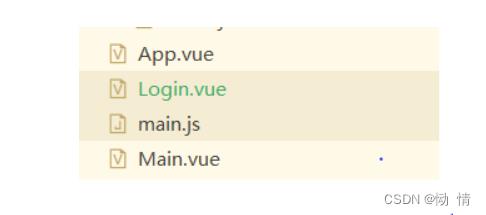
我们在项目中创建出我们所需要的vue文件,vue文件一定要在index.js中进行组件导入,并且设置该组件的路由进行访问
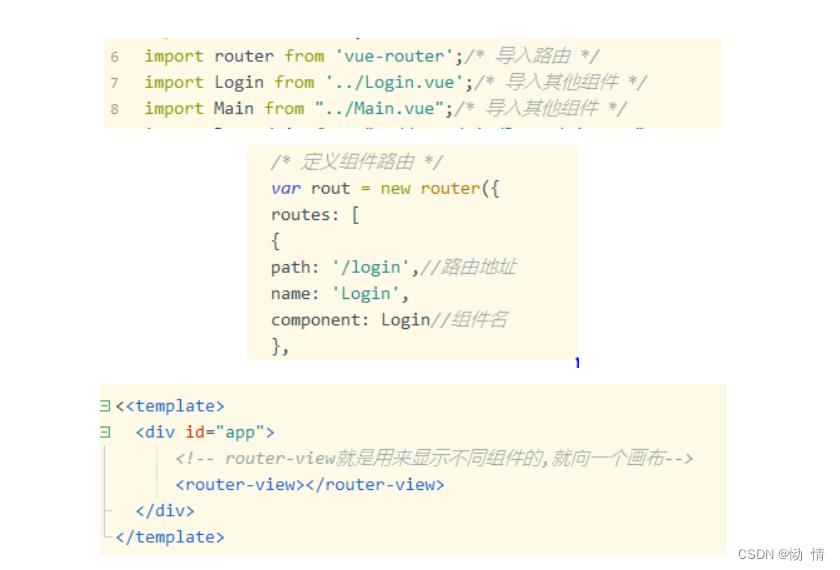
在app.vue中一定要<router-view></router-view>来显示不同的组件
3.网页的跳转
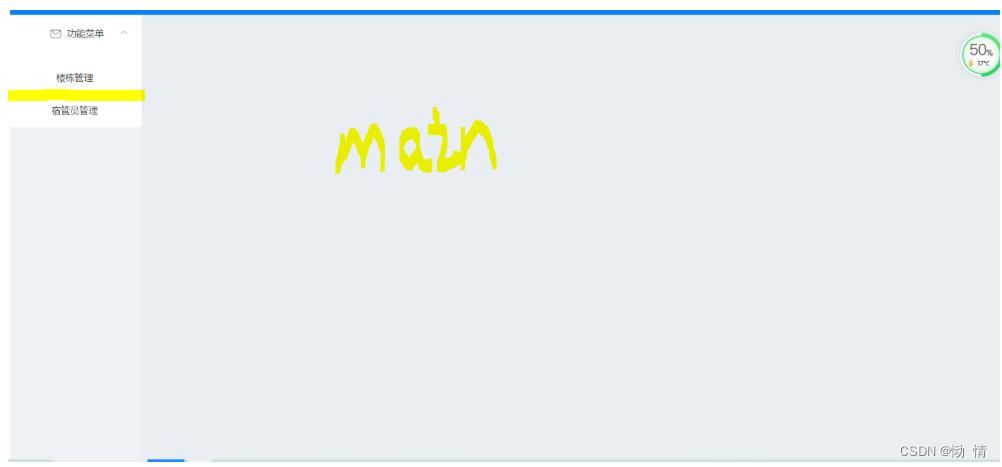
点击楼栋管理和宿舍员管理组件怎么样使得该网页在main中进行渲染呢?
-
第一步:在项目中创建2个目录,然后再对应的目录中创建对应的vue文件,然后在index.js中进行组件导入(导入的方法上面已经说过了,在这里就不多加解释了)
-
第二步:配置路由,这里的话,还是比较容易出错的,children是子组件的路由定义,在父组件的括号里进行定义
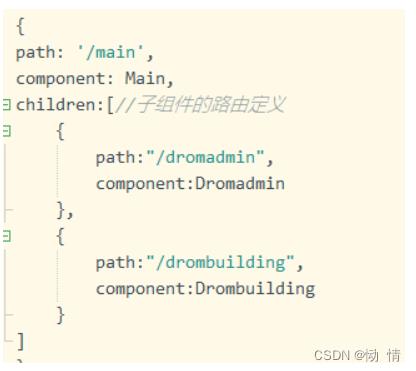
-
在main中找到对应的标签进行路由设置
-

-
在表单中添加一个router

-
在main中添加一个<router-view></router-view>组件

4.弹窗组件的设置
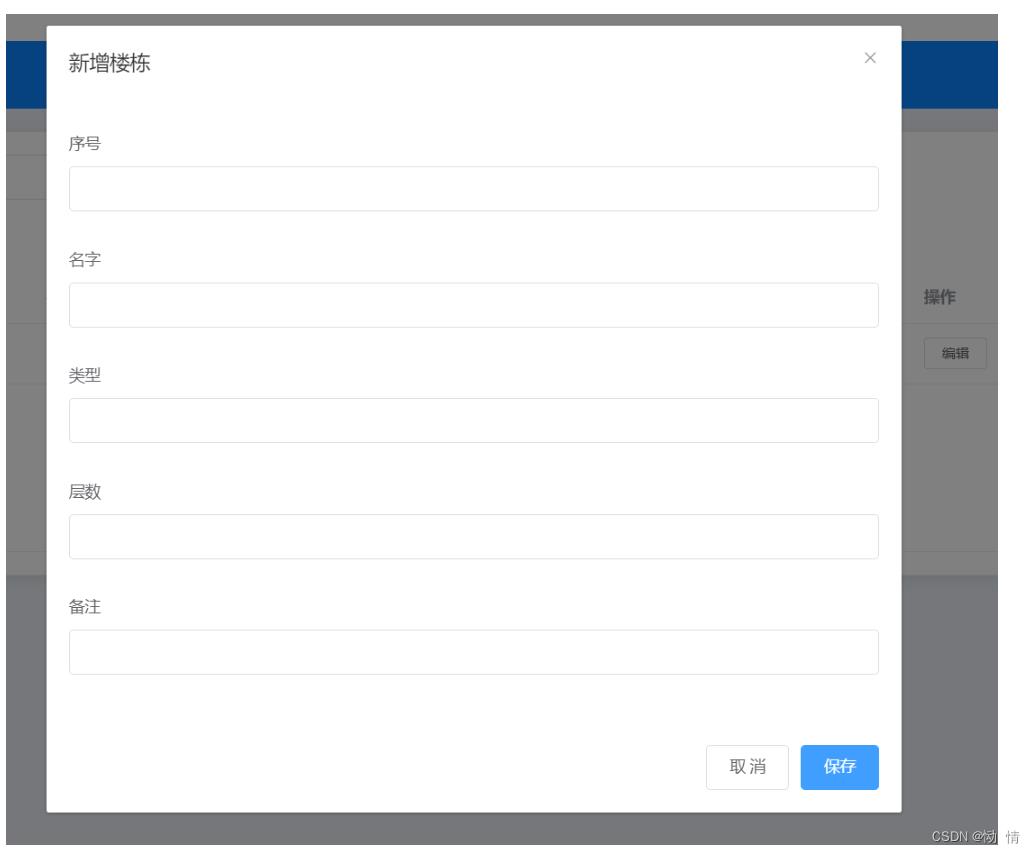
-
在对应的目录中创建一个关于弹窗组件的Vue,然后在element中找到弹窗组件
dialogFormVisible=true时,弹窗显示 dialogFormVisible=false时,弹窗不显示
-

-
在主组件中导入
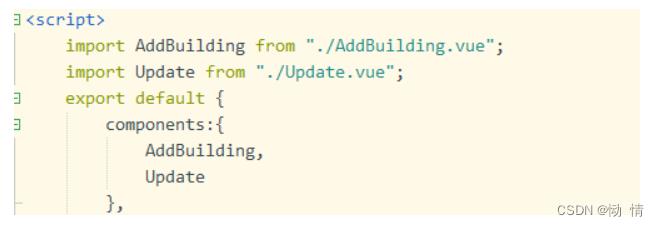
-
放置组件

-
创建一个方法,使得点击后dialogFormVisible=true
-

3.在后端创建项目
1.创建一个idea项目
2.部署服务器

-
点击Web Application,点击OK

-
点击这个,进行服务器的部署

-
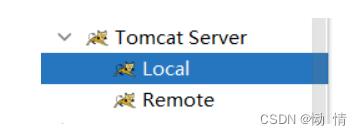
点击第一个Tomcat Server
-
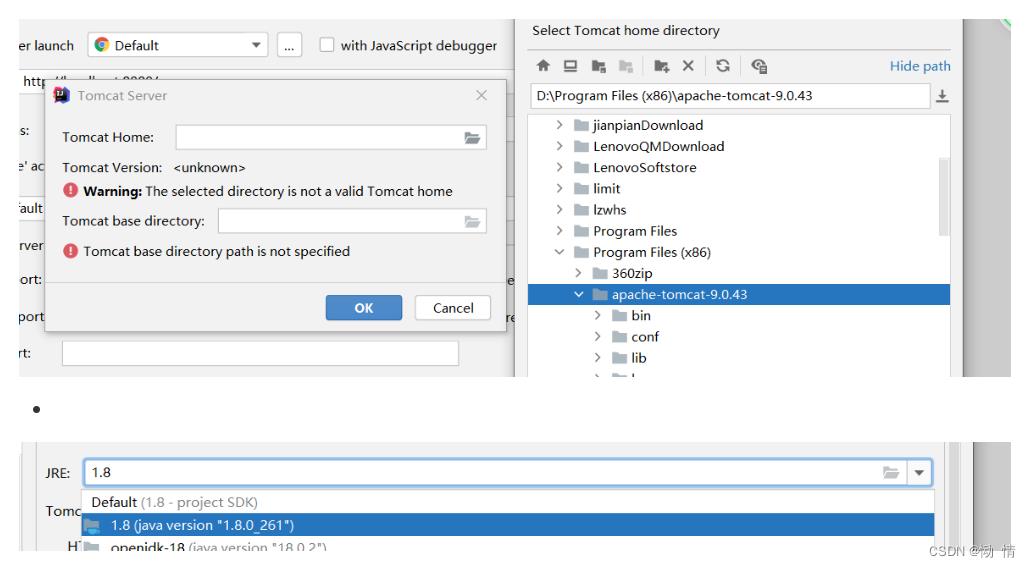
点击bin紧挨着的tomcat
-
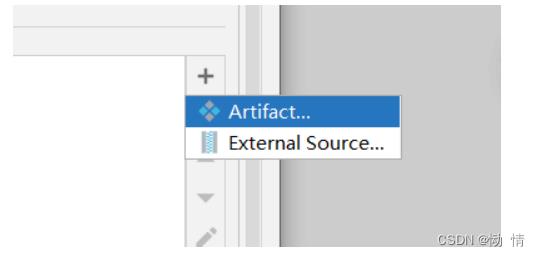
在Deployment中进行服务器部署,在点击最底下Apply进行应用
-
布置好以后就会出现一个小狗的标记

3.导入库
-
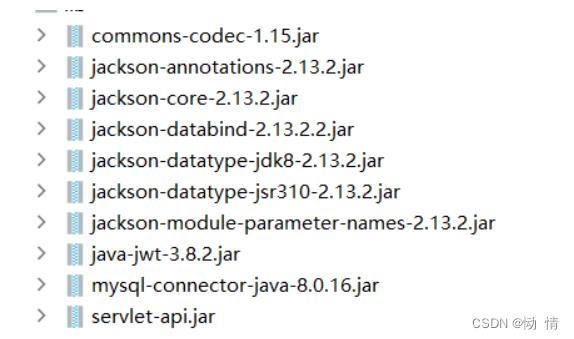
在WEB-INF中创建一个lib文件,导入所需要的包,选中鼠标右键有一个Add Library添加到库
4.配置 Servlet,filter
//配置一个Servlet和filter就要在Web-xml中配置
<servlet>
<servlet-name>名字</servlet-name>
<servlet-class>文件路径</servlet-class>
</servlet>
<servlet-mapping>
<servlet-name>名字(和上面的名字一致)</servlet-name>
<url-pattern>/域名</url-pattern>//一定要/开头,不然项目启动不了
</servlet-mapping>
<filter>
<filter-name>名字</filter-name>
<filter-class>文件路径</filter-class>
</filter>
<filter-mapping>
<filter-name>名字(和上面的名字一致)</filter-name>
<url-pattern>/*</url-pattern>//过滤的类型
</filter-mapping>5.跨域过滤器 token过滤器
//跨域过滤器 官方提供
//@WebFilter(urlPatterns = "/*")
public class CorsFilter implements Filter //解决跨域问题的过滤器
public void doFilter(ServletRequest servletRequest, ServletResponse servletResponse, FilterChain filterChain)
throws IOException, ServletException
HttpServletResponse httpResponse = (HttpServletResponse) servletResponse;
HttpServletRequest httpRequest = (HttpServletRequest) servletRequest;
//允许携带Cookie时不能设置为* 否则前端报错
httpResponse.setHeader("Access-Control-Allow-Origin", httpRequest.getHeader("origin"));//允许所有请求跨域
httpResponse.setHeader("Access-Control-Allow-Methods", "*");//允许跨域的请求方法GET, POST, HEAD 等
httpResponse.setHeader("Access-Control-Allow-Headers", "*");//允许跨域的请求头
httpResponse.setHeader("Access-Control-Allow-Credentials", "true");//是否携带cookie
filterChain.doFilter(servletRequest, servletResponse);
//token过滤器 官方提供
package feifan.com.util;
import com.auth0.jwt.JWT;
import com.auth0.jwt.JWTVerifier;
import com.auth0.jwt.algorithms.Algorithm;
import com.auth0.jwt.interfaces.DecodedJWT;
import java.util.Date;
import java.util.HashMap;
import java.util.Map;
public class JWTUtil
/**
* jwt 生成 token
*
* @param id
* @param account * @return
*/
public static String token(Integer id, String account)
String token = "";
try
//过期时间 为 1970.1.1 0:0:0 至 过期时间 当前的毫秒值 + 有效时间
Date expireDate = new Date(new Date().getTime() + 60 * 60 * 24 * 1000);//过期时间
//秘钥及加密算法 加盐
Algorithm algorithm = Algorithm.HMAC256("ZCEQIUBFKSJBFJH2020BQWE");
//设置头部信息
Map<String, Object> header = new HashMap<>();
header.put("typ", "JWT");//生成的类型
header.put("alg", "HS256");//加密算法
//携带 id,账号信息,生成签名
token = JWT.create()
.withHeader(header)//头部
.withClaim("id", id)//用户id
.withClaim("account", account)//用户账号
.withExpiresAt(expireDate)
.sign(algorithm);
catch (Exception e)
e.printStackTrace();
return null;
return token;
public static boolean verify(String token)
try
//验签
Algorithm algorithm = Algorithm.HMAC256("ZCEQIUBFKSJBFJH2020BQWE");
JWTVerifier verifier = JWT.require(algorithm).build();
DecodedJWT jwt = verifier.verify(token);
return true;
catch (Exception e) //当传过来的 token 如果有问题,抛出异常
return false;
/**
* 获得 token 中 playload 部分数据,按需使用
*
* @param token
* @return
*/
public static DecodedJWT getTokenInfo(String token)
return JWT.require(Algorithm.HMAC256("ZCEQIUBFKSJBFJH2020BQWE")).build().verify(token);
4.一个比较完整项目的代码
项目的重点不是代码,而是思路,代码千篇一律,有一个清晰的思路才是最重要的,一起加油哦
前端代码
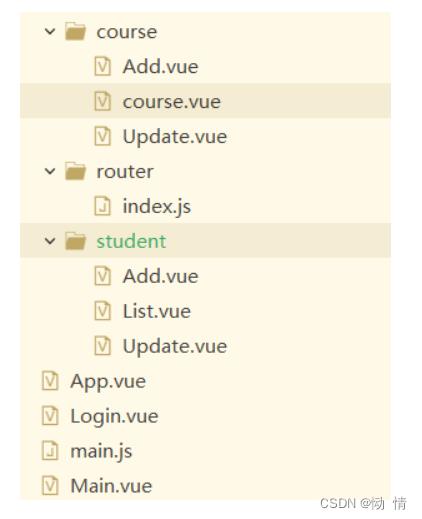
//Add.vue
<template>
    <el-dialog title="新增专业" :visible.sync="dialogFormVisible">
        <el-form :model="form">
            <el-form-item label="专业名称">
                <el-input v-model="form.name" autocomplete="off"></el-input>
            </el-form-item>
        </el-form>
        <div slot="footer" class="dialog-footer">
            <el-button @click="dialogFormVisible = false">取 消</el-button>
            <el-button type="primary" @click="dialogFormVisible =upAddCourseForm()">保存</el-button>
        </div>
    </el-dialog>
</template>
<script>
    export default
        data()
            return
                dialogFormVisible: false,
                form:
                    name: "",
                    mark:"save"


        ,
        methods:
            upAddCourseForm()
                this.$http.post("admin/course",jsonToString(this.form)).then((resp)=>
                    if(resp.data.data==true)
                         this.$message(
                                  message:resp.data.message,
                                  type: 'success'
                                );
                                this.$router.go();

                )

        ,
        mounted()


        function jsonToString(jsonobj)
                           console.log(jsonobj)
                           var str = "";
                           for(var s in jsonobj)
                                str+=s+"="+jsonobj[s]+"&";

                           return str.substring(0,str.length-1);
</script>
<style>
</style>
//course.vue
<template>
<el-card class="box-card" style="text-align: left;">
<el-row :gutter="20">
<el-col :span="6">
<el-input placeholder="专业"></el-input>
</el-col>
<el-col :span="6">
<el-button type="primary" icon="el-icon-search">查询</el-button>
</el-col>
</el-row>
<br />
<el-button type="primary" icon="el-icon-plus" @click="openAddCourseDialog()">新增</el-button>
<el-table :data="courseList" style="width: 100%" height="250">
<el-table-column prop="id" label="序号" width="120">
</el-table-column>
<el-table-column prop="name" label="专业名称" width="120">
</el-table-column>
<el-table-column prop="adminid" label="操作人" width="120">
</el-table-column>
<el-table-column prop="oper_time" label="操作时间" width="180">
</el-table-column>
<el-table-column label="操作">
<template slot-scope="scope">
<el-button size="mini" @click="openUpDateCourse(scope.row.id)">编辑</el-button>
<el-button size="mini" type="danger" @click="deleteCourse(scope.row.id)">删除</el-button>
</template>
</el-table-column>
</el-table>
<!-- </div> -->
<!-- 放置组件,ref引用名 -->
<AddCourse ref="addCourse"></Addcourse>
<UpdateCourse ref="updateCourse"></UpdateCourse>
</el-card>
</template>
<script>
import AddCourse from "./Add.vue";
import UpdateCourse from "./Update.vue";
export default
components:
AddCourse,
UpdateCourse
,
data()
return
courseList:[
id:"",
name:"",
adminid:"",
oper_time:""
]
,
methods:
openAddCourseDialog()
this.$refs.addCourse.dialogFormVisible =true;
,
openUpDateCourse(id)
this.$refs.updateCourse.dialogFormVisible =true;
this.$refs.updateCourse.findStudentById(id);
,
deleteCourse(id)
this.$confirm('确定要删除吗?', '操作提示',
confirmButtonText: '确定',
cancelButtonText: '取消',
type: 'warning'
).then(() =>
this.$http.get("admin/course?mark=delete&id=" + id).then((resp) =>
this.$router.go(); //重载当前组件,刷新
);
)
,
mounted()
this.$http.get("/admin/course?mark=list").then((resp) =>
if (resp.data.code == 200)
console.log(resp);
this.courseList = resp.data.data;
)
</script>
<style>
</style>
//Update.vue
<template>
<el-dialog title="修改专业" :visible.sync="dialogFormVisible">
<el-form :model="form">
<el-form-item label="专业名称">
<el-input v-model="form.name" autocomplete="off"></el-input>
</el-form-item>
</el-form>
<div slot="footer" class="dialog-footer">
<el-button @click="dialogFormVisible = false">取 消</el-button>
<el-button type="primary" @click="dialogFormVisible =save()">保存</el-button>
</div>
</el-dialog>
</template>
<script>
export default
data()
return
dialogFormVisible: false,
form:
id:"",//虽然不显示,但是需要提交的,唯一标识
name: "",
mark:"save"
,
methods:
findStudentById(id)
//向后端发送请求,根据学生id,查询学生信息
this.$http.get("admin/course?mark=findCourseById&id="+id).then((resp) =>
if(resp.data.code==200)
this.form.id=resp.data.data.id;
this.form.name=resp.data.data.name;
)
,
save()
this.$confirm('确定要保存吗?', '操作提示',
confirmButtonText: '确定',
cancelButtonText: '取消',
type: 'warning'
).then(() =>
this.$http.post("admin/course",jsonToString(this.form)).then((resp)=>
this.$router.go(); //重载当前组件,刷新
);
)
,
mounted()
function jsonToString(jsonobj)
console.log(jsonobj)
var str = "";
for(var s in jsonobj)
str+=s+"="+jsonobj[s]+"&";
return str.substring(0,str.length-1);
</script>
<style>
</style>
//index.js
//vue-router是一个插件包,所以我们还是需要用npm来进行安装
//打开命令行工具,进行你的项目目录,输入下面命令
//npm i vue-router@3.5.3
//vue router是一个路由管理器
import Vue from 'vue';
import router from 'vue-router';/* 导入路由 */
import Login from '../Login.vue';/* 导入其他组件 */
import Reg from "../Reg.vue";/* 导入其他组件 */
import Main from "../Main.vue";/* 导入其他组件 */
import StudentList from "../views/student/List.vue";
import Course from "../views/course/course.vue";
Vue.use(router);
/* 定义组件路由 */
var rout = new router(
routes: [
path: '/login',//路由地址
name: 'Login',
component: Login//组件名
,
path: '/main',
component: Main,
children:[//子组件的路由定义
path:"/studentList",
component:StudentList
,
path:"/course",
component:Course
]
,
path:'/reg',
component:Reg
]
);
//添加路由导航守卫,每次发生路由时触发,to.path你要去的页面
rout.beforeEach((to,from,next)=>
if(to.path=="/login")//如果用户访问的登录页,直接放行
return next();
else
var account =sessionStorage.getItem("account");
if(account==null)
return next("/login");
else
return next();//已经登录
)
//导出路由对象
export default rout;//App.vue
<<template>
<div id="app">
<!-- router-view就是用来显示不同组件的,就向一个画布-->
<router-view></router-view>
</div>
</template>
<script>
/* 导出组件,并为组件定义数据,函数,生命周期函数 */
export default
data()
return
</script>
<style>
</style>//Login.vue
<template>
<div class="login_container">
<!-- 登录盒子-->
<div class="login_box">
<!-- 头像盒子-->
<div class="img_box">
<img src="./assets/logo.png"/>
</div>
<div style="padding-top: 100px; padding-right: 30px;">
<el-form ref="form" :model="form" :rules="rules" label-width="80px" >
<el-form-item label="账号" prop="account">
<el-input v-model="form.account" placeholder="请输入账号"></el-input>
</el-form-item>
<el-form-item label="密码" prop="password">
<el-input v-model="form.password" placeholder="请输入密码"></el-input>
</el-form-item>
<el-form-item>
<el-button type="primary" icon="el-icon-top" @click="submitForm('form')">登录</el-button>
<el-button icon="el-icon-delete-solid" @click="resetForm('form')">取消</el-button>
</el-form-item>
</el-form>
</div>
</div>
</div>
</template>
<script>
/* 导出组件,并为组件定义数据,函数,生命周期函数 */
export default
data()
return
form:
account: '',
password: ''
,
rules:
account: [
required: true, message: '请输入正确的账号', trigger: 'blur' ,
min: 3, max: 6, message: '长度在 3 到 6 个字符', trigger: 'blur'
],
password: [
required: true, message: '请输入正确的密码', trigger: 'blur' ,
min: 3, max: 6, message: '长度在 3 到 6 个字符',trigger: 'blur'
]
;
,
methods:
submitForm(form)
//引用,在此把前端登录表单中的数据向后端java发送 this.form
this.$refs[form].validate((valid) =>
//所有的都满足规则返回True,否则返回false
if (valid)
this.$http.post("login",jsonToString(this.form)).then((resp)=>
// console.log(resp);
console.log(resp.data.code);
if(resp.data.code==200)
//sessionStorage浏览器提供的一个会话级别的存储空间,浏览器关闭后立刻消失
sessionStorage.setItem("account",resp.data.data.account);//浏览器关闭即清除
sessionStorage.setItem("token",resp.data.data.token);
// localStorage.setItem("key","value");//长久保存
this.$router.push("/main");
else if(resp.data.code==201)
this.$message(
message:resp.data.message,type: 'warning' );;
else
this.$message.error(resp.data.message);
)
);
,
resetForm(form)
this.$refs[form].resetFields();
//将json对象序列化为键=值&键=值
function jsonToString(jsonobj)
console.log(jsonobj)
var str = "";
for(var s in jsonobj)
str+=s+"="+jsonobj[s]+"&";
return str.substring(0,str.length-1);
</script>
<style>
.login_container
height: 100vh;
margin: 0px;
padding: 0px;
background-image:url(../v2-1853f9575237e195e823f6f2c73138ac_r.jpg);
.login_box
width: 450px;
height: 350px;
background-color: #fff;
border-radius: 10px;
position: absolute;
left: 50%;
top: 50%;
transform: translate(-50%,-50%);
.img_box
width: 130px;
height: 130px;
position: absolute;
left: 50%;
transform: translate(-50%,-50%);
background-color: #fff;
border-radius: 50%;
padding: 5px;
border: 1px solid #eee;
.img_box img
width: 100%;
height: 100%;
border-radius: 50%;
background-color: #eee;
</style>//main.js
//main.js是项目核心配置文件
//导入vue.js
import Vue from 'vue'
//导入一个默认的组件
import App from './App.vue'
Vue.config.productionTip = false
//导入路由组件 ./表示当前目录
import router from "./router/index.js";
Vue.use(router);
//导入ElementUI框架, 会导入ElementUI中所有的组件
import ElementUI from 'element-ui';
import 'element-ui/lib/theme-chalk/index.css';
Vue.use(ElementUI);
//导入 axios
import axios from 'axios';
//设置访问后台服务器地址
axios.defaults.baseURL="http://localhost:8080/webBack/";
//将 axios 挂载到 vue 全局对象中,使用 this 可以直接访问
Vue.prototype.$http=axios;
//axios 请求拦截
axios.interceptors.request.use(config =>
//为请求头对象,添加 Token 验证的 token 字段
config.headers.token =sessionStorage.getItem('token');
return config;
)
// 添加响应拦截器
axios.interceptors.response.use((resp) =>//正常响应拦截
if(resp.data.code==500)
ElementUI.Message(message:resp.data.message,type:"error")
if(resp.data.code==202)
sessionStorage.clear();
router.replace("/login");
return resp;
);
//创建项目中唯一的一个vue对象
new Vue(
render: h => h(App), //默认将app.vue组件加载到唯一的index.html中的<div id="app">div上面,
router,
).$mount('#app')
//Main.vue
<!-- 后端管理界面 -->
<template>
    <el-container>
        顶部
      <el-header>
          <el-dropdown>
                  <i class="el-icon-setting" style="margin-right: 15px"></i>
                  <el-dropdown-menu slot="dropdown">
                    <el-dropdown-item>修改密码</el-dropdown-item>
                    <el-dropdown-item><span @click="logOut()">安全退出</span></el-dropdown-item>
                    <el-dropdown-item>个人信息</el-dropdown-item>
                    <el-dropdown-item><span @click="test()">测试</span></el-dropdown-item>
                  </el-dropdown-menu>
          </el-dropdown>
          <span>account</span>
      </el-header>
      <el-container>
          <!-- 左侧菜单-->
        <el-aside width="200px" style="background-color: rgb(238, 241, 246)">
             <el-menu :default-openeds="['1']" router>
                  <el-submenu index="1">
                    <template slot="title"><i class="el-icon-message"></i>功能菜单</template>
                    <el-menu-item-group>
                      <el-menu-item index="/studentList">学生管理</el-menu-item>
                      <el-menu-item index="/course">课程管理</el-menu-item>
                    </el-menu-item-group>
                  </el-submenu>
                </el-menu>
        </el-aside>
        <!-- 右侧操作区间 -->
        <el-main>
            <router-view></router-view>
        </el-main>
      </el-container>
    </el-container>
</template>
<script>
  export default
      data()
          return
              account:""

      ,
      methods:
          //安全退出
          logOut()
              this.$confirm('确定要退出吗?', '操作提示',
                        confirmButtonText: '确定',
                        cancelButtonText: '取消',
                        type: 'warning'
                      ).then(() =>
                          sessionStorage.clear();
                         this.$router.push("/login")
                      );
            ,
      test()
          //将后端携带token,每次请求都需要发送一个token比较麻烦
          this.$http.get("admin/test").then((resp)=>
          // sessionStorage.setItem("token",resp.data.data.token);
          if(resp.data.code==200)
              alert("测试成功");


      );
      ,
      mounted()
        this.account=sessionStorage.getItem("account");
        // if(this.account==null)判断浏览器中用户信息是否为空,如果为空,说明登录失败,应该跳转到登录界面
        //  this.$router.push("/login");
        //


</script>
<style>
     .el-header
        background-color: #0c81ff;
        color: #333;
        text-align: right;
        line-height: 60px;

      .el-aside
        background-color: #D3DCE6;
        color: #333;
        text-align: center;
        height: 100vh;

      .el-main
        background-color: #E9EEF3;
        color: #333;
        text-align: center;
        height: 100vh;

</style>
后端代码
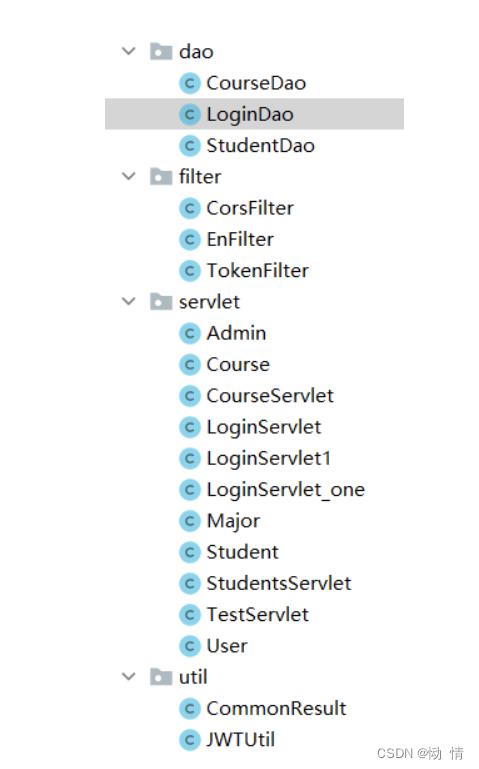
注意:Servlet和过滤器都需要在web-xml中进行配置.
//CourseDao
package feifan.com.servlet;
import com.auth0.jwt.interfaces.DecodedJWT;
import com.fasterxml.jackson.databind.ObjectMapper;
import feifan.com.dao.CourseDao;
import feifan.com.dao.StudentDao;
import feifan.com.util.CommonResult;
import feifan.com.util.JWTUtil;
import javax.servlet.ServletException;
import javax.servlet.http.HttpServlet;
import javax.servlet.http.HttpServletRequest;
import javax.servlet.http.HttpServletResponse;
import java.io.IOException;
import java.io.PrintWriter;
import java.util.List;
public class CourseServlet extends HttpServlet
@Override
protected void doGet(HttpServletRequest req, HttpServletResponse resp) throws ServletException, IOException
String mark=req.getParameter("mark");
System.out.println(mark);
if("list".equals(mark))
findCourseList(req,resp);
if("delete".equals(mark))
deleteCourse(req,resp);
if("findCourseById".equals(mark))
findCourseById(req,resp);
private void findCourseById(HttpServletRequest req, HttpServletResponse resp) throws IOException
resp.setHeader("Content-Type", "text/html;charset=utf-8");//设置响应内容的编码
PrintWriter pt=resp.getWriter();
CommonResult commonResult=null;
try
String id=req.getParameter("id");
CourseDao courseDao=new CourseDao();
Course course=courseDao.findCourseById(id);
commonResult=new CommonResult(200,course,"查询成功");
catch(Exception e)
e.printStackTrace();
commonResult=new CommonResult(500,null,"系统忙"+e.getMessage());
ObjectMapper objectMapper=new ObjectMapper();
String json= objectMapper.writeValueAsString(commonResult);
pt.print(json);
private void deleteCourse(HttpServletRequest req, HttpServletResponse resp) throws IOException
resp.setHeader("Content-Type", "text/html;charset=utf-8");//设置响应内容的编码
PrintWriter pt=resp.getWriter();
CommonResult commonResult=null;
try
String id=req.getParameter("id");
CourseDao courseDao=new CourseDao();
courseDao.deleteCourse(id);
commonResult=new CommonResult(200,null,"删除成功");
catch(Exception e)
e.printStackTrace();
commonResult=new CommonResult(500,null,"系统忙"+e.getMessage());
ObjectMapper objectMapper=new ObjectMapper();
String json= objectMapper.writeValueAsString(commonResult);
pt.print(json);
private void findCourseList(HttpServletRequest req, HttpServletResponse resp) throws IOException
resp.setHeader("Content-Type", "text/html;charset=utf-8");//设置响应内容的编码
PrintWriter pt=resp.getWriter();
CommonResult commonResult=null;
try
CourseDao courseDao=new CourseDao();
List<Course> courseList= courseDao.courses();
commonResult=new CommonResult(200,courseList,"查询成功");
catch(Exception e)
e.printStackTrace();
commonResult=new CommonResult(500,null,"系统忙"+e.getMessage());
ObjectMapper objectMapper=new ObjectMapper();
String json= objectMapper.writeValueAsString(commonResult);
pt.print(json);
@Override
protected void doPost(HttpServletRequest req, HttpServletResponse resp) throws ServletException, IOException
String mark=req.getParameter("mark");
if("save".equals(mark))
addCourse(req,resp);
private void addCourse(HttpServletRequest req, HttpServletResponse resp) throws IOException
resp.setHeader("Content-Type", "text/html;charset=utf-8");//设置响应内容的编码
PrintWriter pt=resp.getWriter();
CommonResult commonResult=null;
try
String id=req.getParameter("id");//修改有id,新增没有id
String name=req.getParameter("name");
//获取请求头中的token
String token = req.getHeader("token");
//解析token
DecodedJWT tokenInfo= JWTUtil.getTokenInfo(token);
//获取到token中的管理员信息
Integer adminid=tokenInfo.getClaim("id").asInt();
if(id==null)
CourseDao studentDao=new CourseDao();
boolean flag= studentDao.addCourse(name,adminid);
commonResult=new CommonResult(200,flag,"添加成功");
else
CourseDao studentDao=new CourseDao();
boolean flag= studentDao.upDateCourse(id,name,adminid);
commonResult=new CommonResult(200,flag,"修改成功");
catch(Exception e)
e.printStackTrace();
commonResult=new CommonResult(500,null,"系统忙"+e.getMessage());
ObjectMapper objectMapper=new ObjectMapper();
String json= objectMapper.writeValueAsString(commonResult);
pt.print(json);
//CommonResult
package feifan.com.util;
public class CommonResult
int code;
Object data;
String message;
public CommonResult(int code, Object data, String message)
this.code = code;
this.data = data;
this.message = message;
public int getCode()
return code;
public void setCode(int code)
this.code = code;
public Object getData()
return data;
public void setData(Object data)
this.data = data;
public String getMessage()
return message;
public void setMessage(String message)
this.message = message;
//CourseServlet
package feifan.com.servlet;
import com.auth0.jwt.interfaces.DecodedJWT;
import com.fasterxml.jackson.databind.ObjectMapper;
import feifan.com.dao.CourseDao;
import feifan.com.dao.StudentDao;
import feifan.com.util.CommonResult;
import feifan.com.util.JWTUtil;
import javax.servlet.ServletException;
import javax.servlet.http.HttpServlet;
import javax.servlet.http.HttpServletRequest;
import javax.servlet.http.HttpServletResponse;
import java.io.IOException;
import java.io.PrintWriter;
import java.util.List;
public class CourseServlet extends HttpServlet
@Override
protected void doGet(HttpServletRequest req, HttpServletResponse resp) throws ServletException, IOException
String mark=req.getParameter("mark");
System.out.println(mark);
if("list".equals(mark))
findCourseList(req,resp);
if("delete".equals(mark))
deleteCourse(req,resp);
if("findCourseById".equals(mark))
findCourseById(req,resp);
private void findCourseById(HttpServletRequest req, HttpServletResponse resp) throws IOException
resp.setHeader("Content-Type", "text/html;charset=utf-8");//设置响应内容的编码
PrintWriter pt=resp.getWriter();
CommonResult commonResult=null;
try
String id=req.getParameter("id");
CourseDao courseDao=new CourseDao();
Course course=courseDao.findCourseById(id);
commonResult=new CommonResult(200,course,"查询成功");
catch(Exception e)
e.printStackTrace();
commonResult=new CommonResult(500,null,"系统忙"+e.getMessage());
ObjectMapper objectMapper=new ObjectMapper();
String json= objectMapper.writeValueAsString(commonResult);
pt.print(json);
private void deleteCourse(HttpServletRequest req, HttpServletResponse resp) throws IOException
resp.setHeader("Content-Type", "text/html;charset=utf-8");//设置响应内容的编码
PrintWriter pt=resp.getWriter();
CommonResult commonResult=null;
try
String id=req.getParameter("id");
CourseDao courseDao=new CourseDao();
courseDao.deleteCourse(id);
commonResult=new CommonResult(200,null,"删除成功");
catch(Exception e)
e.printStackTrace();
commonResult=new CommonResult(500,null,"系统忙"+e.getMessage());
ObjectMapper objectMapper=new ObjectMapper();
String json= objectMapper.writeValueAsString(commonResult);
pt.print(json);
private void findCourseList(HttpServletRequest req, HttpServletResponse resp) throws IOException
resp.setHeader("Content-Type", "text/html;charset=utf-8");//设置响应内容的编码
PrintWriter pt=resp.getWriter();
CommonResult commonResult=null;
try
CourseDao courseDao=new CourseDao();
List<Course> courseList= courseDao.courses();
commonResult=new CommonResult(200,courseList,"查询成功");
catch(Exception e)
e.printStackTrace();
commonResult=new CommonResult(500,null,"系统忙"+e.getMessage());
ObjectMapper objectMapper=new ObjectMapper();
String json= objectMapper.writeValueAsString(commonResult);
pt.print(json);
@Override
protected void doPost(HttpServletRequest req, HttpServletResponse resp) throws ServletException, IOException
String mark=req.getParameter("mark");
if("save".equals(mark))
addCourse(req,resp);
private void addCourse(HttpServletRequest req, HttpServletResponse resp) throws IOException
resp.setHeader("Content-Type", "text/html;charset=utf-8");//设置响应内容的编码
PrintWriter pt=resp.getWriter();
CommonResult commonResult=null;
try
String id=req.getParameter("id");//修改有id,新增没有id
String name=req.getParameter("name");
//获取请求头中的token
String token = req.getHeader("token");
//解析token
DecodedJWT tokenInfo= JWTUtil.getTokenInfo(token);
//获取到token中的管理员信息
Integer adminid=tokenInfo.getClaim("id").asInt();
if(id==null)
CourseDao studentDao=new CourseDao();
boolean flag= studentDao.addCourse(name,adminid);
commonResult=new CommonResult(200,flag,"添加成功");
else
CourseDao studentDao=new CourseDao();
boolean flag= studentDao.upDateCourse(id,name,adminid);
commonResult=new CommonResult(200,flag,"修改成功");
catch(Exception e)
e.printStackTrace();
commonResult=new CommonResult(500,null,"系统忙"+e.getMessage());
ObjectMapper objectMapper=new ObjectMapper();
String json= objectMapper.writeValueAsString(commonResult);
pt.print(json);
//LoginDao
package feifan.com.dao;
import feifan.com.servlet.Admin;
import java.sql.*;
public class LoginDao
public Admin work(String account, String password) throws SQLException
Admin admin=null;
Connection connection = null;
Statement st = null;
PreparedStatement ps = null;
Boolean df = false;
try
Class.forName("com.mysql.cj.jdbc.Driver");//定义驱动程序名为jdbcName com.mysql.cj.jdbc.Driver
//获取数据库连接,使用java.sql里面的DriverManager.getConnection来完成
connection = DriverManager.getConnection("jdbc:mysql://127.0.0.1:3306/zp?serverTimezone=Asia/Shanghai", "root", "root");
//构造一个Statement 对象来执行SQL语句
st = connection.createStatement();
ps = connection.prepareStatement("select id,account from admin where account=? and pass=? ");//执行SQL语句
ps.setObject(1, account);
ps.setObject(2, password);
ResultSet resultSet = ps.executeQuery();//执行sql并返回结果结束.返回一个结果集(ResultSet)对象
while (resultSet.next()) //遍历结果集
admin=new Admin();
admin.setId(resultSet.getInt("id"));
admin.setAccount(resultSet.getString("account"));
System.out.println("数据库连接成功");
catch (ClassNotFoundException | SQLException e)
e.printStackTrace();
finally //关闭记录集
if (connection != null)
connection.close();
if(st!=null)
st.close();
if(ps!=null)
ps.close();
return admin;
//LoginServlet
package feifan.com.servlet;
import com.fasterxml.jackson.databind.ObjectMapper;
import feifan.com.dao.LoginDao;
import feifan.com.util.CommonResult;
import feifan.com.util.JWTUtil;
import javax.servlet.ServletException;
import javax.servlet.http.HttpServlet;
import javax.servlet.http.HttpServletRequest;
import javax.servlet.http.HttpServletResponse;
import java.io.IOException;
import java.io.PrintWriter;
import java.sql.SQLException;
public class LoginServlet_one extends HttpServlet
// @Override
// protected void doGet(HttpServletRequest req, HttpServletResponse resp) throws ServletException, IOException
// resp.setHeader("Content-type", "text/html;charset=utf-8");//设置响应内容的编码
// PrintWriter pt = resp.getWriter();
//
// System.out.println("测试成功");
// CommonResult commonResult = new CommonResult(200,null, "验证token");
// ObjectMapper objectMapper = new ObjectMapper();
// String json = objectMapper.writeValueAsString(commonResult);
// pt.print(json);
//
//
@Override
protected void doPost(HttpServletRequest req, HttpServletResponse resp) throws ServletException, IOException
//req.setCharacterEncoding("utf-8");//设置的是请求数据的解析编码
//接收请求中自己的数据
//req是前端往后端发送的信息,resp是后端向前端发送的信息
String account = req.getParameter("account");//将前端发送过来的账号进行接收
String password = req.getParameter("password");//将前端发送过来的密码进行接收
CommonResult commonResult = null;
System.out.println(account);
resp.setHeader("Content-type", "text/html;charset=utf-8");//设置响应内容的编码
PrintWriter pt = resp.getWriter();
//处理访问dao与数据库交互,根据返回的结果向客户端响应内容
LoginDao loginDao = new LoginDao();//创建一个与数据库连接的对象
try
Admin admin = loginDao.work(account, password);//调用对象中的work()方法
if (admin != null) //如果判断数据库中有admin对象的数据,则进入此循环
//登录成功,生成token,携带用户信息
String token = JWTUtil.token(admin.getId(), admin.getAccount());//将后端通过账号&id生成的token
admin.setToken(token);//在后端将token字符串添加到admin中
commonResult = new CommonResult(200, admin, "登录成功");
else
commonResult = new CommonResult(201, admin, "账号或者密码错误");
catch (Exception throwables)
throwables.printStackTrace();
commonResult = new CommonResult(500, null, "系统忙" + throwables.getLocalizedMessage());
//向前端发送信息
ObjectMapper objectMapper = new ObjectMapper();
String json = objectMapper.writeValueAsString(commonResult);
pt.print(json);
05-Ajax助前后端单飞

非常适合小白入门的PHP Web开发系列教程,想转行吗?一起码呀?
上一篇文章我们了解PHP的基础语法、PHP如何和前端表单交互、PHP的类和对象、函数等知识,希望你能掌握简单的PHP前后端交互、理解类和函数封装。这节我们继续上节课讲到的成绩转评级的案例,讲解JQuery、Ajax的使用实现前后端分离以及与PHP的交互,让用户体验上更好。
[本文目录]
一、回顾上篇文章说的交互过程
1、回顾
2、分解
二、单飞助手Ajax
1、概述
2、使用JQuery
3、使用JQuery的Ajax
4、单飞之妙处横生
一、回顾上篇文章说的交互过程
1、回顾
还记得我们上节课的案例吗?页面长这样的
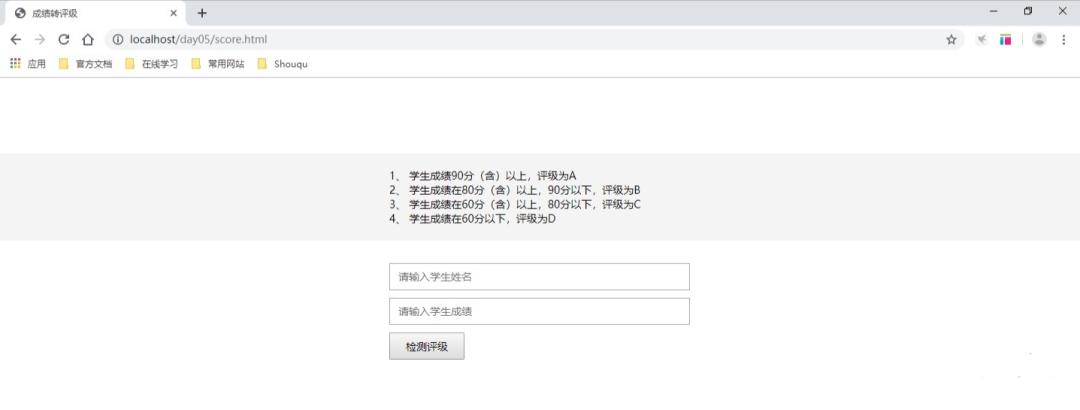
请求后端处理以后返回的结果是这样的


代码的话我们还是照常给大家贴出来(因为我写文章的地点、电脑不固定,所以差别可能在文件的路径上)
<!-- score.html -->
<!-- 使用 localhost/score.html 访问或直接用浏览器打开文件 -->
<!-- score.html文件应与后续.php文件在同一个目录下 -->
<!DOCTYPE html>
<html>
<head>
    <meta charset="utf-8">
    <meta http-equiv="X-UA-Compatible" content="IE=edge">
    <title>成绩转评级</title>
    <style type="text/css">
        /*通用样式*/
        * { font-size: 14px; margin: 0; padding: 0; }
        /*说明部分样式*/
        .explain { background-color: #f4f4f4; margin-top: 100px; padding: 20px 0px; }
        .block { text-align: left; width: 400px; margin: 0 auto; }
        .block ul { list-style: none; }

        /*表单部分样式*/
        .form { width: 400px; margin: 0 auto; margin-top: 20px; }
        .form input, .form button {
            height: 36px;
            box-sizing: border-box;
            margin-top: 10px;
            padding: 5px 10px;
        }
        .form input { width: 100%; }
        .form button { width: 100px; }

    </style>
</head>
<body>

    <div class="explain">
        <div class="block">
            <ul>
                <li>1、 学生成绩90分(含)以上,评级为A</li>
                <li>2、 学生成绩在80分(含)以上,90分以下,评级为B</li>
                <li>3、 学生成绩在60分(含)以上,80分以下,评级为C</li>
                <li>4、 学生成绩在60分以下,评级为D</li>
            </ul>
        </div>
    </div>

    <div class="form">
        <form action="apis/scorelevel.php" method="get" accept-charset="utf-8" target="_blank" onsubmit="return checkform()">
            <input type="text" name="study_name" value="" placeholder="请输入学生姓名">
            <input type="text" name="study_score" value="" placeholder="请输入学生成绩">
            <br>
            <button type="submit">检测评级</button>
        </form>
    </div>

    <script>
        function checkform() {
            var study_name  = document.getElementsByName('study_name')[0].value;
            var study_score = document.getElementsByName('study_score')[0].value;

            if ( !(study_name && study_score) ) {
                alert('学生姓名和学生成绩不能为空');
                return false;
            }
        }
    </script>

</body>
</html>
<?php
/**
* apis/scorelevel.php
* 我们以 “用户输入学生成绩,根据学生成绩对学生评级并输出” 的功能需求来做示例
* 需求的基本内容:
* 学生成绩90分(含)以上,评级为A
* 学生成绩在80分(含)以上,90分以下,评级为B
* 学生成绩在60分(含)以上,80分以下,评级为C
* 学生成绩在60分以下,评级为D
*/
// 首先考虑,成绩从哪里来?用户输入提交过来的
# 获取用户提交的学生名字和成绩
$study_name = isset($_GET['study_name']) ? $_GET['study_name'] : '';
$study_score = isset($_GET['study_score']) ? $_GET['study_score'] : '';
// 初始化评级
$level = '未知';
$level_label = '未知';
// 检测姓名和分数是否为空
if ( $study_name == '' || $study_score == '' ) {
echo '学生姓名和学生成绩未知,请检查提交的数据是否为空';
die;
}
// 根据分数给学生评级
if ( $study_score >= 90 ) {
$level = 'A';
} elseif ( $study_score >= 80 && $study_score < 90 ) {
$level = 'B';
} elseif ( $study_score >= 60 && $study_score < 80 ) {
$level = 'C';
} elseif ( $study_score < 60 ) {
$level = 'D';
} else {
$level = '未知';
}
switch ( $level ) {
case 'A':
$level_label = '优秀';
break;
case 'B':
$level_label = '良好';
break;
case 'C':
$level_label = '及格';
break;
case 'D':
$level_label = '差';
break;
}
echo '学生 '.$study_name.' 的成绩为 '. $study_score .',评级为:'.$level.'('. $level_label .')';
die;
2、我们分解一下这个交互过程
页面的表单直接将表单提交到 scorelevel.php 后端文件进行处理,这个php文件处理后就直接将结果返回给了浏览器页面。请看下面代码里表单标签 form里的属性 action的值,正是要提交到的页面的文件路径
<div class="form">
    <form action="apis/scorelevel.php" method="get" accept-charset="utf-8" target="_blank" onsubmit="return checkform()">
        <input type="text" name="study_name" value="" placeholder="请输入学生姓名">
        <input type="text" name="study_score" value="" placeholder="请输入学生成绩">
        <br>
        <button type="submit">检测评级</button>
    </form>
</div>现在有一个问题是我们每次提交表单都会出现一个新的浏览器标签页面(如果没试过的话尽快尝试一下运行起来),有没有感觉有点不爽,点一次打开个新页面,然后下一个成绩又得去切换再填一次再点一次“检测评级”。好在,我们可以很简单的解决这个问题,就是不打开新的页面,在当前页面提交表单。只需要对html代码稍微修改一下即可
<form action="apis/scorelevel.php" method="get" accept-charset="utf-8" target="_blank" onsubmit="return checkform()">
<!-- 修改为如下代码 -->
<form action="apis/scorelevel.php" method="get" accept-charset="utf-8" target="_self" onsubmit="return checkform()">
实际上就是把表单的属性 target 的值 _blank 改成了 _self,可以理解为前者是打开新页面然后提交表单,后者是在当前页面提交表单,后者其实是可以省略的,也就是把整个 target 去掉,跟 target="_self" 效果是一样的。大家试试就很容易知道这个结果了。
这个时候不打开新页面了。但是有没有发现另外一个问题,就是每次还得返回到表单页面,才能重新再提交新的成绩和学生。是不是还是很烦?怎么办呢?还记得我们说过吗?PHP是解释型脚本语言,是可以嵌入到HTML里面去的,那么我们有(jue)没(dui)有(you)理由想到,既然是提交到php文件处理,那么如果提交到当前文件,php代码也能处理,那不就是实现了提交到当前页面吗?说干就干,在html代码里把php代码嵌入进来,就是把php代码写进html文件里面,但是!记住了,php代码要能执行,文件名后缀必须是.php。于是,我们有了下面的代码。
<html>
<!-- 这里是HTML代码,和上面的页面一样的部分就不写出来了 -->
<!-- 只修改了表单属性action为空表示提交到当前页面(他自己) -->
    <form action="" method="get" accept-charset="utf-8" onsubmit="return checkform()">
        <!-- 表单内容代码跟上面的一样 -->
    </form>
</html>
<?php
    // 1、把php代码的首尾标签协商
    // 2、把scorelevel.php里面的php代码直接拷贝(复制粘贴)到这里来就可以了
    // some php code
?>
然后我们用浏览器打开链接 localhost/day05/scoresubmit.php
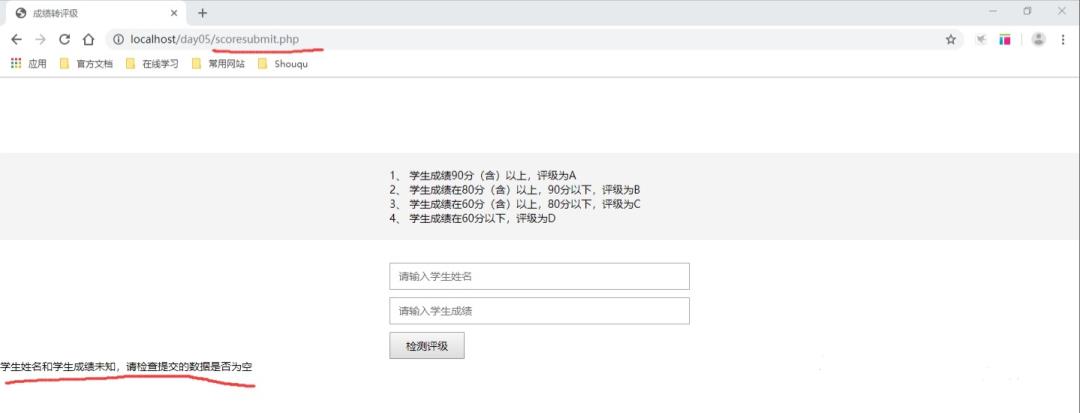
现在我们提交一个表单数据看看结果。
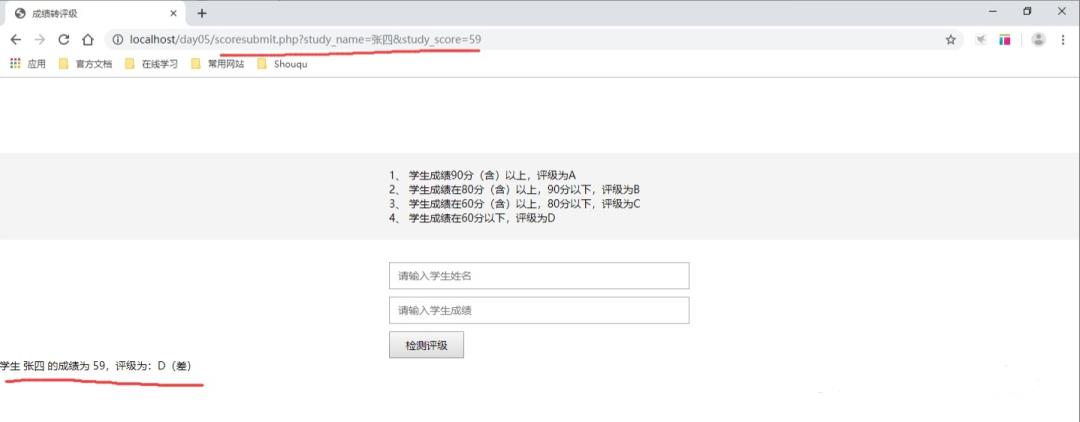
你有没有发现,我们提交到的就是当前页面哦,也能正确输出了。So,我们是不是解决了上面所有的问题了。
那么现在就真的没有问题了吗?(明知故问)我都这么说了,证明肯定还有问题呀~!
第一、每次提交页面会刷新
第二、HTML代码和PHP代码混在了一起,后期维护起来会非常麻烦(当HTML代码很多,php业务代码也很多的时候)虽然现在你还没有发现,但请记住,真的会变得非常困难,这就像你的裤子和衣服一起堆在衣柜的一个格子里,刚开始两三件,问题不大,哪天你买了一百条裤子一百件衣服,这个时候找一条裤子,请发挥你的想象力。
所以说嘛,不论是用户体验上还是代码可维护性上来讲,我们都应该需要改变。
二、单飞助手Ajax
1、概述
为了解决上面的问题,我们有一个前后端分离的这样一个概念,还有一个MVC的概念。这里我们不做深入讨论,因为这个课程面对的电脑和手机前的你,还不需要深入去了解,但请记住一句话,他们解决了前端开发人员必须等待后端开发人员开发完业务逻辑后再去完成页面开发(或者反过来)的问题,为前后端开发人员协同开发、提升开发效率、减少前后端相互影响、减轻后端服务器压力、让应用(网站)更易扩展和维护等问题。需要你最好自主了解一下这两个概念,这里推荐一个典型的MVC PHP框架(框架就是一种能帮助你快速实现业务逻辑不用关注实现路由、数据层等底层东西的一个PHP应用),帮助你从MVC模式开始理解前后端分离,框架名称叫 CodeIgniter 中文网 。
我们还是回到简单一点的内容,我们大多数实现分离和不刷新页面所使用的技术就是 Ajax 了。这个是Javascript的一个功能。
Ajax 即“ A synchronous J avascript And X ML”(异步 JavaScript 和 XML),是指一种创建交互式网页应用的网页开发技术。
Ajax = 异步 JavaScript 和 XML 或者是 HTML(标准通用标记语言的子集)。
Ajax 是一种用于创建快速动态网页的技术。
Ajax 是一种在无需重新加载整个网页的情况下,能够更新部分网页的技术。
通过在后台与服务器进行少量数据交换,Ajax 可以使网页实现异步更新。这意味着可以在不重新加载整个网页的情况下,对网页的某部分进行更新。
传统的网页(不使用 Ajax)如果需要更新内容,必须重载整个网页页面。
以上引用自百度百科 ajax(Ajax 开发)_百度百科
我们知道Javascript可以直接实现很多功能,包括了ajax,但是使用起来并没有那么方便。所以大佬们就做了一个叫 JQuery(JQ) 的js代码库(放很多优化过的js代码的地方),我们可以直接使用这个库,就可以完成很多js原生写起来比较复杂或代码量比较多的功能了,of course~包括我们的 ajax。
2、使用JQuery
要使用JQuery这个库,当然就必须得先引入、包含,我们有两种方式引入,一个是下载jq文件,然后我们自己用 <script>标签引入,二个是直接使用现有的cdn,以上二选一即可,如下:
<html>
<!-- html code -->
<script src="local/jquery.min.js"></script>
<script src="https://cdn.bootcss.com/jquery/3.4.1/jquery.min.js"></script>
</body>
</html>
3、使用JQuery封装好的ajax
先上个 JQuery手册 http://jquery.cuishifeng.cn/,方便大家以后查阅JQuery库的相关方法函数。
首先明确我们的 js 代码要写在哪里,推荐写在 </body> 标签前即可。如下:
<html>
<!-- html code -->
<script src="https://cdn.bootcss.com/jquery/3.4.1/jquery.min.js"></script>
<script>
// js 代码
</script>
</body>
</html>使用ajax可以达到不刷新整个网页就能跟后端交互并更新页面内容。那么怎么使用呢?还记得我们 score.html 页面上有写过的检查表单的js代码吗?
    <script>
        function checkform() {
            var study_name  = document.getElementsByName('study_name')[0].value;
            var study_score = document.getElementsByName('study_score')[0].value;

            if ( !(study_name && study_score) ) {
                alert('学生姓名和学生成绩不能为空');
                return false;
            }
        }
    </script>
当姓名和成绩都有的时候我们就提交表单,现在我们要用jq的ajax来提交表单。需要改一下代码咯。
我们在表单div下新增一点HTML代码,用于最后后端返回的信息的展示
    <div class="form">
    </div>
    <div class="explain">
        <div class="block notice">请输入学生姓名和成绩,点击检测评级进行成绩评级</div>
    </div>
得到页面如下
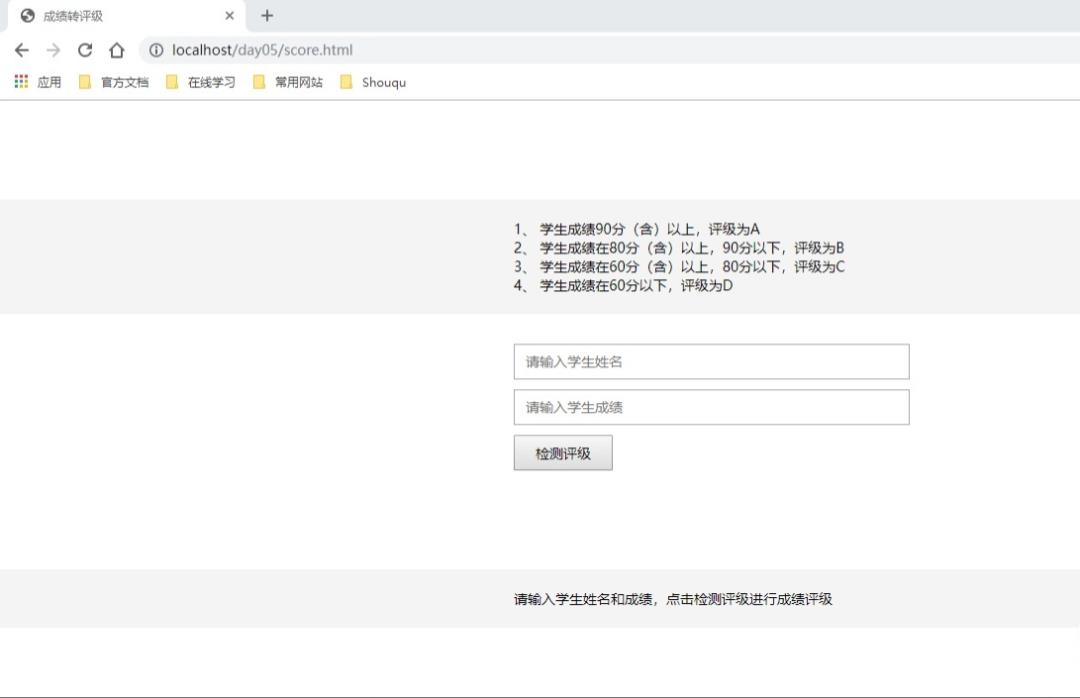
修改表单提交属性action,让他提交到js,让js处理表单的提交,顺便改下js函数名
<form action="javascript:void(0);" method="get" accept-charset="utf-8" onsubmit="return submitform()">然后修改js代码,使用jq的ajax来处理表单提交
<script>
    function submitform() {

        // 使用jq选择器,获取页面标签dom元素的值
        var study_name  = $('input[name=study_name]').val()
        var study_score = $('input[name=study_score]').val()

        // 校验是否已经填写姓名和成绩,没有的话就提示信息
        if ( !(study_name && study_score) ) {
            // 修改提示信息处的文本颜色为红色
            $('.notice').css({color:"red"})
            // 把提示信息以文本text的方式填充到notice div中
            $('.notice').text('学生姓名和学生成绩不能为空')

            // 设置提示3秒后恢复到页面原来提示的文字和样式
            setTimeout(function(){
                // 修改提示信息处的文本颜色为黑色
                $('.notice').css({color:"black"})
                // 把提示信息以文本text的方式填充到notice div中
                $('.notice').text('请输入学生姓名和成绩,点击检测评级进行成绩评级')
            }, 3000)
            return false
        }

        // 如果已经填写了我们就通过ajax提交表单内容
        $.ajax({
            url: 'http://localhost/day05/apis/scorelevel.php', // 后端php地址
            data: $('form').serialize(), // 提交的数据,表单直接序列化
            dataType: 'text', // 返回的数据类型,我们这里直接返回文本就是text了
            success: function(responseText) { // 请求成功的时候进行处理
                // 修改提示信息处的文本颜色为绿色
                $('.notice').css({color:"green"})
                // 把提示信息以文本text的方式填充到notice div中
                $('.notice').text(responseText)
            },
            error: function(err){ // 请求失败的时候进行的处理
                console.log(err)
            }
        })
    }
</script>
{
key1: value1,
key2: value2
}默认进来页面的样子
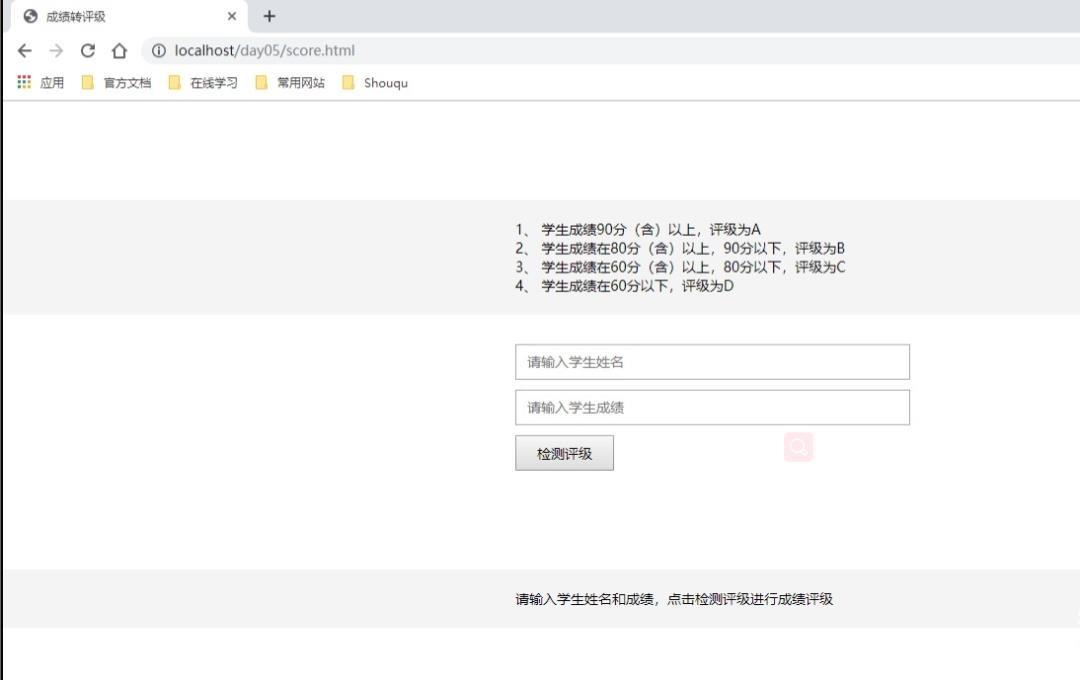
没有填写内容提交页面的样子
正常填写内容后端正确反馈响应的页面样子
至此,我们已经入门了jq的 ajax 的用法,更多相关内容希望大家可以阅读以下jq的相关内容和手册。这个时候我们的页面基本上已经有了很好的体验了。ok,给你几分钟好好体验一下自己写出来的页面,享受这一刻的快乐吧~!
4、单飞之妙处横生-显而易见的好处
想象一下,如果这两个部分代码放一起,多难看,多难看,多难看,这个难不仅是美丑的问题,也是灵魂问题~!
OK,下课!
本文章旨在让你了解使用JQuery AJAX与后端进行异步页面无刷新的交互,提升用户体验和后端性能,以及前后端分离的基础理解。
关注我吧,欢迎转载,转载请保留文章完整性和出处
以上是关于前后端交互(小白教学)的主要内容,如果未能解决你的问题,请参考以下文章