SpringCloud-springcloud简介
Posted 拾忆最初的理想
tags:
篇首语:本文由小常识网(cha138.com)小编为大家整理,主要介绍了SpringCloud-springcloud简介相关的知识,希望对你有一定的参考价值。
1,springcloud简介
springcloud是分布式微服务架构的一站式解决方案,是多种微服务架构落地技术的集合体,俗称微服务全家桶。实现的功能有服务注册与发现,服务调用,服务熔断,负载均衡,服务降级,服务消息队列,配置中心管理,服务网关,服务监控,全链路追踪,自动化部署。
现在我们常用的五大组件
- 服务注册与发现——Eureka
- 负载均衡:
-
- 客户端负载均衡——Ribbon
- 服务端负载均衡:——Feign
- 断路器——Hystrix
- 服务网关——Zuul
- 分布式配置——Spring Cloud Config
2,微服务的优缺点
优点
- 单一职责原则;
- 每个服务足够内聚,足够小,代码容易理解,这样能聚焦一个- 指定的业务功能或业务需求;
- 开发简单,开发效率高,一个服务可能就是专一的只干一件事;
- 微服务能够被小团队单独开发,这个团队只需2-5个开发人员组成;
- 微服务是松耦合的,是有功能意义的服务,无论是在开发阶段或部署阶段都是独立的;
- 微服务能使用不同的语言开发;
- 易于和第三方集成,微服务允许容易且灵活的方式集成自动部署,通过持续集成工具,如jenkins,Hudson,bamboo;
- 微服务易于被一个开发人员理解,修改和维护,这样小团队能够更关注自己的工作成果,无需通过合作才能体现价值;
- 微服务允许利用和融合最新技术;
- 微服务只是业务逻辑的代码,不会和html,CSS,或其他的界面混合;
- 每个微服务都有自己的存储能力,可以有自己的数据库,也可以有统一的数据库;
缺点
- 开发人员要处理分布式系统的复杂性;
- 多服务运维难度,随着服务的增加,运维的压力也在增大;
- 系统部署依赖问题;
- 服务间通信成本问题;
- 数据一致性问题;
- 系统集成测试问题;
- 性能和监控问题;
3,springboot与springcloud的区别
- SpringBoot专注于开苏方便的开发单个个体微服务;
- SpringCloud是关注全局的微服务协调整理治理框架,它将SpringBoot开发的一个个单体微服务,整合并管理起来,为各个微服务之间提供:配置管理、服务发现、断路器、路由、为代理、事件总栈、全局锁、决策竞选、分布式会话等等集成服务;
- SpringBoot可以离开SpringCloud独立使用,开发项目,但SpringCloud离不开SpringBoot,属于依赖关系;
- SpringBoot专注于快速、方便的开发单个个体微服务,SpringCloud关注全局的服务治理框架;
4,搭建父工程
首先创建父工程(maven),然后添加依赖
<?xml version="1.0" encoding="UTF-8"?>
<project xmlns="http://maven.apache.org/POM/4.0.0"
         xmlns:xsi="http://www.w3.org/2001/XMLSchema-instance"
         xsi:schemaLocation="http://maven.apache.org/POM/4.0.0 http://maven.apache.org/xsd/maven-4.0.0.xsd">
    <modelVersion>4.0.0</modelVersion>

    <groupId>com.kuang</groupId>
    <artifactId>springcloud</artifactId>
    <version>1.0-SNAPSHOT</version>

    <!--打包方式  pom-->
    <packaging>pom</packaging>

    <properties>
        <project.build.sourceEncoding>UTF-8</project.build.sourceEncoding>
        <maven.compiler.source>1.8</maven.compiler.source>
        <maven.compiler.target>1.8</maven.compiler.target>
        <junit.version>4.12</junit.version>
        <log4j.version>1.2.17</log4j.version>
        <lombok.version>1.16.18</lombok.version>
    </properties>

    <dependencyManagement>
        <dependencies>
            <dependency>
                <groupId>org.springframework.cloud</groupId>
                <artifactId>spring-cloud-alibaba-dependencies</artifactId>
                <version>0.2.0.RELEASE</version>
                <type>pom</type>
                <scope>import</scope>
            </dependency>
            <!--springCloud的依赖-->
            <dependency>
                <groupId>org.springframework.cloud</groupId>
                <artifactId>spring-cloud-dependencies</artifactId>
                <version>Hoxton.SR1</version>
                <type>pom</type>
                <scope>import</scope>
            </dependency>
            <!--SpringBoot-->
            <dependency>
                <groupId>org.springframework.boot</groupId>
                <artifactId>spring-boot-dependencies</artifactId>
                <version>2.2.5.RELEASE</version>
                <type>pom</type>
                <scope>import</scope>
            </dependency>
            <!--数据库-->
            <dependency>
                <groupId>mysql</groupId>
                <artifactId>mysql-connector-java</artifactId>
                <version>5.1.47</version>
            </dependency>
            <dependency>
                <groupId>com.alibaba</groupId>
                <artifactId>druid</artifactId>
                <version>1.1.10</version>
            </dependency>
            <!--SpringBoot 启动器-->
            <dependency>
                <groupId>org.mybatis.spring.boot</groupId>
                <artifactId>mybatis-spring-boot-starter</artifactId>
                <version>1.3.2</version>
            </dependency>
            <!--日志测试~-->
            <dependency>
                <groupId>ch.qos.logback</groupId>
                <artifactId>logback-core</artifactId>
                <version>1.2.3</version>
            </dependency>
            <dependency>
                <groupId>junit</groupId>
                <artifactId>junit</artifactId>
                <version>$junit.version</version>
            </dependency>
            <dependency>
                <groupId>log4j</groupId>
                <artifactId>log4j</artifactId>
                <version>$log4j.version</version>
            </dependency>
            <dependency>
                <groupId>org.projectlombok</groupId>
                <artifactId>lombok</artifactId>
                <version>$lombok.version</version>
            </dependency>
        </dependencies>
    </dependencyManagement>

</project>
5,创建microservicecloud-api 工程
(封装的整体entity/接口/公共配置等)
导入依赖:
<dependencies>
    <dependency>
        <groupId>org.projectlombok</groupId>
        <artifactId>lombok</artifactId>
    </dependency>
</dependencies>
创建实体类:
//链式写法
@Accessors(chain = true)
@Data
@AllArgsConstructor
@NoArgsConstructor
@ToString
/**
 * Dept 实体类  orm 类表关系映射
 */
public class Dept implements Serializable

    /**
     * 主键
     */
    private Long deptno;

    private String dname;

    /**
     * 这个数据存在哪个数据库字段~微服务,一个服务对应一个数据库,同一个信息可能存在不同数据库
     */
    private String db_source;

    /*
     * 链式写法:
     * Dept dept = new Dept();
     * dept.setDeptNo(11).setDname('sss').setDb_source('001');
     *
     * */
6,搭建服务提供者工程
服务提供者相当于服务端
创建创建springcloud-provider-dep-8001
然后导入依赖
<dependencies>

    <!--我们需要拿到实体类,所以要配置api module-->
	<dependency>
        <groupId>com.kuang</groupId>
        <artifactId>microservicecloud-api</artifactId>
        <version>1.0-SNAPSHOT</version>
        <scope>compile</scope>
    </dependency>
    <!--junit-->
    <dependency>
        <groupId>junit</groupId>
        <artifactId>junit</artifactId>
    </dependency>
    <dependency>
        <groupId>mysql</groupId>
        <artifactId>mysql-connector-java</artifactId>
    </dependency>
    <dependency>
        <groupId>com.alibaba</groupId>
        <artifactId>druid</artifactId>
    </dependency>
    <!--日志门面-->
    <dependency>
        <groupId>ch.qos.logback</groupId>
        <artifactId>logback-core</artifactId>
    </dependency>
    <dependency>
        <groupId>org.mybatis.spring.boot</groupId>
        <artifactId>mybatis-spring-boot-starter</artifactId>
    </dependency>
    <!--test-->
    <dependency>
        <groupId>org.springframework.boot</groupId>
        <artifactId>spring-boot-test</artifactId>
    </dependency>
    <!--web-->
    <dependency>
        <groupId>org.springframework.boot</groupId>
        <artifactId>spring-boot-starter-web</artifactId>
    </dependency>
    <!--jetty:尝试着用这个当应用服务器,与Tomcat没什么区别-->
    <dependency>
        <groupId>org.springframework.boot</groupId>
        <artifactId>spring-boot-starter-jetty</artifactId>
    </dependency>
    <!--热部署工具-->
    <dependency>
        <groupId>org.springframework.boot</groupId>
        <artifactId>spring-boot-devtools</artifactId>
    </dependency>
</dependencies>
然后编写一些配置类:
application.yml文件
server:
  port: 8001

#mybatis配置
mybatis:
  # 配置别名
  type-aliases-package: com.yang.springcloud.pojo
  # mybatis的配置文件
  config-location: classpath:mybatis/mybatis-config.xml
  # 编写sql语句的配置文件
  mapper-locations: classpath:mybatis/mapper/*.xml

#spring配置
spring:
  application:
    # 服务的名称
    name: springcloud-provider-dept
    # 数据源的配置
  datasource:
    type: com.alibaba.druid.pool.DruidDataSourceC3P0Adapter
    driver-class-name: org.gjt.mm.mysql.Driver
    url: jdbc:mysql://localhost:3306/clouddb01?useUnicode=true&characterEncoding=UTF-8
    username: root
    password: ***
mybatis的配置文件mybatis-config.xml
<?xml version="1.0" encoding="UTF-8" ?>
<!DOCTYPE configuration
        PUBLIC "-//mybatis.org//DTD Config 3.0//EN"
        "http://mybatis.org/dtd/mybatis-3-config.dtd">
<configuration>
    <settings>
        <!--开启二级缓存-->
        <setting name="cacheEnabled" value="true"/>
    </settings>
</configuration>
dao层:
@Mapper
@Repository
public interface DeptDao

    /**
     * 插入数据
     * @param dept 部门对象
     * @return 返回是否插入成功
     */
    public boolean addDept(Dept dept);

    /**
     * 根据id查询部门信息
     * @param id 部门id
     * @return 返回部门对象
     */
    public Dept queryById(Long id);

    /**
     * 查询所有的部门信息
     * @return 返回部门信息组成的列表
     */
    public List<Dept> queryAll();
mapper.xml文件
<?xml version="1.0" encoding="UTF-8" ?>
<!DOCTYPE mapper
        PUBLIC "-//mybatis.org//DTD Config 3.0//EN"
        "http://mybatis.org/dtd/mybatis-3-mapper.dtd">
<mapper namespace="com.kuang.springcloud.dao.DeptDao">

    <insert id="addDept" parameterType="com.kuang.springcloud.pojo.Dept">
        insert into dept (dname,db_source)
        values (#dname,DATABASE());
    </insert>

    <select id="queryById" resultType="com.kuang.springcloud.pojo.Dept">
        select *
        from dept
        where deptno = #deptno;
    </select>

    <select id="queryAll" resultType="com.kuang.springcloud.pojo.Dept">
        select * from dept;
    </select>

</mapper>
service层:
public interface DeptService

    /**
     * 插入数据
     * @param dept 部门对象
     * @return 返回是否插入成功
     */
    public boolean addDept(Dept dept);

    /**
     * 根据id查询部门信息
     * @param id 部门id
     * @return 返回部门对象
     */
    public Dept queryById(Long id);

    /**
     * 查询所有的部门信息
     * @return 返回部门信息组成的列表
     */
    public List<Dept> queryAll();
@Service
public class DeptServiceImpl implements DeptService

    @Autowired
    private DeptDao deptDao;

    @Override
    public boolean addDept(Dept dept)
        return deptDao.addDept(dept);


    @Override
    public Dept queryById(Long id)
        return deptDao.queryById(id);


    @Override
    public List<Dept> queryAll()
        return deptDao.queryAll();
controller层:
//提供Restful服务
@RestController
public class DeptController

    @Autowired
    private DeptService deptService;

    @PostMapping("/dept/add")
    public boolean addDept( Dept dept)
        return deptService.addDept(dept);


    @GetMapping("/dept/get/id")
    public Dept queryById(@PathVariable("id") Long id)
        return deptService.queryById(id);


    @GetMapping("/dept/list")
    public List<Dept> queryAll()
        return deptService.queryAll();
编写主启动类:
@SpringBootApplication
public class DeptProvider_8001
    public static void main(String[] args)
        SpringApplication.run(DeptProvider_8001.class,args);
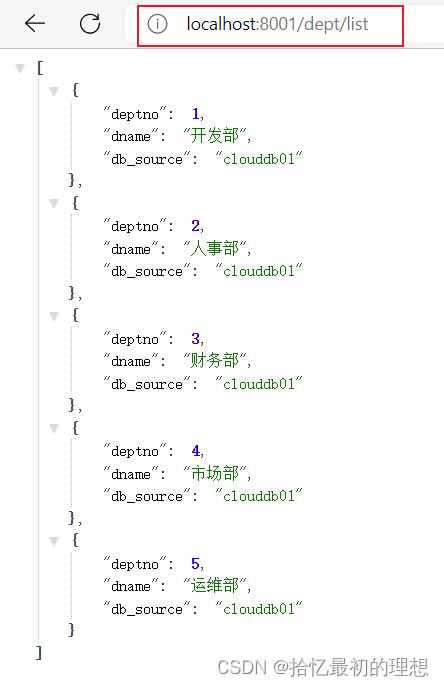
然后启动主启动类进行测试:访问http://localhost:8001/dept/list
出现下面的示例表示服务提供者创建成功
7,搭建服务消费者工程
创建springcloud-consumer-dept-80
导入依赖:
<dependencies>
	<dependency>
        <groupId>com.kuang</groupId>
        <artifactId>microservicecloud-api</artifactId>
        <version>1.0-SNAPSHOT</version>
        <scope>compile</scope>
    </dependency>
    <dependency>
        <groupId>org.springframework.boot</groupId>
        <artifactId>spring-boot-starter-web</artifactId>
    </dependency>
</dependencies>
编写yaml文件
server:
  port: 80
创建消费者的bean
@Configuration
public class ConfigBean
@Bean
public RestTemplate getRestTemplate()
return new RestTemplate(SpringCloud - Spring Cloud 之 Gateway网关,Route路由,Predicate 断言,Filter 过滤器(十三)
阅读本文前可先参考
SpringCloud - Spring Cloud根/父项目,开发准备(二)_MinggeQingchun的博客-CSDN博客
SpringCloud - Spring Cloud 之 Gateway网关(十三)_MinggeQingchun的博客-CSDN博客
Web 有三大组件(监听器 过滤器 servlet),Spring Cloud GateWay 最主要的功能就是路由转发,而在定义转发规则时主要涉及了以下三个核心概念
1、Route(路由)
2、Predicate(断言)
3、Filter(过滤)
一、Routes路由配置
Gateway有两种配置路由方式
1、Java代码配置类路由
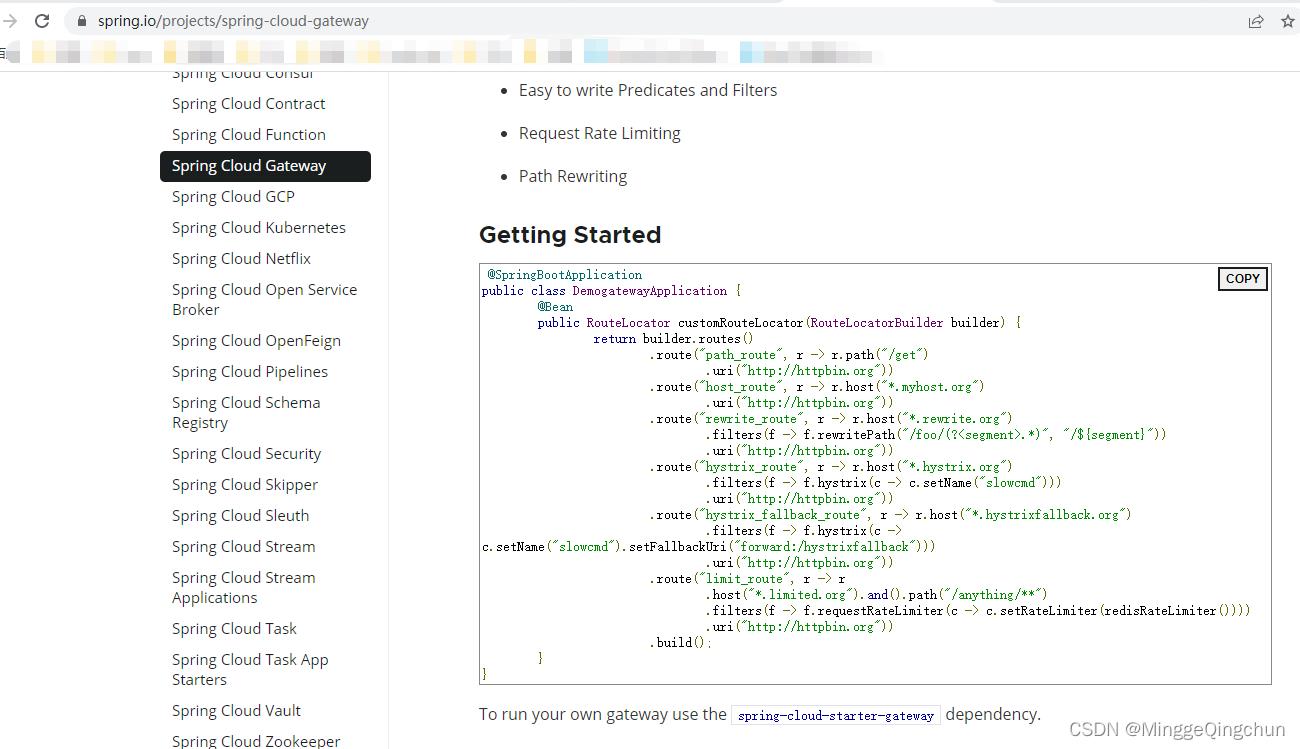
参考官网给出demo Spring Cloud Gateway
@SpringBootApplication
public class DemogatewayApplication
@Bean
public RouteLocator customRouteLocator(RouteLocatorBuilder builder)
return builder.routes()
.route("path_route", r -> r.path("/get")
.uri("http://httpbin.org"))
.route("host_route", r -> r.host("*.myhost.org")
.uri("http://httpbin.org"))
.route("rewrite_route", r -> r.host("*.rewrite.org")
.filters(f -> f.rewritePath("/foo/(?<segment>.*)", "/$segment"))
.uri("http://httpbin.org"))
.route("hystrix_route", r -> r.host("*.hystrix.org")
.filters(f -> f.hystrix(c -> c.setName("slowcmd")))
.uri("http://httpbin.org"))
.route("hystrix_fallback_route", r -> r.host("*.hystrixfallback.org")
.filters(f -> f.hystrix(c -> c.setName("slowcmd").setFallbackUri("forward:/hystrixfallback")))
.uri("http://httpbin.org"))
.route("limit_route", r -> r
.host("*.limited.org").and().path("/anything/**")
.filters(f -> f.requestRateLimiter(c -> c.setRateLimiter(redisRateLimiter())))
.uri("http://httpbin.org"))
.build();
在 springcloud-7-service-eureka-gateway 模块总 自定义一个配置类 GatewayRouteConfig
import org.springframework.cloud.gateway.route.RouteLocator;
import org.springframework.cloud.gateway.route.builder.RouteLocatorBuilder;
import org.springframework.context.annotation.Bean;
import org.springframework.context.annotation.Configuration;
/**
* 路由配置类
*/
@Configuration
public class GatewayRouteConfig
/**
* 代码的路由 和 application.yml文件 不冲突,都可以用
* 如果 uri后面给了一个访问地址 和匹配地址相同,就不会再拼接
*/
@Bean
public RouteLocator customRoiteLocator(RouteLocatorBuilder builder)
//以下url从B站中引用
return builder.routes()
.route("movie-id",r->r.path("/movie").uri("https://www.bilibili.com/movie/?spm_id_from=333.1007.0.0"))
.route("douga-id",r->r.path("/v/douga").uri("https://www.bilibili.com/v/douga/?spm_id_from=333.1007.0.0"))
.build();
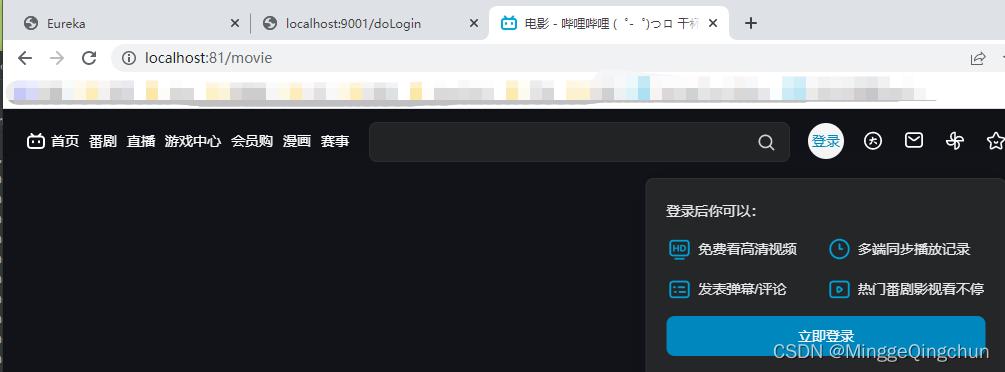
启动springboot 类
输入访问 http://localhost:81/movie
即会跳转到相应 url 进行访问资源
2、application.properties 或 application.yml 配置文件
即 SpringCloud - Spring Cloud 之 Gateway网关(十三)_MinggeQingchun的博客-CSDN博客
文中的 三、Gateway应用方式
application.properties
server.port=81
#eureka注册中心首页的Application这一栏
spring.application.name=springcloud-7-service-eureka-gateway
#每间隔5s,向Eureka服务注册中心发送一次心跳,证明服务是否依然“存活”
eureka.instance.lease-renewal-interval-in-seconds=2
#告诉服务端,如果10s之内没有发送心跳,就代表故障,将本服务踢出
eureka.instance.lease-expiration-duration-in-seconds=10
#告诉服务端,服务实例以IP作为链接,不是取机器名
eureka.instance.prefer-ip-address=false
#注册服务实例ID,,服务ID必须唯一 springcloud-7-service-eureka-gateway
eureka.instance.instance-id=$spring.application.name:$server.port
#注册中心的链接地址 http://eureka8761:8761/eureka,http://eureka8762:8762/eureka,http://eureka8763:8763/eureka
eureka.client.service-url.defaultZone=http://localhost:8761/eureka
#网关路由配置
#开启网关,默认开启
spring.cloud.gateway.enabled=true
#节点 routes 是一个List 对象,其中 routes 集合中中又包含多个对象,每个对象有三个属性(一个 索引[0]代表一个对象)
#路由 id,没有固定规则,但唯一
spring.cloud.gateway.routes[0].id=login-service-route
#匹配后提供服务的路由地址;uri统一资源定位符 url 统一资源标识符
spring.cloud.gateway.routes[0].uri=http://localhost:9001
#以下是断言条件,必选全部符合条件;断言是给某一个路由来设定的一种匹配规则 默认不能作用在动态路由上
#断言,路径匹配,只要Path匹配上了/doLogin 就往 uri 转发 并且将路径带上 注意:Path 中 P 为大写
#也可以全局匹配,如 /service/**
spring.cloud.gateway.routes[0].predicates[0]=Path=/doLogin
#只能是 GET 请求时,才能访问
spring.cloud.gateway.routes[0].predicates[0]=Method=GET,POST
#配置第二个路由规则
spring.cloud.gateway.routes[1].id=admin-service-route
spring.cloud.gateway.routes[1].uri=http://localhost:9001
spring.cloud.gateway.routes[1].predicates[0]=Path=/doAdmin
spring.cloud.gateway.routes[1].predicates[0]=Method=GET,POST
#表明gateway开启服务注册和发现的功能,并且spring cloud gateway自动根据服务发现为每一个服务创建了一个router,这个router将以服务名开头的请求路径转发到对应的服务
spring.cloud.gateway.discovery.locator.enabled=true
#是将请求路径上的服务名配置为小写(服务注册的时候,向注册中心注册时将服务名转成大写了),如以/service/*的请求路径被路由转发到服务名为service的服务上
spring.cloud.gateway.discovery.locator.lower-case-service-id=true
application.yml
server:
port: 81
#eureka注册中心首页的Application这一栏
spring:
application:
name: springcloud-7-service-eureka-gateway
#网关路由配置
cloud:
gateway:
#开启网关,默认开启
enabled: true
#节点 routes 是一个List 对象,其中 routes 集合中中又包含多个对象,每个对象有三个属性(一个 索引[0]代表一个对象)
routes:
#路由 id,没有固定规则,但唯一
- id: login-service-route
#匹配后提供服务的路由地址;uri统一资源定位符 url 统一资源标识符
uri: http://localhost:9001
#以下是断言条件,必选全部符合条件;断言是给某一个路由来设定的一种匹配规则 默认不能作用在动态路由上
predicates:
#断言,路径匹配,只要Path匹配上了/doLogin 就往 uri 转发 并且将路径带上 注意:Path 中 P 为大写
#也可以全局匹配,如 /service/**
- Path=/doLogin
#只能是 GET,POST 请求时,才能访问
- Method=GET,POST
#配置第二个路由规则
- id: admin-service-route
uri: http://localhost:9001
predicates:
- Path=/doAdmin
- Method=GET,POST
#表明gateway开启服务注册和发现的功能,并且spring cloud gateway自动根据服务发现为每一个服务创建了一个router,这个router将以服务名开头的请求路径转发到对应的服务
discovery:
locator:
enabled: true
#是将请求路径上的服务名配置为小写(服务注册的时候,向注册中心注册时将服务名转成大写了),如以/service/*的请求路径被路由转发到服务名为service的服务上
lower-case-service-id: true
eureka:
instance:
#每间隔5s,向Eureka服务注册中心发送一次心跳,证明服务是否依然“存活”
lease-renewal-interval-in-seconds: 2
#告诉服务端,如果10s之内没有发送心跳,就代表故障,将本服务踢出
lease-expiration-duration-in-seconds: 10
#告诉服务端,服务实例以IP作为链接,不是取机器名
prefer-ip-address: false
#注册服务实例ID,,服务ID必须唯一 springcloud-7-service-eureka-gateway
instance-id: $spring.application.name:$server.port
#注册中心的链接地址 http://eureka8761:8761/eureka,http://eureka8762:8762/eureka,http://eureka8763:8763/eureka
client:
service-url:
defaultZone: http://localhost:8761/eureka
3、Gateway 微服务名动态路由,负载均衡
我们设置的 routes的 uri 都是写死的,这样不符合微服务的要求,微服务是只要知道服务的名字,根据名字去找,且直接写死URI就没有负载均衡的效果
默认情况下 Gateway 会根据注册中心的服务列表,以注册中心上微服务名为路径创建动态路
由进行转发,从而实现动态路由的功能
uri 的协议(如 http 协议)为 lb(load Balance),表示启用 Gateway 的负载均衡功能。
lb://serviceName 是 spring cloud gateway 在微服务中自动为我们创建的负载均衡 uri
#匹配后提供服务的路由地址;uri统一资源定位符 url 统一资源标识符
#uri 的协议为 lb(load Balance),表示启用 Gateway 的负载均衡功能
#lb://serviceName 是 spring cloud gateway 在微服务中自动为我们创建的负载均衡 uri;serviceName要和启动的微服务名保持一致
spring.cloud.gateway.routes[0].uri=lb://springcloud-7-service-eureka-gateway-login

#eureka注册中心首页的Application这一栏
spring:
application:
name: springcloud-7-service-eureka-gateway
#网关路由配置
cloud:
gateway:
#开启网关,默认开启
enabled: true
#节点 routes 是一个List 对象,其中 routes 集合中中又包含多个对象,每个对象有三个属性(一个 索引[0]代表一个对象)
routes:
#路由 id,没有固定规则,但唯一
- id: login-service-route
#匹配后提供服务的路由地址;uri统一资源定位符 url 统一资源标识符
#uri: http://localhost:9001
#uri 的协议为 lb(load Balance),表示启用 Gateway 的负载均衡功能
#lb://serviceName 是 spring cloud gateway 在微服务中自动为我们创建的负载均衡 uri;serviceName要和启动的微服务名保持一致
uri: lb://springcloud-7-service-eureka-gateway-login
#以下是断言条件,必选全部符合条件;断言是给某一个路由来设定的一种匹配规则 默认不能作用在动态路由上
predicates:
#断言,路径匹配,只要Path匹配上了/doLogin 就往 uri 转发 并且将路径带上 注意:Path 中 P 为大写
#也可以全局匹配,如 /service/**
- Path=/doLogin
#只能是 GET,POST 请求时,才能访问
- Method=GET,POST
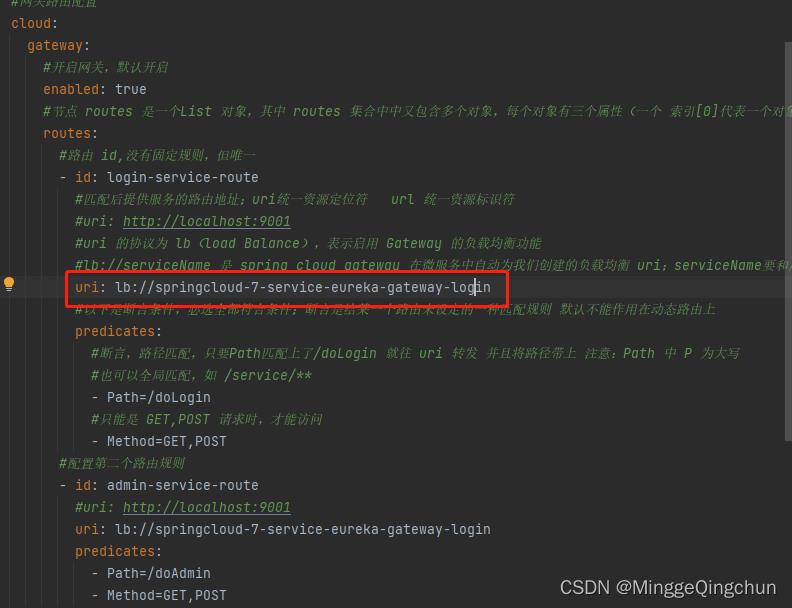
浏览器输入访问http://localhost:81/springcloud-7-service-eureka-gateway-login/doLogin

二、Predicate 断言
Gateway 启动时会去加载一些路由断言工厂(一个 boolean 表达式 )
我们可以通过上述官网查看断言表达式
断言就是路由添加一些条件(通俗的说,断言就是一些布尔表达式,满足条件的返回 true,不满足的返回 false)
Spring Cloud Gateway 将路由作为 Spring WebFlux HandlerMapping 基础架构的一部分进行匹配。
Spring Cloud Gateway 包括许多内置的路由断言工厂。所有这些断言都与 HTTP请求的不同属性匹配。可以将多个路由断言可以组合使用
Spring Cloud Gateway 创建对象时,使用 RoutePredicateFactory 创建 Predicate 对象,Predicate 对象可以赋值给 Route。

规则 实例 说明 Path - Path=/gate/,/rule/ ## 当请求的路径为gate、rule开头的时,转发到http://localhost:9023服务器上 Before - Before=2020-01-20T17:42:47.789-07:00[America/Denver] 在某个时间之前的请求才会被转发到 http://localhost:9023服务器上 After - After=2020-01-20T17:42:47.789-07:00[America/Denver] 在某个时间之后的请求才会被转发 Between - Between=2020-01-20T17:42:47.789-07:00[America/Denver],2020-01-21T17:42:47.789-07:00[America/Denver] 在某个时间段之间的才会被转发 Cookie - Cookie=chocolate, ch.p 名为chocolate的表单或者满足正则ch.p的表单才会被匹配到进行请求转发 Header - Header=X-Request-Id, \\d+ 携带参数X-Request-Id或者满足\\d+的请求头才会匹配 Host - Host=www.hd123.com 当主机名为www.hd123.com的时候直接转发到http://localhost:9023服务器上 Method - Method=GET 只有GET方法才会匹配转发请求,还可以限定POST、PUT等请求方式
application.yml配置文件
server:
port: 81
spring:
application:
name: gateway-81
cloud:
gateway:
enabled: true #开启网关,默认是开启的
routes: #设置路由,注意是数组,可以设置多个,按照 id 做隔离
- id: user-service #路由 id,没有要求,保持唯一即可
uri: lb://provider #使用 lb 协议 微服务名称做负均衡
predicates: #断言匹配
- Path=/info/** #和服务中的路径匹配,是正则匹配的模式
- After=2020-01-20T17:42:47.789-07:00[Asia/Shanghai] #此断言匹配发生在指定 日期时间之后的请求,ZonedDateTime dateTime=ZonedDateTime.now()获得
- Before=2020-06-18T21:26:26.711+08:00[Asia/Shanghai] #此断言匹配发生在指定 日期时间之前的请求
- Between=2020-06-18T21:26:26.711+08:00[Asia/Shanghai],2020-06-18T21:32:26.711+08:00[Asia/Shanghai] #此断言匹配发生在指定日期时间之间的请求
- Cookie=name,xiaobai #Cookie 路由断言工厂接受两个参数,Cookie 名称和 regexp(一 个 Java 正则表达式)。此断言匹配具有给定名称且其值与正则表达式匹配的 cookie
- Header=token,123456 #头路由断言工厂接受两个参数,头名称和 regexp(一个 Java 正 则表达式)。此断言与具有给定名称的头匹配,该头的值与正则表达式匹配。
- Host=**.bai*.com:* #主机路由断言工厂接受一个参数:主机名模式列表。该模式是一 个 ant 样式的模式。作为分隔符。此断言匹配与模式匹配的主机头
- Method=GET,POST #方法路由断言工厂接受一个方法参数,该参数是一个或多个参数: 要匹配的 HTTP 方法
- Query=username,cxs #查询路由断言工厂接受两个参数:一个必需的 param 和一个 可选的 regexp(一个 Java 正则表达式)。
- RemoteAddr=192.168.1.1/24 #RemoteAddr 路由断言工厂接受一个源列表(最小大小 1), 这些源是 cidr 符号(IPv4 或 IPv6)字符串,比如 192.168.1.1/24(其中 192.168.1.1 是 IP 地址,24 是子网掩码)。
三、Filter 过滤器
Gateway 里面的过滤器和 Servlet 里面的过滤器,功能差不多,路由过滤器可以用于修改进入
Http 请求和返回 Http 响应
Gateway 中过滤器
1、按生命周期
pre 在业务逻辑之前
post 在业务逻辑之后
2、按种类
GatewayFilter 需要配置某个路由,才能过滤。如果需要使用全局路由,需要配置 DefaultFilters
GlobalFilter 全局过滤器,不需要配置路由,系统初始化作用到所有路由上
全局过滤器 统计请求次数;限流;token 的校验;ip 黑名单拦截 ;跨域本质(filter) ;144 开头的电话;限制一些 ip 的访问
1、自定义 GlobalFilter 全局过滤器
GlobalFilter 是一种作用于所有的路由上的全局过滤器,通过它,我们可以实现一些统一化的业务功能,例如权限认证、IP 访问限制等。当某个请求被路由匹配时,那么所有的 GlobalFilter 会和该路由自身配置的 GatewayFilter 组合成一个过滤器链
import com.fasterxml.jackson.core.JsonProcessingException;
import com.fasterxml.jackson.databind.ObjectMapper;
import org.springframework.cloud.gateway.filter.GatewayFilterChain;
import org.springframework.cloud.gateway.filter.GlobalFilter;
import org.springframework.core.Ordered;
import org.springframework.core.io.buffer.DataBuffer;
import org.springframework.http.HttpHeaders;
import org.springframework.http.HttpStatus;
import org.springframework.http.server.reactive.ServerHttpRequest;
import org.springframework.http.server.reactive.ServerHttpResponse;
import org.springframework.stereotype.Component;
import org.springframework.web.server.ServerWebExchange;
import reactor.core.publisher.Mono;
import java.util.HashMap;
/**
* 自定义全局过滤器
*/
@Component
public class GlobalFilterConfig implements GlobalFilter, Ordered
/**
* 过滤方法
* 过滤器链模式;责任链模式
*/
@Override
public Mono<Void> filter(ServerWebExchange exchange, GatewayFilterChain chain)
//针对请求的过滤,拿到请求的header、url、参数等
// HttpServletRequest 是web里面的
// ServerHttpRequest 是webFlux里面(响应式)
ServerHttpRequest request = exchange.getRequest();
String path = request.getURI().getPath();
System.out.println("path====" + path);
HttpHeaders headers = request.getHeaders();
System.out.println("headers====" + headers);
String methodName = request.getMethod().name();
System.out.println("methodName====" + methodName);
//IPV4、IPV6地址
String hostName = request.getRemoteAddress().getHostName();
System.out.println("hostName====" + hostName);
String ip = request.getHeaders().getHost().getHostString();
System.out.println("ip====" + ip);
// 响应相关的数据
ServerHttpResponse response = exchange.getResponse();
//响应头设置编码
response.getHeaders().set("content-type","application/json;charset=utf-8");
HashMap<String ,Object> map = new HashMap<>(4);
map.put("code", HttpStatus.UNAUTHORIZED.value());
map.put("msg","你未授权");
ObjectMapper objectMapper = new ObjectMapper();
//将一个map转成一个字节数组
byte[] bytes = new byte[0];
try
bytes = objectMapper.writeValueAsBytes(map);
catch (JsonProcessingException e)
e.printStackTrace();
//通过buffer工厂将字节数组包装成一个数据包
DataBuffer wrap = response.bufferFactory().wrap(bytes);
return response.writeWith(Mono.just(wrap));
// 放行 到下一个过滤器
// return chain.filter(exchange);
/**
* 指定顺序的方法,越小越先执行
*/
@Override
public int getOrder()
return 0;

2、IP、Token认证拦截
1、token认证拦截
import com.fasterxml.jackson.core.JsonProcessingException;
import com.fasterxml.jackson.databind.ObjectMapper;
import org.springframework.beans.factory.annotation.Autowired;
import org.springframework.cloud.gateway.filter.GatewayFilterChain;
import org.springframework.cloud.gateway.filter.GlobalFilter;
import org.springframework.core.Ordered;
import org.springframework.core.io.buffer.DataBuffer;
import org.springframework.data.redis.core.StringRedisTemplate;
import org.springframework.http.HttpHeaders;
import org.springframework.http.HttpStatus;
import org.springframework.http.server.reactive.ServerHttpRequest;
import org.springframework.http.server.reactive.ServerHttpResponse;
import org.springframework.stereotype.Component;
import org.springframework.util.CollectionUtils;
import org.springframework.util.StringUtils;
import org.springframework.web.server.ServerWebExchange;
import reactor.core.publisher.Mono;
import java.util.Arrays;
import java.util.HashMap;
import java.util.List;
/**
* token校验
*/
@Component
public class TokenCheckFilter implements GlobalFilter, Ordered
/**
* 指定好放行的路径
*/
public static final List<String> ALLOW_URL = Arrays.asList("/springcloud-7-service-eureka-gateway-login/doLogin", "/myUrl","/doLogin");
@Autowired
private StringRedisTemplate redisTemplate;
/**
* 和前端约定好 一般放在请求头里面 一般 key Authorization value bearer token
* 1、拿到请求url
* 2、判断放行
* 3、拿到请求头
* 4、拿到token
* 5、校验
* 6、放行/拦截
*/
@Override
public Mono<Void> filter(ServerWebExchange exchange, GatewayFilterChain chain)
ServerHttpRequest request = exchange.getRequest();
String path = request.getURI().getPath();
if (ALLOW_URL.contains(path))
return chain.filter(exchange);
// 检查
HttpHeaders headers = request.getHeaders();
List<String> authorization = headers.get("Authorization");
if (!CollectionUtils.isEmpty(authorization))
String token = authorization.get(0);
if (StringUtils.hasText(token))
// 约定好的有前缀的 bearer token
String realToken = token.replaceFirst("bearer ", "");
if (StringUtils.hasText(realToken) && redisTemplate.hasKey(realToken))
return chain.filter(exchange);
// 拦截
ServerHttpResponse response = exchange.getResponse();
response.getHeaders().set("content-type","application/json;charset=utf-8");
HashMap<String, Object> map = new HashMap<>(4);
// 返回401
map.put("code", HttpStatus.UNAUTHORIZED.value());
map.put("msg","未授权");
ObjectMapper objectMapper = new ObjectMapper();
byte[] bytes = new byte[0];
try
bytes = objectMapper.writeValueAsBytes(map);
catch (JsonProcessingException e)
e.printStackTrace();
DataBuffer wrap = response.bufferFactory().wrap(bytes);
return response.writeWith(Mono.just(wrap));
/**
* 这个顺序 最好在0附近 -2 -1 0 1
* @return
*/
@Override
public int getOrder()
return 1;
2、IP认证拦截
import com.fasterxml.jackson.core.JsonProcessingException;
import com.fasterxml.jackson.databind.ObjectMapper;
import org.springframework.cloud.gateway.filter.GatewayFilterChain;
import org.springframework.cloud.gateway.filter.GlobalFilter;
import org.springframework.core.Ordered;
import org.springframework.core.io.buffer.DataBuffer;
import org.springframework.http.server.reactive.ServerHttpRequest;
import org.springframework.http.server.reactive.ServerHttpResponse;
import org.springframework.stereotype.Component;
import org.springframework.web.server.ServerWebExchange;
import reactor.core.publisher.Mono;
import java.util.Arrays;
import java.util.HashMap;
import java.util.List;
/**
* 网关里面 过滤器
* ip拦截
* 请求都有一个源头
* 电话 如:144 开头
* 请求------->gateway------->service
* 黑名单 black_list
* 白名单 white_list
* 根据数量
* 像具体的业务服务 一般黑名单
* 一般像数据库 用白名单
*/
@Component
public class IPCheckFilter implements GlobalFilter, Ordered
/**
* 网关的并发比较高,不要在网关里面直接操作mysql
* 后台系统可以查询数据库,用户量并发量不大
* 如果并发量大 可以查redis 或者 在内存中写好
*/
public static final List<String> BLACK_LIST = Arrays.asList("127.0.0.1", "144.128.139.137");
/**
* 1、获取到ip
* 2、校验ip是否符合规范
* 3、放行 OR 拦截
*/
@Override
public Mono<Void> filter(ServerWebExchange exchange, GatewayFilterChain chain)
ServerHttpRequest request = exchange.getRequest();
String ip = request.getHeaders().getHost().getHostString();
// 查询数据库 看这个ip是否存在黑名单里面
if (!BLACK_LIST.contains(ip))
return chain.filter(exchange);
//拦截
//注:此处如果拦截IP,就要放开 GlobalFilter 的拦截
ServerHttpResponse response = exchange.getResponse();
response.getHeaders().set("content-type","application/json;charset=utf-8");
HashMap<String, Object> map = new HashMap<>(4);
map.put("code", 438);
map.put("msg","你是黑名单");
ObjectMapper objectMapper = new ObjectMapper();
byte[] bytes = new byte[0];
try
bytes = objectMapper.writeValueAsBytes(map);
catch (JsonProcessingException e)
e.printStackTrace();
DataBuffer wrap = response.bufferFactory().wrap(bytes);
return response.writeWith(Mono.just(wrap));
@Override
public int getOrder()
return 0;

3、限流
限流就是限制一段时间内,用户访问资源的次数,减轻服务器压力,限流大致分为两种:
1、IP 限流(5s 内同一个 ip 访问超过 3 次,则限制不让访问,过一段时间才可继续访问)
2.、请求量限流(只要在一段时间内(窗口期),请求次数达到阀值,就直接拒绝后面来的访问了,
过一段时间才可以继续访问)(粒度可以细化到一个 api(url),一个服务)
限流模型:漏斗算法 ,令牌桶算法,窗口滑动算法 计数器算法
令牌桶算法
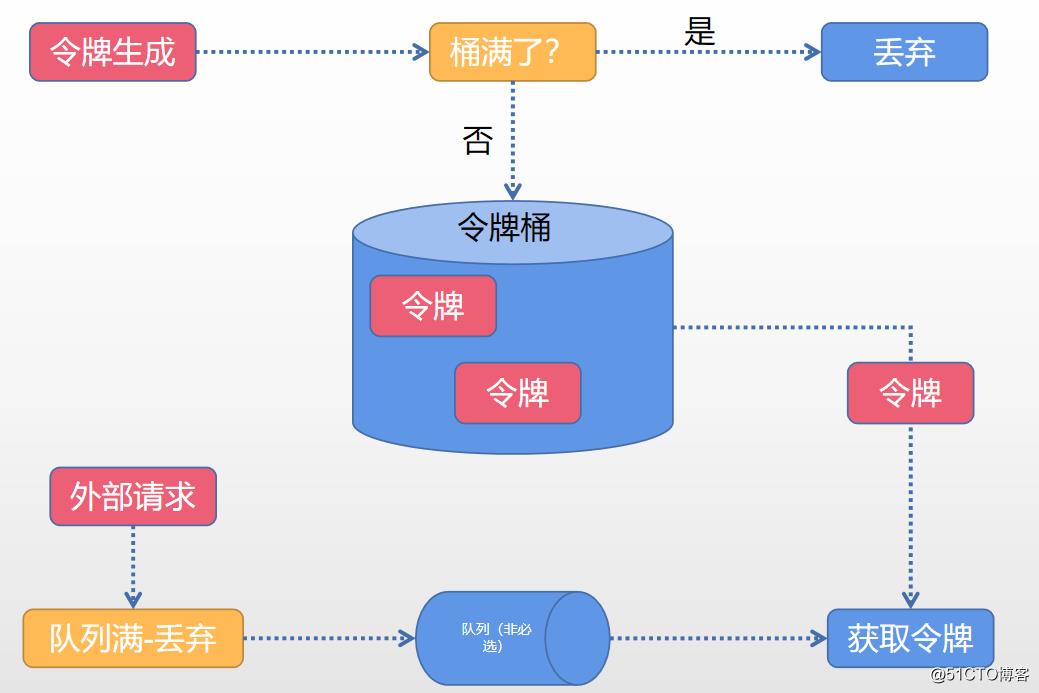
(1)所有的请求在处理之前都需要拿到一个可用的令牌才会被处理;
(2)根据限流大小,设置按照一定的速率往桶里添加令牌
(3)桶设置最大的放置令牌限制,当桶满时、新添加的令牌就被丢弃或者拒绝;
(4)请求达到后首先要获取令牌桶中的令牌,拿着令牌才可以进行其他的业务逻辑,处理完业务逻辑之后,将令牌直接删除;
(5)令牌桶有最低限额,当桶中的令牌达到最低限额的时候,请求处理完之后将不会删除令
牌,以此保证足够的限流
Spring Cloud Gateway 已经内置了一个 RequestRateLimiterGatewayFilterFactory,可以直接使用。
目前 RequestRateLimiterGatewayFilterFactory 的实现依赖于 Redis,所以我们还要引入 spring-boot-starter-data-redis-reactive 依赖
<!--限流要引入 Redis-->
<dependency>
<groupId>org.springframework.boot</groupId>
<artifactId>spring-boot-starter-data-redis-reactive</artifactId>
</dependency>
配置类
import org.springframework.cloud.gateway.filter.ratelimit.KeyResolver;
import org.springframework.context.annotation.Bean;
import org.springframework.context.annotation.Configuration;
import org.springframework.context.annotation.Primary;
import reactor.core.publisher.Mono;
/**
* 自定义请求限流
*/
@Configuration
public class RequestRateLimiterConfig
// 针对某一个接口,ip来限流,如/doLogin,每一个ip,10s只能访问3次
@Bean
@Primary // 主候选的
public KeyResolver ipKeyResolver()
return exchange -> Mono.just(exchange.getRequest().getHeaders().getHost().getHostString());
// 针对这个路径来限制 /doLogin
// api 就是 接口 外面一般把gateway api网关 新一代网关
@Bean
public KeyResolver apiKeyResolver()
return exchange -> Mono.just(exchange.getRequest().getPath().value());
需要添加一个 @Primary // 主候选的 注解,不然报如下错误

启动快速访问
4、CORS跨域配置
@Configuration
public class CorsConfig
@Bean
public CorsWebFilter corsFilter()
CorsConfiguration config = new CorsConfiguration();
config.addAllowedMethod("*");
config.addAllowedOrigin("*");
config.addAllowedHeader("*");
UrlBasedCorsConfigurationSource source = new UrlBasedCorsConfigurationSource(new PathPatternParser());
source.registerCorsConfiguration("/**", config);
return new CorsWebFilter(source);
或者 yml 文件配置
spring:
cloud:
gateway:
globalcors:
corsConfigurations: '[/**]': // 针对哪些路径
allowCredentials: true // 这个是可以携带 cookie
allowedHeaders: '*'
allowedMethods: '*' allowedOrigins: '*'
以上是关于SpringCloud-springcloud简介的主要内容,如果未能解决你的问题,请参考以下文章