HBuilderX uni-app简单实现静态登录页面(实例)
Posted 和风微凉
tags:
篇首语:本文由小常识网(cha138.com)小编为大家整理,主要介绍了HBuilderX uni-app简单实现静态登录页面(实例)相关的知识,希望对你有一定的参考价值。
本章用到......uni-app页面跳转uni.navigateTo方法、uni.navigateBack方法。uni-app简单实现邮箱验证码发送点击后读秒样式。登录账号、密码正则表达式验证等
适合刚入门的小伙伴,大佬就没必要看了
静态页面!静态页面!没有绑定后端数据接口
目录
一、HBuilderX下载
https://dcloud.io/hbuilderx.html
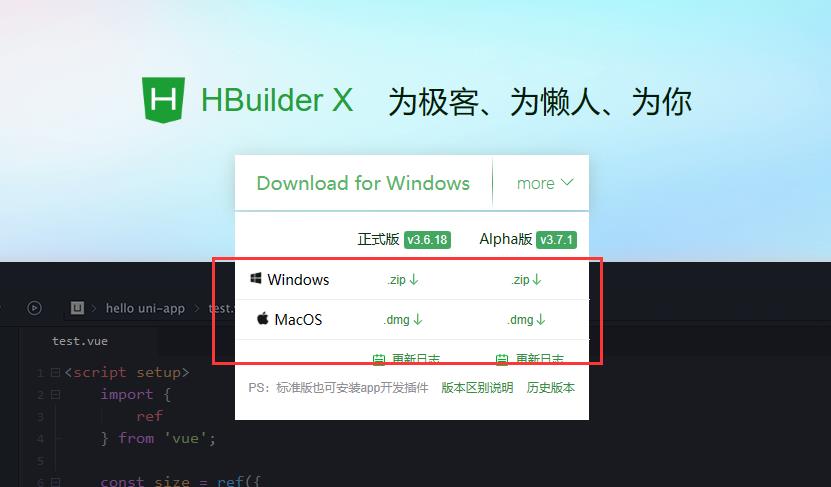
官网直接下载解压即可
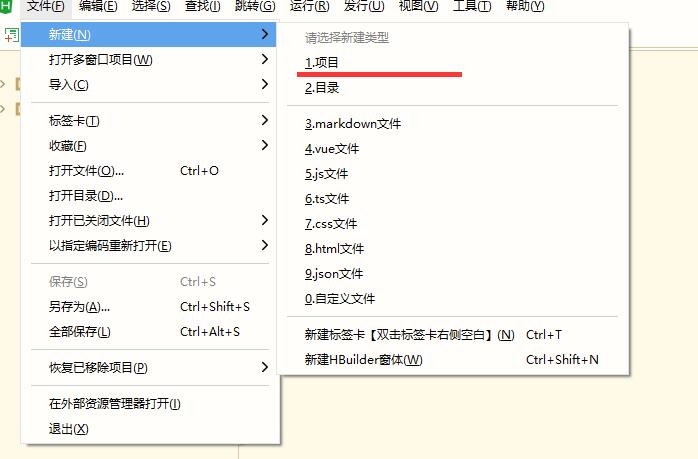
二、创建uni-app项目
文件-新建-项目
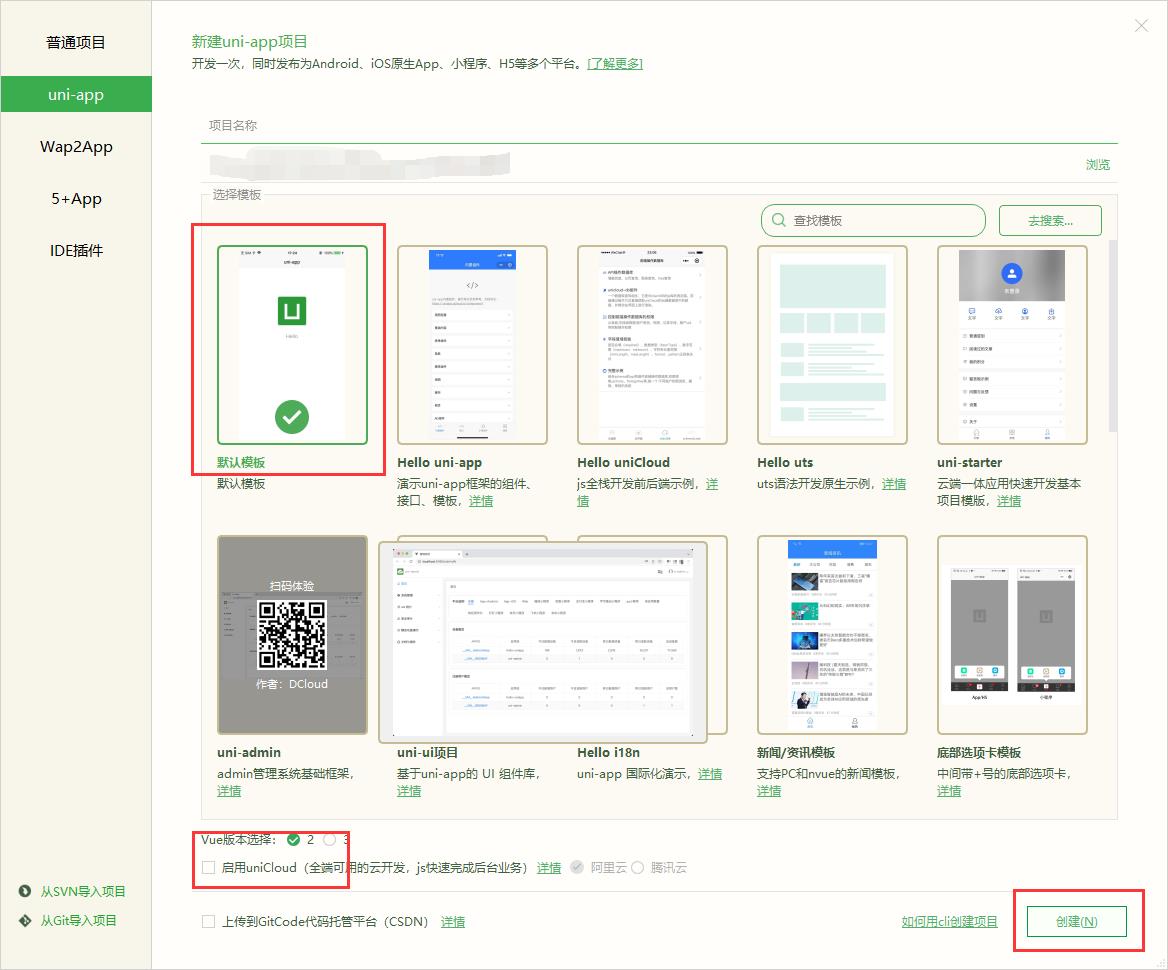
我这里直接选择默认模板,Vue版本、uniCloud自行选择即可
创建完成后自动生成文件夹
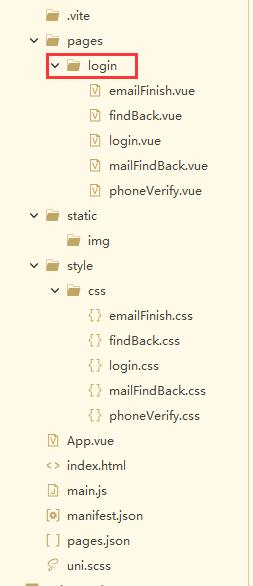
文件名这里自动生成原本是index,文件名自行定义即可
页面文件自己新建Vue文件即可
pages.json配置文件
注意!!这个文件后续如果需要新添加新页面时这个文件里一定要配置参数不然页面出不来,代码格式看下面代码↓↓↓↓↓↓↓↓↓
	// 设置单页面
	"pages": [ //pages数组中第一项表示应用启动页,参考:https://uniapp.dcloud.io/collocation/pages

			"path": "pages/login/login",
			"style":
				// 设置顶部导航栏
				"navigationBarTitleText": "",
				"navigationBarBackgroundColor": "#FFFFFF"

		,

			"path": "pages/login/findBack",
			"style":
				"navigationBarTitleText": "找回密码"

		,

			"path": "pages/login/mailFindBack",
			"style":
				"navigationBarTitleText": "邮箱找回密码"

		,

			"path": "pages/login/phoneVerify",
			"style":
				"navigationBarTitleText": "",
				"navigationBarBackgroundColor": "#FFFFFF"

		,

			"path": "pages/login/emailFinish",
			"style":
				"navigationBarTitleText": ""


            //新添加的Vue页面配置!!!
			"path": "",
			"style":
				"navigationBarTitleText": ""


	],
	// 设置全部页面
	"globalStyle":
		"navigationBarTextStyle": "black",
		"navigationBarTitleText": "uni-app",
		"navigationBarBackgroundColor": "#F8F8F8",
		"backgroundColor": "#F8F8F8"
	,
	"uniIdRouter": ,

	// 设置底部导航栏
	"tabBar":
类似navigationBarTitleText(导航栏text)、navigationBarBackgroundColor(导航栏背景色)等等属性可以查看相关资料自行配置即可
pages里设置单页面参数,每个页面配置对应path路径参数
globalStyle里设置全局页面参数
js、josn、scss文件等等其他配置文件这里就不多说了自行研究吧!!!因为我也还没搞清楚到底怎么用哈哈哈
进入正题↓↓↓↓↓↓↓↓↓↓↓↓↓代码看着有些乱........凑合看慢慢理解吧
代码里的src图片链接自行修改!!!!(还有css里的URL)
三、登录页面
先看一下效果图
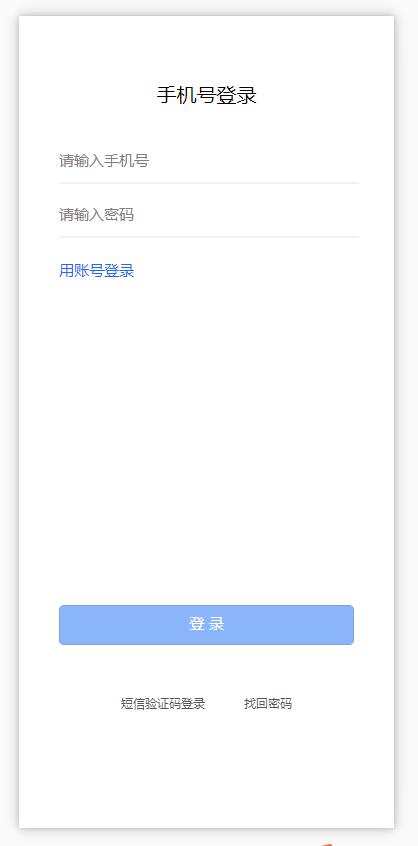
login.vue页面
<!-- 登录页面 -->
<template>
	<view class="flex-col flex-auto group">
	  <text class="self-center text_2" v-if="type==1000">手机号登录</text>
	  <text class="self-center text_2" v-if="type==2000">账号登录</text>
	  <!-- 手机号登录 -->
	  <view class="" v-if="type==1000">
		<view class="flex-col justify-start items-start text-wrapper">
		  <input type="text" class="font_1" @input="onInput" placeholder="请输入手机号" v-model="phoneNumber">
		</view>
		<!-- svg画线 -->
		<view style="height: 1px;">
			<svg xmlns="http://www.w3.org/2000/svg" version="1.1">
			  <line x1="0" y1="0" x2="400" y2="0" style="stroke:rgb(0,0,0);stroke-width:0.2" />
			</svg>
		</view>

		<view class="flex-col justify-start items-start text-wrapper_2">
		  <input type="text" password="true" class="font_1" @input="onInput"  placeholder="请输入密码" v-model="phonePassword">
		</view>

		<!-- svg画线 -->
		<view style="height: 1px;">
			<svg xmlns="http://www.w3.org/2000/svg" version="1.1">
			  <line x1="0" y1="0" x2="400" y2="0" style="stroke:rgb(0,0,0);stroke-width:0.2" />
			</svg>
		</view>
	  </view>
	  <!-- 账号登录 -->
	  <view class="" v-if="type==2000">
		<view class="flex-col justify-start items-start text-wrapper">
		  <input type="text" class="font_1" @input="onInput" placeholder="请输入用户名" v-model="idNumber">
		</view>
		<!-- svg画线 -->
		<view style="height: 1px;">
			<svg xmlns="http://www.w3.org/2000/svg" version="1.1">
			  <line x1="0" y1="0" x2="400" y2="0" style="stroke:rgb(0,0,0);stroke-width:0.2" />
			</svg>
		</view>
		<view class="flex-col justify-start items-start text-wrapper_2">
		  <input type="text" password="true" class="font_1" @input="onInput" placeholder="请输入用户密码" v-model="idPassword">
		</view>
		<!-- svg画线 -->
		<view style="height: 1px;">
			<svg xmlns="http://www.w3.org/2000/svg" version="1.1">
			  <line x1="0" y1="0" x2="400" y2="0" style="stroke:rgb(0,0,0);stroke-width:0.2" />
			</svg>
		</view>
	  </view>

	  <view class="self-start font_1 text_3" @click="type=2000" v-if="type==1000">用账号登录</view>
	  <view class="self-start font_1 text_3" @click="type=1000" v-if="type==2000">用手机号登录</view>
	  <!-- 登录按钮1 -->
	  <view class="flex-col justify-start items-center button" v-if="btnShow">
		  <button class="font_1 text_4" @click="onSubmit">登 录</button>
	  </view>
	  <!-- 登录按钮2 -->
	  <view class="flex-col justify-start items-center button2" v-else>
		  <button class="font_1 text_66">登 录</button>
	  </view>


	  <view class="flex-row justify-between group_2" v-if="type==1000">
		<text class="font_2" @click="onPageJump('/pages/login/phoneVerify')">短信验证码登录</text>
		<text class="font_2" @click="onPageJump('/pages/login/findBack')">找回密码</text>
	  </view>
	  <view class="flex-row justify-between group_3" v-else>
		<text class="font_2" @click="onPageJump('/pages/login/findBack')">找回密码</text>
	  </view>
	</view>

</template>

<script>
	export default
		components:

		,
		data()
			return
				type: 1000,						//判断登录类型手机登录或账号登录
				phoneNumber:'',					//手机账号
				phonePassword:'',				//手机密码
				idNumber:'',					//账号
				idPassword:'',					//账号密码
				btnShow:false,					//判断登录按钮显示隐藏
				timeOut:null,					//添加定时器

		,
		onLoad()

		,
		created()

		,
		// 方法
		methods:
			// 找回密码跳转页面
			onPageJump(url)
				uni.navigateTo(
					url: url
				);
			,
			// 判断显示登录按钮
			onInput()
				this.timeOut && clearTimeout(this.timeOut)
				this.timeOut = setTimeout(() =>
					if (this.type == 1000)
						if (this.phoneNumber && this.phonePassword)
							this.btnShow = true;
						 else
							this.btnShow = false;

					 else
						if (this.idNumber && this.idPassword)
							this.btnShow = true;
						 else
							this.btnShow = false;


				, 100);
			,
			// 点击登录
			onSubmit()
				// 判断登录方式为手机号登录
				if(this.type==1000)
					// 判断验证手机号
					if(!this.phoneNumber)
						uni.showToast(
							title: '请输入手机号',
							icon: 'none',
						);
						return;

					const phoneNumber= /^(0|86|17951)?(13[0-9]|15[012356789]|17[678]|18[0-9]|14[57])[0-9]8$/;
					if(!phoneNumber.test(this.phoneNumber))
						uni.showToast(
							title: '手机号输入不正确',
							icon: 'none',
						);
						return;

					// 判断验证手机密码
					if(!this.phonePassword)
						uni.showToast(
							title: '请输入密码',
							icon: 'none',
						);
						return;

					uni.showToast(
						title: '正在登录',
						icon: 'loading',
					);
				else
					// 判断验证账号
					if(!this.idNumber)
						uni.showToast(
							title: '请输入账号',
							icon: 'none',
						);
						return;

					// 判断验证账号密码
					if(!this.idPassword)
						uni.showToast(
							title: '请输入账号密码',
							icon: 'none',
						);
						return;

					uni.showToast(
						title: '正在登录',
						icon: 'loading',
					);

			,


</script>

<style>
	@import"../../style/css/login.css";
</style>
一个小tips:
先说一下这个页面↑↑↑↑↑↑↑↑↑↑↑↑↑↑
svg因为我这里账号、密码input输入框的border边框要设置成小数1px以下0.1px、0.2px、0.3px等等,所以这里用了svg的画图,如果有小伙伴碰到同样问题可以参考一下,不需要的直接style里直接设置border参数即可
uni.showToast是uni-app弹出框的方法直接用就行,参数么。。自己研究研究就行 (例:icon图标参数有四种类型none、loading、success、error)
style外部引用css样式直接用@import相对路径即可
login.css文件
style样式最好还是用自己写的就别直接复制了,我这里用的是平台自动生成的所以比较乱随便看看就行了看多了头疼(仅供参考全局样式可以直接略过)
/************************************************************
	** 全局样式 **                               **
	************************************************************/
	html
	  font-size: 16px;


	body
	  margin: 0;
	  font-family: -apple-system, BlinkMacSystemFont, 'Segoe UI', 'Roboto', 'Oxygen', 'Ubuntu', 'Cantarell', 'Fira Sans',
	    'Droid Sans', 'Helvetica Neue', 'Microsoft Yahei', sans-serif;
	  -webkit-font-smoothing: antialiased;
	  -moz-osx-font-smoothing: grayscale;


	view,
	image,
	text
	  box-sizing: border-box;
	  flex-shrink: 0;


	#app
	  width: 100vw;
	  height: 100vh;


	.flex-row
	  display: flex;
	  flex-direction: row;


	.flex-col
	  display: flex;
	  flex-direction: column;


	.justify-start
	  justify-content: flex-start;


	.justify-end
	  justify-content: flex-end;


	.justify-center
	  justify-content: center;


	.justify-between
	  justify-content: space-between;


	.justify-around
	  justify-content: space-around;


	.justify-evenly
	  justify-content: space-evenly;


	.items-start
	  align-items: flex-start;


	.items-end
	  align-items: flex-end;


	.items-center
	  align-items: center;


	.items-baseline
	  align-items: baseline;


	.items-stretch
	  align-items: stretch;


	.self-start
	  align-self: flex-start;


	.self-end
	  align-self: flex-end;


	.self-center
	  align-self: center;


	.self-baseline
	  align-self: baseline;


	.self-stretch
	  align-self: stretch;


	.flex-1
	  flex: 1 1 0%;


	.flex-auto
	  flex: 1 1 auto;


	.grow
	  flex-grow: 1;


	.grow-0
	  flex-grow: 0;


	.shrink
	  flex-shrink: 1;


	.shrink-0
	  flex-shrink: 0;


	.relative
	  position: relative;


	/* ---------------------------------------------------------------------- */

	.group
	  padding: 20px 40px 10px;
	  overflow-y: auto;

	.text_2
	  color: #020202;
	  font-size: 20px;
	  font-family: 'PingFang SC';
	  line-height: 28px;
	  text-align: center;

	.text-wrapper
	  margin-top: 42px;
	  padding-bottom: 12px;
	  /* border-bottom: solid 1px #888888; */

	.font_1
	  width: 100%;
	  font-size: 15px;
	  font-family: 'PingFang SC';
	  line-height: 21px;
	  color: #00000;

	.text-wrapper_2
	  padding: 20px 0 12px;
	  /* border-bottom: solid 1px #888888; */

	.text_3
	  margin-top: 22px;
	  color: #166bf8;

	/* 登录按钮1 */
	.button button
	  margin-top: 324px;
	  padding: 8px 0 11px;
	  /* background-color: #166bf880; */
	  background-image: url('。。。。。。。。。。。。。。。。。。。。');
	  background-size: 100% 100%;
	  background-repeat: no-repeat;
	  border-radius: 5px;
	  width: 100%;

	.text_4
	  color: #ffffff;

	.group_2
	  padding: 50px 62px;

	.group_3
	  padding: 50px 42%;

	.font_2
	  font-size: 12px;
	  font-family: 'PingFang SC';
	  line-height: 17px;
	  color: #555555;

	/*  登录按钮2*/
	.button2 button
	  width: 100%;
	  margin-top: 324px;
	  padding: 8px 0 11px;
	  background-color: #166bf880;
	  border-radius: 5px;
	  line-height: 21px;
	  font-size: 15px;

	.text_66
	  color: #ffffff;
四、手机短信验证页面
点击登录页面上的短信验证码登录后跳转到此页,跳转方法会用到uni.navigateTo方法在登录页面看代码自行理解吧↑↑↑↑↑↑↑↑↑↑↑
跳转、返回的方法参考文档:
 https://www.bookstack.cn/read/uniapp-api/spilt.5.ead34267bd06d88a.md
注意!!添加新页面的时候上面的↑↑↑↑↑↑↑↑↑↑↑pages.json配置文件也需要添加对应的页面配置才行不然页面出不来
效果图:
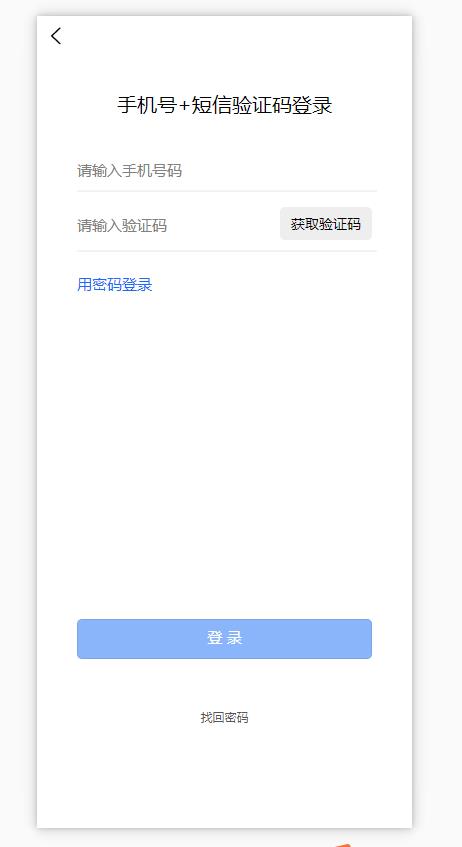
phoneVerify.vue页面
<!-- 手机验证找回密码 -->
<template>
	<view class="flex-col flex-auto group">
	  <text class="self-center text_2">手机号+短信验证码登录</text>
	  <view class="flex-col group_2 space-y-10">
		<input type="number" class="self-start font_1" @input="onInput" placeholder="请输入手机号码" v-model="phoneNumber">
	    <!-- svg画线 -->
	    <view style="height: 1px;">
	    	<svg xmlns="http://www.w3.org/2000/svg" version="1.1">
	    	  <line x1="0" y1="0" x2="400" y2="0" style="stroke:rgb(0,0,0);stroke-width:0.2" />
	    	</svg>
	    </view>

		<view class="flex-row justify-between group_3">
		  <input type="number" class="self-start font_1 text_4" maxlength="6" @input="onInput" placeholder="请输入验证码" v-model="code">
	      <view class="flex-col justify-start items-center self-center text-wrapper">
	        <!-- <text class="font_1 text_3" @click="onSetCode()">获取验证码</text> -->
			<text v-bind:class="acquire:isGrey,again:!isGrey"
			           v-bind:disabled="dis" type="primary"
			           @click="onSetCode">
			     <span v-if="show">获取验证码</span>
			     <span v-else>重新发送(counts)</span>
			</text>
	      </view>
	    </view>

		<!-- svg画线 -->
		<view style="height: 1px;">
			<svg xmlns="http://www.w3.org/2000/svg" version="1.1">
			  <line x1="0" y1="0" x2="400" y2="0" style="stroke:rgb(0,0,0);stroke-width:0.2" />
			</svg>
		</view>
	  </view>
	  <view class="self-start font_1 text_5" @click="onPageJump('/pages/login/login')">用密码登录</view>
	  <view class="flex-col justify-start items-center button" v-if="btnShow">
		  <button class="font_1 text_6" @click="onSubmit()">登 录</button>
	  </view>
	  <!-- 登录按钮2 -->
	  <view class="flex-col justify-start items-center button2" v-else>
	  		  <button class="font_1 text_66">登 录</button>
	  </view>
	  <text class="self-center text_7" @click="onPageJump('/pages/login/findBack')">找回密码</text>
	</view>

</template>

<script>
	export default
	  components:

	  ,
	  data()
	    return
			phoneNumber:'',			//手机号验证
			code:'',				//验证码
			dis: false,		 //判断是否禁用状态
			show: true,		 //判断显示为发送还是重新发送
			isGrey: false,   //class判断按钮样式
			timer: null,     //设置计时器,
			count: "",		 //定义常量
			num:'',			 //判断是否为第一次点击
			btnShow:false,					//判断登录按钮显示隐藏
			timeOut:null,					//添加定时器
		;
	  ,
	  // 方法
	  methods:
		  // 找回密码跳转页面
		  onPageJump(url)
		  	uni.navigateTo(
		  		url: url
		  	);
		  ,

		  // 发送验证码
		  onSetCode()
		    let TIME_COUNT = 60;
		    if (!this.timer)
				uni.showToast(
					title: '已发送验证码',
					icon: 'success',
				);
				this.count = TIME_COUNT;
				this.isGrey = true;
				this.show = false;
				this.dis = true;
				this.timer = setInterval(() =>
				  if (this.count > 0 && this.count <= TIME_COUNT)
						this.count--;
					 else
						this.dis = false;
						this.isGrey = false;
						this.show = true;
						clearInterval(this.timer);
						this.timer = null;

				, 1000);

		  ,
		  // 判断显示登录按钮
		  onInput()
		  	this.timeOut && clearTimeout(this.timeOut)
		  	this.timeOut = setTimeout(() =>
				if (this.phoneNumber && this.code)
					this.btnShow = true;
				 else
					this.btnShow = false;

		  	, 100);
		  ,
		  //点击登录
		  onSubmit()
			 // 判断验证手机号
			 if(!this.phoneNumber)
			 	uni.showToast(
			 		title: '请输入手机号',
			 		icon: 'none',
			 	);
			 	return;

			 const phoneNumber= /^(0|86|17951)?(13[0-9]|15[012356789]|17[678]|18[0-9]|14[57])[0-9]8$/;
			 if(!phoneNumber.test(this.phoneNumber))
			 	uni.showToast(
			 		title: '手机号输入不正确',
			 		icon: 'none',
			 	);
			 	return;

			 // 判断验证码
			 if(!this.code)
			 	uni.showToast(
			 		title: '请输入验证码',
			 		icon: 'none',
			 	);
			 	return;

			 uni.showToast(
			 	title: '请稍后...',
			 	icon: 'loading',
			 );
		  ,

	    ,
	;
</script>

<style>
	@import"../../style/css/phoneVerify.css";
	/* 验证码按钮样式 */
	.acquire
	   padding: 3px 0px;
	   background-color: #eeeeee;
	   border-radius: 5px;
	   width: 92px;
	   height: 29px;
	   color: #666;
	   font-size: 14px;
	   line-height: 20px;
	   text-align: center;

	  .again
	    padding: 3px 0px;
	    background-color: #eeeeee;
	    border-radius: 5px;
	    width: 92px;
	    height: 29px;
		color: #000000;
		font-size: 14px;
		line-height: 20px;
		text-align: center;


</style>
这个页面因为是静态的没有后端接口只是做的样式,所以验证码读秒这块内容刷新页面时会重置重新开始读秒这里注意一下就行,如果接后端接口实现的话原理也差不多自己慢慢理解就行
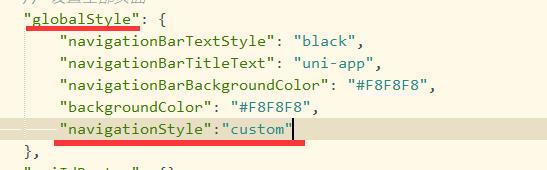
大概就长这样:

至于左上角这个返回键的小钮钮是uni-app创建项目时自带的 pages.json配置文件可以配置关闭 用("navigationStyle":"custom")这个参数就能关闭,单页面关闭在pages里配置,全部关闭在globalStyle里配置。
大概长这样:

也可以在Vue页面的方法里用uni.navigateBack方法自己写一个返回的方法。uni.navigateBack返回页面的方法具体怎么用↓↓↓↓↓↓↓↓↓↓↓↓↓↓↓↓↓↓↓后面的页面会有用到
phoneVerify.css文件
/************************************************************
	** 全局样式 **
	************************************************************/
	html
	  font-size: 16px;


	body
	  margin: 0;
	  font-family: -apple-system, BlinkMacSystemFont, 'Segoe UI', 'Roboto', 'Oxygen', 'Ubuntu', 'Cantarell', 'Fira Sans',
	    'Droid Sans', 'Helvetica Neue', 'Microsoft Yahei', sans-serif;
	  -webkit-font-smoothing: antialiased;
	  -moz-osx-font-smoothing: grayscale;


	view,
	image,
	text
	  box-sizing: border-box;
	  flex-shrink: 0;


	#app
	  width: 100vw;
	  height: 100vh;


	.flex-row
	  display: flex;
	  flex-direction: row;


	.flex-col
	  display: flex;
	  flex-direction: column;


	.justify-start
	  justify-content: flex-start;


	.justify-end
	  justify-content: flex-end;


	.justify-center
	  justify-content: center;


	.justify-between
	  justify-content: space-between;


	.justify-around
	  justify-content: space-around;


	.justify-evenly
	  justify-content: space-evenly;


	.items-start
	  align-items: flex-start;


	.items-end
	  align-items: flex-end;


	.items-center
	  align-items: center;


	.items-baseline
	  align-items: baseline;


	.items-stretch
	  align-items: stretch;


	.self-start
	  align-self: flex-start;


	.self-end
	  align-self: flex-end;


	.self-center
	  align-self: center;


	.self-baseline
	  align-self: baseline;


	.self-stretch
	  align-self: stretch;


	.flex-1
	  flex: 1 1 0%;


	.flex-auto
	  flex: 1 1 auto;


	.grow
	  flex-grow: 1;


	.grow-0
	  flex-grow: 0;


	.shrink
	  flex-shrink: 1;


	.shrink-0
	  flex-shrink: 0;


	.relative
	  position: relative;


	/* ------------------------------------------------ */
	.group
	  padding: 30px 40px 60px;
	  overflow-y: auto;

	.text_2
	  color: #020202;
	  font-size: 20px;
	  font-family: 'PingFang SC';
	  line-height: 28px;

	.group_2
	  margin-top: 42px;
	  /* border-bottom: solid 1px #888888; */

	.space-y-10 > view:not(:first-child),
	.space-y-10 > text:not(:first-child),
	.space-y-10 > image:not(:first-child)
	  margin-top: 10px;

	.font_1
	  font-size: 15px;
	  font-family: 'PingFang SC';
	  line-height: 21px;
	  color: #000000;

	.group_3
	  padding: 5px 0;
	  /* border-top: solid 1px #888888; */

	.text_4
	  margin-top: 8px;

	.text-wrapper
	  padding: 4px 0;
	  background-color: #eeeeee;
	  border-radius: 5px;
	  width: 92px;
	  height: 29px;

	.text_3
	  color: #000000;
	  font-size: 14px;
	  line-height: 20px;

	.text_5
	  margin-top: 22px;
	  color: #166bf8;

	.button button
	  margin-top: 324px;
	  padding: 8px 0 11px;
	  /* background-color: #166bf880; */
	  background-image: url('。。。。。。。。。。。。。。。。。。。。。。');
	  background-size: 100% 100%;
	  background-repeat: no-repeat;
	  border-radius: 5px;
	  width: 100%;

	.text_6
	  color: #ffffff;

	.text_7
	  margin-top: 50px;
	  color: #555555;
	  font-size: 12px;
	  font-family: 'PingFang SC';
	  line-height: 17px;

	/*  登录按钮2*/
	.button2 button
	  width: 100%;
	  margin-top: 324px;
	  padding: 8px 0 11px;
	  background-color: #166bf880;
	  border-radius: 5px;
	  line-height: 21px;
	  font-size: 15px;

	.text_66
	  color: #ffffff;
五、找回密码页面
在登录页面点击找回密码后跳转到此页面
同样在pages.json文件里配置对应页面参数↑↑↑↑↑↑↑↑↑
效果图:
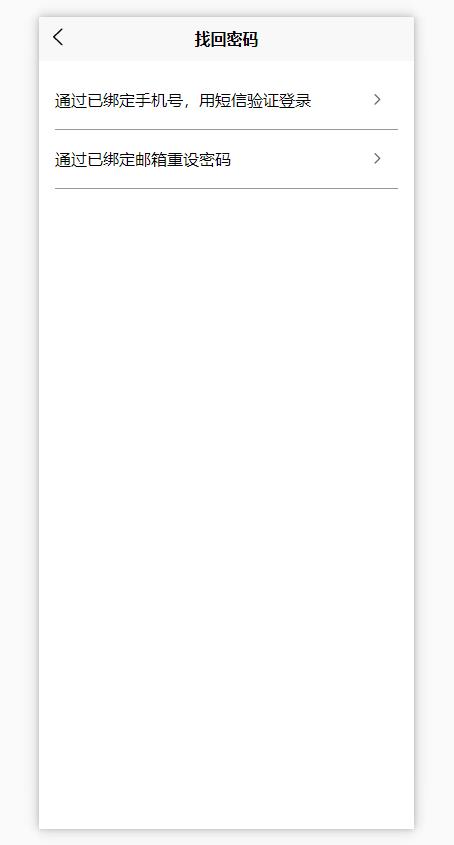
点击通过手机号跳转到手机短信验证页面 也就是第四步的页面点击通过邮箱验证跳转到邮箱验证页面 也就是第六步的页面
findBack.vue页面
<!-- 找回密码 -->
<template>
	<view class="flex-col justify-start flex-auto group_3">
	  <view class="flex-col section">
	    <view class="flex-row justify-between items-center group_4" @click="onPageJump('/pages/login/phoneVerify')">
	      <text class="font_1">通过已绑定手机号,用短信验证登录</text>
	      <image
	        class="image_5"
	        src="https://codefun-proj-user-res-1256085488.cos.ap-guangzhou.myqcloud.com/637d8bf95a7e3f031010c80e/63e351ec66570000128a304a/16758423632990405565.png"
	      />
	    </view>
	    <view class="flex-row justify-between items-center group_4" @click="onPageJump('/pages/login/mailFindBack')">
	      <text class="font_1">通过已绑定邮箱重设密码</text>
	      <image
	        class="image_5"
	        src="。。。。。。。。。。。。。。。"
	      />
	    </view>
	  </view>
	</view>
</template>

<script>
	export default
	  components: ,
	  data()
	    return

		;

	  ,

	  methods:
		  onPageJump(url)
		  	uni.navigateTo(
		  		url:url
		  	)
		  ,
	  ,
	;
</script>

<style>
	@import"../../style/css/findBack.css";
</style>
findBack.css文件
/************************************************************
	** 全局样式 **
	************************************************************/
	html
	  font-size: 16px;


	body
	  margin: 0;
	  font-family: -apple-system, BlinkMacSystemFont, 'Segoe UI', 'Roboto', 'Oxygen', 'Ubuntu', 'Cantarell', 'Fira Sans',
	    'Droid Sans', 'Helvetica Neue', 'Microsoft Yahei', sans-serif;
	  -webkit-font-smoothing: antialiased;
	  -moz-osx-font-smoothing: grayscale;


	view,
	image,
	text
	  box-sizing: border-box;
	  flex-shrink: 0;


	#app
	  width: 100vw;
	  height: 100vh;


	.flex-row
	  display: flex;
	  flex-direction: row;


	.flex-col
	  display: flex;
	  flex-direction: column;


	.justify-start
	  justify-content: flex-start;


	.justify-end
	  justify-content: flex-end;


	.justify-center
	  justify-content: center;


	.justify-between
	  justify-content: space-between;


	.justify-around
	  justify-content: space-around;


	.justify-evenly
	  justify-content: space-evenly;


	.items-start
	  align-items: flex-start;


	.items-end
	  align-items: flex-end;


	.items-center
	  align-items: center;


	.items-baseline
	  align-items: baseline;


	.items-stretch
	  align-items: stretch;


	.self-start
	  align-self: flex-start;


	.self-end
	  align-self: flex-end;


	.self-center
	  align-self: center;


	.self-baseline
	  align-self: baseline;


	.self-stretch
	  align-self: stretch;


	.flex-1
	  flex: 1 1 0%;


	.flex-auto
	  flex: 1 1 auto;


	.grow
	  flex-grow: 1;


	.grow-0
	  flex-grow: 0;


	.shrink
	  flex-shrink: 1;


	.shrink-0
	  flex-shrink: 0;


	.relative
	  position: relative;


	.font_1
	  font-size: 16px;
	  font-family: 'PingFang SC';
	  line-height: 22px;
	  color: #020202;

	.group_3
	  padding: 10px 0 586px;
	  overflow-y: auto;

	.section
	  padding: 0px 16px;
	  background-color: #ffffff;

	.group_4
	  padding: 18px 0;
	  border-bottom: solid 1px #979797;

	.image_5
	  margin-right: 14px;
	  width: 12px;
	  height: 12px;
六、邮箱找回密码页面
效果图:
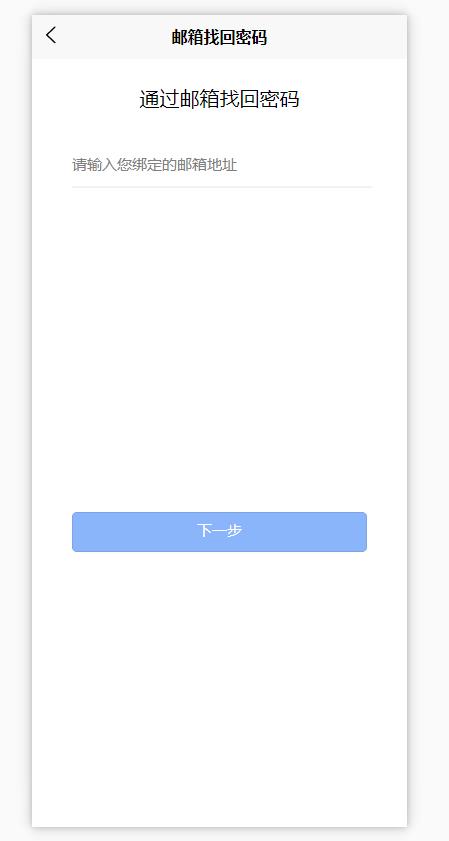
mailFandBack.vue页面
<!-- 邮件找回密码 -->
<template>
	<view class="flex-col flex-auto group">
	  <text class="self-center text_2">通过邮箱找回密码</text>
	  <input type="text" class="self-start font_1 text_3" @input="onInput" placeholder="请输入您绑定的邮箱地址" v-model="email">
	  <!-- svg画线 -->
	  <view style="height: 1px;">
	  	<svg xmlns="http://www.w3.org/2000/svg" version="1.1">
	  	  <line x1="0" y1="0" x2="400" y2="0" style="stroke:rgb(0,0,0);stroke-width:0.2" />
	  	</svg>
	  </view>

	  <view class="flex-col justify-start items-center button" v-if="btnShow">
		  <text class="font_1 text_4" @click="onSubmit()">下一步</text>
	  </view>
	  <!-- 下一步按钮2 -->
	  <view class="flex-col justify-start items-center button2" v-else>
	  		  <button class="font_1 text_66">下一步</button>
	  </view>
	</view>
</template>

<script>
	export default
	  components:

	  ,
	  data()
	    return
			email:'',		//邮箱
			btnShow:false,					//判断登录按钮显示隐藏
			timeOut:null,					//添加定时器
		;
	  ,

	  methods:
		  // 判断显示下一步按钮
		  onInput()
		  	this.timeOut && clearTimeout(this.timeOut)
		  	this.timeOut = setTimeout(() =>
				if (this.email)
					this.btnShow = true;
				 else
					this.btnShow = false;

		  	, 100);
		  ,
		  // 点击下一步
		  onSubmit()
			  if(!this.email)
				  uni.showToast(
				  	title: '请输入邮箱',
				  	icon: 'none',
				  );
				  return;

			  const email= /^\\w3,@\\w2,\\.(com|cn|net|com\\.cn)$/;
			  if(!email.test(this.email))
				uni.showToast(
					title: '邮箱输入不正确',
					icon: 'none',
				);
				return;

			  uni.showToast(
			  	title: '请稍后...',
			  	icon: 'loading',

			  );
			  // 添加定时器延时跳转页面
			  setTimeout(function()
				  uni.navigateTo(
				  	url: '/pages/login/emailFinish'
				  );
			  ,2000)


		,
	;
</script>

<style>
	@import"../../style/css/mailFindBack.css";
</style>
mailFandBack.css文件
/************************************************************
	** 全局样式 **
	************************************************************/

	html
	  font-size: 16px;


	body
	  margin: 0;
	  font-family: -apple-system, BlinkMacSystemFont, 'Segoe UI', 'Roboto', 'Oxygen', 'Ubuntu', 'Cantarell', 'Fira Sans',
	    'Droid Sans', 'Helvetica Neue', 'Microsoft Yahei', sans-serif;
	  -webkit-font-smoothing: antialiased;
	  -moz-osx-font-smoothing: grayscale;


	view,
	image,
	text
	  box-sizing: border-box;
	  flex-shrink: 0;


	#app
	  width: 100vw;
	  height: 100vh;


	.flex-row
	  display: flex;
	  flex-direction: row;


	.flex-col
	  display: flex;
	  flex-direction: column;


	.justify-start
	  justify-content: flex-start;


	.justify-end
	  justify-content: flex-end;


	.justify-center
	  justify-content: center;


	.justify-between
	  justify-content: space-between;


	.justify-around
	  justify-content: space-around;


	.justify-evenly
	  justify-content: space-evenly;


	.items-start
	  align-items: flex-start;


	.items-end
	  align-items: flex-end;


	.items-center
	  align-items: center;


	.items-baseline
	  align-items: baseline;


	.items-stretch
	  align-items: stretch;


	.self-start
	  align-self: flex-start;


	.self-end
	  align-self: flex-end;


	.self-center
	  align-self: center;


	.self-baseline
	  align-self: baseline;


	.self-stretch
	  align-self: stretch;


	.flex-1
	  flex: 1 1 0%;


	.flex-auto
	  flex: 1 1 auto;


	.grow
	  flex-grow: 1;


	.grow-0
	  flex-grow: 0;


	.shrink
	  flex-shrink: 1;


	.shrink-0
	  flex-shrink: 0;


	.relative
	  position: relative;

	/* ------------------------------------------------------------------------------ */

	.group
	  padding: 25px 40px 127px;
	  overflow-y: auto;

	.text_2
	  color: #020202;
	  font-size: 20px;
	  font-family: 'PingFang SC';
	  line-height: 28px;

	.font_1
	  font-size: 15px;
	  font-family: 'PingFang SC';
	  line-height: 21px;

	.text_3
	  margin-top: 42px;
	  margin-bottom: 12px;
	  color: #999999;

	/* .section
	  margin-top: 12px;
	  background-color: #888888;
	  height: 1px;
	 */
	.button
	  margin-top: 324px;
	  padding: 8px 0 11px;
	  /* background-color: #166bf880; */
	  background-image: url('。。。。。。。。。。。。');
	  background-size: 100% 100%;
	  background-repeat: no-repeat;
	  border-radius: 5px;

	.text_4
	  color: #ffffff;

	/*  下一步按钮2*/
	.button2 button
	  width: 100%;
	  margin-top: 324px;
	  padding: 8px 0 11px;
	  background-color: #166bf880;
	  border-radius: 5px;
	  line-height: 21px;
	  font-size: 15px;

	.text_66
	  color: #ffffff;
七、邮箱发送验证成功页面
效果图:
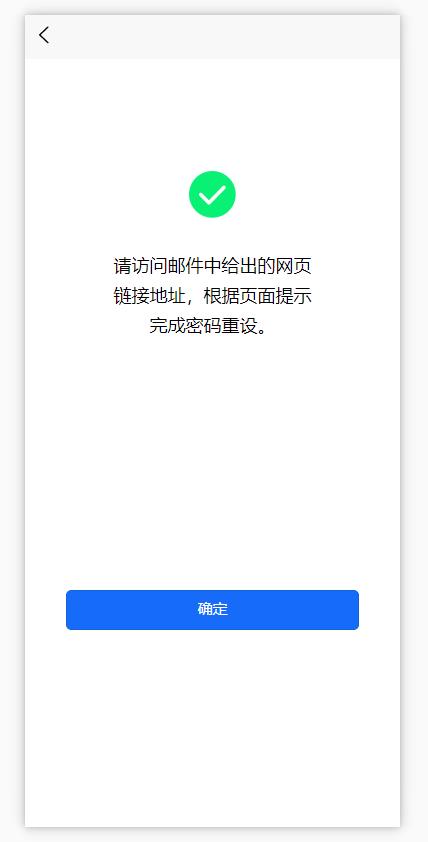
emailFinish.vue页面
<template>
<view class="flex-col flex-auto group">
<view class="flex-col group_2">
<image
class="self-center image_5"
src="。。。。。。。。。。。。。。"
/>
<text class="self-center text_2">请访问邮件中给出的网页链接地址,根据页面提示完成密码重设。</text>
<view class="flex-col justify-start items-center button">
<button class="text_3" @click="Back">确定</button>
</view>
</view>
</view>
</template>
<script>
export default
components:
,
data()
return
;
,
methods:
// 点击确定返回上一页
Back()
// 返回到上一个页面
uni.navigateBack(
delta:1,//返回层数,2则上上页,默认delta:1
)
,
,
;
</script>
<style>
@import"../../style/css/emailFinish.css";
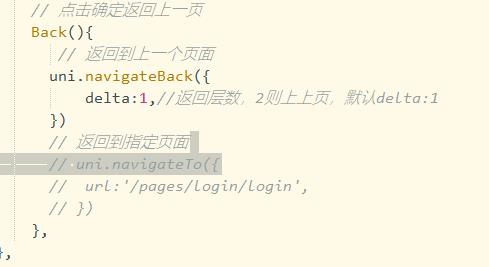
</style>点击返回上一页面可以用uni.navigateBack方法
点击跳转到指定页面可以用uni.navigateTo方法(因为都属于跳转页面也可以用这个方法返回上一页自行理解吧)
大概长这样:
emailFinish.css文件
/************************************************************
	** 全局样式 **
	************************************************************/

	html
	  font-size: 16px;


	body
	  margin: 0;
	  font-family: -apple-system, BlinkMacSystemFont, 'Segoe UI', 'Roboto', 'Oxygen', 'Ubuntu', 'Cantarell', 'Fira Sans',
	    'Droid Sans', 'Helvetica Neue', 'Microsoft Yahei', sans-serif;
	  -webkit-font-smoothing: antialiased;
	  -moz-osx-font-smoothing: grayscale;


	view,
	image,
	text
	  box-sizing: border-box;
	  flex-shrink: 0;


	#app
	  width: 100vw;
	  height: 100vh;


	.flex-row
	  display: flex;
	  flex-direction: row;


	.flex-col
	  display: flex;
	  flex-direction: column;


	.justify-start
	  justify-content: flex-start;


	.justify-end
	  justify-content: flex-end;


	.justify-center
	  justify-content: center;


	.justify-between
	  justify-content: space-between;


	.justify-around
	  justify-content: space-around;


	.justify-evenly
	  justify-content: space-evenly;


	.items-start
	  align-items: flex-start;


	.items-end
	  align-items: flex-end;


	.items-center
	  align-items: center;


	.items-baseline
	  align-items: baseline;


	.items-stretch
	  align-items: stretch;


	.self-start
	  align-self: flex-start;


	.self-end
	  align-self: flex-end;


	.self-center
	  align-self: center;


	.self-baseline
	  align-self: baseline;


	.self-stretch
	  align-self: stretch;


	.flex-1
	  flex: 1 1 0%;


	.flex-auto
	  flex: 1 1 auto;


	.grow
	  flex-grow: 1;


	.grow-0
	  flex-grow: 0;


	.shrink
	  flex-shrink: 1;


	.shrink-0
	  flex-shrink: 0;


	.relative
	  position: relative;

	/* ------------------------------------------------------------------------------ */

	.group
	  padding: 25px 40px 127px;
	  overflow-y: auto;

	.text_2
	  color: #020202;
	  font-size: 20px;
	  font-family: 'PingFang SC';
	  line-height: 28px;

	.font_1
	  font-size: 15px;
	  font-family: 'PingFang SC';
	  line-height: 21px;

	.text_3
	  margin-top: 42px;
	  margin-bottom: 12px;
	  color: #999999;

	/* .section
	  margin-top: 12px;
	  background-color: #888888;
	  height: 1px;
	 */
	.button
	  margin-top: 324px;
	  padding: 8px 0 11px;
	  /* background-color: #166bf880; */
	  background-image: url('。。。。。。。。。。。。。。。');
	  background-size: 100% 100%;
	  background-repeat: no-repeat;
	  border-radius: 5px;

	.text_4
	  color: #ffffff;

	/*  下一步按钮2*/
	.button2 button
	  width: 100%;
	  margin-top: 324px;
	  padding: 8px 0 11px;
	  background-color: #166bf880;
	  border-radius: 5px;
	  line-height: 21px;
	  font-size: 15px;

	.text_66
	  color: #ffffff;
本章也是自己参考相关资料和各位大佬的文章自行整理仅供参考,希望可以帮助到和我一样菜鸡的小伙伴
参考资料:
https://blog.csdn.net/weixin_40614372/article/details/101537653
uni-app官网:
https://uniapp.dcloud.net.cn/component/
登录页面完成后我用的是Strophe.js对接Openfire的接口,然后把Strophe.js的用法加到↑本文的登录页里使用
链接:
基于XMPP服务的Strophe.js用法_和风微凉的博客-CSDN博客
uni-ui简单入门教程 - 如何用HBuilderX为uni-app项目启用uni-ui扩展组件?
须知
- uni-app是一个前端框架
- 简单来说,uni-app的组件,类似HTML的标签,例如a转navigation、span转text等
- uni-app的组件包括 基础组件 (自带免安装) + 扩展组件 (可选装,官方出品uni-ui或者第三方)
- uni-app出品的uni-ui官方手册很坑爹,组件代码是一个文档,效果展示是另一个文档!
【uni-ui效果展示】 https://hellouniapp.dcloud.net.cn/pages/extUI/badge/badge
【uni-ui组件代码】 https://uniapp.dcloud.io/component/uniui/uni-ui - 注意:手册【uni-ui组件代码】是官方组件手册的一小部分
- uni-ui开箱即用,无需配置 (HBuilderX版本3.3.5.20211229或以上)
uni-ui安装
1)没有项目
在HBuilderX新建项目,选择uni-app类别的uni-ui项目,如图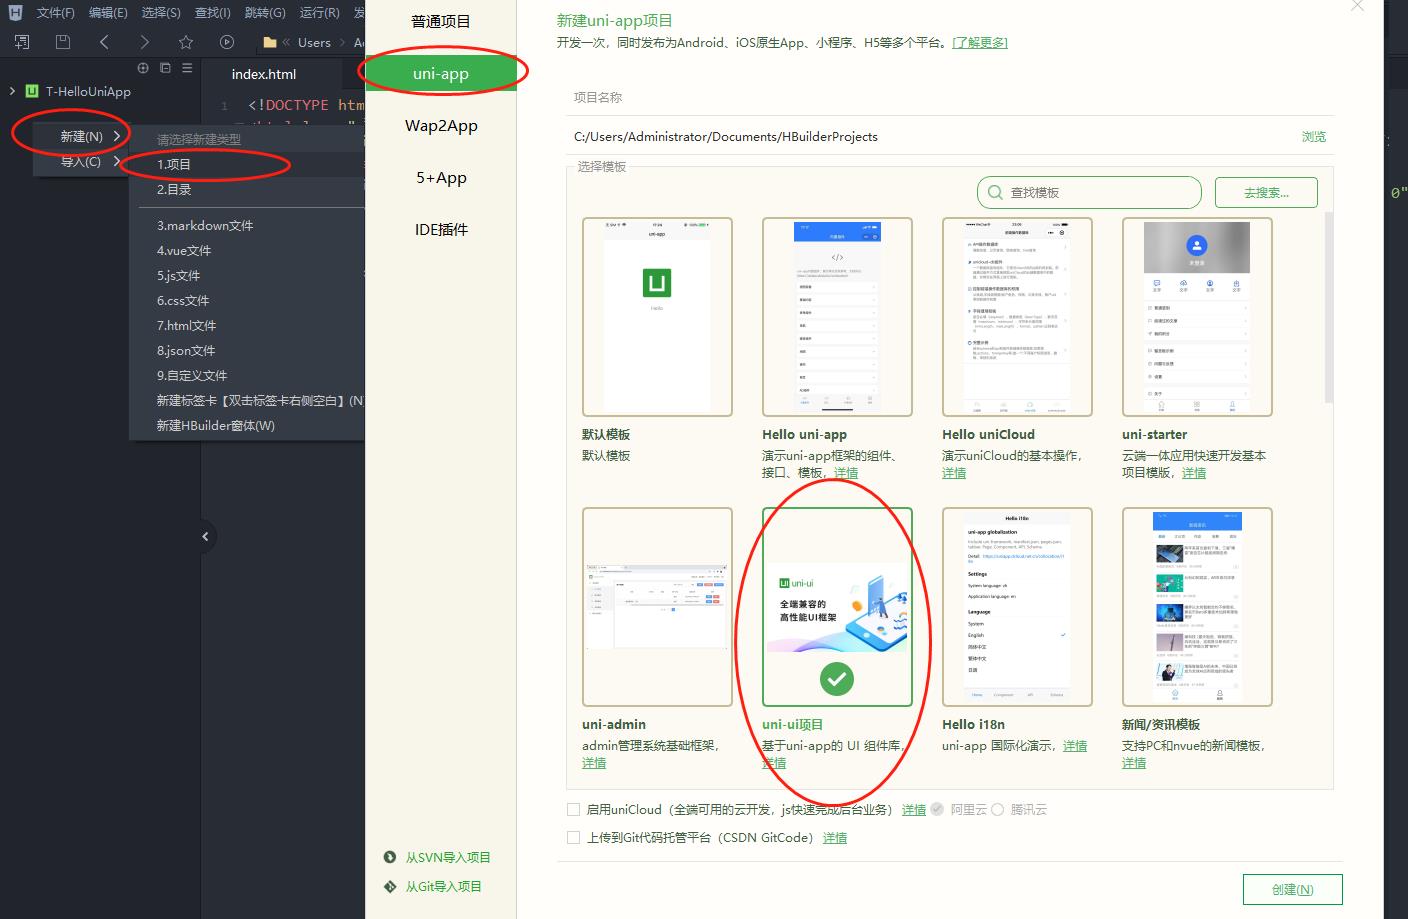
2)已有项目的情况
打开https://ext.dcloud.net.cn/plugin?id=55
点击“使用HBuilderX导入插件”,在编辑器中选择项目并确定即可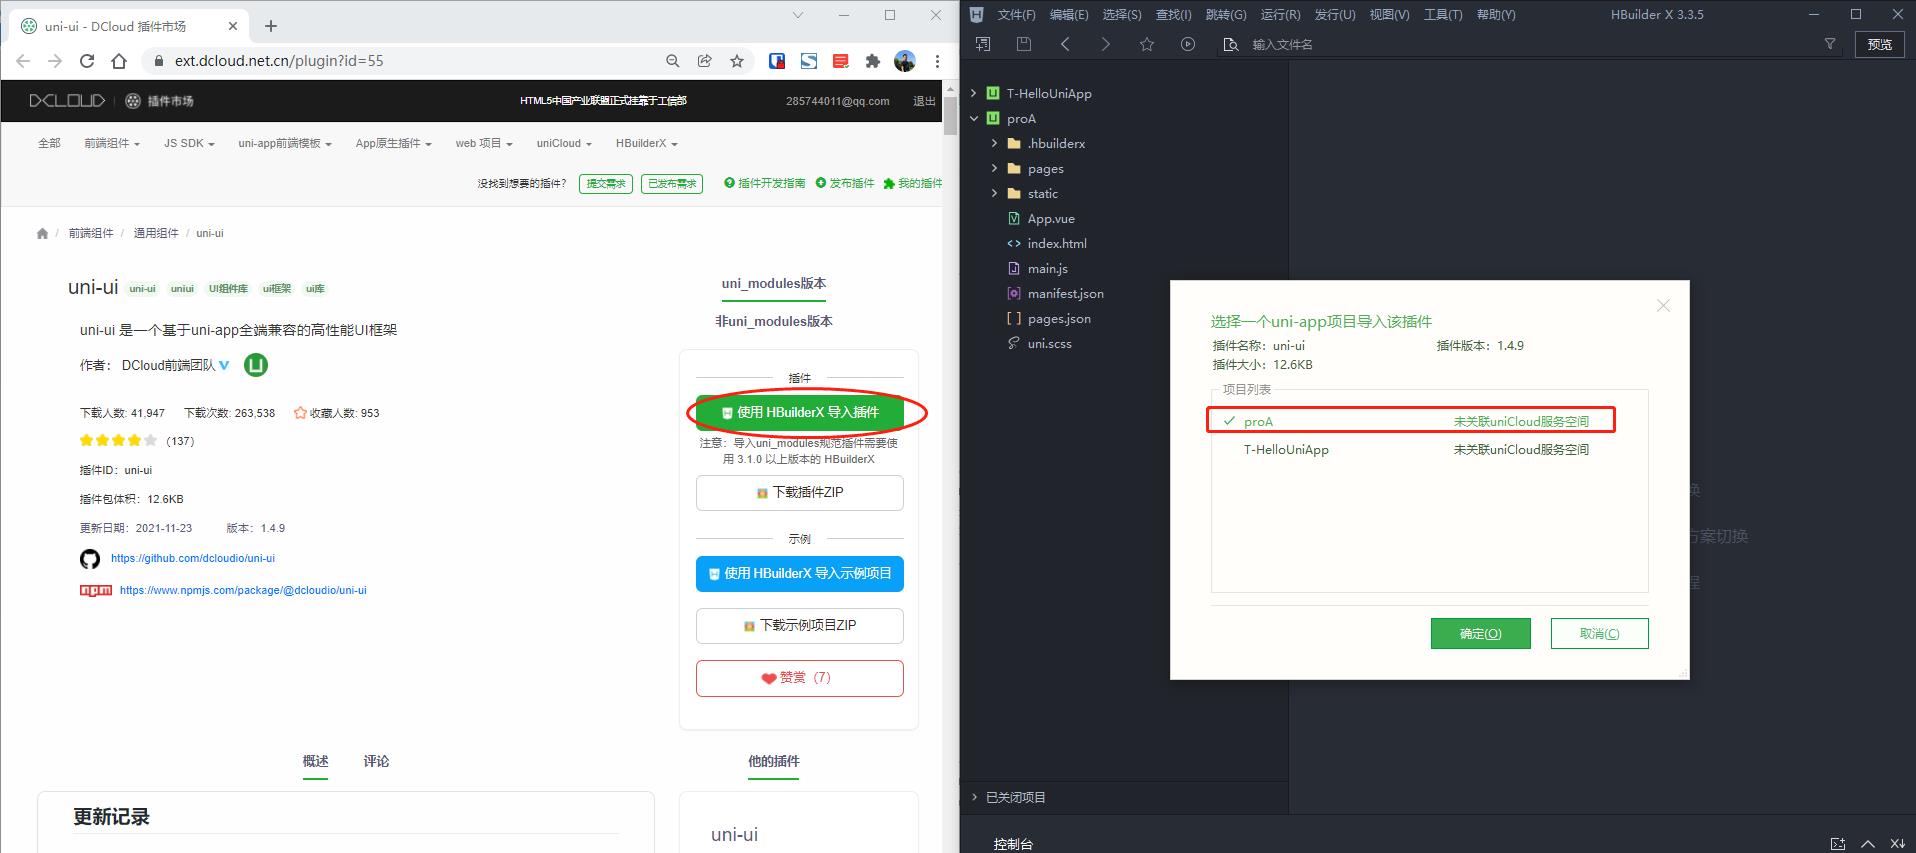
uni-ui简单入门教程
- 在效果展示手册中,找到想要的效果,例如底部工具栏
https://hellouniapp.dcloud.net.cn/pages/extUI/goods-nav/goods-nav - 在组件代码手册中,找到对应的组件代码
https://uniapp.dcloud.io/component/uniui/uni-goods-nav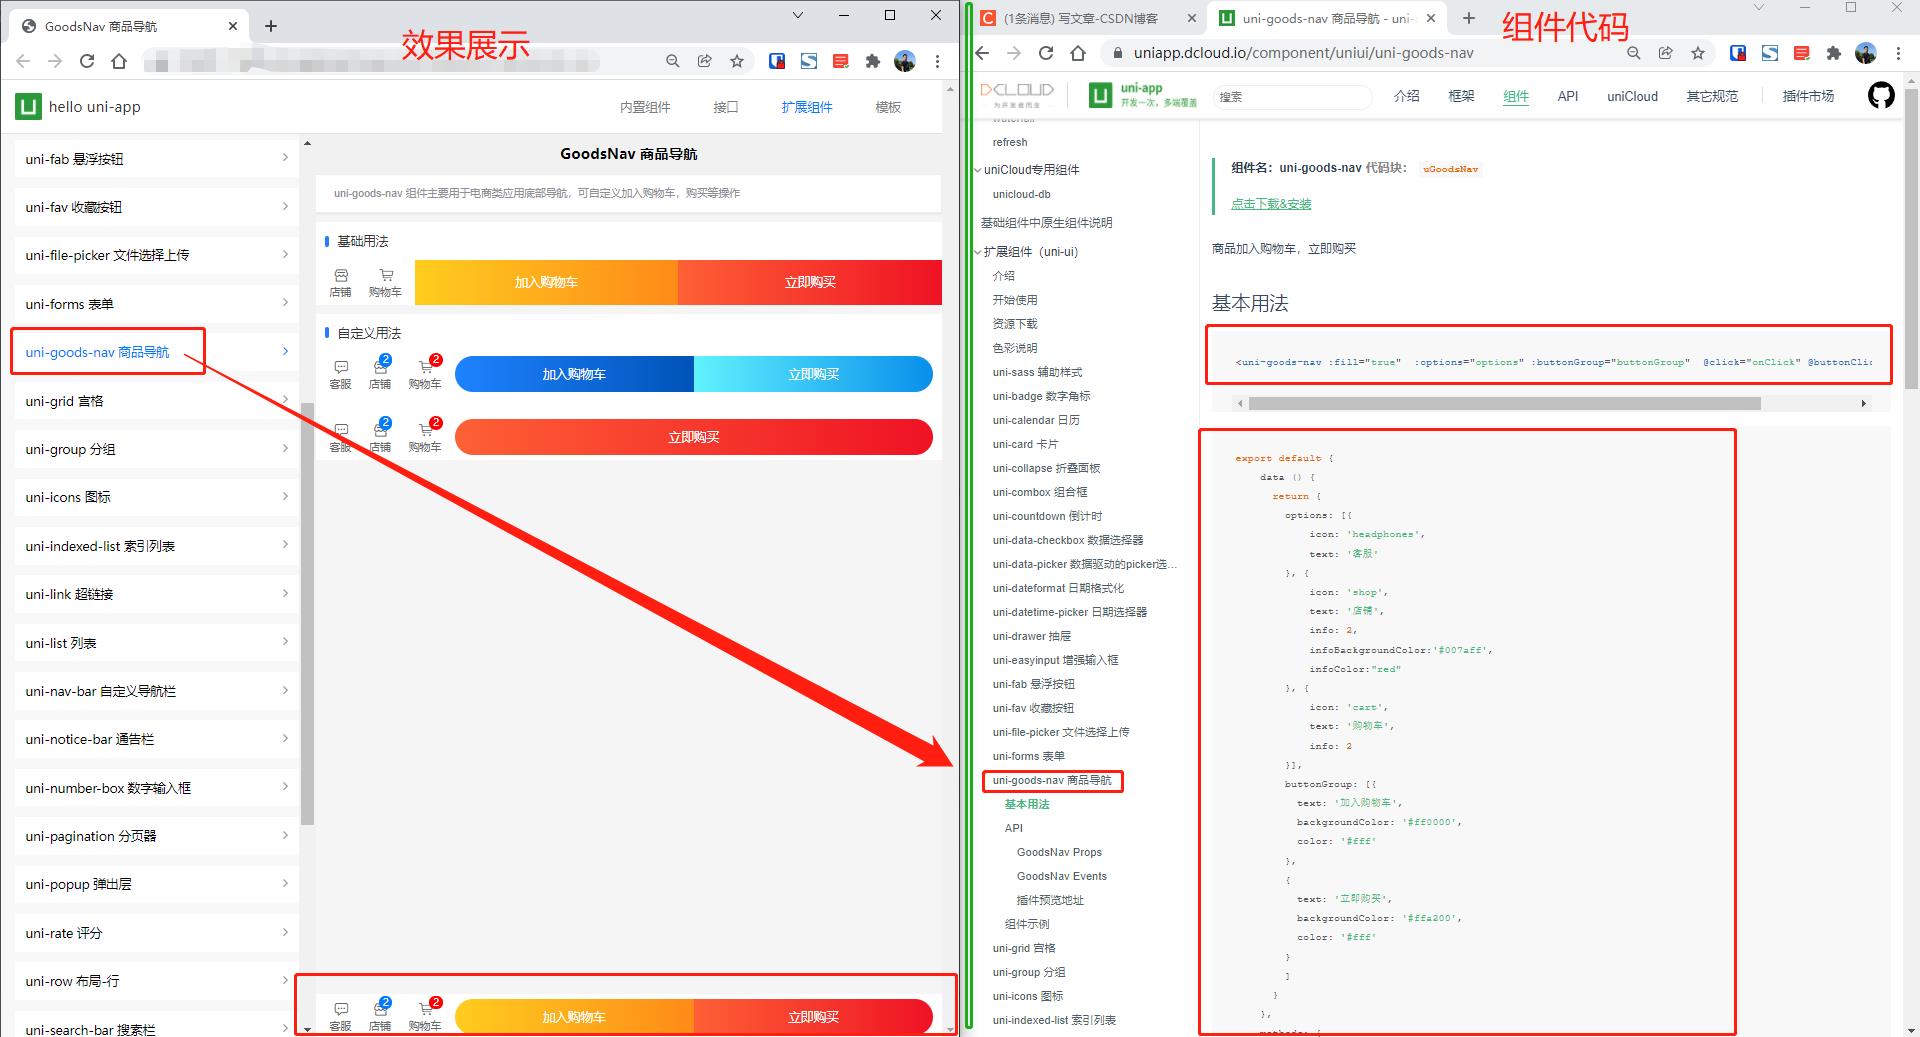
- 获取到组件代码的代码
1) template代码(写在标签template里面的唯一的view里面,代码如下)
<uni-goods-nav :fill="true" :options="options" :buttonGroup="buttonGroup" @click="onClick" @buttonClick="buttonClick" />
2) script代码
export default
data ()
return
options: [
icon: 'headphones',
text: '客服'
,
icon: 'shop',
text: '店铺',
info: 2,
infoBackgroundColor:'#007aff',
infoColor:"red"
,
icon: 'cart',
text: '购物车',
info: 2
],
buttonGroup: [
text: '加入购物车',
backgroundColor: '#ff0000',
color: '#fff'
,
text: '立即购买',
backgroundColor: '#ffa200',
color: '#fff'
]
,
methods:
onClick (e)
uni.showToast(
title: `点击$e.content.text`,
icon: 'none'
)
,
buttonClick (e)
console.log(e)
this.options[2].info++
- 打开项目的视图文件\\pages\\index\\index.vue

原代码:<template> <view class="content"> <image class="logo" src="/static/logo.png"></image> <view class="text-area"> <text class="title">title</text> </view> </view> </template> <script> export default data() return title: 'Hello' , onLoad() , methods: </script> <style> .content display: flex; flex-direction: column; align-items: center; justify-content: center; .logo height: 200rpx; width: 200rpx; margin-top: 200rpx; margin-left: auto; margin-right: auto; margin-bottom: 50rpx; .text-area display: flex; justify-content: center; .title font-size: 36rpx; color: #8f8f94; </style> - 修改为:
注意:<template> <view> <uni-nav-bar left-icon="back" left-text="返回" right-text="菜单" title="导航栏组件"></uni-nav-bar> <view class="content"> <image class="logo" src="/static/logo.png"></image> <view class="text-area"> <text class="title">title</text> </view> </view> <view class="myFixedBottom"> <uni-goods-nav :fill="true" :options="options" :buttonGroup="buttonGroup" @click="onClick" @buttonClick="buttonClick" /> </view> </view> </template> <script> export default data() return title: 'Hello', options: [ icon: 'headphones', text: '客服' , icon: 'shop', text: '店铺', info: 2, infoBackgroundColor: '#007aff', infoColor: "red" , icon: 'cart', text: '购物车', info: 2 ], buttonGroup: [ text: '加入购物车', backgroundColor: '#ff0000', color: '#fff' , text: '立即购买', backgroundColor: '#ffa200', color: '#fff' ] , onLoad() , methods: onClick(e) uni.showToast( title: `点击$e.content.text`, icon: 'none' ) , buttonClick(e) console.log(e) this.options[2].info++ </script> <style> .content display: flex; flex-direction: column; align-items: center; justify-content: center; .logo height: 200rpx; width: 200rpx; margin-top: 200rpx; margin-left: auto; margin-right: auto; margin-bottom: 50rpx; .text-area display: flex; justify-content: center; .title font-size: 36rpx; color: #8f8f94; .myFixedBottom width: 100%; position: fixed; bottom: 0; left: 0; </style>
我用一个view标签把uni-goods-nav包起来了,加了个类名.myFixedBottom
定义css为:
.myFixedBottom
width: 100%;
position: fixed;
bottom: 0;
left: 0;
另外,把<view class="content">的类清空了,以免影响底部导航栏。
- ok!保存并且查看效果即可

更多的请按照以上顺序来:
1)先看效果,找到自己喜欢的uni-ui组件
2)再找代码,html代码写在template标签里面,css写在style标签里面,js代码注意和原来的script代码合并,不要漏了或者格式错误即可
刷新,预览,搞定!
以上是关于HBuilderX uni-app简单实现静态登录页面(实例)的主要内容,如果未能解决你的问题,请参考以下文章
uni-ui简单入门教程 - 如何用HBuilderX为uni-app项目启用uni-ui扩展组件?