Java基础Spring 中 Bean 的理解与使用
Posted 致最长的电影
tags:
篇首语:本文由小常识网(cha138.com)小编为大家整理,主要介绍了Java基础Spring 中 Bean 的理解与使用相关的知识,希望对你有一定的参考价值。
大白话讲解:
从广义上 Spring 注解可以分为两类:
- 一类注解是用于注册 Bean
假如 IoC 容器是一间空屋子,首先这间空屋子啥都没有,我们要吃大餐,我们就要从外部搬运食材和餐具进来。这里把某一样食材或者某一样餐具搬进空屋子的操作就相当于每个注册 Bean 的注解作用类似。注册 Bean 的注解作用就是往 IoC容器中放(注册)东西!
用于注册 Bean 的注解:比如 @Component、@Repository、@Controller、@Service、@Configuration 这些注解就是用于注册 Bean,放进 IoC 容器中,一来交给 Spring 管理方便解耦,二来还可以进行二次使用,啥是二次使用呢?这里的二次使用可以理解为:在你开始从外部搬运食材和餐具进空屋子的时候,一次性搬运了猪肉、羊肉、铁勺、筷子四样东西,这个时候你要开始吃大餐,首先你吃东西的时候肯定要用筷子或者铁勺,别说你手抓,只要你需要,你就会去找,这个时候发现你已经把筷子或者铁勺放进了屋子,你就不同再去外部拿筷子进屋子了,意思就是 IoC 容器中已经存在,就可以直接拿去用,而不必再去注册!而拿屋子里已有的东西的操作就是下面要讲的关于使用 Bean 的注解!
- 一类注解是用于使用 Bean
用于使用 Bean 的注解:比如 @Autowired、@Resource 注解,这些注解就是把屋子里的东西自己拿来用,如果你要拿,前提一定是屋子(IoC)里有的,不然就会报错。比如你要做一道牛肉拼盘需要五头牛做原材料才行,你现在锅里只有四头牛,这个时候你知道,自己往屋子里搬过五头牛,这个时候就直接把屋子里的那头牛直接放进锅里,完成牛肉拼盘的组装。是的这些注解就是需要啥,只要容器中有就往容器中拿,就是这么豪横!而这些注解又有各自的区别,比如 @Autowired 用在筷子上,这筷子你可能想用木质的,或许只想用铁质的,@Autowired 作用在什么属性的筷子就那什么筷子,而 @Resource 如果用在安格斯牛肉上面,就指定要名字就是安格斯牛肉的牛肉。
一、定义
Bean 是 Spring 框架中最核心的两个概念之一(另一个是面向切面编程 AOP)
Spring 官方文档对 bean 的解释是:
In Spring, the objects that form the backbone of your application and that are managed by the Spring IoC container are called beans. A bean is an object that is instantiated, assembled, and otherwise managed by a Spring IoC container.
翻译过来就是:
在 Spring 中,构成应用程序主干并由 Spring IoC 容器管理的对象称为 bean。bean 是由Spring IoC 容器实例化、组装和管理的对象。
从上面翻译过来意思来看:
- bean 是对象,一个或者多个不限定
- bean 由 Spring 中一个叫 IoC 的东西管理的
- 我们的应用程序由一个个 bean 构成
那么问题来了,IoC 是什么呢?
二、控制反转(IoC)
控制反转英文全称:Inversion of Control,简称就是 IoC。控制反转通过依赖注入(DI)方式实现对象之间的松耦合关系。程序运行时,依赖对象由辅助程序动态生成并注入到被依赖对象中,动态绑定两者的使用关系。Spring IoC 容器就是这样的辅助程序,它负责对象的生成和依赖的注入,然后再交由我们使用。
1、什么是依赖注入与控制反转呢?先通过一个例子来理解一下
首先有一个类叫做 Student,里面有两个成员变量分别是 id 和 name,并提供 set、get方法。
public class Student
    private Integer id;
    private String name;

    public Integer getId()
        return id;


    public void setId(Integer id)
        this.id = id;


    public String getName()
        return name;


    public void setName(String name)
        this.name = name;
另外一个类叫做 StudentManager
public class StudentManager
    private Student student;

    public void setStudent(Student student)
        this.student = student;


    public void show()
        System.out.println(student.getId());
        System.out.println(student.getName());
这个 StudentManager 类有个成员是 Student 的一个对象,然后它的 show 方法能够打印这个 student 的 id 以及 name,并提供了 setStudent 方法初始化 Student 对象。我们可以说,StudentManager(被依赖对象) 是依赖于 Student(依赖对象)的。
有一个问题,StudentManager 与 Student 之间的耦合非常紧密,假如我们还没有来的及对 StudentManager 的 student 绑定对象,却调用了 show 方法的话,那么程序将会抛出空指针异常。所以 Spring 提供了一套叫做控制反转与依赖注入这套机制,目的就是为了解耦。
在 Spring 中,你不需要自己创建对象,你只需要告诉 Spring,哪些类我需要创建出对象,然后在启动项目的时候 Spring 就会自动帮你创建出该对象,并且只存在一个类的实例。这个类的实例在 Spring 中被称为 Bean。而这种模式,我们称之为“单例模式”。也就是一个类只有一个实例的意思。
那么 Spring 是靠什么来了解究竟哪些类需要帮我们创建呢,这里介绍最常用的两种方式------Java 注解配置,Java 代码配置。之前还有 XML 配置等,但是之前的现在已经不推荐使用了。
首先介绍的是 Java 注解配置,这是最简单也是最常用的一种方式。
| 声明 | 含义 |
| @Component | 当前类是组件,没有明确的意思 |
| @Service | 当前类在业务逻辑层使用 |
| @Repository | 当前类在数据访问层 |
| @Controller | 当前类在展示层(MVC)使用 |
以上四种声明方式效果完全一致,使用不同的关键词是为了给阅读的人能够快速了解该类属于哪一层。
使用方法为:在定义的实体类前使用该注解。让我们看下面一段代码
@Component
public class Student
    private Integer id;
    private String name;

    public Integer getId()
        return id;


    public void setId(Integer id)
        this.id = id;


    public String getName()
        return name;


    public void setName(String name)
        this.name = name;
我们在刚才的 Student 类前面,加上了 @Component 注解,成功告诉 Spring:你要在项目创建运行时帮我创建 Student 类的 Bean (对象)。
好了,这时候添加“依赖”就已经做完了,但是还没完,我们虽然让 Spring 帮我们创建了对象,但是 StudentManager 怎么知道这个对象在哪呢?所以接下来,我们要告诉 StudentManager 刚才 Spring 帮我们创建的 Bean (对象)到底在哪,也就是使用(“注入”)这个 Bean。
我们来看看注入注解的语法:
| 声明 | 含义 |
| @Autowired | 根据 Bean 的 Class 类型来自动装配 |
| @Inject | 翻译为“注入”最易懂得注入注解 |
| @Resource | 翻译为“资源”,根据 Bean 得属性名称(id 或 name)自动装配 |
使用方法:在我们需要注入依赖的成员变量前使用该注解,看一下下面一段代码
@Component
public class StudentManager
    @Autowired
    private Student student;

    public void show()
        System.out.println(student.getId());
        System.out.println(student.getName());
可以看到,在声明成员变量 Student 的前面我们使用了 @Autowired,所以 Spring 会自动帮我们使用(注入)一个 Bean,我们就再也不用担心忘记绑定对象而出现空指针了。但是可以发现,虽然我们告诉了 Spring 哪些类是需要添加依赖,哪些类是需要注入 Bean,但是 Spring 还需要我们做一次配置,来真正完成这样一个操作。
2、让 Spring 控制类构建过程
不用 new,让 Spring 控制 new 过程。在 Spring 中,我们基本不需要 new 一个类,这些都是让 Spring 去做的。Spring 启动时会把所需的类实例化对象,如果需要依赖,则先实例化依赖,然后实例化当前类。因为依赖必须通过构建函数传入,所以实例化时,当前类就会接收并保存所有依赖的对象。这一步也就是所谓的依赖注入。
3、这就是 IOC
在 Spring 中,类的实例化、依赖的实例化、依赖的传入都交由 Spring Bean 容器控制,而不是用 new 方式实例化对象、通过非构造函数方法传入依赖等常规方式。实质的控制权已经交由程序管理,而不是程序员管理,所以叫控制反转。
三、 @Bean 注解的使用
1、使用说明
- @Bean 注解作用在方法上,产生一个 Bean 对象,然后这个 Bean 对象交给 Spring 管理,剩下的你就不用管了。产生这个 Bean 对象的方法 Spring 只会调用一次,随后这个 Spring 将会将这个 Bean 对象放在自己的 IOC 容器中。
- @Bean 方法名与返回类名一致,首字母小写。
- @Component、@Repository、@Controller、@Service 这些注解只局限于自己编写的类,而 @Bean 注解能把第三方库中的类实例加入 IOC 容器中并交给 Spring 管理。
- @Bean 一般和 @Component 或者 @Configuration 一起使用
2、Bean 名称
2.1、默认情况下 Bean 名称就是方法名(首字母小写),比如下面 Bean 名称便是 myBean
@Bean
public MyBean myBean()
    return new MyBean();
2.2、@Bean 注解支持设置别名。比如下面除了主名称 myBean 外,还有个别名 myBean1(两个都可以使用)
@Bean("myBean1")
public MyBean myBean()
    return new MyBean();
2.3、@Bean 注解可以接受一个 String 数组设置多个别名。比如下面除了主名称 myBean 外,还有别名 myBean1、myBean2(三个都可以使用)
@Bean("myBean1","myBean2")
public MyBean myBean()
    return new MyBean();
3、@Bean 与其他注解产生的火花
@Bean 注解常常与 @Scope、@Lazy、@DependsOn 和 @link Primary 注解一起使用
3.1、@Profile 注解
为在不同环境下使用不同的配置提供了支持,如开发环境和生产环境的数据库配置是不同的
@Bean
@Profile("!dev")  // 不是dev环境的能使用这个bean
public MyBean myBean()
    MyBean myBean = new MyBean();
    myBean.setPort("8080");
    return myBean;
3.2、@Scope 注解
在 Spring 中对于 bean 的默认处理都是单例的,我们通过上下文容器.getBean方法拿到 bean 容器,并对其进行实例化,这个实例化的过程其实只进行一次,即多次 getBean 获取的对象都是同一个对象,也就相当于这个 bean 的实例在 IOC 容器中是 public 的,对于所有的 bean 请求来讲都可以共享此 bean。@Scope 注解将其改成 prototype 原型模式(每次获取 Bean 的时候会有一个新的实例)
@Bean
@Scope("prototype")
public MyBean myBean()
    MyBean myBean = new MyBean();
    myBean.setPort("8080");
    return myBean;
@SpringBootApplication
@MapperScan("com.example.quartzdemo.dao")//使用MapperScan批量扫描所有的Mapper接口;
public class QuartzDemoApplication
    public static void main(String[] args)
        ConfigurableApplicationContext context = SpringApplication.run(QuartzDemoApplication.class, args);
        MyBean myBean = (MyBean) context.getBean("myBean");
        System.out.println(myBean);
        MyBean myBean2 = (MyBean) context.getBean("myBean");
        System.out.println(myBean2);
打印输出结果:
com.example.quartzdemo.config.MyBean@49601f82
com.example.quartzdemo.config.MyBean@23e44287
将 @Scope("prototype") 删除掉,再运行启动类,打印结果如下:
com.example.quartzdemo.config.MyBean@4cdd2c73
com.example.quartzdemo.config.MyBean@4cdd2c73
3.3、@Lazy 注解:
在 Spring 框架中,默认会在启动时会创建所有的 Bean 对象,但有些 bean 对象假如长时间不用,启动时就创建对象,会占用其内存资源,从而造成一定的资源浪费,此时我们可以基于懒加载策略延迟对象的创建。
    @Bean
    @Lazy
    public MyBean myBean()
        MyBean myBean = new MyBean();
        myBean.setPort("8080");
        return myBean;
3.4、@DependsOn注解:
表示在当前 Bean 创建之前需要先创建特定的其他 Bean
四、Bean 规范
- 所有属性为 private
- 提供默认构造方法
- 提供 getter 和 setter
- 实现 Serializable (比如可以实现Serializable 接口,用于实现bean的持久性)
- 属性类型使用包装类
五、参考文档
Spring基础:Bean的装配
Spring基础:Bean的装配
- Bean的装配可以理解为将Bean依赖注入到Spring容器中
- Bean的装配方式即依赖注入方式
- 常用的Bean的装配方式有基于Xml的装配,基于注解的装配
- 最常用的是基于注解的装配
下面介绍基于Xml的装配方式
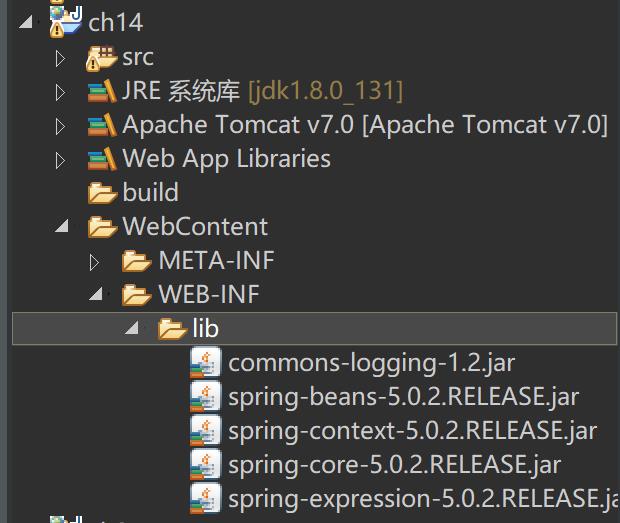
1-在eclipse中创建名为ch14的web应用,并导入相关jar包,如图所示。

2-在ch14的src目录下assemble包,并在该包下创建ComplexUser类,在该类中分别使用构造方法注入和使用属性setter方法注入。
import java.util.List;
import java.util.Map;
import java.util.Set;
public class ComplexUser {
	private String uname ;
	private List<String> hobbyList ;
	private Map<String,String> residenceMap ;
	private Set<String> aliasSet ;
	private String [] array ;
	//使用构造方法注入,需要提供带参数的构造方法
	public ComplexUser(String uname, List hobbyList, Map residenceMap, Set aliasSet, String [] array) {
		this.uname = uname ;
		this.hobbyList = hobbyList ;
		this.residenceMap = residenceMap ;
		this.aliasSet = aliasSet ;
		this.array = array ;
	}
	//使用属性的setter方法注入
	public ComplexUser() {}
	public void setUname(String uname) {
		this.uname = uname ;
	}
	public void setHobbyList(List<String> hobbyList) {
		this.hobbyList = hobbyList;
	}
	public void setResidenceMap(Map<String, String> residenceMap) {
		this.residenceMap = residenceMap;
	}
	public void setAliasSet(Set<String> aliasSet) {
		this.aliasSet = aliasSet;
	}
	public void setArray(String[] array) {
		this.array = array;
	}
 	public String toString() {
		return "uname = " + uname + ";hobbyList = " + hobbyList + ";residenceMap = " + residenceMap + ";aliasSet = " + aliasSet + ";array = " + array ;
	}
}
2-配置Bean,在Spring配置文件中使用实现类ComplexUser配置Bean的两个实例。
<?xml version="1.0" encoding="UTF-8"?>
<beans xmlns="http://www.springframework.org/schema/beans"
xmlns:xsi="http://www.w3.org/2001/XMLSchema-instance"
xsi:schemaLocation="http://www.springframework.org/schema/beans
http://www.springframework.org/schema/beans/spring-beans.xsd">
<!-- 使用构造方法方式装配注入ComplexUser实例user1 -->
<bean id = "user1" class = "assemble.ComplexUser">

<constructor-arg index = "0" value = "王国栋"/>

<constructor-arg index = "1" >
<list>
<value>唱歌</value>
<value>打球</value>
<value>爬山</value>
</list>
</constructor-arg>

<constructor-arg index = "2">
<map>
<entry key = "nanjing" value = "南京"/>
<entry key = "nanchang" value = "南昌"/>
<entry key = "shanghai" value = "上海"/>
</map>
</constructor-arg>

<constructor-arg>
<set>
<value>王国栋 101</value>
<value>王国栋 102</value>
<value>王国栋 103</value>
</set>
</constructor-arg>

<constructor-arg>
<array>
<value>努力</value>
<value>加油</value>
<value>坚强</value>
</array>
</constructor-arg>
</bean>

<!-- 使用属性的setter方法装配ComplexUser实例user2 -->
<bean id = "user2" class = "assemble.ComplexUser">
<property name = "uname" value = "王国栋2"/>

<property name="hobbyList">
<list>
<value>看书</value>
<value>学习</value>
<value>睡觉</value>
</list>
</property>

<property name ="residenceMap" >
<map>
<entry key = "beijing" value = "北京"/>
<entry key = "shanghai" value = "上海"/>
<entry key = "nanjing" value = "南京"/>
</map>
</property>

<property name = "aliasSet">
<set>
<value>王国栋 104</value>
<value>王国栋 105</value>
<value>王国栋 106</value>
</set>
</property>

<property name = "array">
<array>
<value>挫折</value>
<value>困难</value>
</array>
</property>
</bean>
</beans>
3-在ch3中创建test包,在该包中创建TestAssemble测试类。
import org.springframework.context.ApplicationContext;
import org.springframework.context.support.ClassPathXmlApplicationContext;

import assemble.ComplexUser;

public class TestAssemble {
	public static void main(String[] args) {
		//初始化Spring容器,架子啊配置文件
		ApplicationContext appCon = new ClassPathXmlApplicationContext("applicationContext.xml") ;
		//使用构造方法装配测试
		ComplexUser u1 = (ComplexUser) appCon.getBean("user1") ;
		System.out.println(u1);
		//使用属性的setter方法装配测试
		ComplexUser u2 = (ComplexUser) appCon.getBean("user2") ;
		System.out.println(u2) ;
	}
}
4-测试结果如下:

接下来,使用注解的方式装配Bean
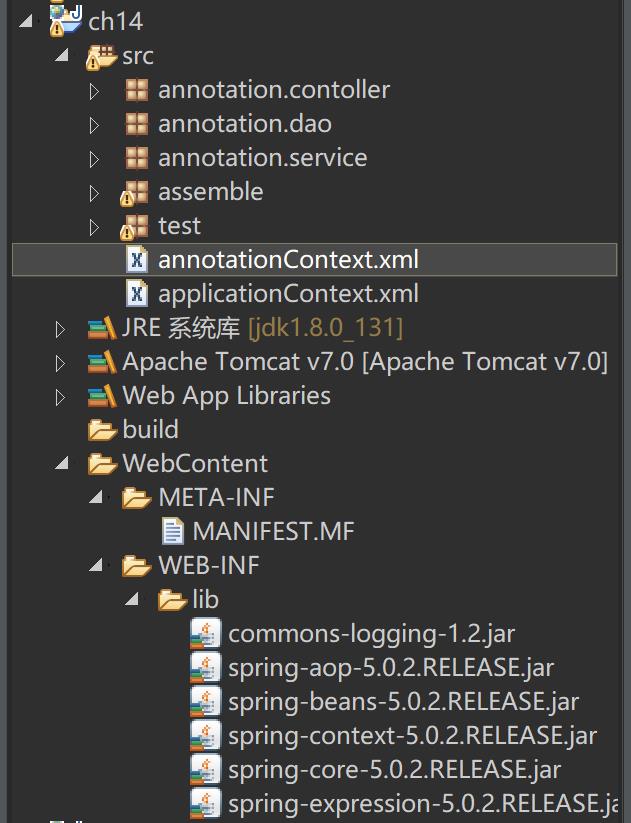
1-导入所需的jar包,如下图所示。

2-在src目录下创建annotation.dao包,并在该包中创建TestDao接口和接口的实现方法TestDaoImpl方法
public interface TestDao {
	public void save() ;
}
import org.springframework.stereotype.Repository;

@Repository("testDao")
public class TestDaoImpl implements TestDao{

	@Override
	public void save() {
		System.out.println("testDao save") ;
	}
}
3-在src文件下创建TestService接口和该接口的实现类TestServiceImpl类
public interface TestService {
	public void save() ;
}
import javax.annotation.Resource;

import org.springframework.stereotype.Service;

import annotation.dao.TestDao;

@Service("testService")
public class TestServiceImpl implements TestService{
@Resource(name = "testDao")
private TestDao testDao ;
	@Override
	public void save() {
		testDao.save();
		System.out.println("testService save") ;
	}
}
4-在src目录下创建annotation.controller包,并在该包中创建TestController实现类
import org.springframework.beans.factory.annotation.Autowired;
import org.springframework.stereotype.Controller;

import annotation.service.TestService;

@Controller
public class TestController {
	@Autowired
	private TestService testService ;
	public void save() {
		testService.save();
		System.out.println("testController save") ;
	}

}
5-在src目录下创建annotationContext.xml文件,在该文件中配置扫描包为annotation
<?xml version="1.0" encoding="UTF-8"?>
<beans xmlns="http://www.springframework.org/schema/beans"
xmlns:xsi="http://www.w3.org/2001/XMLSchema-instance"
xmlns:context = "http://www.springframework.org/schema/context"
xsi:schemaLocation="http://www.springframework.org/schema/beans
http://www.springframework.org/schema/beans/spring-beans.xsd
http://www.springframework.org/schema/context
http://www.springframework.org/schema/context/spring-context.xsd">
<!-- 使用context命名空间,通过Spring扫描包annotation及其子包下所有Bean的实现类,进行注释解析 -->
<context:component-scan base-package = "annotation"/>
</beans>
6-在test包中创建测试类TestMoreAnnotation
import org.springframework.context.ApplicationContext;
import org.springframework.context.support.ClassPathXmlApplicationContext;

import annotation.contoller.TestController;

public class TestMoreAnnotaion {
	public static void main(String[] args) {
		//初始化Spring容器,加载配置文件
		ApplicationContext appCon = new ClassPathXmlApplicationContext("annotationContext.xml") ;
		//实例化
		TestController tc = (TestController)appCon.getBean("testController") ;
		//调用对象的方法
		tc.save();
	}
}
7-测试结果如下:

以上是关于Java基础Spring 中 Bean 的理解与使用的主要内容,如果未能解决你的问题,请参考以下文章