Spring Boot 2.0 使用模板引擎返回JSP页面实战
Posted 技术宅星云-博客园
tags:
篇首语:本文由小常识网(cha138.com)小编为大家整理,主要介绍了Spring Boot 2.0 使用模板引擎返回JSP页面实战相关的知识,希望对你有一定的参考价值。
1. 模板引擎JSP的限制
在开始之前呢,我觉得我们有必要先去了解下 Spring Boot 2.0 官方文档中提到的如下内容:
模板引擎
除了REST Web服务之外,还可以使用Spring MVC来服务动态html内容。Spring MVC支持多种模板技术,包括Thymeleaf,FreeMarker,和JSPs。此外,许多其他模板引擎包括它们自己的Spring MVC集成。
Spring Boot 包括以下模板引擎的自动配置支持:
如果可能的话,JSPs应该是可以避免的。因为使用嵌入servlet容器时,有几个已知的限制。
当您使用默认配置的这些模板引擎时,您的模板会自动从 src/main/resources/templates 中提取。
根据您运行应用程序的方式,IntelliJ IDEA以不同的方式排序 classpath。 使用主方法在IDE中运行应用程序会导致与使用Maven或Gradle或从其打包的jar运行应用程序时不同的顺序。 这可能会导致Spring Boot无法在classpath中找到模板。 如果您遇到此问题,可以在IDE中重新排序类路径,以便首先放置模块的类和资源。
或者,您可以配置模板前缀以搜索类路径中的每个模板目录,如下所示:classpath *:/ templates /。
那么由哪些限制呢?
JSP限制
当运行使用嵌入的servlet容器的Spring Boot应用程序(并打包为可执行文件)时,JSP支持中存在一些限制。
- 有了Tomcat,如果你使用war包装,它应该可以工作。 也就是说,一个可执行的war工作,也可以部署到一个标准的容器(不限于,但包括Tomcat)。 由于Tomcat中的硬编码文件模式,可执行jar无法使用。
- 使用Jetty,如果您使用war包装,它应该可以工作。 也就是说,一个可执行的jar有效,并且也可以部署到任何标准容器。
- Undertow不支持JSP。
- 创建自定义error.jsp页面不会覆盖错误处理的默认视图。 应该使用自定义错误页面。
有一个JSP示例,以便您可以看到如何设置。
其实刚开始我有些不太理解官网上面这段话的意思,直到后来我才渐渐理解。
学习Spring Boot 2.0 这么多天,感觉有了更深刻的认识和理解,这里分享下:
Spring Boot 2.0 由于微服务的兴起而被广为人知,当我们在做微服务开发一般需要提供接口返回JSON,在Spring 4.0 以前需要@ResponseBody + @Controller合在一起使用,而在Spring 4.0 之后只需要使用@RestController 即可达到相同的效果。
1. Spring Boot 2.0 更是很友好地吸收了Spring 4.0 开始出现的@RestController.
记忆: @RestController注解相当于@ResponseBody + @Controller合在一起的作用
2. 值得注意的是,当我们使用Spring Boot 2.0 想要返回页面而不是提供json或者xml数据接口的时候,切记不能再使用@RestController了,只能使用@Controller.
3. Spring Boot 2.0 对返回页面 支持FreeMarker,Groovy,Thymeleaf,Muslache 多种模板技术,但是Spring Boot 2.0 缺憾是 由于默认使用内嵌的Tomcat容器,对于JSPs 这种模板技术支持不是很友好,所以我们其实完全可以使用其他的模板引擎技术,避免使用Jsps 模板和使用JSTL标签库
4. Spring Boot 2.0 封装了很多强大的模块和默认的XML配置,大大降低了开发难度。
5. Spring Boot 2.0 不仅 支持Spring MVC (基于Servlet API ),支持Spring WebFlux (基于Reactive Streams API),而且也友好支持redies,mongodb 等No-SQL 数据库 集成以及消息处理中间件等。
6. Spring Boot 2.0 不止支持Spring Cloud 分布式服务框架集成(Spring 全家桶之一),也支持阿里巴巴 开源的 Dubbo 分布式服务框架集成。
2. 开始实战
尽管官网文档中提到使用JSP有一些限制,但是往往我们还是比较习惯想用下JSP,那么如何操作呢?且跟我一步一步来操作。
- 开发工具:Intellij Idea
- JDK 版本:9.0.1
- Maven 版本:3.5.2
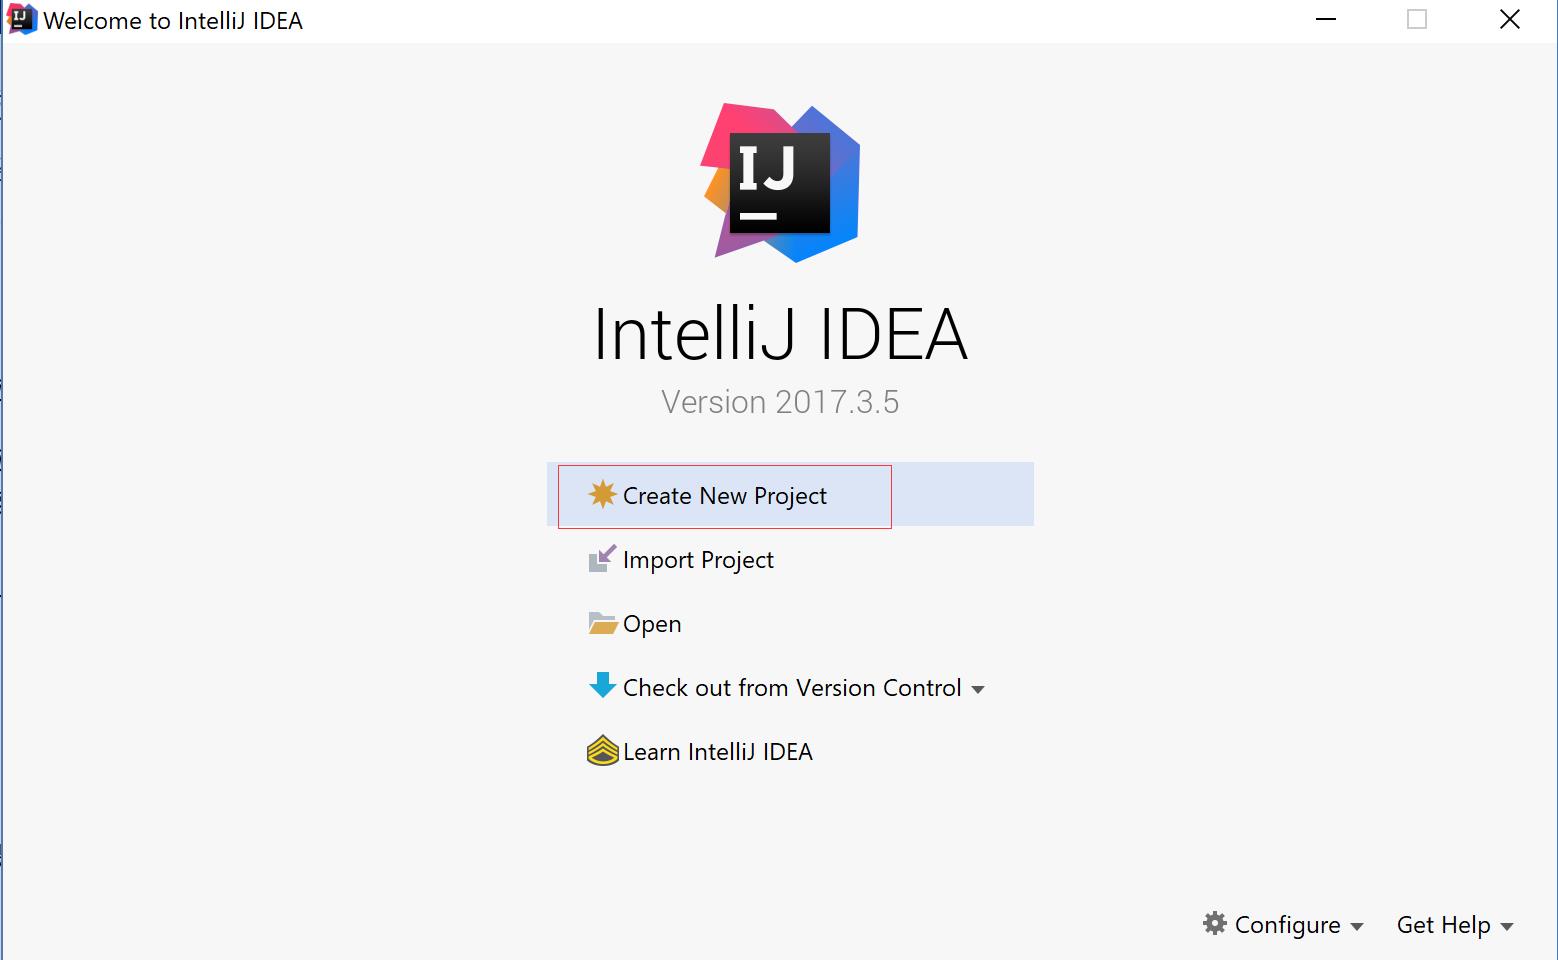
2.1 创建一个项目
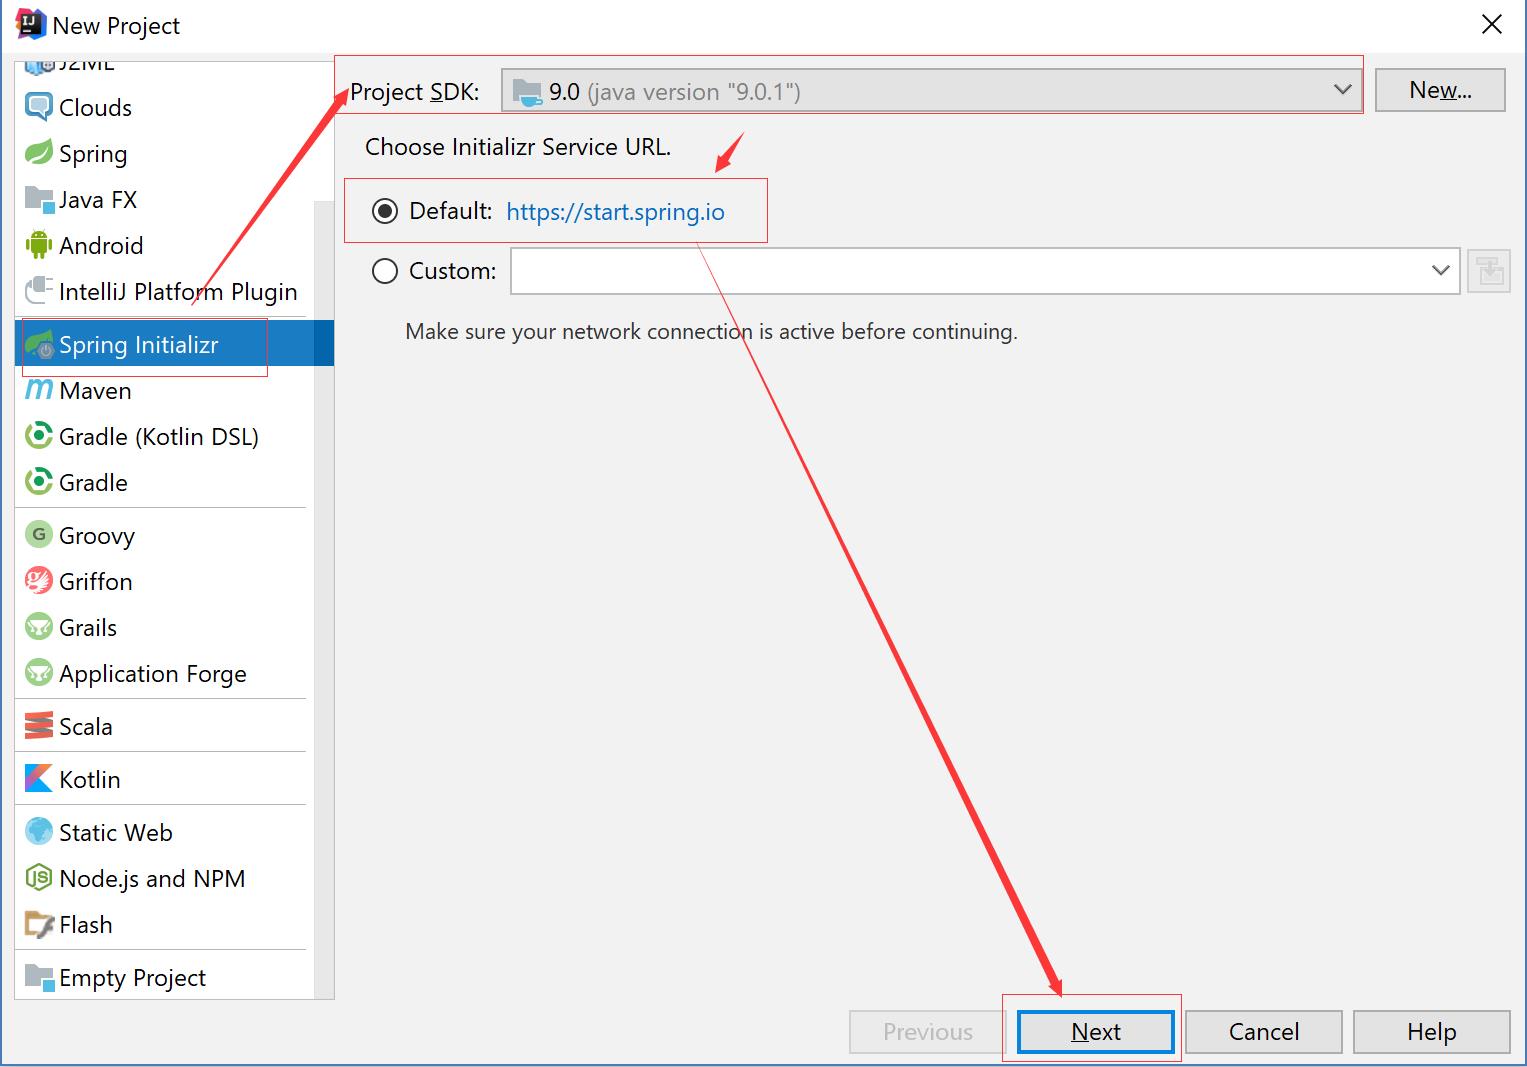
2.2 选择Spring Initizlizr 帮助我们快速创建Spring Boot 应用
2.3 填写如下项目配置信息
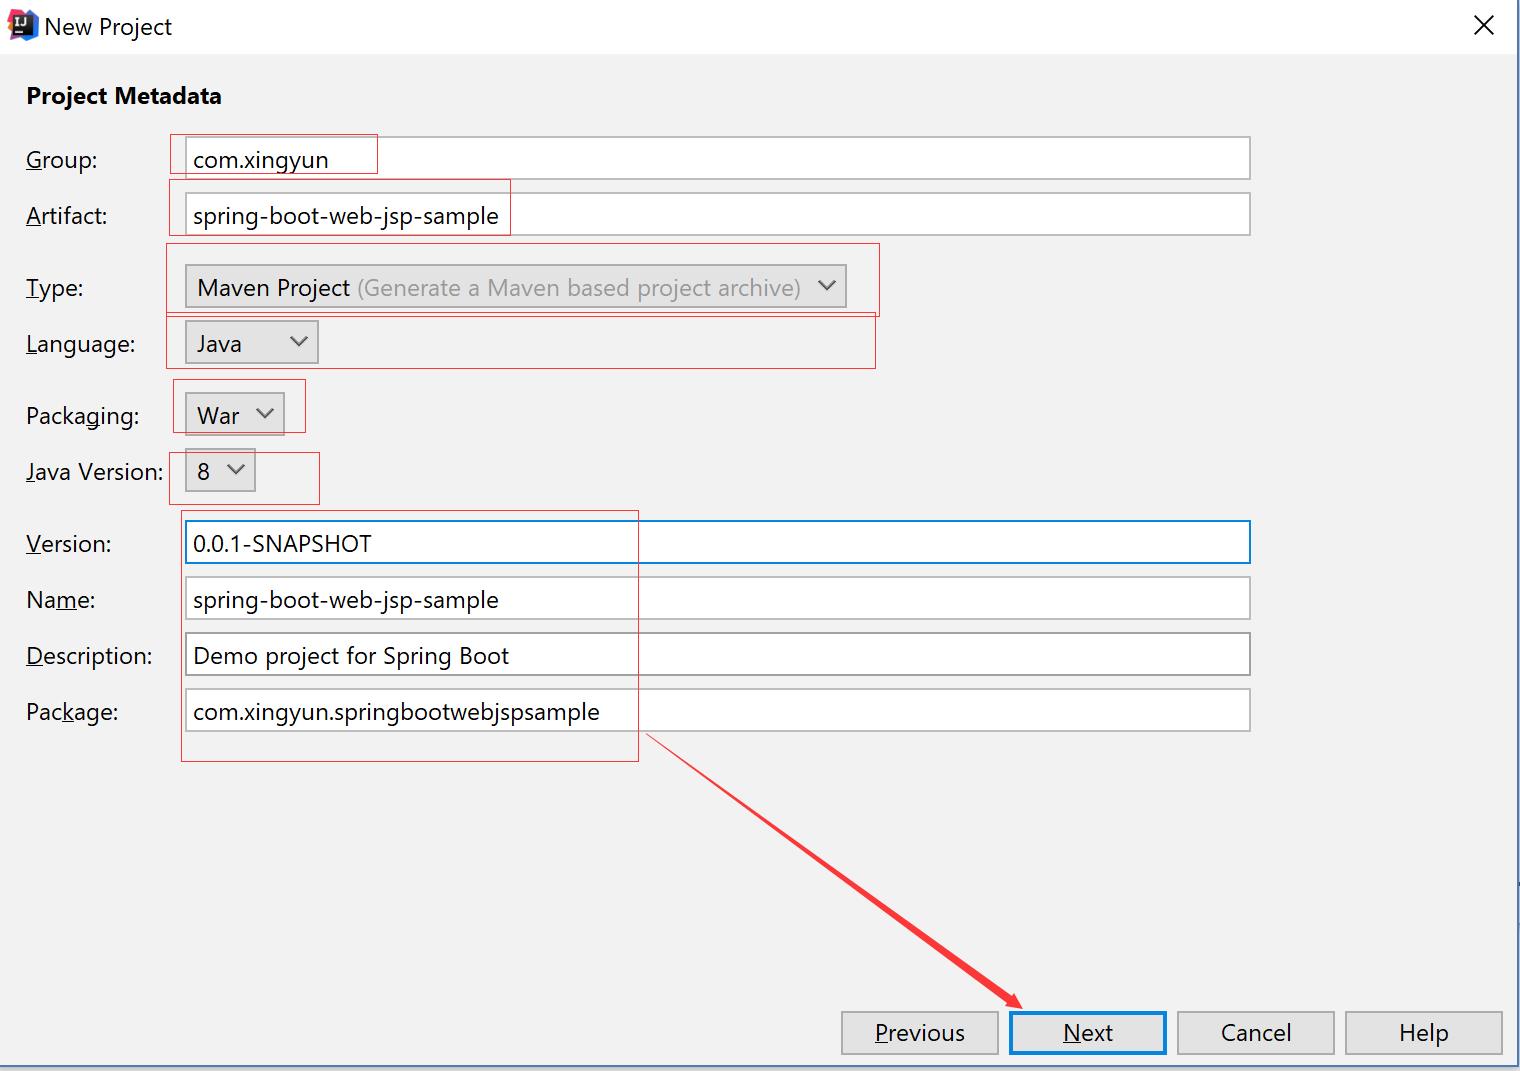
Tips: 注意这里我们使用War 而不是Jar
2.4 勾选web模板支持

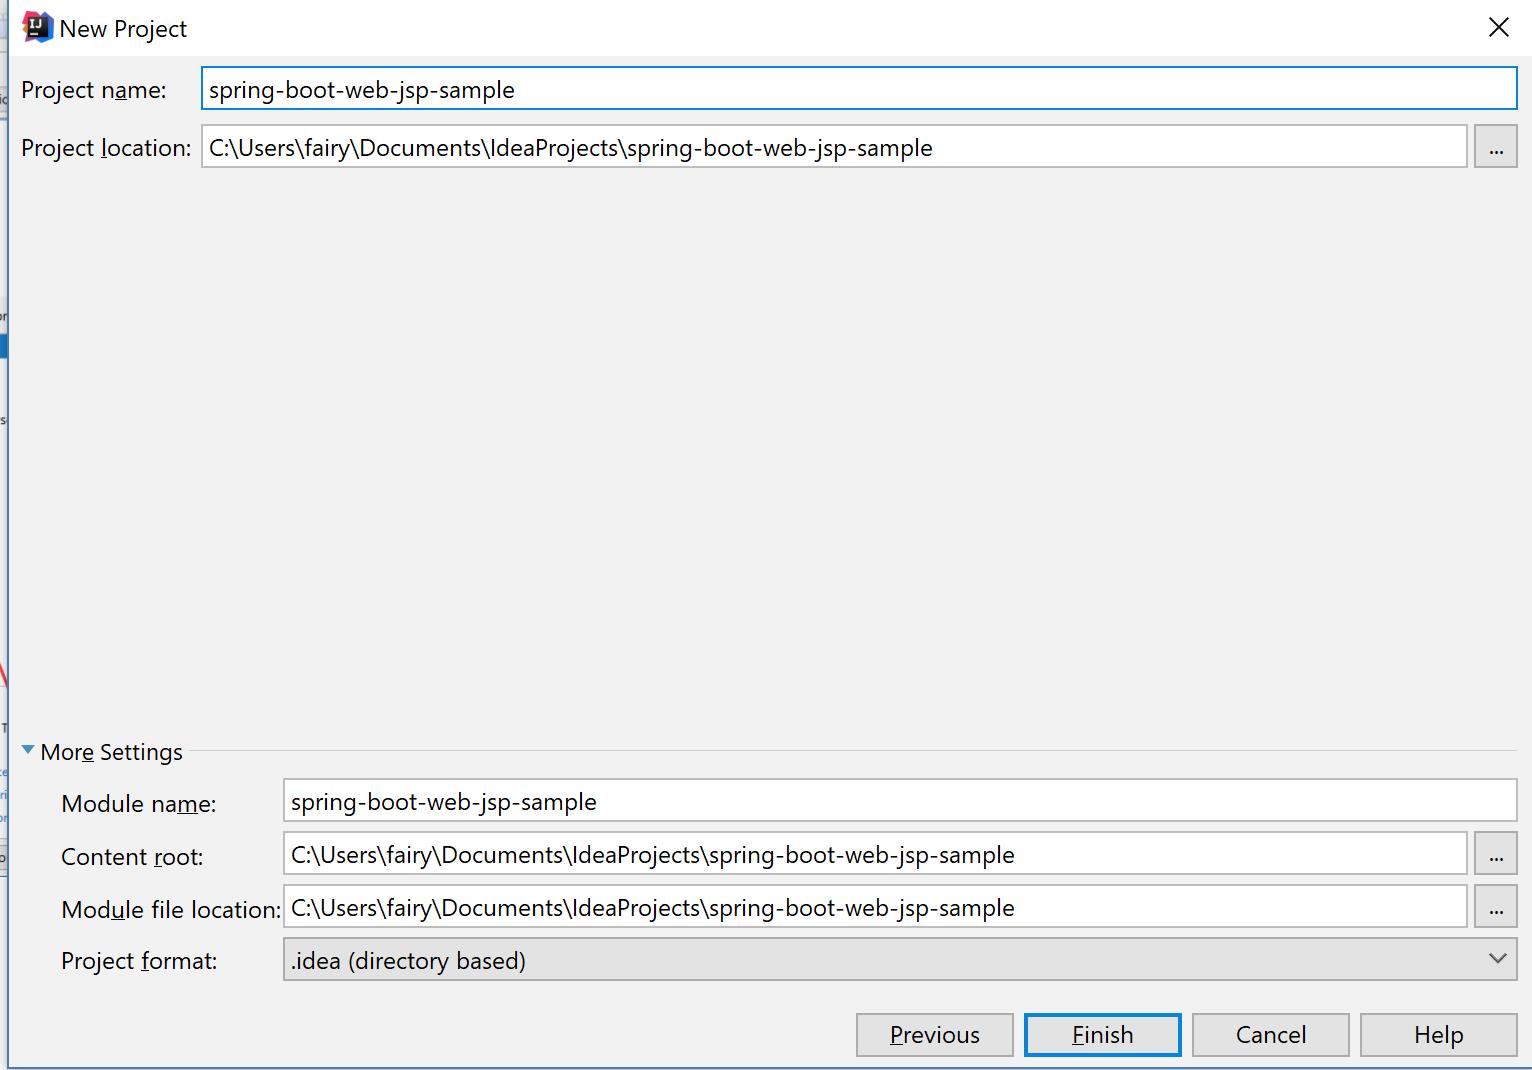
2.5 选择项目保存路径
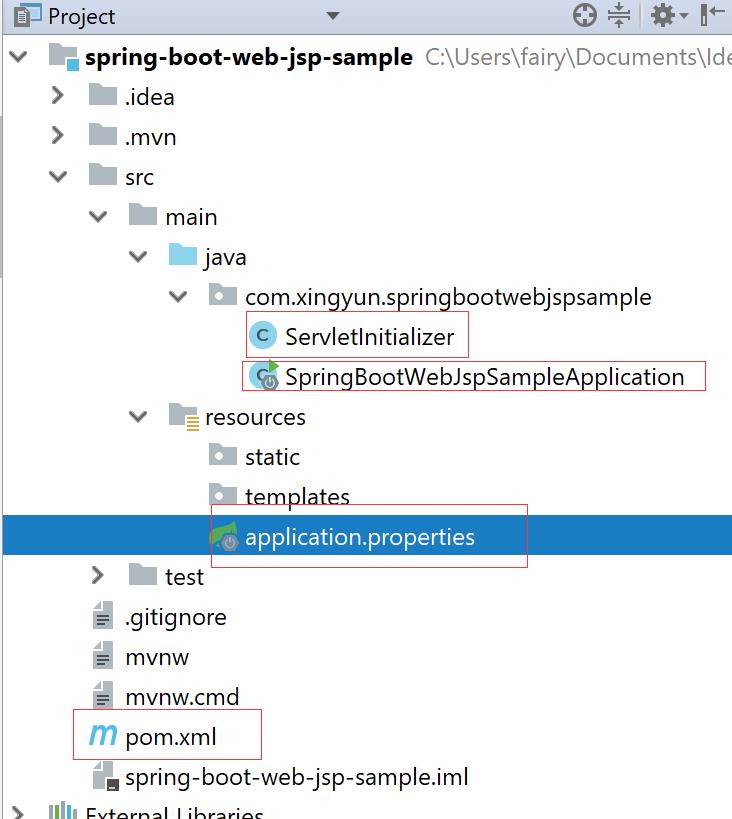
2.6 创建成功后你应该能看到这样的项目结构
2.7 配置JPS页面匹配前后缀路径
application.properties
spring.mvc.view.prefix=/WEB-INF/views/
spring.mvc.view.suffix=.jsp
2.8 必须手动创建 webapp/WEB-INF 文件夹
文件夹目录结构如图所示
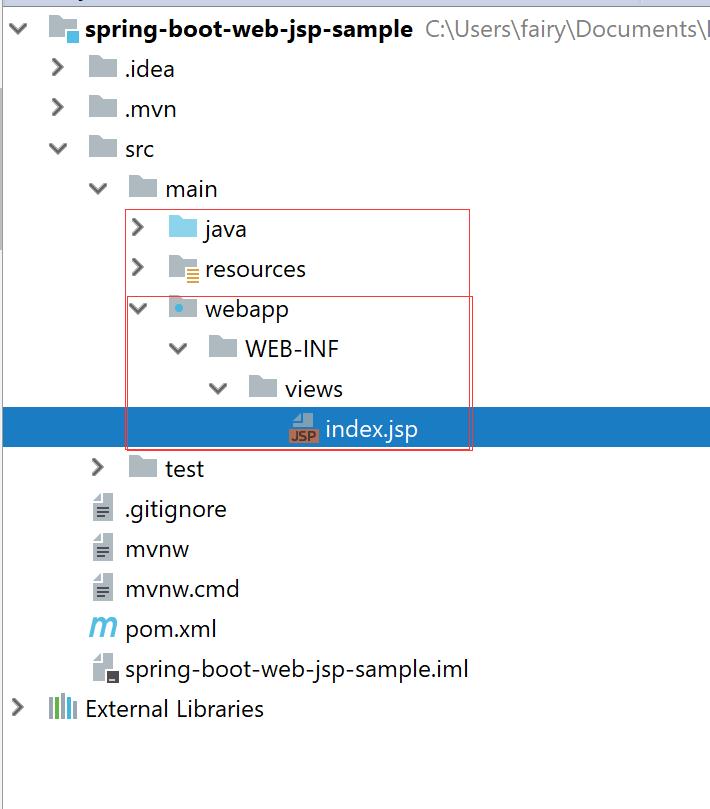
Tips:这里注意下jsp路径必须和刚才配置的路径保持一致
2.9 修改index.jsp
<%--
  Created by IntelliJ IDEA.
  User: fairy
  Date: 4/6/2018
  Time: 9:56 AM
  To change this template use File | Settings | File Templates.
--%>
<%@ page contentType="text/html;charset=UTF-8" language="java" %>
<html>
<head>
    <title>Title</title>
</head>
<body>
  Hello World,Spring Boot 2.0 JSP Sample
</body>
</html>
2.10 必须实现SpringBootServletInitializer 接口并且重写方法
我们打开ServletInitializer.java可以看到IDE已经自动为我们实现了这个接口并且重写了这个方法
ServletInitializer.java
package com.xingyun.springbootwebjspsample;

import org.springframework.boot.builder.SpringApplicationBuilder;
import org.springframework.boot.web.servlet.support.SpringBootServletInitializer;

public class ServletInitializer extends SpringBootServletInitializer {

    @Override
    protected SpringApplicationBuilder configure(SpringApplicationBuilder application) {
        return application.sources(SpringBootWebJspSampleApplication.class);
    }

}
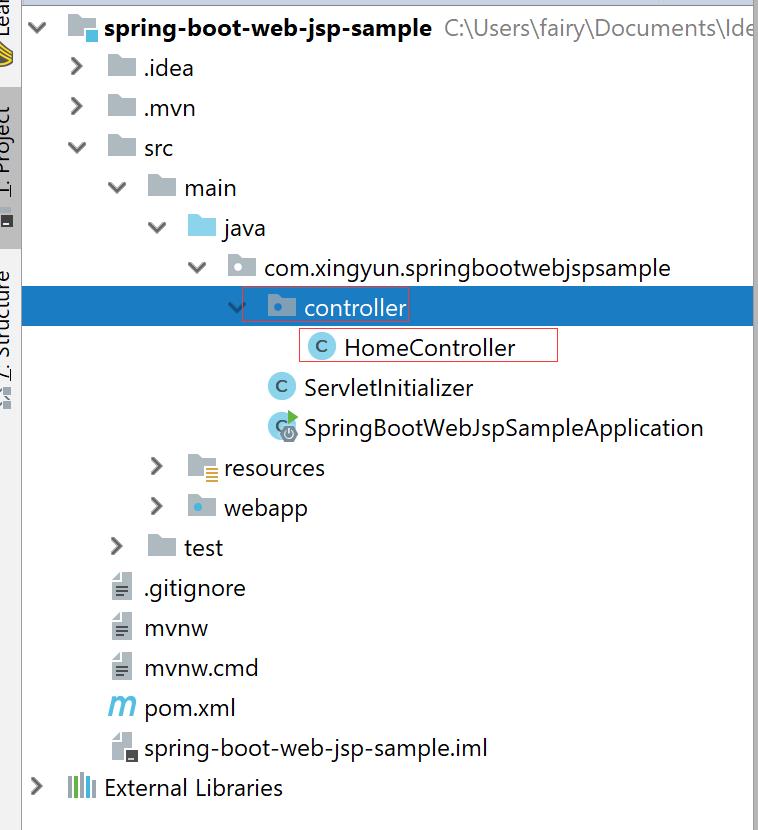
2.11创建controller 文件夹并且创建HomeController.java
HomeController.java
package com.xingyun.springbootwebjspsample.controller;

import org.springframework.stereotype.Controller;
import org.springframework.web.bind.annotation.GetMapping;

@Controller
public class HomeController {

    @GetMapping("/")
    public String home(){
        return "index";
    }
}
Tips: 这里注意下,我们使用JSP页面的话将不能使用@RestController注解,必须使用@Controller 才得行
2.12 配置POM.xml

<?xml version="1.0" encoding="UTF-8"?>
<project xmlns="http://maven.apache.org/POM/4.0.0" xmlns:xsi="http://www.w3.org/2001/XMLSchema-instance"
    xsi:schemaLocation="http://maven.apache.org/POM/4.0.0 http://maven.apache.org/xsd/maven-4.0.0.xsd">
    <modelVersion>4.0.0</modelVersion>

    <groupId>com.xingyun</groupId>
    <artifactId>spring-boot-web-jsp-sample</artifactId>
    <version>0.0.1-SNAPSHOT</version>
    <packaging>war</packaging>

    <name>spring-boot-web-jsp-sample</name>
    <description>Demo project for Spring Boot</description>

    <parent>
        <groupId>org.springframework.boot</groupId>
        <artifactId>spring-boot-starter-parent</artifactId>
        <version>2.0.1.RELEASE</version>
        <relativePath/> <!-- lookup parent from repository -->
    </parent>

    <properties>
        <project.build.sourceEncoding>UTF-8</project.build.sourceEncoding>
        <project.reporting.outputEncoding>UTF-8</project.reporting.outputEncoding>
        <java.version>1.8</java.version>
    </properties>

    <dependencies>
        <!-- Web 项目所以添加Spring MVC Web模块支持-->
        <dependency>
            <groupId>org.springframework.boot</groupId>
            <artifactId>spring-boot-starter-web</artifactId>
        </dependency>

        <!--jsp页面使用jstl标签-->
        <dependency>
            <groupId>javax.servlet</groupId>
            <artifactId>jstl</artifactId>
        </dependency>

        <!--Provided  start-->
        <!--War包部署到外部的Tomcat中已经包含了这些,
        所以需要添加以下依赖
        否则会和内嵌的Tomcat 容器发生冲突
        -->
        <dependency>
            <groupId>org.springframework.boot</groupId>
            <artifactId>spring-boot-starter-tomcat</artifactId>
            <scope>provided</scope>
        </dependency>
        <!--用于编译jsp-->
        <dependency>
            <groupId>org.apache.tomcat.embed</groupId>
            <artifactId>tomcat-embed-jasper</artifactId>
            <scope>provided</scope>
        </dependency>
        <!--Provided  End-->
        <dependency>
            <groupId>org.springframework.boot</groupId>
            <artifactId>spring-boot-starter-test</artifactId>
            <scope>test</scope>
        </dependency>
    </dependencies>

    <build>
        <plugins>
            <plugin>
                <groupId>org.springframework.boot</groupId>
                <artifactId>spring-boot-maven-plugin</artifactId>
            </plugin>
        </plugins>
    </build>

</project>
Tips:
我们需要添加web模板支持,所以要添加spring-boot-starter-web
由于我们在JSP页面需要使用JSP标签库,所以要加入JSTL标签库依赖
War包部署到外部的Tomcat中已经包含了这些,所以需要添加以下依赖
spring-boot-starter-tomcat 和 tomcat-embed-jasper
否则会和内嵌的Tomcat 容器发生冲突,并且<scope>provided</scope>不能修改也不能注释掉
关于这个插件如果需要做单元测试,请添加,如果不做单元测试也可以不添加
           <plugin>
                <groupId>org.apache.maven.plugins</groupId>
                <artifactId>maven-surefire-plugin</artifactId>
                <configuration>
                    <useSystemClassLoader>false</useSystemClassLoader>
                </configuration>
            </plugin>
2.13 部署war 包
到了最后这一步,千万不要急着Run As Java Application
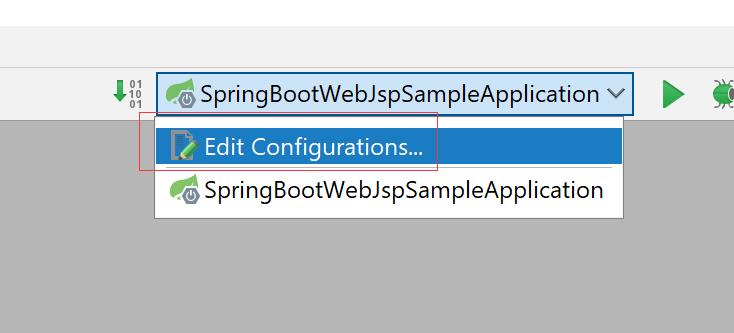
2.13.1 点击“Edit configurations”
2.13.2 点击‘+’号,选择tomcat Server ---> Local
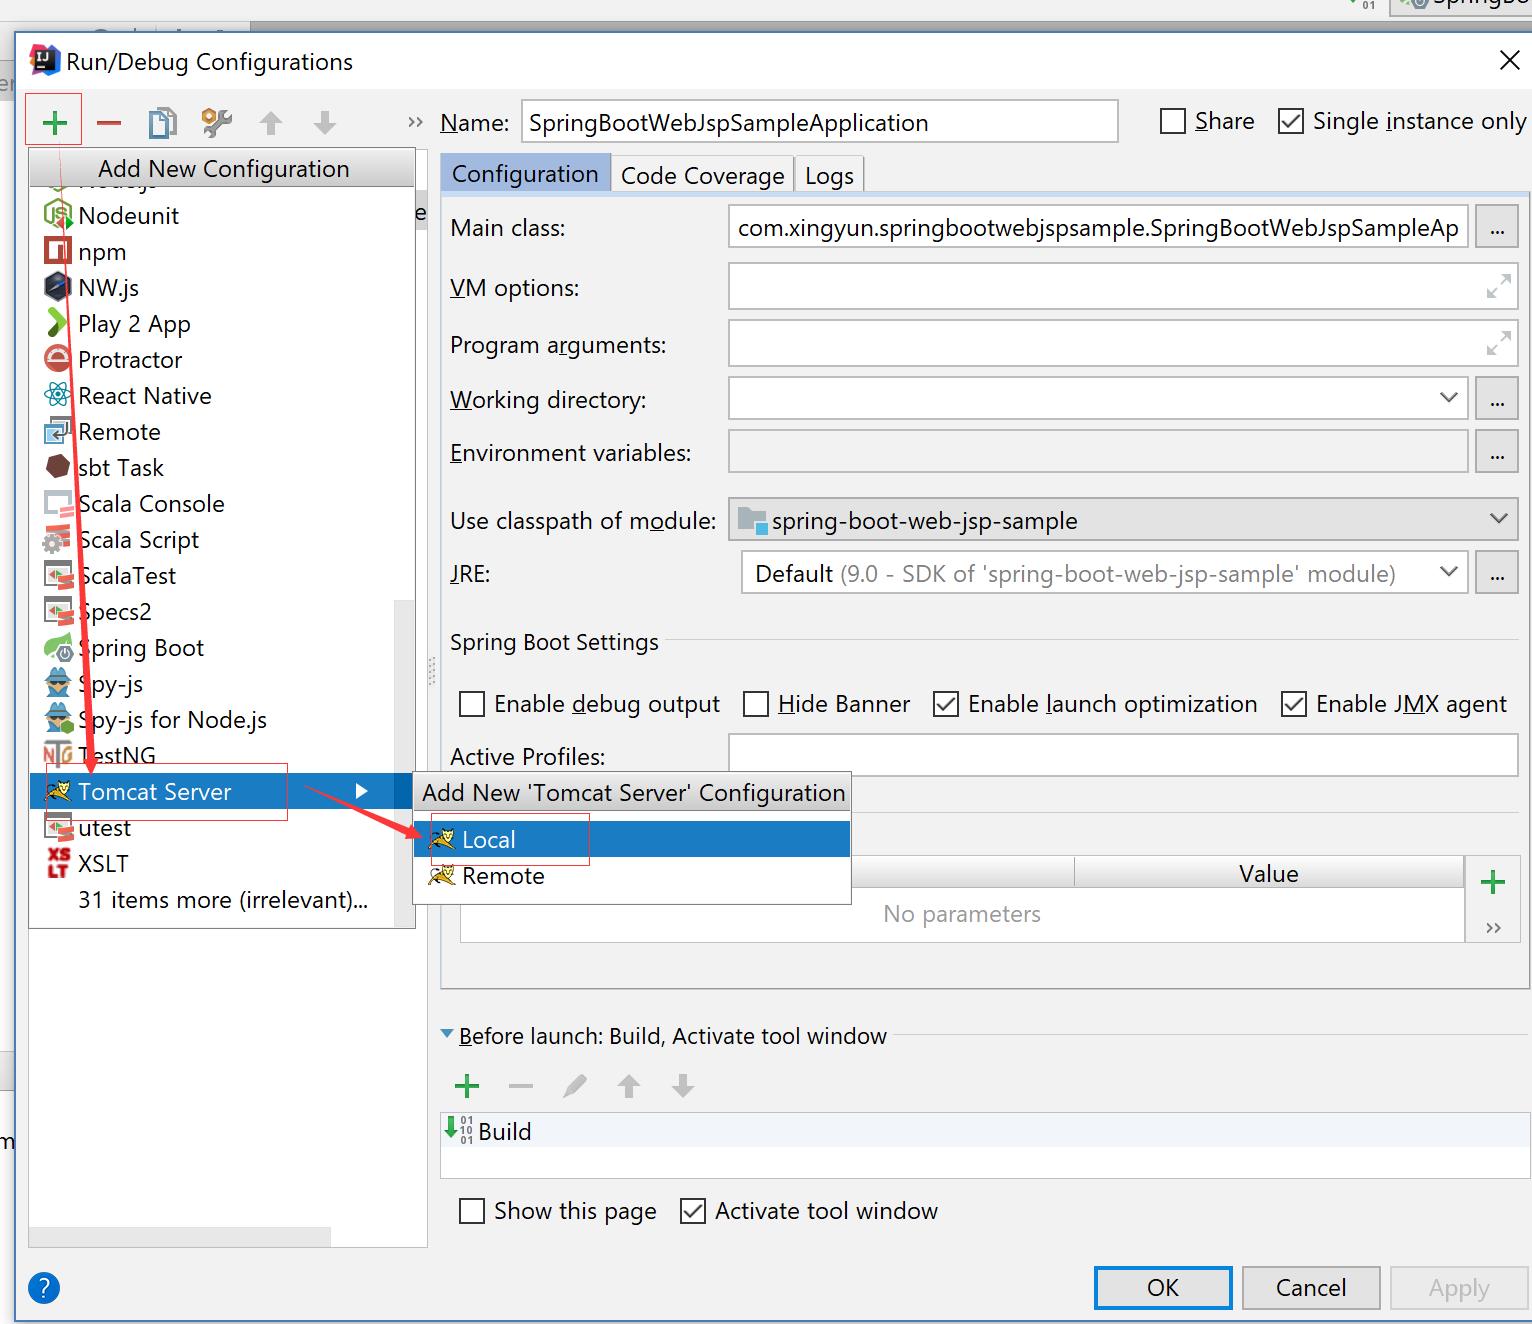
2.13.3 编辑名称,点击Fix --------> Apply-------> OK
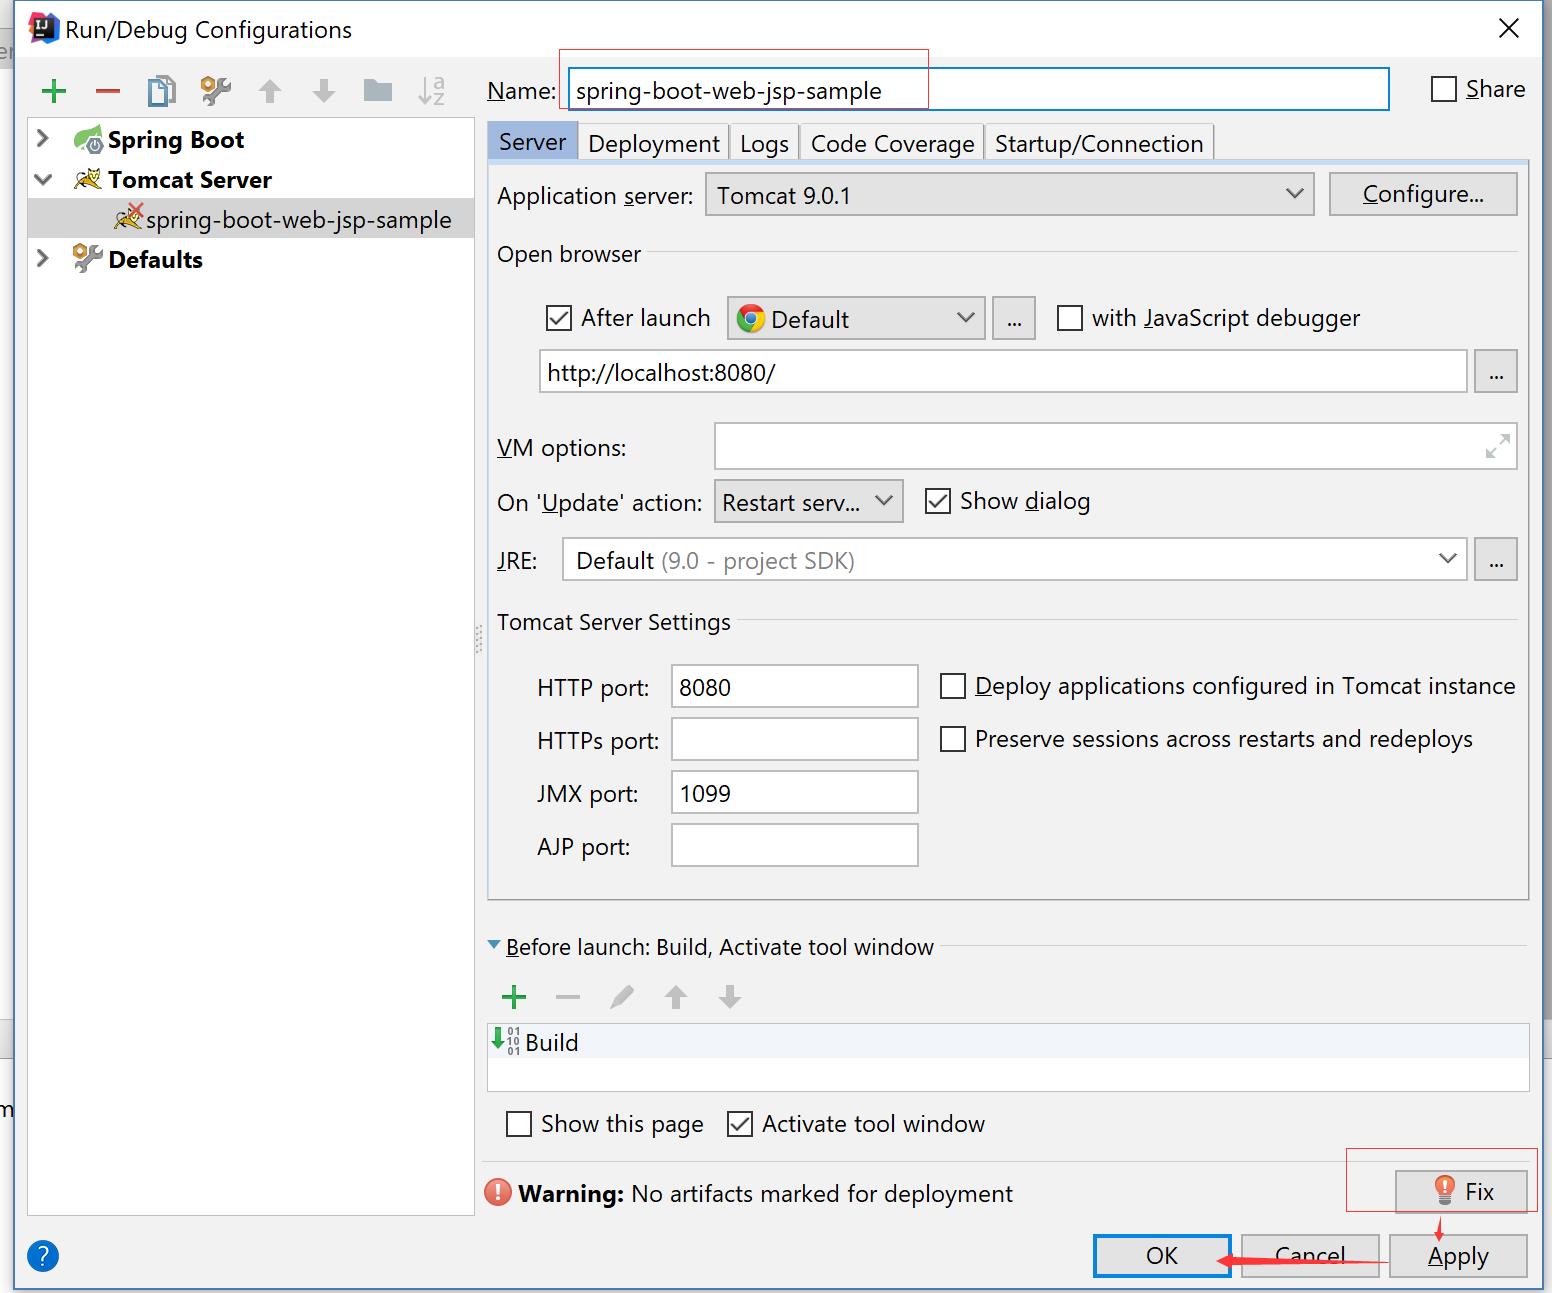
然后点击启动按钮

程序会自动打开:http://localhost:8080

3. 本博文项目案例源码
4. 可能出现的问题
在初次学习时候可能会出现一些常见的异常,可以移步去我的CSDN博客看这篇文章
细数Spring Boot 中容易中招的那些坑
https://blog.csdn.net/hadues/article/details/79334355
@ConfigurationProperties(prefix = "xxx")的值取出为空
https://blog.csdn.net/hadues/article/details/79123645
真正解决方案:java.lang.ClassNotFoundException: javax.xml.bind.JAXBException
https://blog.csdn.net/hadues/article/details/79188793
参考文章:https://www.jianshu.com/p/c544e9a9e96f
IDEA 热部署 https://liuyanzhao.com/7105.html
以上是关于Spring Boot 2.0 使用模板引擎返回JSP页面实战的主要内容,如果未能解决你的问题,请参考以下文章
