Spring Boot 基础快速构建项目,在浏览器和后台显示输出结果
Posted 林月明
tags:
篇首语:本文由小常识网(cha138.com)小编为大家整理,主要介绍了Spring Boot 基础快速构建项目,在浏览器和后台显示输出结果相关的知识,希望对你有一定的参考价值。
一、代码演示及操作步骤
1、创建Web项目
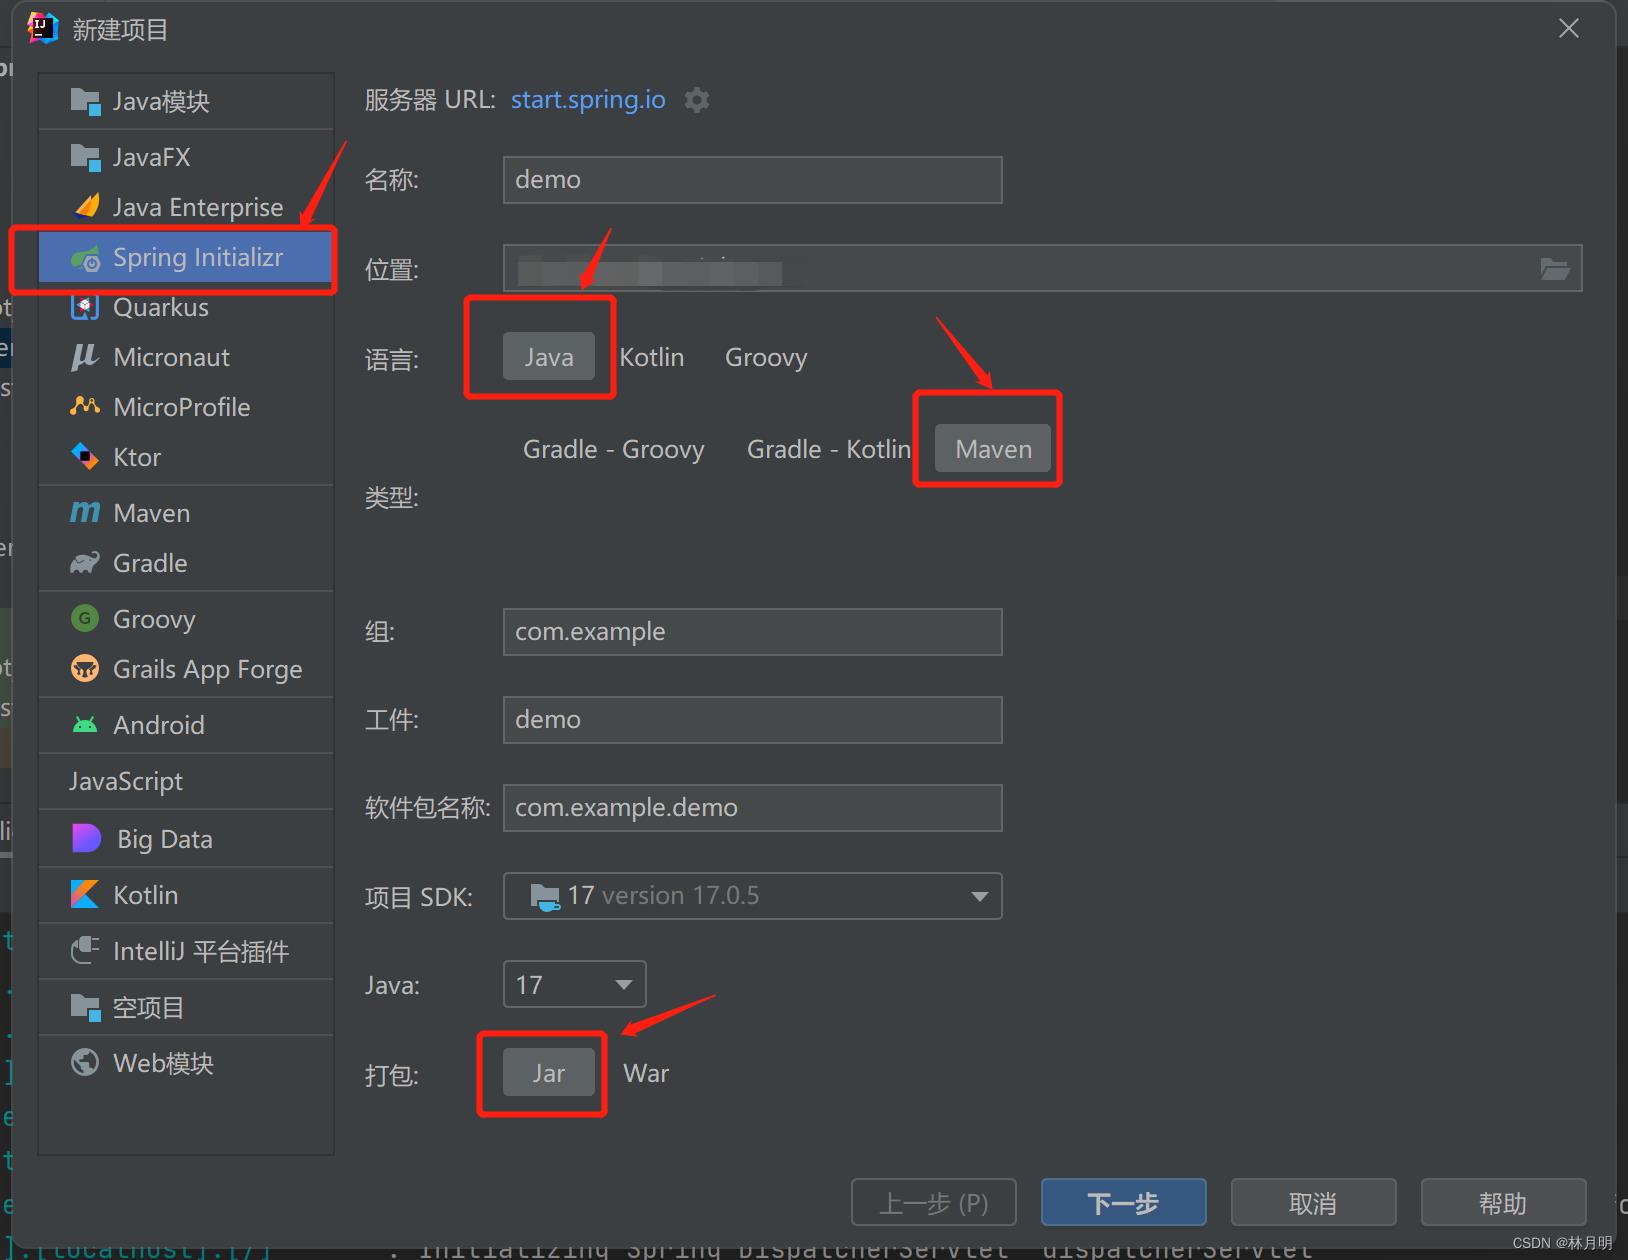
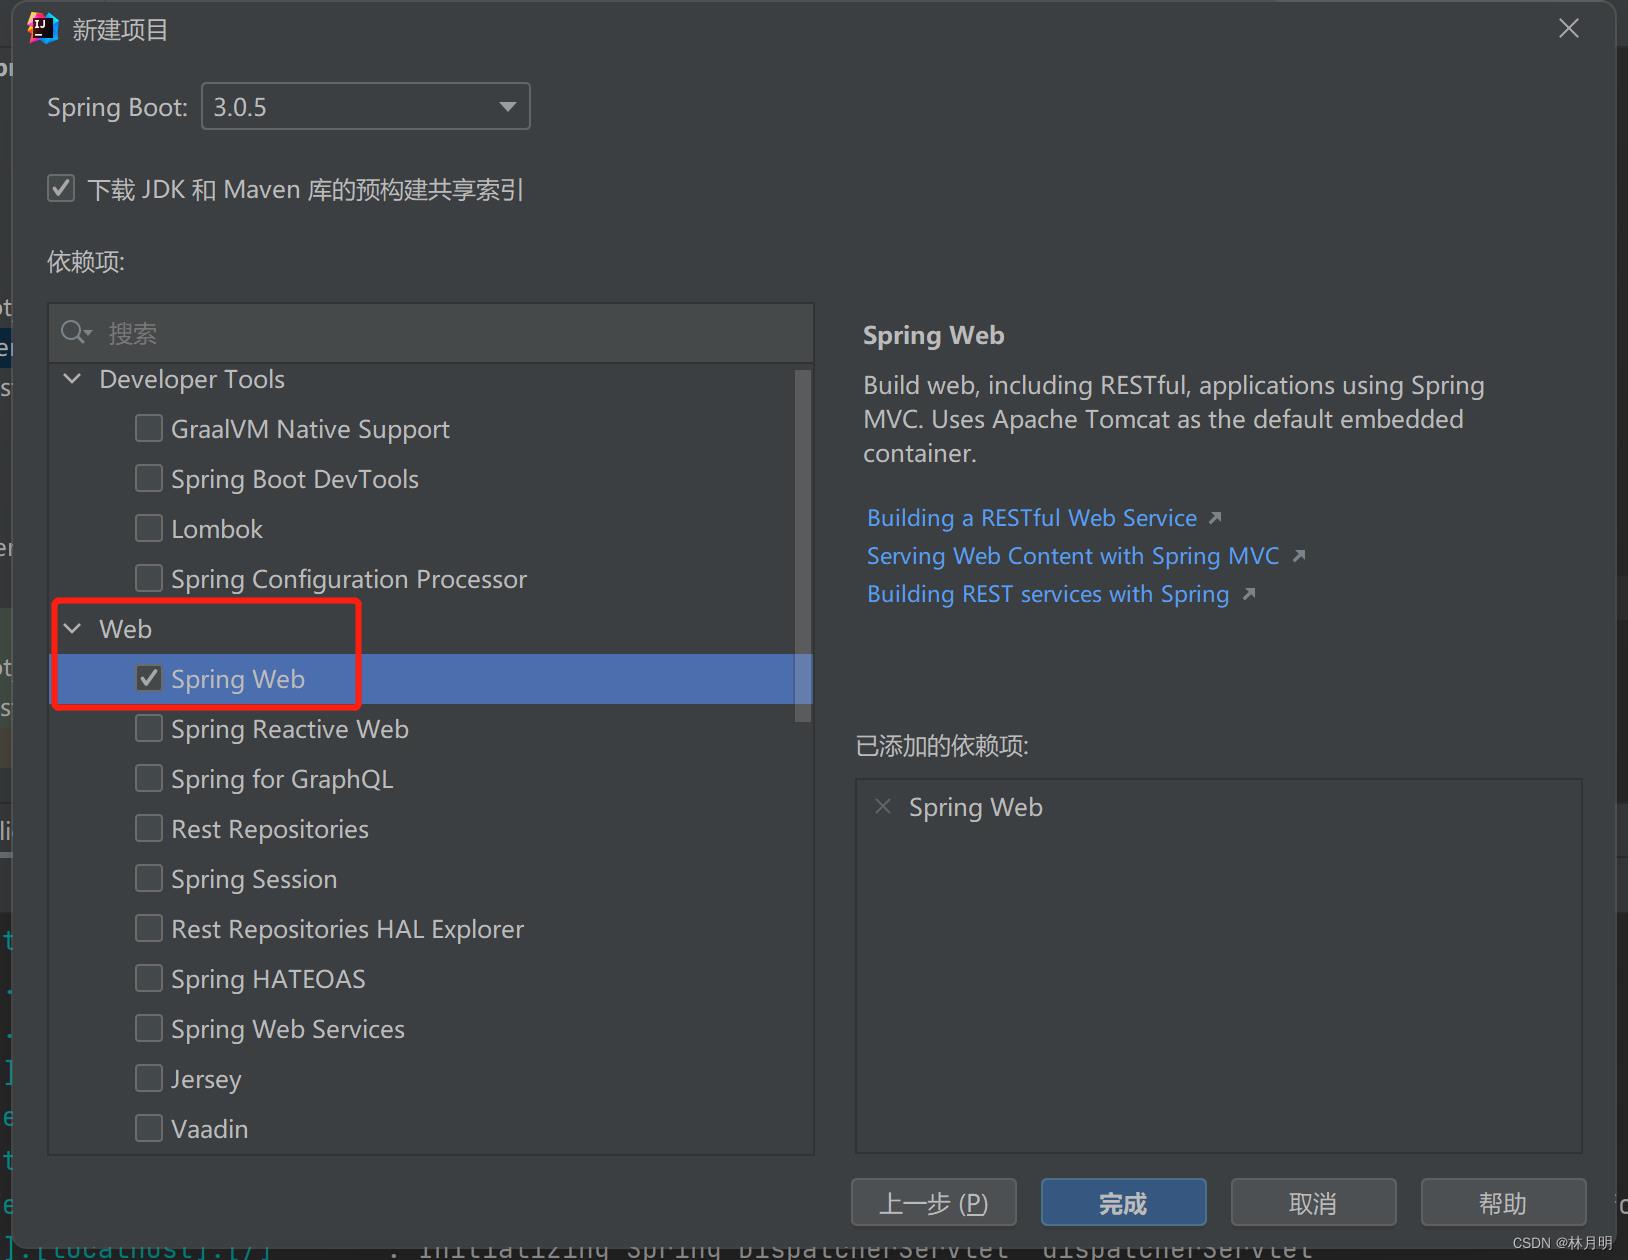
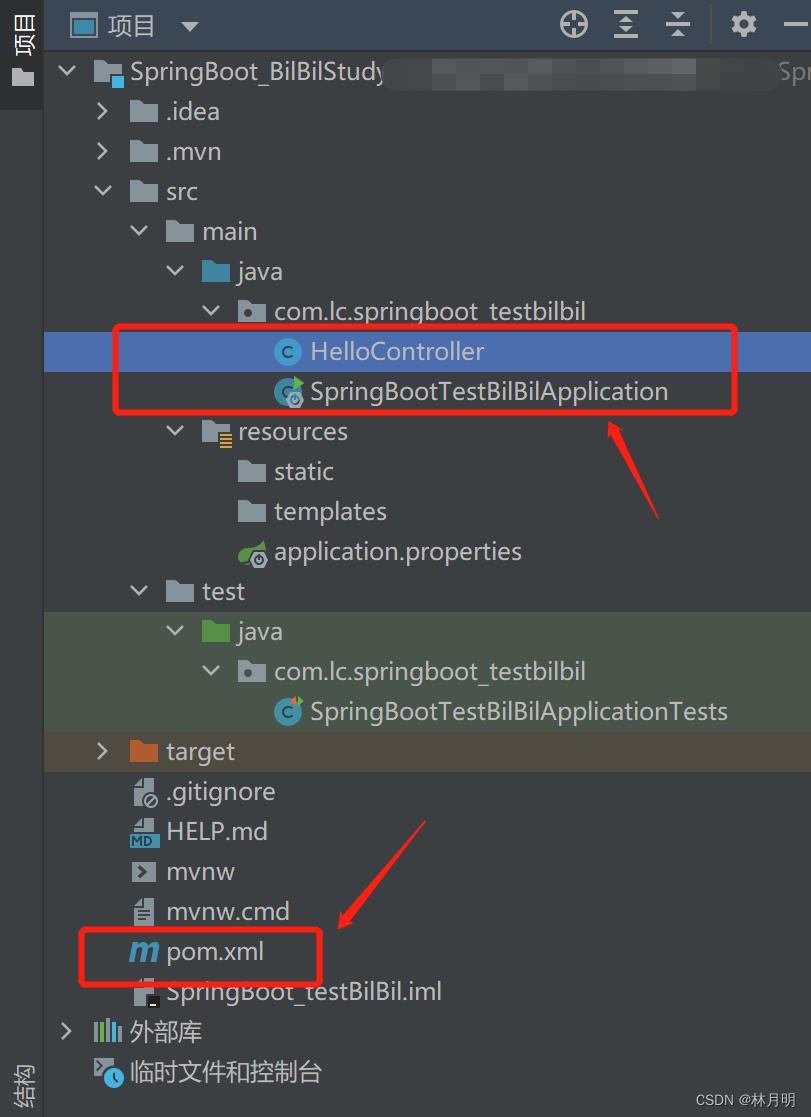
2、项目结构
在与Application同级目录下创建Controller。重点关注pom、Application、Controller三个文件。
3、代码练习
3.1在浏览器输出Hello World
1)Controller
package com.lc.springboot_testbilbil;

import org.springframework.web.bind.annotation.RequestMapping;
import org.springframework.web.bind.annotation.RestController;

@RestController
public class HelloController
    @RequestMapping("/hello")
    public String hello()
        return "Hello World!";
2)Application
package com.lc.springboot_testbilbil;

import org.springframework.boot.SpringApplication;
import org.springframework.boot.autoconfigure.SpringBootApplication;

@SpringBootApplication
public class SpringBootTestBilBilApplication

    public static void main(String[] args)
        SpringApplication.run(SpringBootTestBilBilApplication.class, args);
3)运行结果:
后台:

根据后台提示的端口8080,浏览器地址输入localhost:8080/hello可以得到代码输出结果:

3.2 YAML数据格式和数据获取
配置文件在resources根目录下。在同一级目录下优先级从高到低为:properties>yml>yaml。
1)创建yml文件

2).yml
 server:
   port: 8081

 name : XiaoLi
#对象
 person1:
   name1 : $name
  #XiaoLi
   age1 : 20

#对象行内写法
 person2 : name2: XiaoYue, age2: 30

#数组
 address1 :
   -Nanning
   -Liuzhou

  #数组行内写法
 address2 : [Nanning,Liuzhou]

#纯量
 msg1 : 'hello \\n world'
#不会识别转义字符,导致原样输出
 msg2 : "hello \\n world"
#会识别转义字符
3)Controller
package com.lc.springboot_testbilbil;

import org.springframework.beans.factory.annotation.Autowired;
import org.springframework.beans.factory.annotation.Value;
import org.springframework.core.env.Environment;
import org.springframework.web.bind.annotation.RequestMapping;
import org.springframework.web.bind.annotation.RestController;

@RestController
public class HelloController

    @Value("$name")
    private String Name;

    @Value("$person1.name1")
    private String Name1;

    @Autowired
    private Environment env;

    @RequestMapping("/helloYML")
    public String hello()
        System.out.println(Name);
        System.out.println(Name1);
        System.out.println("person2.name是"+env.getProperty("person2.name2"));
        System.out.println("person2.age是"+env.getProperty("person2.age2"));
        System.out.println("person1.name是"+env.getProperty("person1.name1"));
        System.out.println("person1.age是"+env.getProperty("person1.age1"));
        return "Hello World! 你好林月明!";
4)Application
package com.lc.springboot_testbilbil;

import org.springframework.boot.SpringApplication;
import org.springframework.boot.autoconfigure.SpringBootApplication;

@SpringBootApplication
public class SpringBootTestBilBilApplication

    public static void main(String[] args)
        SpringApplication.run(SpringBootTestBilBilApplication.class, args);
5)运行结果

 注:刷新浏览器后,后台才会出现输出结果
二、参考链接
1、黑马程序员SpringBoot教程https://www.bilibili.com/video/BV1Lq4y1J77x?p=5&vd_source=841fee104972680a6cac4dbdbf144b50
2、报错解决
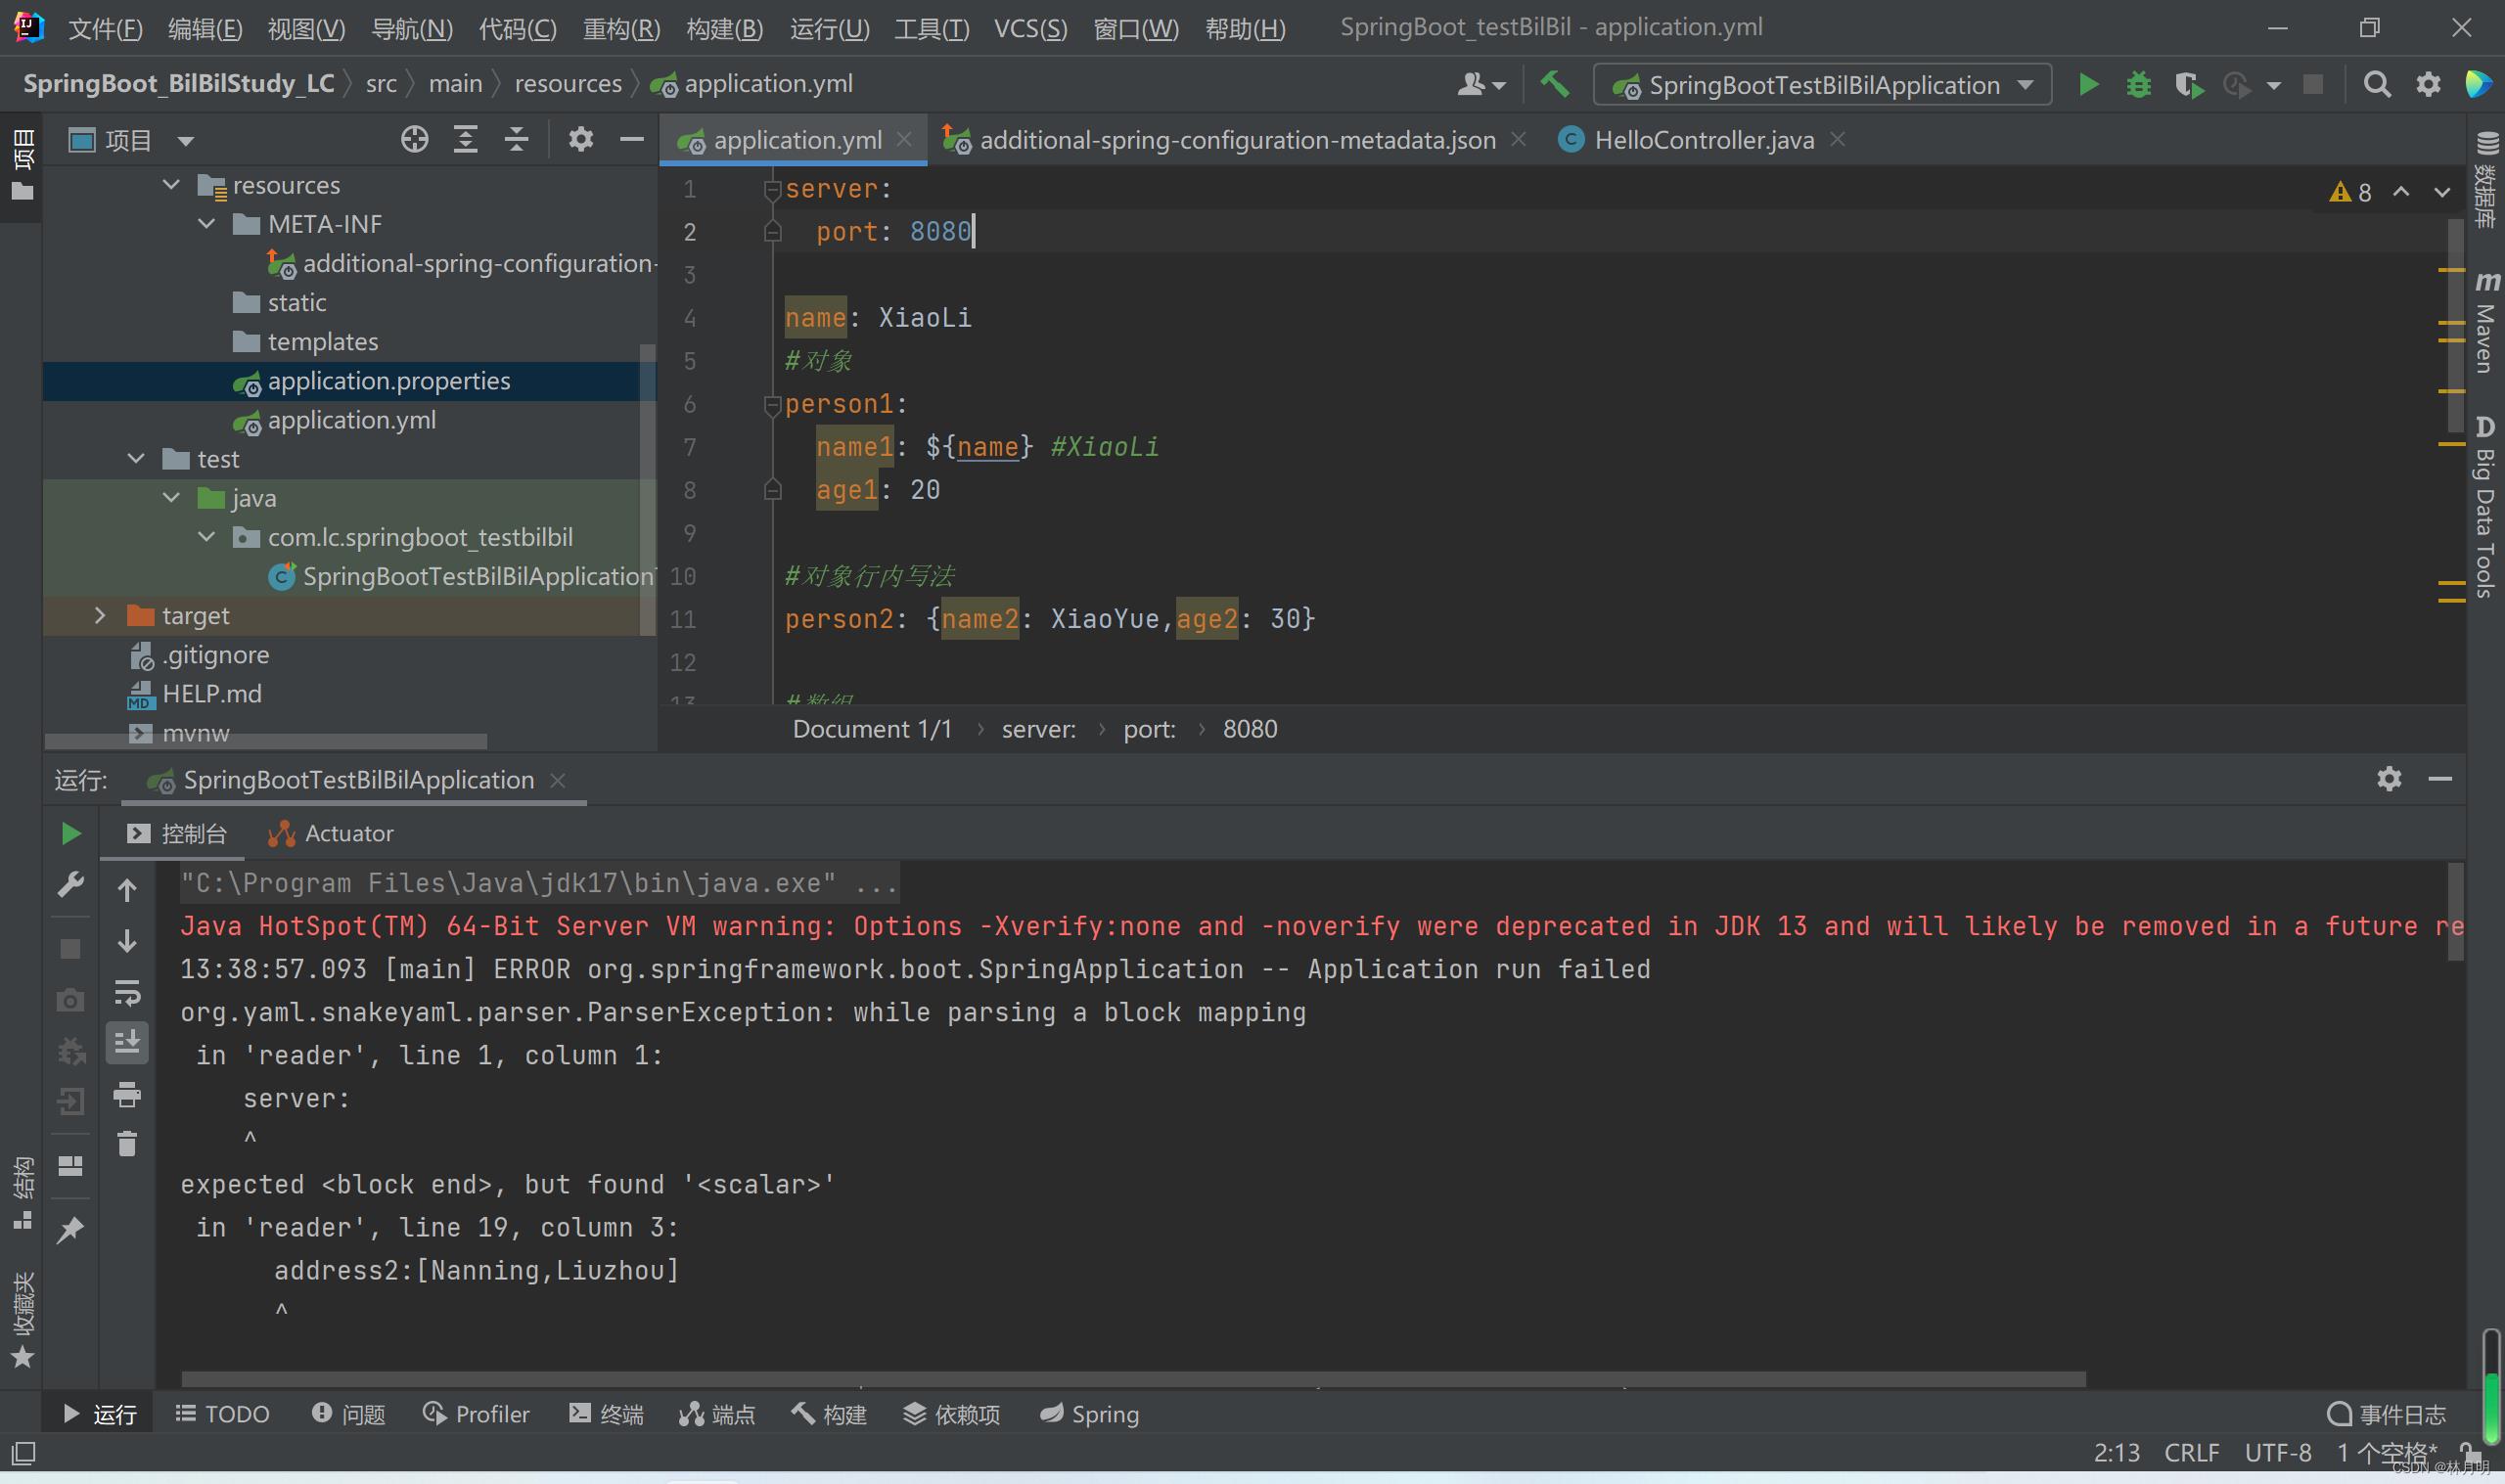
1)报错expected <block end>, but found BlockMappingStart......
解决方法:每个配置行前需要有空格!!!每个“:”两边需要有空格!!!数组中间加空格!!!
参考链接:
https://www.cnblogs.com/chenkeyu/p/6858342.html
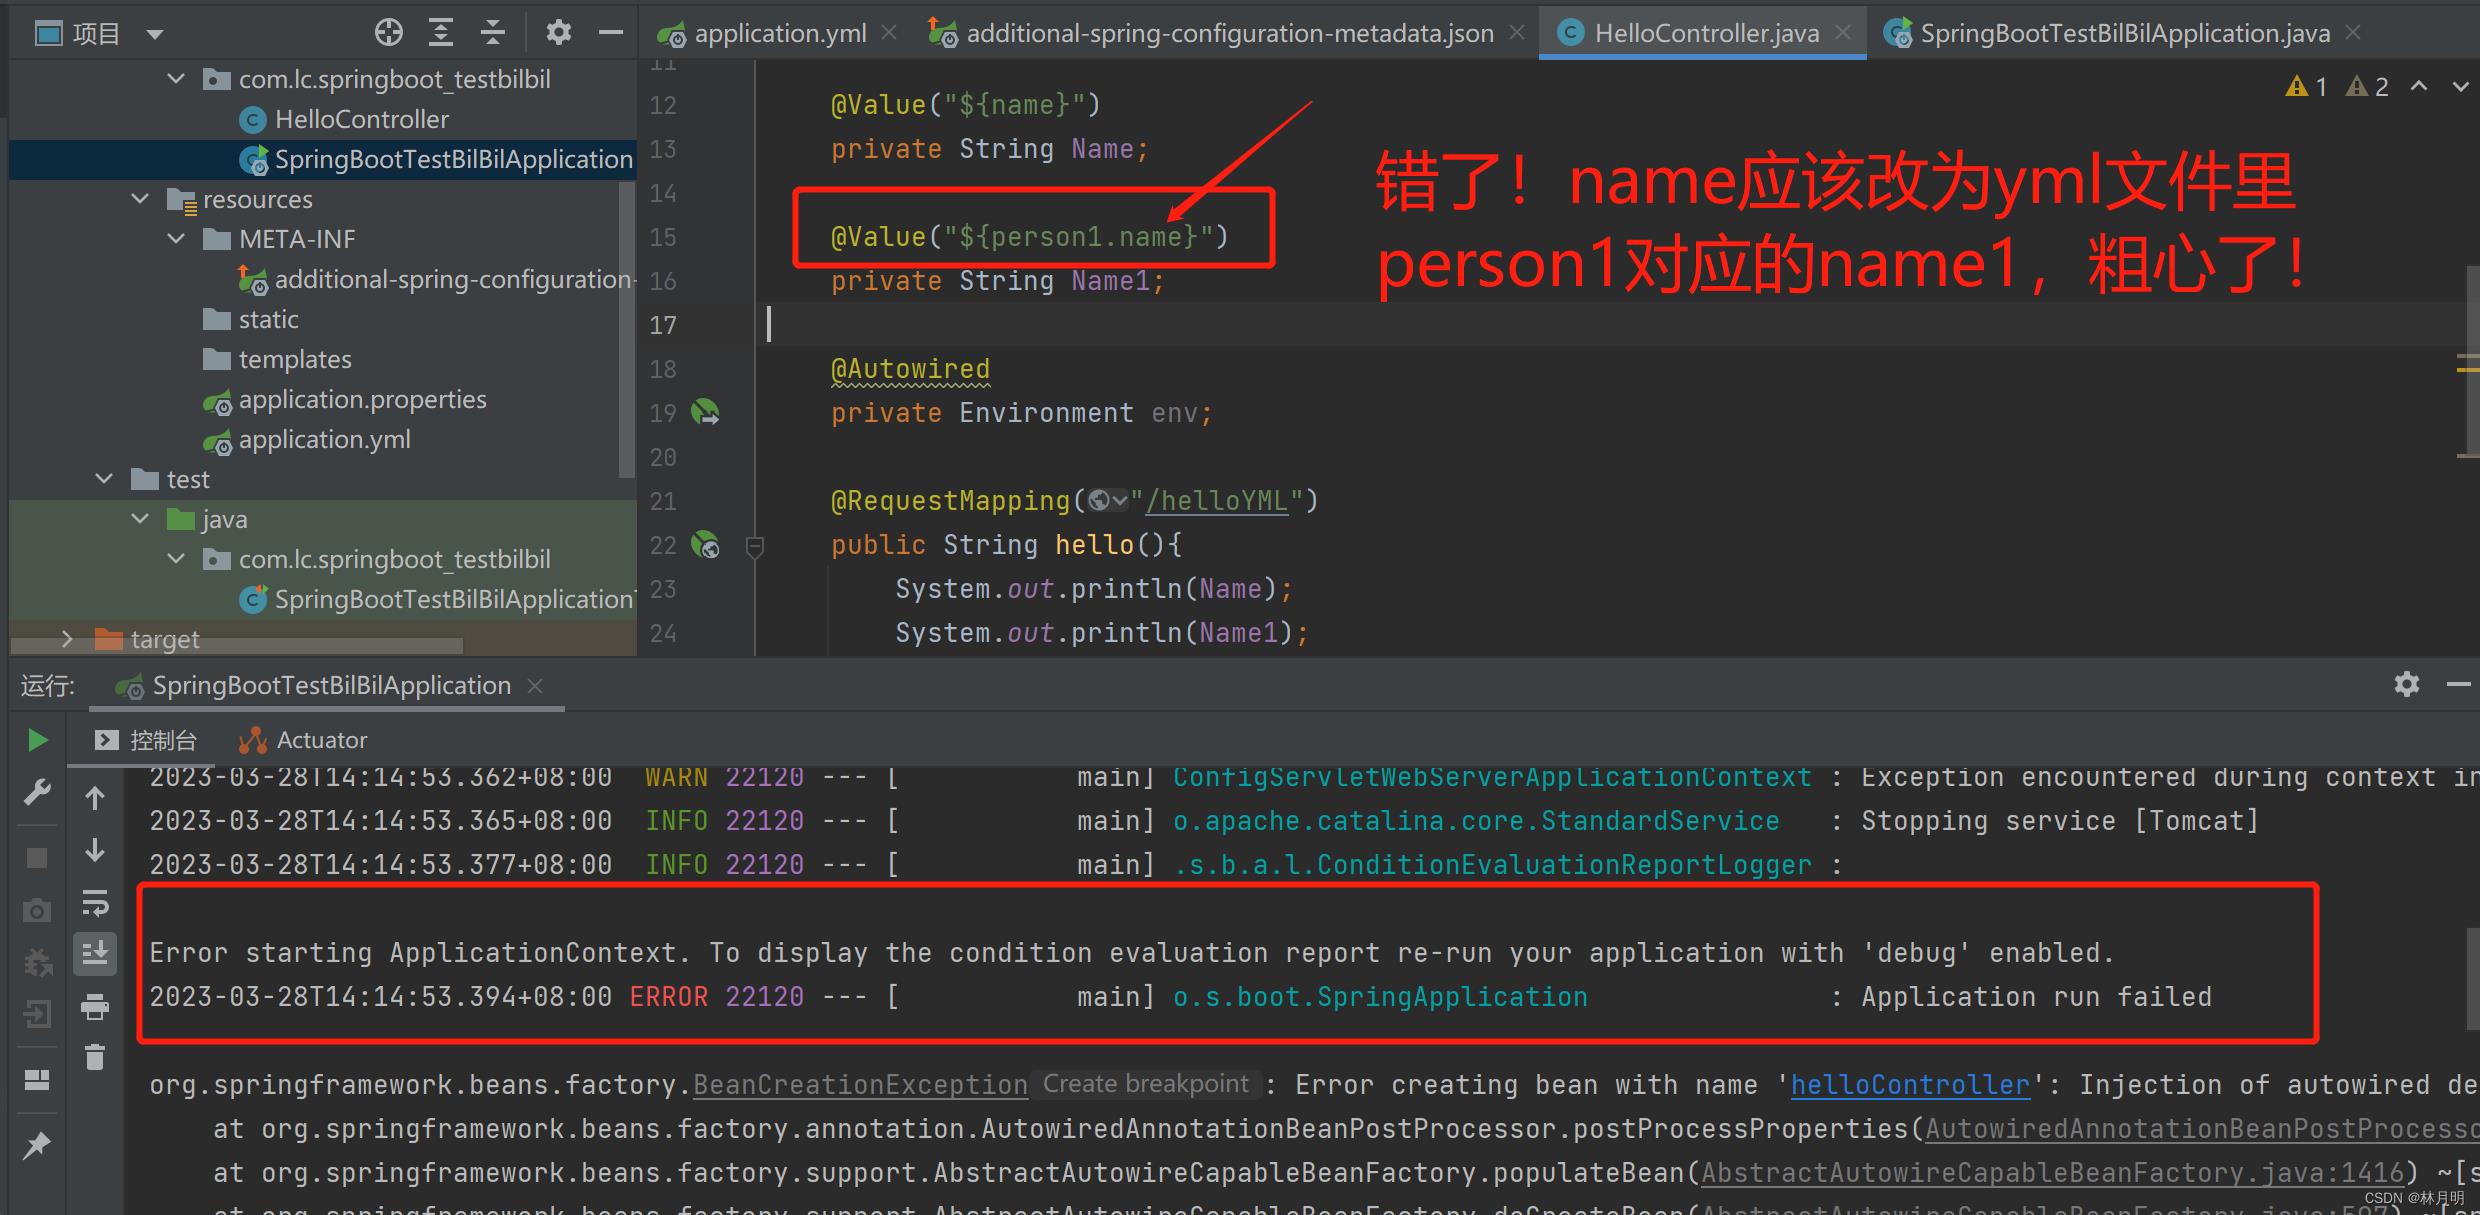
2)报错:Error starting ApplicationContext. To display the condition evaluation report re-run your application with 'debug' enabled.
解决方法:由于自己粗心,写错了引用字段,改正后就对了
其他参考链接:https://blog.csdn.net/m0_50762431/article/details/122143601
以上是关于Spring Boot 基础快速构建项目,在浏览器和后台显示输出结果的主要内容,如果未能解决你的问题,请参考以下文章