javascript运动系列第七篇——鼠标跟随运动
Posted 小火柴的蓝色理想
tags:
篇首语:本文由小常识网(cha138.com)小编为大家整理,主要介绍了javascript运动系列第七篇——鼠标跟随运动相关的知识,希望对你有一定的参考价值。
前面的话
运动除了直线运动和曲线运动两种运动形式外,还有一种运动形式是鼠标跟随运动,而这种跟随运动需要用到三角函数的相关内容或者需要进行比例运算。本文将以几个小实例来介绍鼠标跟随运动的相关内容
眼球转动
在很多网页中,都存在着跟随运动,比如眼球转动。鼠标在网页中移动时,眼球也会跟着朝相应方向转动

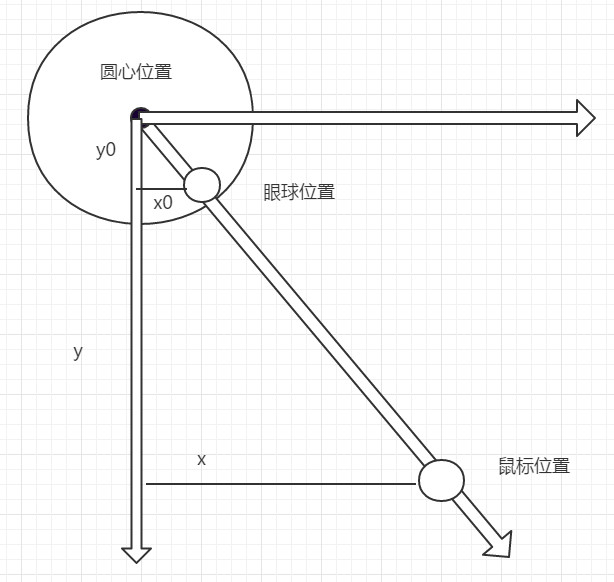
上面是眼球转动的示意图,(x0,y0)是眼球的位置,而(x,y)是鼠标的位置。设直线与垂直方向的夹角为a,假设圆心点坐标为(0,0),可以得到以下公式
    tan(a) = x/y = x0/y0
    x0 = r*sin(a)
    y0 = r*cos(a)
在mousemove事件中,可以很容易的得到鼠标位置(x,y),由此求出夹角a,进而可以求出眼球的位置
设左眼为ball1,右眼为ball2。左眼的圆心坐标是(39,72),右眼的圆心坐标是(106,68),眼球可以移动的半径是12px
<!DOCTYPE html>
<html lang="en">
<head>
<meta charset="UTF-8">
<title>Document</title>
<style>
#test{position: absolute;top: 100px;left: 200px;}
#ball1{position: absolute;top: 62px;left: 28px;}
#ball2{position: absolute;top: 58px;left: 96px;}
</style>
</head>
<body>
<div id="test">
    <img src="head.png" alt="body">
    <img id="ball1" src="ball.png" alt="ball">
    <img id="ball2" src="ball.png" alt="ball">
</div>
<script>
//声明脑袋的默认偏移
var offsetLeft = test.offsetLeft;
var offsetTop = test.offsetTop;
//声明左眼夹角a1、右眼夹角a2
var a1,a2;
//声明左眼圆心(X1,Y1)、右眼圆心(X2,Y2)
var X1 = 38,Y1 = 72,X2 = 106,Y2 = 68;
//声明半径
var R = 12;
document.onmousemove = function(e){
    e = e || event;
    //获取鼠标坐标
    var x = e.clientX;
    var y = e.clientY;
    //更新夹角a1、a2
    a1 = Math.atan2(x-X1-offsetLeft,y-Y1-offsetTop);
    a2 = Math.atan2(x-X2-offsetLeft,y-Y2-offsetTop);
    //更新左眼、右眼的left、top值
    ball1.style.left = R*Math.sin(a1) + X1 -10 + \'px\';
    ball1.style.top = R*Math.cos(a1) + Y1 -10+ \'px\';
    ball2.style.left = R*Math.sin(a2) + X2 -10 + \'px\';
    ball2.style.top = R*Math.cos(a2) + Y2 -10 + \'px\';
}
</script>
</body>
</html>
苹果菜单
苹果菜单中也存在着鼠标跟随运动,与鼠标距离越近的菜单项的宽高越大,越远则宽高越小

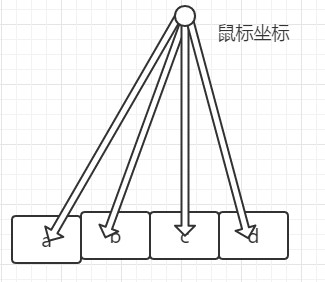
鼠标坐标可以通过mousemove事件中的clientX和clientY获得。菜单项的坐标其实是已知项。而鼠标坐标与菜单项的距离就是要求的距离,而距离与菜单项的宽高成反比
[注意]不能够将元素的自定义属性命名为x,因为x已经被浏览器使用
<!DOCTYPE html>
<html lang="en">
<head>
<meta charset="UTF-8">
<title>Document</title>
<style>
body{margin: 0;}
#test{position: absolute;bottom:10px;width: 100%;text-align: center;}
img{width: 64px;height: 64px;}
</style>
</head>
<body>
<div id="test">
    <img id="img1" src="img/1.png">
    <img src="img/2.png">
    <img src="img/3.png">
    <img src="img/4.png">
    <img src="img/5.png">
</div>
<script>
//声明菜单项的宽高值
var offsetWidth = img1.offsetWidth;
var offsetHeight = img1.offsetHeight;
//声明外层盒子的left、top值
var offsetLeft = test.offsetLeft;
var offsetTop = test.offsetTop;
//获取菜单项
var imgs = test.getElementsByTagName(\'img\');
document.onmousemove = function(e){
    e = e || event;
    //更新鼠标位置
    var x = e.clientX;
    var y = e.clientY;
    for(var i = 0; i < imgs.length; i++){
        //获取菜单项的坐标
        imgs[i].x0= imgs[i].offsetLeft+offsetLeft+imgs[i].offsetWidth/2;
        imgs[i].y0 = imgs[i].offsetTop + offsetTop + imgs[i].offsetHeight/2;
        //更新鼠标与菜单项的距离
        imgs[i].len =Math.sqrt((x-imgs[i].x0)*(x-imgs[i].x0) + (y-imgs[i].y0)*(y-imgs[i].y0));
        //限制范围
        if(imgs[i].len > 150){
            imgs[i].len = 150;
        }
        //更新菜单项的宽高
        imgs[i].style.width = (1-imgs[i].len/300)*2*offsetWidth + \'px\';
        imgs[i].style.height = (1-imgs[i].len/300)*2*offsetHeight + \'px\';

    }
}
</script>
</body>
</html>
方向跟随
有许多网页都有方向跟随的效果。鼠标从哪个方向移入,元素就跟着从哪个方向移入。鼠标从哪个方向移出,类似地,元素也跟着从哪个方向移出
移入移出的运动效果使用匀速直线运动即可,这里主要需要判断方向

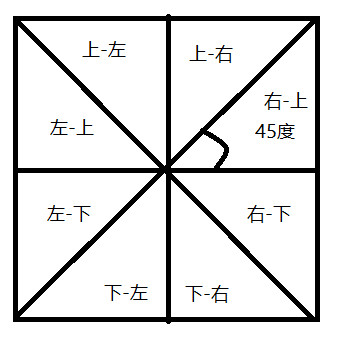
由示意图中所示,可以把一个正方形的元素分成(上-右、上-左、左-上、左-下、下-右、下-左、右-上、右-下)这8个部分,每个部分是一个等腰直角三角形,当元素进入某个区域时,横线前面的方向就表示元素的方向
假设正方形的中心坐标为(x0,y0),动态元素(move)进入时的坐标为(x,y),以这两个坐标组成的直线与水平正方向的直线的夹角作为基准角,假设为a,则通过确定夹角a的范围,可以确定动态元素(move)进入的方向
-45<a<45时,进入方向为右
45<a<135时,进入方向为上
a>135或a<-135时,进入方向为左
-135<a<-45时,进入方向为下
确定好动态元素(move)进入的方向后,需要根据方向,将动态元素(move)瞬间变换到对应的位置。然后,动态元素(move)进行匀速直线运动,最终停止在与静态元素(test)重合的位置
动态元素(move)移出静态元素(test)的范围时,要注意的是,并不会触发静态元素(test)的mouseout事件。因为,此时鼠标一直处于动态元素(move)上。所以,触发的是动态元素(move)的mouseout事件
<!DOCTYPE html> <html lang="en"> <head> <meta charset="UTF-8"> <title>Document</title> <style> #box{overflow: hidden;position: relative;left: 100px;top: 100px;height: 100px;width: 300px;} .test{width: 100px;height: 100px;position: absolute;font:20px/100px \'宋体\';text-align: center;} </style> </head> <body> <div id="box"> <div class="test" style="top: 0px;left: 0px;background-color: pink;">1</div> <div class="test" style="top: 0px;left: 100px;background-color: lightcoral;">2</div> <div class="test" style="top: 0px;left: 200px;background-color: lightgreen;">3</div> <div id="move" style="width: 100px;height: 100px;background-color: lightblue;position: absolute;top: -100px;left: -100px;"></div> </div> <script> var tests = box.getElementsByTagName(\'div\'); for(var i = 0; i < tests.length; i++){ tests[i].onmouseover = fn; } //鼠标移出动态元素(move)时,再将fn()函数置于所有静态元素上 move.onmouseout = fn; function fn(e){ e = e || event; //阻止冒泡 if(e.stopPropagation){ e.stopPropagation(); }else{ e.cancelBubble = true; } for(var i = 0; i < tests.length; i++){ tests[i].onmouseover = fn; } var _this = this; //鼠标移入动态元素(move)时,将静态元素上的mouseover事件置空 move.onmouseover = function(){ move.innerHTML = _this.innerHTML; _this.onmouseover = null; } //声明坐标 var x = e.clientX; var y = e.clientY; //声明静态元素(test)左上角坐标(相对于父级) var x11 = this.offsetLeft; var y11 = this.offsetTop; //声明静态元素(test)中心点坐标(相对于父级) var x10 = x11 + this.offsetWidth/2; var y10 = y11 + this.offsetHeight/2; //声明静态元素(test)左上角坐标(相对于文档) var x21 = this.parentNode.offsetLeft + x11; var y21 = this.parentNode.offsetTop + y11; //声明静态元素(test)中心点坐标(相对于文档) var x20 = x21 + this.offsetWidth/2; var y20 = y21 + this.offsetHeight/2; //声明静态元素宽高 var height = this.offsetHeight; var width = this.offsetWidth; //声明并计算夹角 var a = Math.atan2(y20-y,x-x20)*180/Math.PI; //声明并计算方向 var dir; if(a > -45 && a < 45){ dir = \'right\'; }else if(a > 45 && a < 135){ dir = \'top\'; }else if(a > -135 && a < 45){ dir = \'bottom\'; }else{ dir = \'left\'; } //鼠标移入时 if(e.type == \'mouseover\'){ //更新动态元素(move)的初始位置 //移动动态元素(move)直到完全覆盖静态元素(test) if(dir == \'right\'){ move.style.left = x10 + width/2 + \'px\'; move.style.top = y10 - height/2 + \'px\'; fnMove(move,\'left\',x11) }else if(dir == \'top\'){ move.style.left = x10 - width/2 + \'px\'; move.style.top = y10 - height/2 - height + \'px\'; fnMove(move,\'top\',y11) }else if(dir == \'left\'){ move.style.left = x10 - width/2 - width + \'px\'; move.style.top = y10 - height/2 + \'px\'; fnMove(move,\'left\',x11) }else{ move.style.left Unity3D UGUI组件跟随鼠标运动