ExtJS5搭建MVVM框架
Posted 风浪子
tags:
篇首语:本文由小常识网(cha138.com)小编为大家整理,主要介绍了ExtJS5搭建MVVM框架相关的知识,希望对你有一定的参考价值。
概述
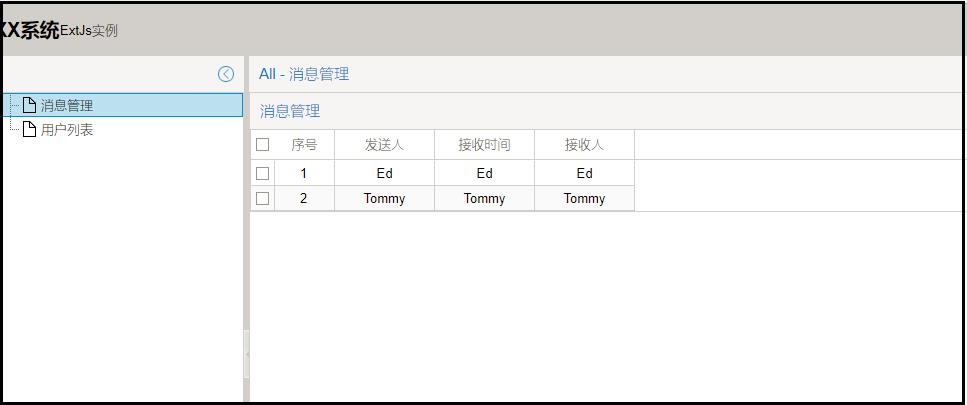
· ExtJs5能够搭建Js的MVC框架,通过配置路由能够通过左边树形菜单导航到所需的页面,效果如下:
搭建JS框架
新建home.htm页面作为ExtJs加载的主体页面,页面引入ExtJs需要的JS和ExtJs入口Js文件app.js
<!DOCTYPE html>
<html>
<head>
    <meta charset="utf-8">
    <meta http-equiv="X-UA-Compatible" content="IE=edge">
    <title>ExtJS演示</title>
    <script type="text/javascript" src="Ext/ext-all.js"></script>
    <script type="text/javascript" src="Ext/ext-locale-zh_CN.js"></script>
    <link rel="stylesheet" type="text/css" href="Ext/packages/ext-theme-crisp/build/resources/ext-theme-crisp-all_01.css">
    <script type="text/javascript" src="app.js"></script>
</head>
<body>
</body>
</html>
app.js是ExtJs框架的入口,新建ExtJs中Application程序,指定所有新建ExtJs类的命名空间必须是MyApp开头,类似 MyApp.***,另外在app.js同级目录下新建app文件夹,里面新建文件夹view和viewmodel,这些文件夹的命名和规则必须是确定,不能任意修改,否则文件加载的时候,找不到相应的Js文件;
//ExtJs的入口,加载该Js之后,自动调用launch方法内容项
Ext.application({
    name   : \'MyApp\',
    extend:\'MyApp.Application\',
    autoCreateViewport:\'MyApp.view.main.Main\',
    // controllers:[\'Users\'],
    listen: {
        controller: {
            \'#\': {
                unmatchedroute: \'onUnmatchedRoute\'
            }
        }
    },
    onUnmatchedRoute: function(hash) {
        alert(\'Unmatched\', hash);
    },
    init:function(){
      var me=this;
      me.setDefaultToken(\'all\');
    },
    launch : function() {
    }
});
在app目录下,新建Application.js,命名MyApp.Application,代码如下,切记定义Js组件的名称,必须和文件路径对应
Ext.define(\'MyApp.Application\',{
    extend:\'Ext.app.Application\',
    name:\'MyApp\',
    // stores:[
    //     \'UserStore@MyApp.store\'
    // ]
});
在app目录下,新建文件夹view\\main,里面新建main.js,主要继承Ext.container.Container容器控件,负责页面布局使用,页面布局模式采用border使用,分为头部、导航、中间页面内容展示;
Ext.define(\'MyApp.view.main.Main\',{
    extend:\'Ext.container.Container\',
    xtype:\'app-main\',
    requires:[\'MyApp.view.main.MainController\',\'MyApp.view.main.Header\',\'MyApp.view.main.Navigation\',\'MyApp.view.main.ContentPanel\'],
    controller:\'main\',
    layout:{type:\'border\'},
    items:[
    {region:\'north\',xtype:\'app-header\'},
    {region:\'west\',xtype:\'app-navigation\'},
    {region:\'center\',xtype:\'app-contentPanel\'}
    ]
});
在app\\view\\main,新建总部内容MainController.js,类型是Ext.app.ViewController。内容如下,主要负责Main.js的Action和hander的绑定,控制页面的路由导航
var com={\'message-view\':\'MyApp.view.message.MessageController\',\'UserGrid\':\'MyApp.view.user.UserGridController\'};
Ext.define(\'MyApp.view.main.MainController\',{
    extend:\'Ext.app.ViewController\',
    requires:[
    \'Ext.window.MessageBox\'
    ],
    alias:\'controller.main\',
    control:{
        \'app-navigation\':{
            selectionchange:\'onTreeNavSelectionChange\'
        }
    },
    onTreeNavSelectionChange:function(selModel,records)
    {
        var record=records[0];
        console.log(record.getId());
        if(record)
            this.redirectTo(record.getId());
    },
    routes: {
            \':id\': {
                action: \'handleRout\',
                before: \'beforeHandleRout\'
            }
        },
    handleRout: function (id) {
    console.log(\'Handle:\'+id);
        var me=this,
        mainView = me.getView(),
        navigationTree = mainView.down(\'app-navigation\'),
        contentPanel = mainView.down(\'app-contentPanel\'),
        store=navigationTree.getStore(),
        node=store.getNodeById(id);
        contentPanel.removeAll(true),
        controlName=com[id];
        Ext.create(controlName);//MyApp.view.message.MessageController
        var module = Ext.apply({}, {
            xtype: id,
            itemId: id,
            //glyph: node.get(\'glyph\'),
            title: node.get(\'text\')
            //  tooltip: node.get(\'text\')
        });
        contentPanel.add(module);
        var text = node.get(\'text\'),
        title = node.isLeaf() ? (node.parentNode.get(\'text\') + \' - \' + text) : text;
        contentPanel.setTitle(title);
        //Ext.suspendLayouts(); //暂停布局
        Ext.resumeLayouts(true); //恢复布局
    },
    beforeHandleRout: function (id, action) {
    //动态实例化controller
        action.stop();
        var me=this,
        store=Ext.StoreMgr.get(\'NavigationStore\');
        node=store.getNodeById(id);
        if(node)
        {
          action.resume();
        }
        else
        {
          Ext.Msg.alert(
            \'路由跳转失败\',
            \'找不到id为\' + id + \' 的组件. 界面将跳转到应用初始界面\',
            function() {
                me.redirectTo(\'all\');
            }
        );
          action.stop();
        }
    },
});
在app\\view\\main,新建头部Header.js,内容如下
Ext.define(\'MyApp.view.main.Header\',{
    extend:\'Ext.Container\',
    xtype:\'app-header\',
    height:52,
    layout:{type:\'hbox\',align:\'middle\'},
    items:[
        {xtype:\'component\',html:\'<h2>XX系统</h2>\'},
        {xtype:\'component\',html:\'ExtJs实例\',flex:1}
    ]
});
在app\\view\\main,新建导航Navigation.js,内容如下,PS 树形结构的id名称要和视图的xtype对应
Ext.define("MyApp.view.main.Navigation",{
    extend:\'Ext.tree.Panel\',
    xtype:\'app-navigation\',
    rootVisible:false,
    userArrows:true,
    // hideHeaders:true,
    width:250,
    minWidth:100,
    split:true,
    collapsible:true,
    store:Ext.create(\'Ext.data.TreeStore\', {
        id:\'NavigationStore\',
        root: {
            expanded: true,
            id:\'all\',
            text:\'All\',
            children: [
                {text: "消息管理", id: "message-view", leaf: true},
                {text: "用户列表", id: "UserGrid", leaf: true}
            ]
        }
    })
});
在app\\view\\main,新建总部内容ContentPanel.js,内容如下
Ext.define(\'MyApp.view.main.ContentPanel\',{
    extend:\'Ext.panel.Panel\',
    xtype:\'app-contentPanel\',
    autoScroll:true
});
在app\\view\\user,新建用户页面UserGrid.js,内容如下
Ext.define(\'MyApp.view.user.UserGrid\', {
    extend: \'Ext.grid.Panel\',
    xtype: \'UserGrid\',
    title: \'用户列表\',
    requires:[\'MyApp.store.UserStore\'],
    store:Ext.create(\'MyApp.store.UserStore\'),
    controller:\'usergrid\',
    initComponent:function(){
        var me = this;
         me.columns = [
             {xtype: \'rownumberer\',header: \'序号\', width: 60, align: \'center\'},
             {xtype: \'rownumberer\',header: \'用户名\', width: 60, align: \'center\'},
             {xtype: \'rownumberer\',header: \'年龄\', width: 60, align: \'center\'},
         ];
        me.callParent();
    },
    width: 400,
    height:600,
    border:true,
    listeners:{
        itemdblclick: {
            fn: \'userClick\',
            scope: "controller"
        }
    }
});
在app\\view\\user,新建用户视图控制器UserGridController.js,内容如下
Ext.define(\'MyApp.view.user.UserGridController\',{
    extend:\'Ext.app.ViewController\',
    alias:\'controller.usergrid\',
    requires:["MyApp.view.user.UserGrid"],
    userClick:function( view, record, item, index, e, eOpts){
        alert(\'hello\'+record.get(\'name\'))
    }
});
在app\\model ,新建UserModel.js,内容如下
Ext.define(\'MyApp.model.UserModel\', {
    extend: \'Ext.data.Model\',
    fields: [
        {name: \'name\', type: \'string\'},
        {name: \'age\',  type: \'int\'},
        {name: \'phone\',  type: \'string\'}
    ]
});
在app\\store,新建UserStore.js,内容如下
Ext.define(\'MyApp.store.UserStore\', {
    extend: \'Ext.data.Store\',
    model: \'MyApp.model.UserModel\',
    autoLoad: true,
    alias:\'user-store\',
    proxy: {
        type: \'ajax\',
        api: {
            read: \'data/users.json\'
        },
        reader: {
            type: \'json\',
            rootProperty: \'users\',
            successProperty: \'success\'
        }
    }
});
需要注意事项:
1、文件目录必须按Ext.define的定义的顺序建立,这个是默认约定的,否则找不到文件Js;
2、导航的id值必须是和新建的控件名称的xtype类型对应,否则加载控件失败;
3、ViewController和View绑定,在Js里面requires的内容项,默认会加载相应的Js文件;
4、如果提示,extjs Cannot read property \'isBufferedStore\' of undefined,主要原因在于store内容为空导致的;
完整代码如下
以上是关于ExtJS5搭建MVVM框架的主要内容,如果未能解决你的问题,请参考以下文章