JavaWeb——JSP开发2
Posted xxbbtt
tags:
篇首语:本文由小常识网(cha138.com)小编为大家整理,主要介绍了JavaWeb——JSP开发2相关的知识,希望对你有一定的参考价值。
使用JSP+Servlet实现文件的上传和下载功能
1、文件模型
首先是文件本身,这里创建一个类记录文件的名字和内容:
public class Attachment {
    private String name;
    private byte[] contents;

    public Attachment() {
    }

    public String getName() {
        return this.name;
    }

    public void setName(String name) {
        this.name = name;
    }

    public byte[] getContents() {
        return this.contents;
    }

    public void setContents(byte[] contents) {
        this.contents = contents;
    }
}
其次在创建一个类记录上传者的信息,信息有用户名、主题、文件描述、已经上传的文件
public class Ticket {
    private String customerName;
    private String subject;
    private String body;
    private Map<String, Attachment> attachments = new LinkedHashMap();

    public Ticket() {
    }

    public String getCustomerName() {
        return this.customerName;
    }

    public void setCustomerName(String customerName) {
        this.customerName = customerName;
    }

    public String getSubject() {
        return this.subject;
    }

    public void setSubject(String subject) {
        this.subject = subject;
    }

    public String getBody() {
        return this.body;
    }

    public void setBody(String body) {
        this.body = body;
    }

    public Attachment getAttachment(String name) {
        return (Attachment)this.attachments.get(name);
    }

    public Collection<Attachment> getAttachments() {
        return this.attachments.values();
    }

    public void addAttachment(Attachment attachment) {
        this.attachments.put(attachment.getName(), attachment);
    }

    public int getNumberOfAttachments() {
        return this.attachments.size();
    }
}
2、页面逻辑
这个demo将会实现三个页面
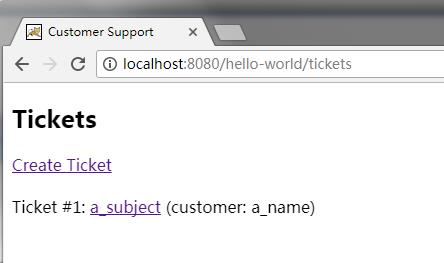
- 默认首页,提供跳转去上传页面的链接,以及已经上传的文件列表,文件列表中文件的主题名将链接到文件的详细信息页面

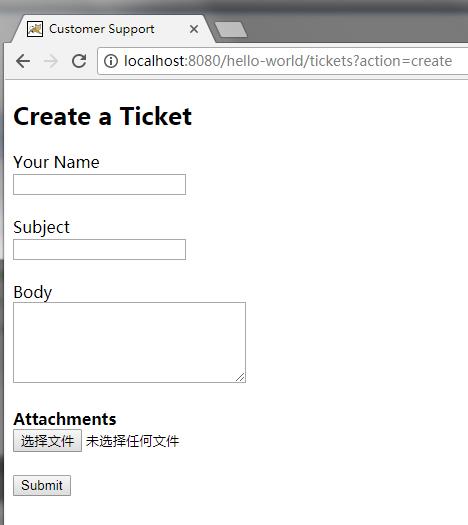
- 上传文件页面,这里客户可以填写文件的详细信息,并选择文件上传,点击Submit提交之后将会进入文件的详细信息页面,表示文件成功上传

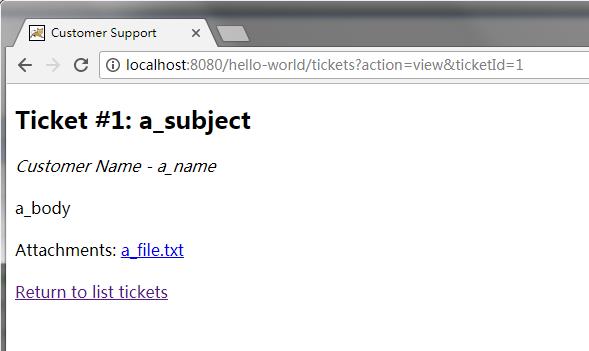
- 文件详细信息页面会展示文件的详细信息,并提供文件下载链接,和返回第一个页面的链接

3、代码逻辑
- 使用一个LinkedHashMap保存已经上传的文件信息,使用一个volatile类型的变量记录文件的id。
- 使用action进行页面的重定向,以及上传、下载功能。
public class TicketServlet extends HttpServlet
{
    private volatile int TICKET_ID_SEQUENCE = 1;

    private Map<Integer, Ticket> ticketDatabase = new LinkedHashMap<>();

    @Override
    protected void doGet(HttpServletRequest request, HttpServletResponse response)
            throws ServletException, IOException
    {
        String action = request.getParameter("action");
        if(action == null) {
            action = "list";
        }
        System.out.println(action);
        switch(action)
        {
            case "create":
                //进入上传文件页面
                this.showTicketForm(request, response);
                break;
            case "view":
                //进入文件详细信息页面
                this.viewTicket(request, response);
                break;
            case "download":
                //实现下载功能
                this.downloadAttachment(request, response);
                break;
            case "list":
            default:
                //进入默认页面
                this.listTickets(request, response);
                break;
        }
    }

    @Override
    protected void doPost(HttpServletRequest request, HttpServletResponse response)
            throws ServletException, IOException
    {
        String action = request.getParameter("action");
        if(action == null) {
            action = "list";
        }
        switch(action)
        {
            case "create":
                //实现上传功能
                this.createTicket(request, response);
                break;
            case "list":
            default:
                //进入默认页面
                response.sendRedirect("tickets");
                break;
        }
    }
4、三个页面的JSP
- 默认界面,将接收来自请求的ticketDatabase这个map,然后通过判断这个map的大小展示已上传文件列表,还有就是还提供了两个链接修改action的值实现重定向
<%@ page session="false" import="java.util.Map" %>
<%
    @SuppressWarnings("unchecked")
    Map<Integer, Ticket> ticketDatabase =
            (Map<Integer, Ticket>)request.getAttribute("ticketDatabase");
%>
<!DOCTYPE html>
<html>
    <head>
        <title>Customer Support</title>
    </head>
    <body>
        <h2>Tickets</h2>
        <a href="<c:url value="/tickets">
            <c:param name="action" value="create" />
        </c:url>">Create Ticket</a><br /><br />
        <%
            if(ticketDatabase.size() == 0)
            {
                %><i>There are no tickets in the system.</i><%
            }
            else
            {
                for(int id : ticketDatabase.keySet())
                {
                    String idString = Integer.toString(id);
                    Ticket ticket = ticketDatabase.get(id);
                    %>Ticket #<%= idString %>: <a href="<c:url value="/tickets">
                        <c:param name="action" value="view" />
                        <c:param name="ticketId" value="<%= idString %>" />
                    </c:url>"><%= ticket.getSubject() %></a> (customer:
        <%= ticket.getCustomerName() %>)<br /><%
                }
            }
        %>
    </body>
</html>
- 文件上传页面,提供用户填写信息的输入框,提供点击Submit按钮进行跳转和上传文件,将action的值赋值为create
<%@ page session="false" %>
<!DOCTYPE html>
<html>
    <head>
        <title>Customer Support</title>
    </head>
    <body>
        <h2>Create a Ticket</h2>
        <form method="POST" action="tickets" enctype="multipart/form-data">
            <input type="hidden" name="action" value="create"/>
            Your Name<br/>
            <input type="text" name="customerName"><br/><br/>
            Subject<br/>
            <input type="text" name="subject"><br/><br/>
            Body<br/>
            <textarea name="body" rows="5" cols="30"></textarea><br/><br/>
            <b>Attachments</b><br/>
            <input type="file" name="file1"/><br/><br/>
            <input type="submit" value="Submit"/>
        </form>
    </body>
</html>
- 文件详细信息页面,打印文件的详细信息,提供下载链接(这个链接将action值修改为download),返回默认页面的链接
<%@ page session="false" %>
<%
    String ticketId = (String)request.getAttribute("ticketId");
    Ticket ticket = (Ticket)request.getAttribute("ticket");
%>
<!DOCTYPE html>
<html>
    <head>
        <title>Customer Support</title>
    </head>
    <body>
        <h2>Ticket #<%= ticketId %>: <%= ticket.getSubject() %></h2>
        <i>Customer Name - <%= ticket.getCustomerName() %></i><br /><br />
        <%= ticket.getBody() %><br /><br />
        <%
            if(ticket.getNumberOfAttachments() > 0)
            {
                %>Attachments: <%
                int i = 0;
                for(Attachment a : ticket.getAttachments())
                {
                    if(i++ > 0)
                        out.print(", ");
                    %><a href="<c:url value="/tickets">
                        <c:param name="action" value="download" />
                        <c:param name="ticketId" value="<%= ticketId %>" />
                        <c:param name="attachment" value="<%= a.getName() %>" />
                    </c:url>"><%= a.getName() %></a><%
                }
                %><br /><br /><%
            }
        %>
        <a href="<c:url value="/tickets" />">Return to list tickets</a>
    </body>
</html>
5、具体方法的实现
- listTickets方法将会把这个map传递给一会将要运行的JSP,然后通过方法getRequestDispatcher可以获得一个javax.servlet.RequestDispatcher,这个对象将用于处理针对指定路径的内部转发和包含,通过该对象,将请求转发给调用forward方法的listTickets.jsp
    private void listTickets(HttpServletRequest request,
                             HttpServletResponse response)
            throws ServletException, IOException
    {
        request.setAttribute("ticketDatabase", this.ticketDatabase);

        request.getRequestDispatcher("/WEB-INF/jsp/view/listTickets.jsp")
                .forward(request, response);
    }
- showTicketForm方法将同样调用getRequestDispatcher,将请求转发给ticketForm.jsp
    private void showTicketForm(HttpServletRequest request,
                                HttpServletResponse response)
            throws ServletException, IOException
    {
        request.getRequestDispatcher("/WEB-INF/jsp/view/ticketForm.jsp")
               .forward(request, response);
    }
- createTicket方法将在上传页面点击Submit之后调用,通过request.getParameter获取请求的参数,创建一个Ticket对象并设置其CustomerName、Subject、Body,之后使用request.getParts()获取上传的文件,获取一个Part对象filePart,调用processAttachment()方法将这个Part对象转化为Attachment对象,然后添加到Ticket对象中,再然后将TICKET_ID_SEQUENCE加一作为id放入Map中,然后重定向到文件的详细信息页面
    private void createTicket(HttpServletRequest request,
                              HttpServletResponse response)
            throws ServletException, IOException
    {
        Ticket ticket = new Ticket();
        ticket.setCustomerName(request.getParameter("customerName"));
        ticket.setSubject(request.getParameter("subject"));
        ticket.setBody(request.getParameter("body"));

        Part filePart = request.getPart("file1");
        if(filePart != null && filePart.getSize() > 0)
        {
            Attachment attachment = this.processAttachment(filePart);
            if(attachment != null) {
                ticket.addAttachment(attachment);
            }
        }

        int id;
        synchronized(this)
        {
            id = this.TICKET_ID_SEQUENCE++;
            this.ticketDatabase.put(id, ticket);
        }

        response.sendRedirect("tickets?action=view&ticketId=" + id);
    }
这里的processAttachment方法实现了将这个Part对象转化为Attachment对象,具体是先从Part获得InputStream,并将其复制到Attachment对象中。然后还使用了getSubmittedFileName()获取文件名。
    private Attachment processAttachment(Part filePart)
            throws IOException
    {
        InputStream inputStream = filePart.getInputStream();
        ByteArrayOutputStream outputStream = new ByteArrayOutputStream();

        int read;
        final byte[] bytes = new byte[1024];

        while((read = inputStream.read(bytes)) != -1)
        {
            outputStream.write(bytes, 0, read);
        }

        Attachment attachment = new Attachment();
        attachment.setName(filePart.getSubmittedFileName());
        attachment.setContents(outputStream.toByteArray());

        return attachment;
    }
- viewTicket方法首先是获取id,然后根据这个id调用getTicket方法获取到Ticket对象。获取到Ticket对象之后把这个对象和id一起以及请求转发给viewTicket.jsp
    private void viewTicket(HttpServletRequest request,
                            HttpServletResponse response)
            throws ServletException, IOException
    {
        String idString = request.getParameter("ticketId");
        Ticket ticket = this.getTicket(idString, response);
        if(ticket == null) {
            return;
        }

        request.setAttribute("ticketId", idString);
        request.setAttribute("ticket", ticket);

        request.getRequestDispatcher("/WEB-INF/jsp/view/viewTicket.jsp")
               .forward(request, response);
    }
其次这个根据id获取Ticket的getTicket方法如果有什么错误将会被重定向到/tickets页面
    private Ticket getTicket(String idString, HttpServletResponse response)
            throws ServletException, IOException
    {
        if(idString == null || idString.length() == 0)
        {
            response.sendRedirect("tickets");
            return null;
        }

        try
        {
            Ticket ticket = this.ticketDatabase.get(Integer.parseInt(idString));
            if(ticket == null)
            {
                response.sendRedirect("tickets");
                return null;
            }
            return ticket;
        }
        catch(Exception e)
        {
            response.sendRedirect("tickets");
            return null;
        }
    }
- downloadAttachment方法这个方法首先是根据id获取Ticket对象,然后从请求中获取文件的名字,根据这个name从Ticket中获取文件的Attachment对象。
private void downloadAttachment(HttpServletRequest request,
                                    HttpServletResponse response)
            throws ServletException, IOException
    {
        String idString = request.getParameter("ticketId");
        Ticket ticket = this.getTicket(idString, response);
        if(ticket == null) {
            return;
        }

        String name = request.getParameter("attachment");
        if(name == null)
        {
            response.sendRedirect("tickets?action=view&ticketId=" + idString);
            return;
        }

        Attachment attachment = ticket.getAttachment(name);
        if(attachment == null)
        {
            response.sendRedirect("tickets?action=view&ticketId=" + idString);
            return;
        }

        response.setHeader("Content-Disposition",
                "attachment; filename=" + attachment.getName());
        response.setContentType("application/octet-stream");

        ServletOutputStream stream = response.getOutputStream();
        stream.write(attachment.getContents());
    }
最后的这几行代码,用于处理浏览器的下载请求,响应中设置头Content-Disposition,将强制浏览器询问客户是保存还是下载文件,而不是在浏览器从查看文件,设置的文件类型是通用的/二进制内容类型的,这样容器就不会使用字符编码对该数据进行处理。最后使用ServletOutputStream将文件内容输出到响应中。如果希望实现大文件下载,应该将数据从文件的InputStream中复制到ResponseOutputStream ,并且经常刷新ResponseOutputStream,这样数据才能不断被发送到用户浏览器中。
以上是关于JavaWeb——JSP开发2的主要内容,如果未能解决你的问题,请参考以下文章