LVGL移植STM32F1基于STM32CubeMX配置硬件SPI驱动1.8寸TFT ST7735S跑LVGL图形demo
Posted perseverance52
tags:
篇首语:本文由小常识网(cha138.com)小编为大家整理,主要介绍了LVGL移植STM32F1基于STM32CubeMX配置硬件SPI驱动1.8寸TFT ST7735S跑LVGL图形demo相关的知识,希望对你有一定的参考价值。
【LVGL移植】STM32F1基于STM32CubeMX配置硬件SPI驱动1.8寸TFT ST7735S屏幕跑LVGL图形demo
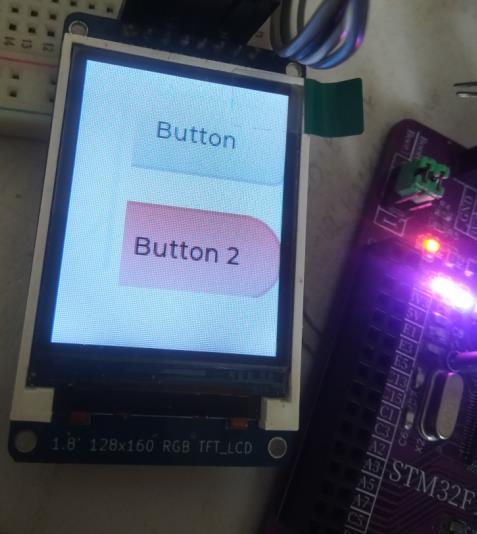
- 🎬运行LVGL 按键组件demo
✨基于STM32CubeMX配置工程是因为方便移植,只要是STM32芯片,拿到我的这个工程源码就可以根据自己的stm32芯片,自行通过STM32CubeMX工具软件进行工程配置,并将我的工程中的屏幕驱动文件拷贝到自己的工程目录下,修改2个驱动函数代码就可以轻松点亮。
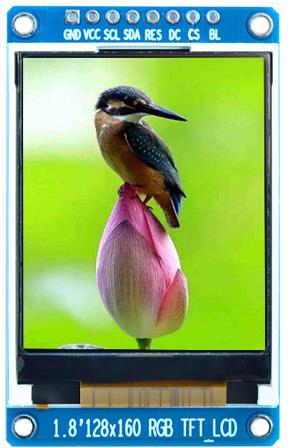
- 📌相关篇《STM32F1基于STM32CubeMX配置硬件SPI驱动1.8寸TFT LCD128X160 ST7735S屏幕》
- ✨版本说明:基于LVGL8.3版本裸机移植的。不包含操作OS系统,**当然我会将个人移植成功的源代码工程分享出来。**方便大家移植到自己所使用的芯片上,如果和我使用的屏幕相同那么可以做到无缝对接,如果是其他屏幕需要自行准备屏幕驱动代码,并进行替换。点亮屏幕后在做移植。基于STM32CubeMX配置工程,可以方便统一性,移植更容易简单。
- 🔖工程所使用的是
STM32F103VET6 - ⚡本项目是针对:1.8寸TFT LCD128X160 ST7735S屏幕
🎉折腾了我一天半,大部分时间在找不显示的问题。首先是没有处理好刷屏显示函数(
disp_flush),处理好了,就缺一个可运行的demo.以为LVGL难度不大,只要按照步骤和工程项目结构布局,没有什么难度。
- 📺新手可以看正点原子的LVGL移植视频教程:
第4讲 基础篇-LVGL移植(无操作系统1)
- 📍LVGL在线文档:
https://docs.lvgl.io/8.3/
📋在线文档可以帮助我们快速查阅LVGL的API的使用和参数以及提供了相关的demo案例。直接拷贝到项目中就可以运行验证,根据个人需求可以自定义设计。
📑个人移植工程步骤
- 下载LVGL库。
- 提取必要的LVGL库文件。
- 提前准备好,可以驱动点亮屏幕的工程模版。
- 导入LVGL到现有的工程模版当中。
- 添加源文件以及头文件路径。
- 修改导入的LVGL的配置函数和宏定义。
- 添加LVGL demo函数。
⛳注意事项
-
🍁工程文件架构
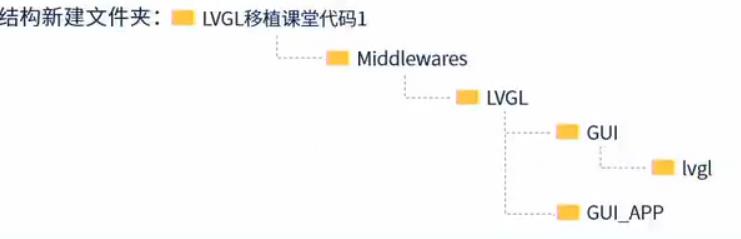
-
🌴项目树结构:
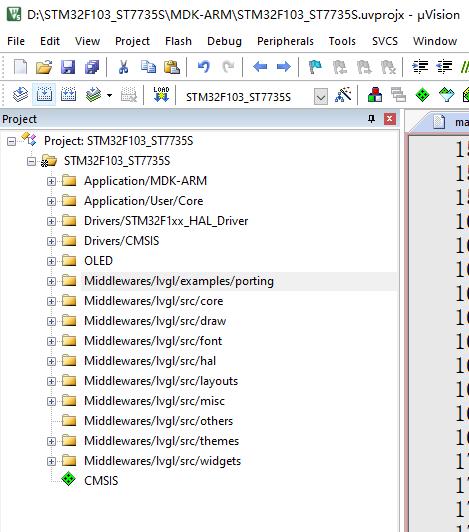
-
🔰其他屏幕接口移植,只要能点亮的,目标芯片满足LVGL要求的基本都可以移植,重点和难点就是要对接换LVGL刷屏显示函数(
disp_flush):
static void disp_flush(lv_disp_drv_t * disp_drv, const lv_area_t * area, lv_color_t * color_p)

    if(disp_flush_enabled)
        /*The most simple case (but also the slowest) to put all pixels to the screen one-by-one*/

        int32_t x;
        int32_t y;
        for(y = area->y1; y <= area->y2; y++)
            for(x = area->x1; x <= area->x2; x++)
                /*Put a pixel to the display. For example:*/
                /*put_px(x, y, *color_p)*/
				LCD_Fast_DrawPoint(x, y, color_p->full);
                color_p++;
🛠Keil工程设置
- 🌿屏蔽报警设置:
--diag_suppress=188,546,68,111,1215
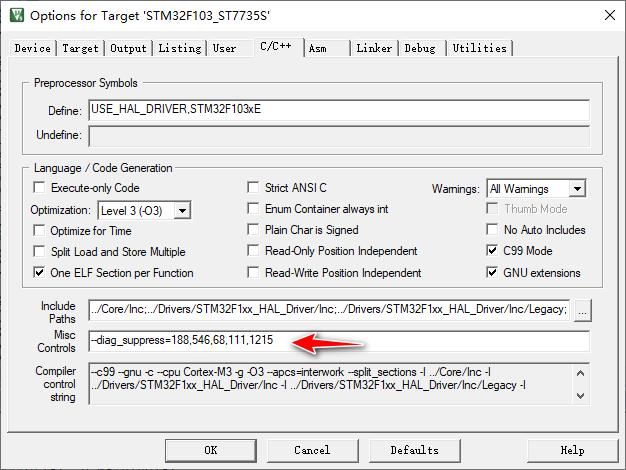
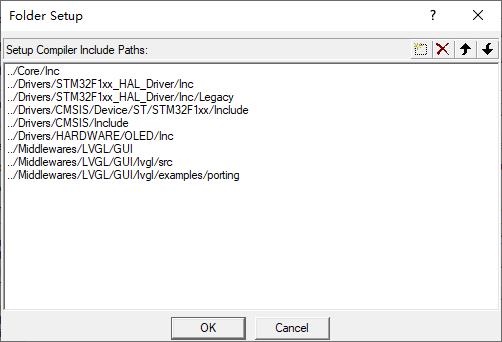
- 🌿头文件路径设置
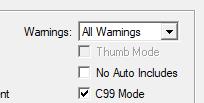
- 🌿勾选C99 Mode选项
🔨项目参数配置
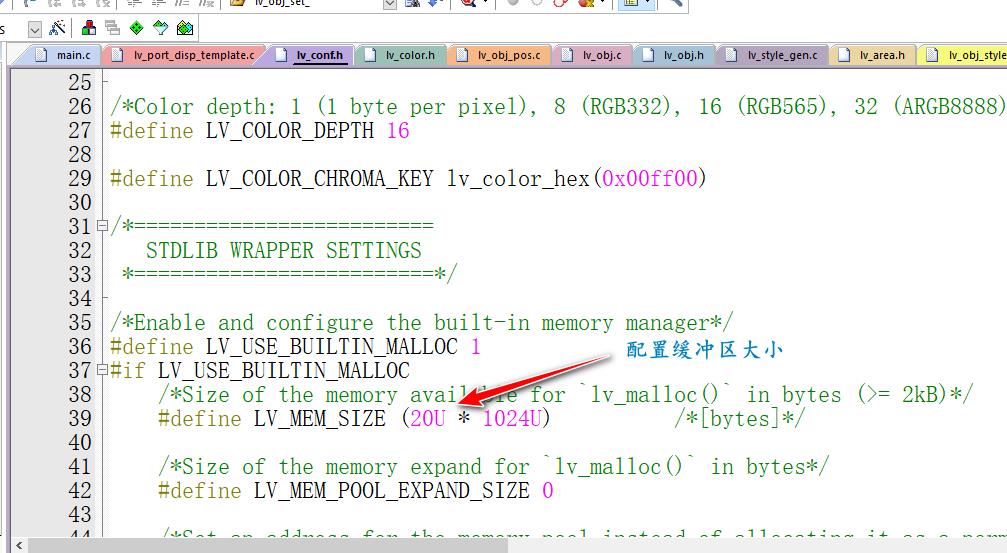
- 🌿在
LV_CONF_h文件中启用相关宏和配置缓冲区大小。(直接关系到编译是否成功,默认LVGL配置的是128U)
- 🌿在屏幕显示源文件
lv_port_disp_template.c中设置屏幕像素和刷屏显示函数
#ifndef MY_DISP_HOR_RES
    #warning Please define or replace the macro MY_DISP_HOR_RES with the actual screen width, default value 320 is used for now.
    #define MY_DISP_HOR_RES    160
#endif

#ifndef MY_DISP_VER_RES
    #warning Please define or replace the macro MY_DISP_HOR_RES with the actual screen height, default value 240 is used for now.
    #define MY_DISP_VER_RES    128
#endif
/*Flush the content of the internal buffer the specific area on the display
 *You can use DMA or any hardware acceleration to do this operation in the background but
 *'lv_disp_flush_ready()' has to be called when finished.*/
static void disp_flush(lv_disp_drv_t * disp_drv, const lv_area_t * area, lv_color_t * color_p)

    if(disp_flush_enabled)
        /*The most simple case (but also the slowest) to put all pixels to the screen one-by-one*/

        int32_t x;
        int32_t y;
        for(y = area->y1; y <= area->y2; y++)
            for(x = area->x1; x <= area->x2; x++)
                /*Put a pixel to the display. For example:*/
                /*put_px(x, y, *color_p)*/
							LCD_Fast_DrawPoint(x, y, color_p->full);
                color_p++;


//	LCD_Color_Fill(area->x1, area->y1, area->x2, area->y2,color_p);
    /*IMPORTANT!!!
     *Inform the graphics library that you are ready with the flushing*/
    lv_disp_flush_ready(disp_drv);
📝主程序代码
/* USER CODE BEGIN Header */
/**
******************************************************************************
* @file : main.c
* @brief : Main program body
******************************************************************************
* @attention
*
* Copyright (c) 2023 STMicroelectronics.
* All rights reserved.
*
* This software is licensed under terms that can be found in the LICENSE file
* in the root directory of this software component.
* If no LICENSE file comes with this software, it is provided AS-IS.
*
******************************************************************************
*/
/* USER CODE END Header */
/* Includes ------------------------------------------------------------------*/
#include "main.h"
#include "spi.h"
#include "tim.h"
#include "gpio.h"
/* Private includes ----------------------------------------------------------*/
/* USER CODE BEGIN Includes */
#include "lcd.h"
/* USER CODE END Includes */
/* Private typedef -----------------------------------------------------------*/
/* USER CODE BEGIN PTD */
#include "lcd.h"
#include "lv_port_disp_template.h"
//#include "lv_port_indev.h"// 输入设备初始化(如果没有实现就注释掉)
#include "lvgl.h"
/* USER CODE END PTD */
/* Private define ------------------------------------------------------------*/
/* USER CODE BEGIN PD */
/* USER CODE END PD */
/* Private macro -------------------------------------------------------------*/
/* USER CODE BEGIN PM */
uint16_t cnt = 0;
/* USER CODE END PM */
/* Private variables ---------------------------------------------------------*/
/* USER CODE BEGIN PV */
/* USER CODE END PV */
/* Private function prototypes -----------------------------------------------*/
void SystemClock_Config(void);
/* USER CODE BEGIN PFP */
/* USER CODE END PFP */
/* Private user code ---------------------------------------------------------*/
/* USER CODE BEGIN 0 */
void HAL_TIM_PeriodElapsedCallback(TIM_HandleTypeDef *htim)
// static uint32_t time = 0;
if (htim->Instance == TIM6) // 定时器6基地址
lv_tick_inc(1);//lvgl 的 1ms 心跳
cnt++;
__HAL_TIM_CLEAR_IT(&htim6, TIM_IT_UPDATE);
/*
static void lv_ex_label(void)
static char *STR = "Perseverance51";
lv_obj_t *label = lv_label_create(lv_scr_act());
lv_label_set_recolor(label, true);
lv_label_set_long_mode(label, LV_LABEL_LONG_SCROLL_CIRCULAR); //Circular scroll
lv_obj_set_width(label, 160);
lv_label_set_text_fmt(label, "Gitee: %s",STR);
lv_obj_align(label, LV_ALIGN_CENTER, 0, 10);
lv_obj_t *label2 = lv_label_create(lv_scr_act());
lv_label_set_recolor(label2, true);
lv_label_set_long_mode(label2, LV_LABEL_LONG_SCROLL_CIRCULAR); //Circular scroll
lv_obj_set_width(label2, 160);
lv_label_set_text_fmt(label2, "Hello world!");
lv_obj_align(label2, LV_ALIGN_CENTER, 0, -10);
*/
static lv_style_t style_btn;
static lv_style_t style_btn_pressed;
static lv_style_t style_btn_red;
static lv_color_t darken(const lv_color_filter_dsc_t * dsc, lv_color_t color, lv_opa_t opa)
LV_UNUSED(dsc);
return lv_color_darken(color, opa);
static void style_init(void)
/*Create a simple button style*/
lv_style_init(&style_btn);
lv_style_set_radius(&style_btn, 10);
lv_style_set_bg_opa(&style_btn, LV_OPA_COVER);
lv_style_set_bg_color(&style_btn, lv_palette_lighten(LV_PALETTE_GREY, 3));
lv_style_set_bg_grad_color(&style_btn, lv_palette_main(LV_PALETTE_GREY));
lv_style_set_bg_grad_dir(&style_btn, LV_GRAD_DIR_VER);
lv_style_set_border_color(&style_btn, lv_color_black());
lv_style_set_border_opa(&style_btn, LV_OPA_20);
lv_style_set_border_width(&style_btn, 2);
lv_style_set_text_color(&style_btn, lv_color_black());
/*Create a style for the pressed state.
*Use a color filter to simply modify all colors in this state*/
static lv_color_filter_dsc_t color_filter;
lv_color_filter_dsc_init(&color_filter, darken);
lv_style_init(&style_btn_pressed);
lv_style_set_color_filter_dsc(&style_btn_pressed, &color_filter);
lv_style_set_color_filter_opa(&style_btn_pressed, LV_OPA_20);
/*Create a red style. Change only some colors.*/
lv_style_init(&style_btn_red);
lv_style_set_bg_color(&style_btn_red, lv_palette_main(LV_PALETTE_RED));
lv_style_set_bg_grad_color(&style_btn_red, lv_palette_lighten(LV_PALETTE_RED, 3));
/**
* Create styles from scratch for buttons.
*/
void lv_example_get_started_2(void)
/*Initialize the style*/
style_init();
/*Create a button and use the new styles*/
lv_obj_t * btn = lv_btn_create(lv_scr_act());
/* Remove the styles coming from the theme
* Note that size and position are also stored as style properties
* so lv_obj_remove_style_all will remove the set size and position too */
lv_obj_remove_style_all(btn);
lv_obj_set_pos(btn, 10, 10);
lv_obj_set_size(btn, 120, 50);
lv_obj_add_style(btn, &style_btn, 0);
lv_obj_add_style(btn, &style_btn_pressed, LV_STATE_PRESSED);
/*Add a label to the button*/
lv_obj_t * label = lv_label_create(btn);
lv_label_set_text(label, "Button");
lv_obj_center(label);
/*Create another button and use the red style too*/
lv_obj_t * btn2 = lv_btn_create(lv_scr_act());
lv_obj_remove_style_all(btn2); /*Remove the styles coming from the theme*/
lv_obj_set_pos(btn2, 10, 80);
lv_obj_set_size(btn2, 120, 50);
lv_obj_add_style(btn2, &style_btn, 0);
lv_obj_add_style(btn2, &style_btn_red, 0);
lv_obj_add_style(btn2, &style_btn_pressed, LV_STATE_PRESSED);
lv_obj_set_style_radius(btn2, LV_RADIUS_CIRCLE, 0); /*Add a local style too*/
label = lv_label_create(btn2);
lv_label_set_text(label, "Button 2");
lv_obj_center(label);
/* USER CODE END 0 */
/**
* @brief The application entry point.
* @retval int
*/
int main(void)
/* USER CODE BEGIN 1 */
/* USER CODE END 1 */
/* MCU Configuration--------------------------------------------------------*/
/* Reset of all peripherals, Initializes the Flash interface and the Systick. */
HAL_Init();
/* USER CODE BEGIN Init */
/* USER CODE END Init */
/* Configure the system clock */
SystemClock_Config();
/* USER CODE BEGIN SysInit */
/* USER CODE END SysInit */
/* Initialize all configured peripherals */
MX_GPIO_Init();
MX_SPI2_Init();
MX_TIM6_Init();
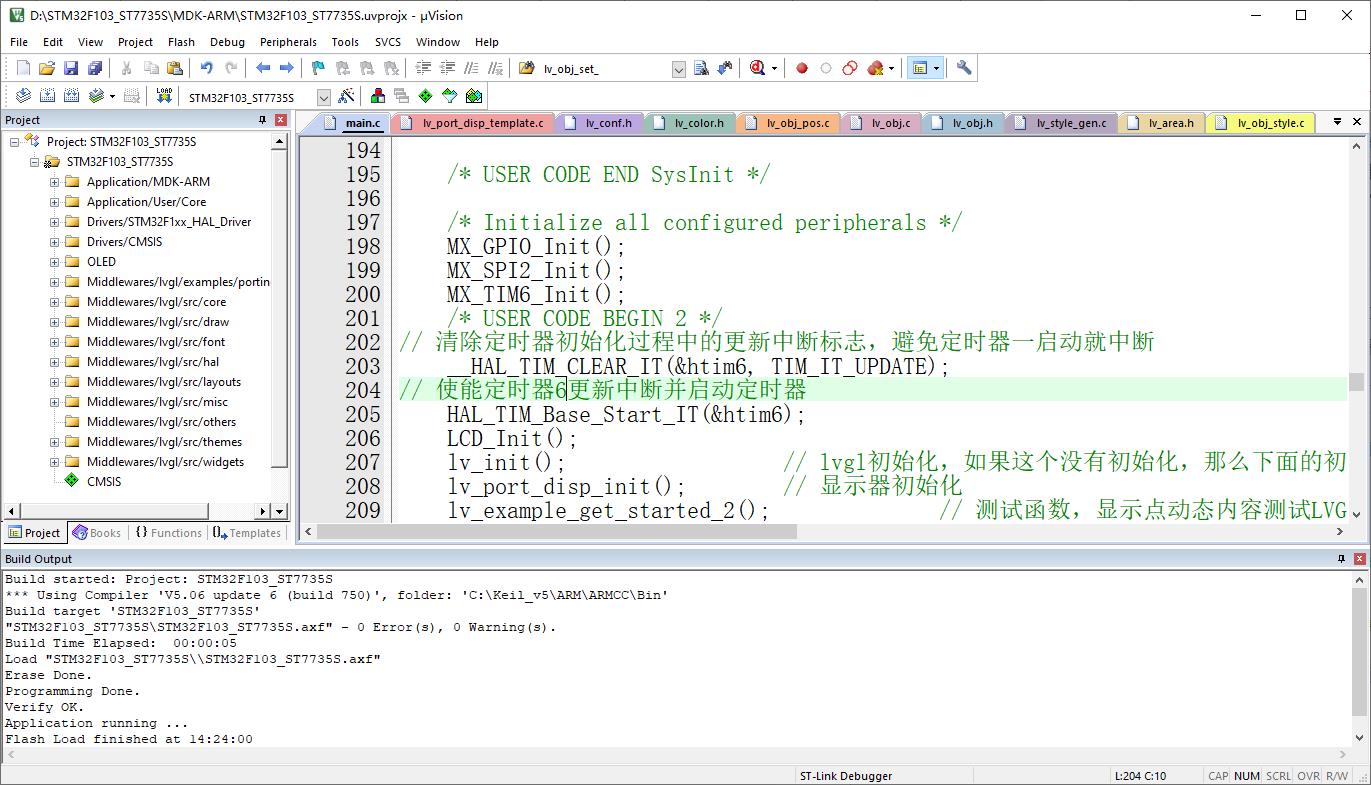
/* USER CODE BEGIN 2 */
// 清除定时器初始化过程中的更新中断标志,避免定时器一启动就中断
__HAL_TIM_CLEAR_IT(&htim6, TIM_IT_UPDATE);
// 使能定时器6更新中断并启动定时器
HAL_TIM_Base_Start_IT(&htim6);
LCD_Init();
lv_init(); // lvgl初始化,如果这个没有初始化,那么下面的初始化会崩溃
lv_port_disp_init(); // 显示器初始化
lv_example_get_started_2(); // demo函数,显示2个按键,测试LVGL是否成功
/* USER CODE END 2 */
/* Infinite loop */
/* USER CODE BEGIN WHILE */
while (1)
/* USER CODE END WHILE */
/* USER CODE BEGIN 3 */
// LCD_Clear(WHITE);
// HAL_Delay(1000);
// LCD_Draw_Circle(50,50,45,RED);
// HAL_Delay(1000);
// LCD_Clear(RED);
// HAL_Delay(1000);
// Demo_Menu();
lv_task_handler(); // 运行所有lvgl的timer
if (cnt > 1000)
cnt = 0;
HAL_GPIO_TogglePin(GPIOE, GPIO_PIN_5);
/* USER CODE END 3 */
/**
* @brief System Clock Configuration
* @retval None
*/
void SystemClock_Config(void)
RCC_OscInitTypeDef RCC_OscInitStruct = 0;
RCC_ClkInitTypeDef RCC_ClkInitStruct = 0;
/** Initializes the RCC Oscillators according to the specified parameters
* in the RCC_OscInitTypeDef structure.
*/
RCC_OscInitStruct.OscillatorType = RCC_OSCILLATORTYPE_HSE;
RCC_OscInitStruct.HSEState = RCC_HSE_ON;
RCC_OscInitStruct.HSEPredivValue = RCC_HSE_PREDIV_DIV1;
RCC_OscInitStruct.HSIState = RCC_HSI_ON;
RCC_OscInitStruct.PLL.PLLState = RCC_PLL_ON;
RCC_OscInitStruct.PLL.PLLSource = RCC_PLLSOURCE_HSE;
RCC_OscInitStruct.PLL.PLLMUL = RCC_PLL_MUL9;
if (HAL_RCC_OscConfig(&RCC_OscInitStruct) != HAL_OK)
Error_Handler();
/** Initializes the CPU, AHB and APB buses clocks
*/
RCC_ClkInitStruct.ClockType = RCC_CLOCKTYPE_HCLK | RCC_CLOCKTYPE_SYSCLK
| RCC_CLOCKTYPE_PCLK1 | RCC_CLOCKTYPE_PCLK2;
RCC_ClkInitStruct.SYSCLKSource = RCC_SYSCLKSOURCE_PLLCLK;
RCC_ClkInitStruct.AHBCLKDivider = RCC_SYSCLK_DIV1;
RCC_ClkInitStruct.APB1CLKDivider = RCC_HCLK_DIV2;
RCC_ClkInitStruct.APB2CLKDivider = RCC_HCLK_DIV1;
if (HAL_RCC_ClockConfig(&RCC_ClkInitStruct, FLASH_LATENCY_2) != HAL_OK)
Error_Handler();
/* USER CODE BEGIN 4 */
/* USER CODE END 4 */
/**
* @brief This function is executed in case of error occurrence.
* @retval None
*/
void Error_Handler(void)
/* USER CODE BEGIN Error_Handler_Debug */
/* User can add his own implementation to report the HAL error return state */
__disable_irq();
while (1)
/* USER CODE END Error_Handler_Debug */
#ifdef USE_FULL_ASSERT
/**
* @brief Reports the name of the source file and the source line number
* where the assert_param error has occurred.
* @param file: pointer to the source file name
* @param line: assert_param error line source number
* @retval None
*/
void assert_failed(uint8_t *file, uint32_t line)
/* USER CODE BEGIN 6 */
/* User can add his own implementation to report the file name and line number,
ex: printf("Wrong parameters value: file %s on line %d\\r\\n", file, line) */
/* USER CODE END 6 */
#endif /* USE_FULL_ASSERT */
📚工程源码(包含LVGL 8.3库)
复制这段内容后打开百度网盘手机App,操作更方便哦
链接: https://pan.baidu.com/s/1f_P8bEqrT7-AN2L9NVMynA
提取码: w7ck
以上是关于LVGL移植STM32F1基于STM32CubeMX配置硬件SPI驱动1.8寸TFT ST7735S跑LVGL图形demo的主要内容,如果未能解决你的问题,请参考以下文章