STM8S系列基于IAR标准外设printf输出demo
Posted perseverance52
tags:
篇首语:本文由小常识网(cha138.com)小编为大家整理,主要介绍了STM8S系列基于IAR标准外设printf输出demo相关的知识,希望对你有一定的参考价值。
STM8S系列基于IAR标准外设printf输出demo
- 📌STM8S/A标准外设库(库版本
V2.3.1) - 📍官网标准外设库:
https://www.st.com/zh/embedded-software/stsw-stm8069.html
⛳注意事项
- 🚩在内存空间比较有限的情况下,请谨慎使用,只是为了方便调试时查看信息。因为使用printf函数需要占用很多内存空间。
- 🔰为什么不使用ST官方标准库内所提供的模版,因为官方提供的工程模版,涵盖了整个所有的STM8系列型号产品,整个模版工程很臃肿,也尝试过使用该模版来创建新工程,编译时没有问题,发现在烧录的时候,提示代码空间不够,超了,自己新建的工程将代码移植过去就没有问题。
📖输出函数选择差异:putchar() 和 fputc()
- 🌿使用
putchar()作为对外输出重载函数,只需要包含stdio.h即可。(推荐)
int putchar( int ch )

    while( !( UART1->SR & 0X80 ) ); //循环发送,直到发送完毕
    UART1->DR = ( u8 ) ch;//直接操作寄存器,提高执行效率
    return ch;
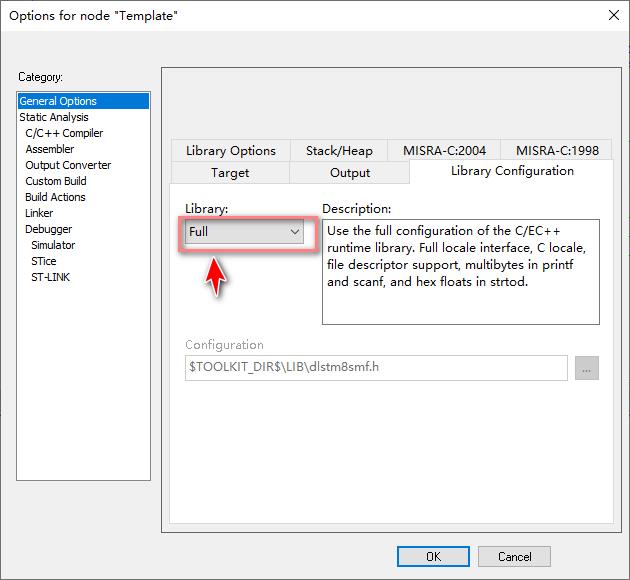
- 🍁使用
fputc()时还行需要在工程选项中配置开启full选项,所占用的内存空间更多,如果程序大一点,后面在烧录的时候有可能会报内存空间超了的问题。
/*******************************************************************************
**函数名称:int fputc(int ch, FILE *f)
**功能描述:系统标准Printf函数的接口函数
**入口参数:int ch, FILE *f 系统连接
**输出:无
*******************************************************************************/
int fputc( int ch, FILE *f )

    Send( ch );
    return ch;
🔖所以在使用时建议还是使用
putchar()函数。
🔨IAR工程搭建
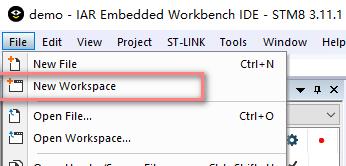
- 在创建工程前,先搭建工作空间。
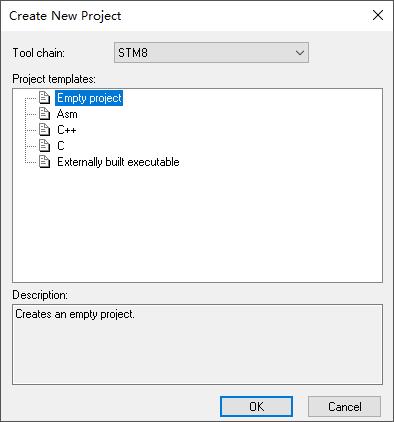
- 创建工程,选择空工程作为模版,取好工程名并保存。


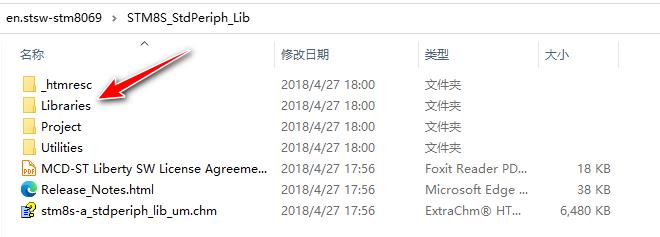
3. 将从官方下载下来的标准外设库资源解压,并将里面的Library文件夹拷贝到项目工程目录下。
-
加载标准外设库中所要用到的源文件(.c文件),可以按需添加,如果不清楚要添加哪些也可以全部添加进来,编译时报错,就移除没有的。

-
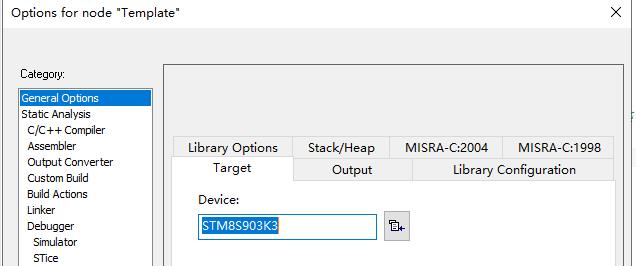
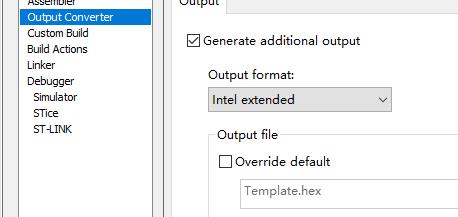
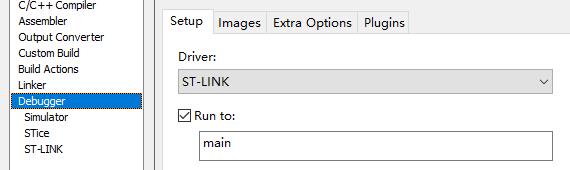
配置单片机型号以及添加头文件路径,输出编译文件格式,烧录器。

📝demo主程序代码
/* Includes ------------------------------------------------------------------*/
#include "stm8s.h"
#include <stdio.h>

/* Private defines -----------------------------------------------------------*/
/* Private function prototypes -----------------------------------------------*/
/* Private functions ---------------------------------------------------------*/
#define LED_GPIO_PORT  (GPIOD)
#define LED_GPIO_PINS  (GPIO_PIN_2|GPIO_PIN_7)

void Delay( uint16_t nCount )

    /* Decrement nCount value */
    while ( nCount != 0 )

        nCount--;


void Init_UART1( void )

    UART1_DeInit();
    UART1_Init( ( u32 )9600, UART1_WORDLENGTH_8D, UART1_STOPBITS_1, UART1_PARITY_NO, UART1_SYNCMODE_CLOCK_DISABLE, UART1_MODE_TX_ENABLE );
//  UART1_Cmd(ENABLE);

void Send( uint8_t dat )

    while( ( UART1_GetFlagStatus( UART1_FLAG_TXE ) == RESET ) );
    UART1_SendData8( dat );


/*******************************************************************************
**函数名称:int fputc(int ch, FILE *f)
**功能描述:系统标准Printf函数的接口函数
**入口参数:int ch, FILE *f 系统连接
**输出:无
*******************************************************************************/
//int fputc( int ch, FILE *f )
//
//    Send( ch );
//    return ch;
//


int putchar( int ch )

    while( !( UART1->SR & 0X80 ) ); //循环发送,直到发送完毕
    UART1->DR = ( u8 ) ch;//直接操作寄存器,提高执行效率
    return ch;

void delay_ms ( int ms ) //Function Definition

    int i, j;
    for ( i = 0; i <= ms; i++ )
        for ( j = 0; j < 120; j++ ) // Nop = Fosc/4
            __asm( "nop" ); //Perform no operation //assembly code


void main( void )

    //CLK_HSIPrescalerConfig(CLK_PRESCALER_HSIDIV1);
    Init_UART1();
    GPIO_Init( LED_GPIO_PORT, ( GPIO_Pin_TypeDef )LED_GPIO_PINS, GPIO_MODE_OUT_PP_HIGH_SLOW ); //led
    /* Infinite loop */
    while ( 1 )

        delay_ms( 1000 );
        printf( "Hello World! \\r\\n" );
        GPIO_WriteReverse( LED_GPIO_PORT, ( GPIO_Pin_TypeDef )LED_GPIO_PINS );
        delay_ms( 1000 );
        printf( "STM8S903K3T6 \\r\\n" );


#ifdef USE_FULL_ASSERT

/**断言函数:它的作用是在编程的过程中为程序提供参数检查
  * @brief  Reports the name of the source file and the source line number
  *   where the assert_param error has occurred.
  * @param file: pointer to the source file name
  * @param line: assert_param error line source number
  * @retval : None
  */
void assert_failed( u8* file, u32 line )

    /* User can add his own implementation to report the file name and line number,
       ex: printf("Wrong parameters value: file %s on line %d\\r\\n", file, line) */

    /* Infinite loop */
    while ( 1 )


#endif
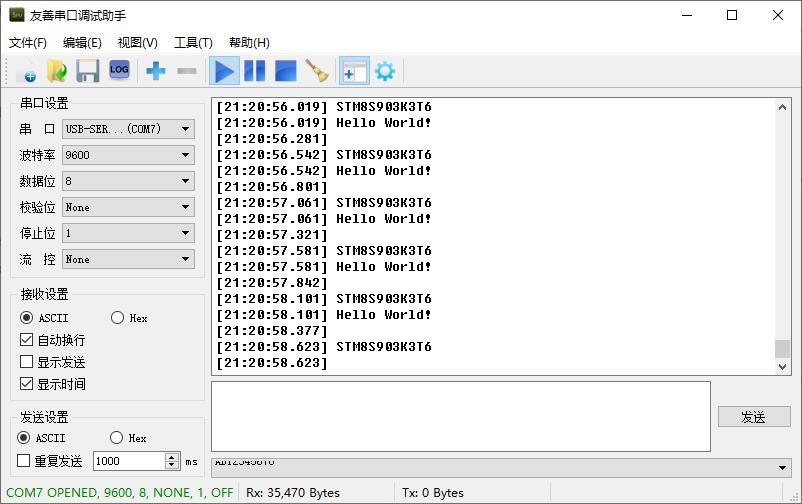
- 📜串口打印效果:
📚工程源码
链接: https://pan.baidu.com/s/11U3Its5OklRpwdJQH1aW_g
提取码: b8h3
以上是关于STM8S系列基于IAR标准外设printf输出demo的主要内容,如果未能解决你的问题,请参考以下文章