ThinkPHP ^6图片操作进阶
Posted JSON_L
tags:
篇首语:本文由小常识网(cha138.com)小编为大家整理,主要介绍了ThinkPHP ^6图片操作进阶相关的知识,希望对你有一定的参考价值。
图片裁剪、缩略、水印不再是TP框架系统内置的功能,需要安装。
目录
安装
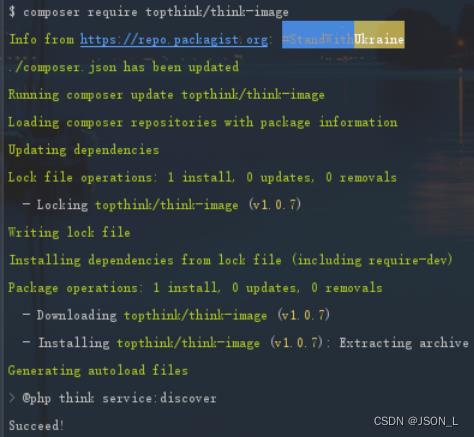
使用composer在项目根目录打开命令行执行:
composer require topthink/think-image过程如下:

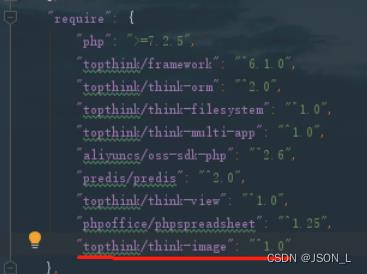
查看composer.json

图像处理
1.创建图片对象
$image = \\think\\Image::open('./uploads/1.jpg');图片对象属性
think\\Image Object
(
    [im:protected] => Resource id #165
    [gif:protected] =>
    [info:protected] => Array
    (
        [width] => 1920
        [height] => 1080
        [type] => jpeg
        [mime] => image/jpeg
        )
)
2.获取图像属性
echo ' 宽度:';
echo $image->width();

echo ' 高度:';
echo $image->height();

echo ' 类型:';
echo $image->type();

echo ' 图片mime:';
echo $image->mime();

echo ' 图片大小:';
print_r($image->size());
3.裁剪图像
使用crop()方法可以裁剪图片,并使用save()方法保存到指定路径;
/**
 * 裁剪图像
 *
 * @param  integer $w      裁剪区域宽度
 * @param  integer $h      裁剪区域高度
 * @param  integer $x      裁剪区域x坐标
 * @param  integer $y      裁剪区域y坐标
 * @param  integer $width  图像保存宽度
 * @param  integer $height 图像保存高度
 *
 * @return $this
 */
public function crop($w, $h, $x = 0, $y = 0, $width = null, $height = null)


// 只设置宽高
$image->crop(400,400)->save('./uploads/crop1.png');


// 设置宽高和坐标
$image->crop(400,400, 200, 200)->save('./uploads/crop2.png');


// 设置宽高和坐标 并保持图片宽高

// 具体来说就是裁剪原图400*400,坐标200*200,并设置裁剪后的图片为500*500
$image->crop(400,400, 200, 200, 500, 500)->save('./uploads/crop3.png');
4.生成缩略图
使用thumb()方法,可以生成缩略图,配合save()把缩略图保存下来;
/**
 * 生成缩略图
 * @param  integer $width  缩略图最大宽度
 * @param  integer $height 缩略图最大高度
 * @param int      $type   缩略图裁剪类型
 * @return $this
 */
public function thumb($width, $height, $type = self::THUMB_SCALING)
例子:
$image->thumb(500,500)->save('./uploads/thumb6.png');默认等比例类型裁剪
裁剪类型设置为第三个参数默认为:$type = self::THUMB_SCALING
而这个常量设定的定义如下:
const THUMB_SCALING = 1;   // 常量,标识缩略图等比例缩放类型

const THUMB_FILLED = 2;    // 常量,标识缩略图缩放后填充类型

const THUMB_CENTER = 3;    // 常量,标识缩略图居中裁剪类型

const THUMB_NORTHWEST = 4; // 常量,标识缩略图左上角裁剪类型

const THUMB_SOUTHEAST = 5; // 常量,标识缩略图右下角裁剪类型

const THUMB_FIXED = 6;     // 常量,标识缩略图固定处理类型
5.旋转图像
使用rotate()方法,可以旋转图片,默认是90度,参数可以设置
/**
 * 旋转图像
 * @param int $degrees 顺时针旋转的度数
 * @return $this
 */
public function rotate($degrees = 90)
例子:
$image->rotate()->save('./uploads/rotate1.png');
6.翻转图像
使用filp()方法,可以翻转图像,实现以x/y轴翻转图像
/**
 * 翻转图像
 * @param integer $direction 翻转轴,X或者Y
 * @return $this
 */
public function flip($direction = self::FLIP_X)
参数direction,默认x轴翻转
const FLIP_X = 1; // 常量,表示以x轴翻转

const FILP_Y = 2; // 常量,表示以y轴翻转
例子:
$image->flip()->save('./uploads/flip1.png');7.保存图像
save()方法可以配置的参数除了保存文件名的路径,还有以下几个:
/**
 * 保存图像
 * @param string      $pathname  图像保存路径名称
 * @param null|string $type      图像类型
 * @param int         $quality   图像质量
 * @param bool        $interlace 是否对JPEG类型图像设置隔行扫描
 * @return $this
 */
public function save($pathname, $type = null, $quality = 80, $interlace = true)
8.添加水印
图片水印
water()方法,给图片增加一个图片水印,默认位置为右下角,可看源码常量:
/**
 * 添加水印
 *
 * @param  string $source 水印图片路径
 * @param int     $locate 水印位置
 * @param int     $alpha  透明度
 * @return $this
 */
public function water($source, $locate = self::WATER_SOUTHEAST, $alpha = 100)
水印位置参数
const WATER_SOUTHEAST = 9;   // 右下角水印

const WATER_SOUTHWEST = 7;   // 左下角水印

const WATER_NORTHWEST = 1;   // 左上角水印

const WATER_NORTHEAST = 3;   // 右上角水印

const WATER_CENTER = 5;      // 居中水印

const WATER_SOUTH = 8;       // 下居中水印

const WATER_EAST = 6;        // 右居中水印

const WATER_NORTH = 2;       // 上居中水印

const WATER_WEST = 4;        // 左居中水印

$locate = [x,y];         // 自定义水印坐标
例子:
$image->water('./uploads/mr.Yu.png', 9, 50)->save('./uploads/water1.png');效果:

文字水印
text()方法,可以给图片增加一个文字水印。
需要字体文件,没有的先下载好
/**
 * 图像添加文字
 * @param  string  $text   添加的文字
 * @param  string  $font   字体路径
 * @param  integer $size   字号
 * @param  string  $color  文字颜色
 * @param int      $locate 文字写入位置
 * @param  integer $offset 文字相对当前位置的偏移量
 * @param  integer $angle  文字倾斜角度
 * @return $this
 * @throws ImageException
 */
public function text($text, $font, $size, $color = '#00000000',
    $locate = self::WATER_SOUTHEAST, $offset = 0, $angle = 0)
需要注意第五个参数,位置类型如下:
const WATER_SOUTHEAST = 9;// 右下角文字

const WATER_SOUTHWEST = 7;// 左下角文字

const WATER_NORTHWEST = 1;// 左上角文字

const WATER_NORTHEAST = 3;// 右上角文字

const WATER_CENTER = 5;   // 居中文字

const WATER_SOUTH = 8;    // 下居中文字

const WATER_EAST = 6;     // 右居中文字

const WATER_NORTH = 2;    // 上居中文字

const WATER_WEST = 4;     // 左居中文字

$locate = [x, y];     // 自定义文字坐标
例子:
// 获取当前工作目录
// getcwd()


$image->text('Mr.Yu', getcwd().'/font/msyh.ttf', 10, '#ffffff', 7)
->save('./uploads/text1.png');
效果:

总结:
Think-image类封装的图片处理方法,可以很方便的对图片相应处理,节省自己摸索和验证时间。
以上是关于ThinkPHP ^6图片操作进阶的主要内容,如果未能解决你的问题,请参考以下文章