华为荣耀上一个小有意思的时钟效果
Posted GAStudio
tags:
篇首语:本文由小常识网(cha138.com)小编为大家整理,主要介绍了华为荣耀上一个小有意思的时钟效果相关的知识,希望对你有一定的参考价值。
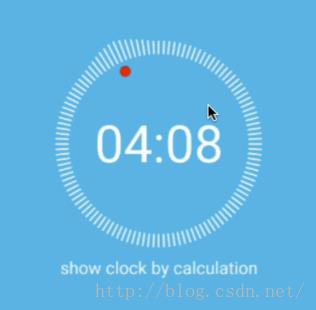
今天主要给大家带来一个在荣耀8上看到的一个小有意思的时钟效果,这个效果比较简单,俗话说,“人生在世,无非就是把复杂的事情整简单,抑或把简单的事情搞复杂”,既然比较简单,那咱们就多用几种方案来实现,进而开拓一下思路;
首先先上效果图:

--------------------------------------------------
如果你想看 GAStudio Github主页,请戳这里;
如果你想看 GAStudio更多技术文章,请戳这里;
QQ技术交流群:277582728;
--------------------------------------------------
从效果图上看,和常见表盘一样,每根线代表一条时间刻度,一个红色小圈随着时间的变化不断的移动,而差异的点主要在于表盘有一个突起,并且这个突起随着红点的移动而移动,现在针对这个效果,我们从以下三个思路来实现:
一、使用切图作为蒙板与刻度线进行图像混合;
二、自行勾勒对应形状Path与刻度线进行图像混合;
三、动态计算刻度线长度;
有同学可能会认为第一种和第二种核心原理一样,都是用的混合模式(Xfermode),确实如此,但最终实现结果会有差异,值得考虑;
接下来咱们分别来看下这三种实现;
一、使用切图作为蒙板与刻度线进行图像混合:
使用切图蒙版方案可以概括为如图的过程:

无非就是用蒙版遮盖掉我们不想进行显示的区域,思路整理起来就是下面的过程:
1. 绘制表盘刻度;
2. 使用遮罩图与表盘刻度进行混合;
3. 不断旋转遮罩图;
核心代码整理如下:
protected void onDraw(Canvas canvas)
        super.onDraw(canvas);
        // Save a layer
        int layerCount = canvas.saveLayer(mClockViewRectF, mPaint, Canvas.ALL_SAVE_FLAG);

        // Draw the DEFAULT_TOTAL_CLOCK_SCALE_LINE_NUM clock scale lines
        mPaint.setColor(mClockScaleLineColor);

        // Because the picture is not perfect, we need mAdjustClockScaleLineStartX.
        float clockScaleLineStartY = mAdjustClockScaleLineStartX + mClockViewRectF.top;
        float clockScaleLineEndY = clockScaleLineStartY + mClockScaleLineHeight;
        for (int i = 0; i < DEFAULT_TOTAL_CLOCK_SCALE_LINE_NUM; i++)
            canvas.drawLine(mClockViewCenterX, clockScaleLineStartY,
                    mClockViewCenterX, clockScaleLineEndY, mPaint);
            canvas.rotate(ANGLE_PER_SCALE, mClockViewCenterX, mClockViewCenterY);

        mPaint.setXfermode(mXfermode);
        canvas.rotate(mNowClockAngle, mClockViewCenterX, mClockViewCenterY);
        canvas.drawBitmap(mClockMaskBitmap, null, mClockViewRectF, mPaint);
        mPaint.setXfermode(null);

        // Draw clock point
        mPaint.setColor(mClockPointColor);
        canvas.drawCircle(mClockPointCenterX, mClockPointCenterY, mClockPointRadius, mPaint);

        canvas.restoreToCount(layerCount);
        updateTimeText(canvas);
该方案实现效果如下:

二、自行勾勒对应形状Path与刻度线进行图像混合:
用path勾勒对应形状Path,可以将蒙版图分为如下图所示两部分。一是除了突起部分的圆环部分,二是突起部分,这个突起部分可以使用贝塞尔曲线进行拟合,也可以使用线性拟合(即采用直线连接每个刻度线的顶端),本次选择采用线性拟合的方式,有兴趣的同学可以尝试贝塞尔曲线方式;

先定义一个数组表示突起部分刻度线的相对长度关系:
    private static final float[] CLOCK_SCALE_LINE_BASE_LEN_ARRAY = new float[]
            1F, 1.1F, 1.21F, 1.32F, 1.452F,
            1.551F, 1.6827F, 1.75F, 1.6827F, 1.551F,
            1.452F, 1.32F, 1.21F, 1.1F, 1F;
private void generateMaskPath()
        Point point = new Point(mClockViewCenterX, mClockViewCenterY - mClockMaskRadius - mClockScaleLineHeight);
        mClockMaskPath.moveTo(point.x, point.y);

        // Generate contour of the special clock scale lines
        int arrayLen = CLOCK_SCALE_LINE_BASE_LEN_ARRAY.length;
        for (int index = 0; index < arrayLen; index++)
            calculateNextPoint(point, CLOCK_SCALE_LINE_BASE_LEN_ARRAY[index],
                    (float) Math.toRadians(ANGLE_PER_SCALE * (index + 1)));
            mClockMaskPath.lineTo(point.x, point.y);


        // Generate contour of the normal clock scale lines
        int insertLen = mClockScaleLineMaxHeight - mClockScaleLineHeight;
        RectF cycleRectF = new RectF(mClockViewRectF);
        cycleRectF.inset(insertLen, insertLen);
        mClockMaskPath.arcTo(cycleRectF, arrayLen * ANGLE_PER_SCALE - 90,
                (DEFAULT_TOTAL_CLOCK_SCALE_LINE_NUM - arrayLen) * ANGLE_PER_SCALE);
    @Override
    protected void onDraw(Canvas canvas)
        super.onDraw(canvas);
        // Save layer
        int layerOne = canvas.saveLayer(mClockViewRectF, mPaint, Canvas.ALL_SAVE_FLAG);

        // Draw clock scale lines
        mPaint.setColor(mClockScaleLineColor);
        float clockScaleLineStartY = mAdjustClockScaleLineStartX + mClockViewRectF.top;
        float clockScaleLineEndY = clockScaleLineStartY + mClockScaleLineMaxHeight;
        for (int i = 0; i < DEFAULT_TOTAL_CLOCK_SCALE_LINE_NUM; i++)
            canvas.drawLine(mClockViewCenterX, clockScaleLineStartY,
                    mClockViewCenterX, clockScaleLineEndY, mPaint);
            canvas.rotate(ANGLE_PER_SCALE, mClockViewCenterX, mClockViewCenterY);


        mPaint.setXfermode(mXfermode);
        canvas.rotate(mNowClockAngle - mClockMaskAdjustAngle, mClockViewCenterX, mClockViewCenterY);
        // Generate a mask by path
        int layerTwo = canvas.saveLayer(mClockViewRectF, mPaint, Canvas.ALL_SAVE_FLAG);
        mPaint.setXfermode(null);
        canvas.drawOval(mClockViewRectF, mPaint);
        mPaint.setXfermode(mXfermode);
        canvas.drawPath(mClockMaskPath, mPaint);
        canvas.restoreToCount(layerTwo);

        mPaint.setXfermode(null);
        // Draw clock point
        mPaint.setColor(mClockPointColor);
        canvas.rotate(mClockMaskAdjustAngle, mClockViewCenterX, mClockViewCenterY);
        canvas.drawCircle(mClockPointCenterX, mClockPointCenterY, mClockPointRadius, mPaint);

        canvas.restoreToCount(layerOne);
        updateTimeText(canvas);
该方案实现效果如下:

单从效果来说,似乎与第一种方案无异,一会儿咱们再进行比较,接下来看第三种方案;
三、动态计算刻度线长度:
首先咱们稍微整理一下思路:
1. 除了突起的刻度线,其他刻度线长度一致,咱们不妨先将长度一致的先绘制;
2. 经过观察,突起部分中间长,两边短,呈对称性,所以考虑一半即可,这样就只需考虑len1 - len5;
3. 长度变化是有规律的,具有周期性,周期为totalTime * perAngle / 360,也即转一圈的时间(一分钟),除以刻度线的条数;我们有如下几个长度的线,len1, len2, len3, len4, len5, 那么在一个周期时间内,len1 变到 len2, len2变到 len3...... 我们就可以得到这样如下公式:

上述公式中,len表示长度,factor表示归一化时间因子,从0到1变化; 4. 右边的几条线,只不过把左边的变长改为变短即可,依旧能适应上述公式;
经过上面的分析,绘制的核心代码如下:
    @Override
    protected void onDraw(Canvas canvas)
        super.onDraw(canvas);
        // Normalization the angle
        float normalizedTimePeriod = mRemainderOfNowClockAngle / ANGLE_PER_SCALE;
        int clockScaleLineStartY = mClockViewRect.top + mClockScaleLineMaxHeight;

        canvas.save();

        // Rotate the canvas to now clock angle
        canvas.rotate(mNowClockAngle, mClockViewCenterX, mClockViewCenterY);

        // Draw the point
        mPaint.setColor(mClockPointColor);
        canvas.drawCircle(mClockPointCenterX, mClockPointCenterY, mClockPointRadius, mPaint);

        // The follow adjustArrayLen indicate the special clock scale num
        int adjustArrayLen = CLOCK_SCALE_LINE_BASE_LEN_ARRAY.length - 1;

        // Rotate the canvas to ensure that the longest scale line points to now scale line
        canvas.rotate(-mRemainderOfNowClockAngle - (adjustArrayLen - 2) / 2f * ANGLE_PER_SCALE,
                mClockViewCenterX, mClockViewCenterY);
        mPaint.setColor(mClockScaleLineColor);

        // Draw the special lines
        // First draw the rightmost clock scale line, so you need to start with index = adjustArrayLen - 1;
        for (int index = adjustArrayLen - 1; index >= 0; index--)
            // The follow function is mean that Length 1 changes to length 2 within a certain period.
            // The formula can be expressed as follows, changeLen1 = (len2 - len1) * timeFactor + len1.
            float specialLineNowLen = (mClockScaleLineHeight * (CLOCK_SCALE_LINE_BASE_LEN_ARRAY[index]
                    + normalizedTimePeriod * (CLOCK_SCALE_LINE_BASE_LEN_ARRAY[index + 1]
                    - CLOCK_SCALE_LINE_BASE_LEN_ARRAY[index])));
            float specialClockEndY = clockScaleLineStartY - specialLineNowLen;
            canvas.drawLine(mClockViewCenterX, clockScaleLineStartY, mClockViewCenterX, specialClockEndY, mPaint);
            canvas.rotate(ANGLE_PER_SCALE, mClockViewCenterX, mClockViewCenterY);


        // Draw the normal lines
        int clockScaleLineEndY = mClockScaleLineMaxHeight + mClockViewRect.top - mClockScaleLineHeight;
        for (int other = 0; other < (DEFAULT_TOTAL_CLOCK_SCALE_LINE_NUM - adjustArrayLen); other++)
            canvas.drawLine(mClockViewCenterX, clockScaleLineStartY, mClockViewCenterX,
                    clockScaleLineEndY, mPaint);
            canvas.rotate(ANGLE_PER_SCALE, mClockViewCenterX, mClockViewCenterY);


        canvas.restore();
        updateDigitalTimeText(canvas);
该方案实现效果如下:

OK,到此为止,三种方案已经实现完毕,最后,咱们一起从cpu占用、内存占用、FPS这几个方面进行个简单的比较:
测试机型为 moto 1085| 性能指标 | 方案一(图片蒙版) | 方案二(path蒙版) | 方案三(动态计算) |
| CPU | 30% | 34% | 20% |
| 内存 (增加内存) | 2.70M | 0.41M | 0.41M |
| FPS(平均值) | 54 | 54 | 58 |
孰好孰坏,咱们用数据说话,大家可自行评判;
github 源码地址:https://github.com/Ajian-studio/GAHonorClock
--------------------------------------------------
如果你想看 GAStudio Github主页,请戳这里;
如果你想看 GAStudio更多技术文章,请戳这里;
QQ技术交流群:277582728;
--------------------------------------------------
以上是关于华为荣耀上一个小有意思的时钟效果的主要内容,如果未能解决你的问题,请参考以下文章