GUI开发:窗口界面开发
Posted 「已注销」
tags:
篇首语:本文由小常识网(cha138.com)小编为大家整理,主要介绍了GUI开发:窗口界面开发相关的知识,希望对你有一定的参考价值。
前言
在对PyQt有个初步的了解后,就可以上手干了,然后一边开发一边学习,其实的话我要不做一个工具得了,就是可以帮助鉴黄师鉴黄的,就是他们将网站输入进去,然后这边就返回是什么类型的网站,然后这里面也要开发一个功能就是可以批量判断的,就是读入一个txt文件嘛。
那么我们来预想一下我们的界面是什么样的:这里我想的是我能不能先去找一下网上的好看的GUI是什么样的,因为如果我的大脑里没有概念的话,我也是不知道做什么样的
GUI页面构思
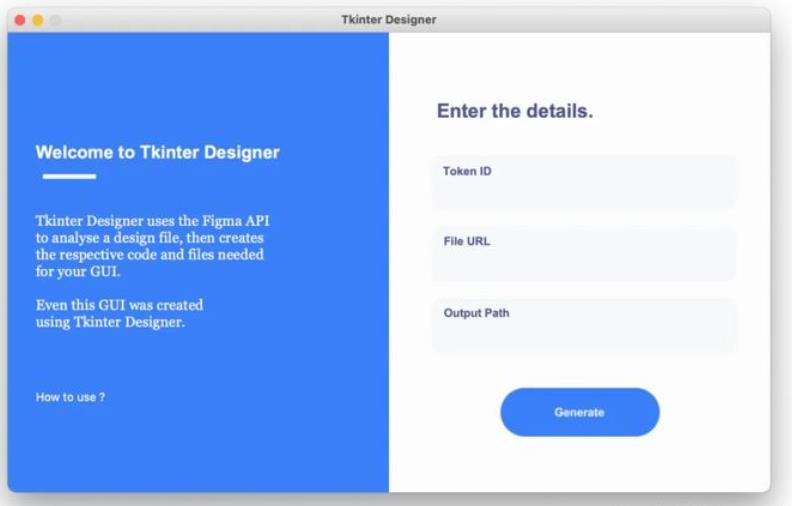
这个样式我看很不错,左边可以放入一下信息,然后右边放置一些选项,马上我就仿照他的配色去做了一个,最后不得不感叹配色这玩意有说道呀,蓝白黑三者的组合好强呀,真的很美观,下面来看一下我预计想要做成的画面吧:
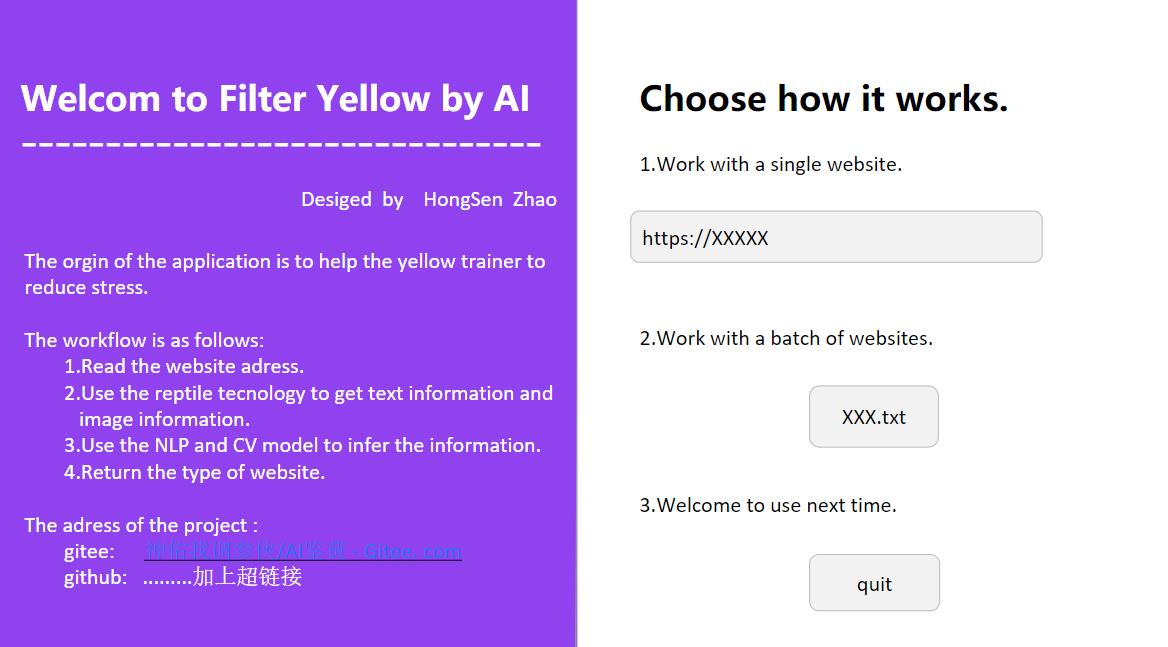
总感觉差了点什么,但是说不出来,先照着这个做吧,做出后可以再优化。。。。。。突然想到哪里不对了,可以修改比例呀,下面我们来看看:

合理了,开始肝。
GUI界面开发
先说下这里面的细节:就是gitee和github后面的网站要涉及点击后超链接跳转,然后其他也没啥了,一边做一边说吧:
然后我发现我就开发一个界面的话貌似没有必要从头开写吧,我完全可以使用QT 设计师来做呀。
Qt designer设置
这里先看下效果,然后我在说说怎么做出的:

嘿嘿,是不是有那味了呢,也是实现起来真不难,但是探索过程是真的好痛苦,开始的时候是看了大量的代码,然后后面感觉没啥用(其实后期ui文件转python代码的时候会用到),后面就合计用Qt designer去做,然后的话看了很多的视频也是云里雾里的,于是就自己摸索,就是一步步查出来的,然后这里我重点说一下这个QSS,真的神器呀,卧槽。特别的好用,然后的话也是用啥就查吧,感觉从头开始学起来很费劲的。
然后这里其实也不太需要QSS基础吧,有个添加资源可以选择一下。ui文件我也放在文件夹下了,想要的可以查看一下。
写文字不要用多文本输入那个,在窗口显示的时候,用户可以去掉,
转化成代码运行

这里是看了一个教程,感兴趣的也可以看下:https://www.jianshu.com/p/1b2e6237eb3d,说的很明白了。
但是被同学吐槽说太丑了,额。。。不过好像确实有点丑,可能是左边字太多了,那我就选择b方案了,那就上面弄个图片(在图片上面放上图片),然后下面点开始,跳出另一个窗口,然后在那个窗口上操作,今天就干这些,然后把功能弄了,就去弄多线程去。
修改后界面
将布局什么的改了一下,然后我们现在看看效果:
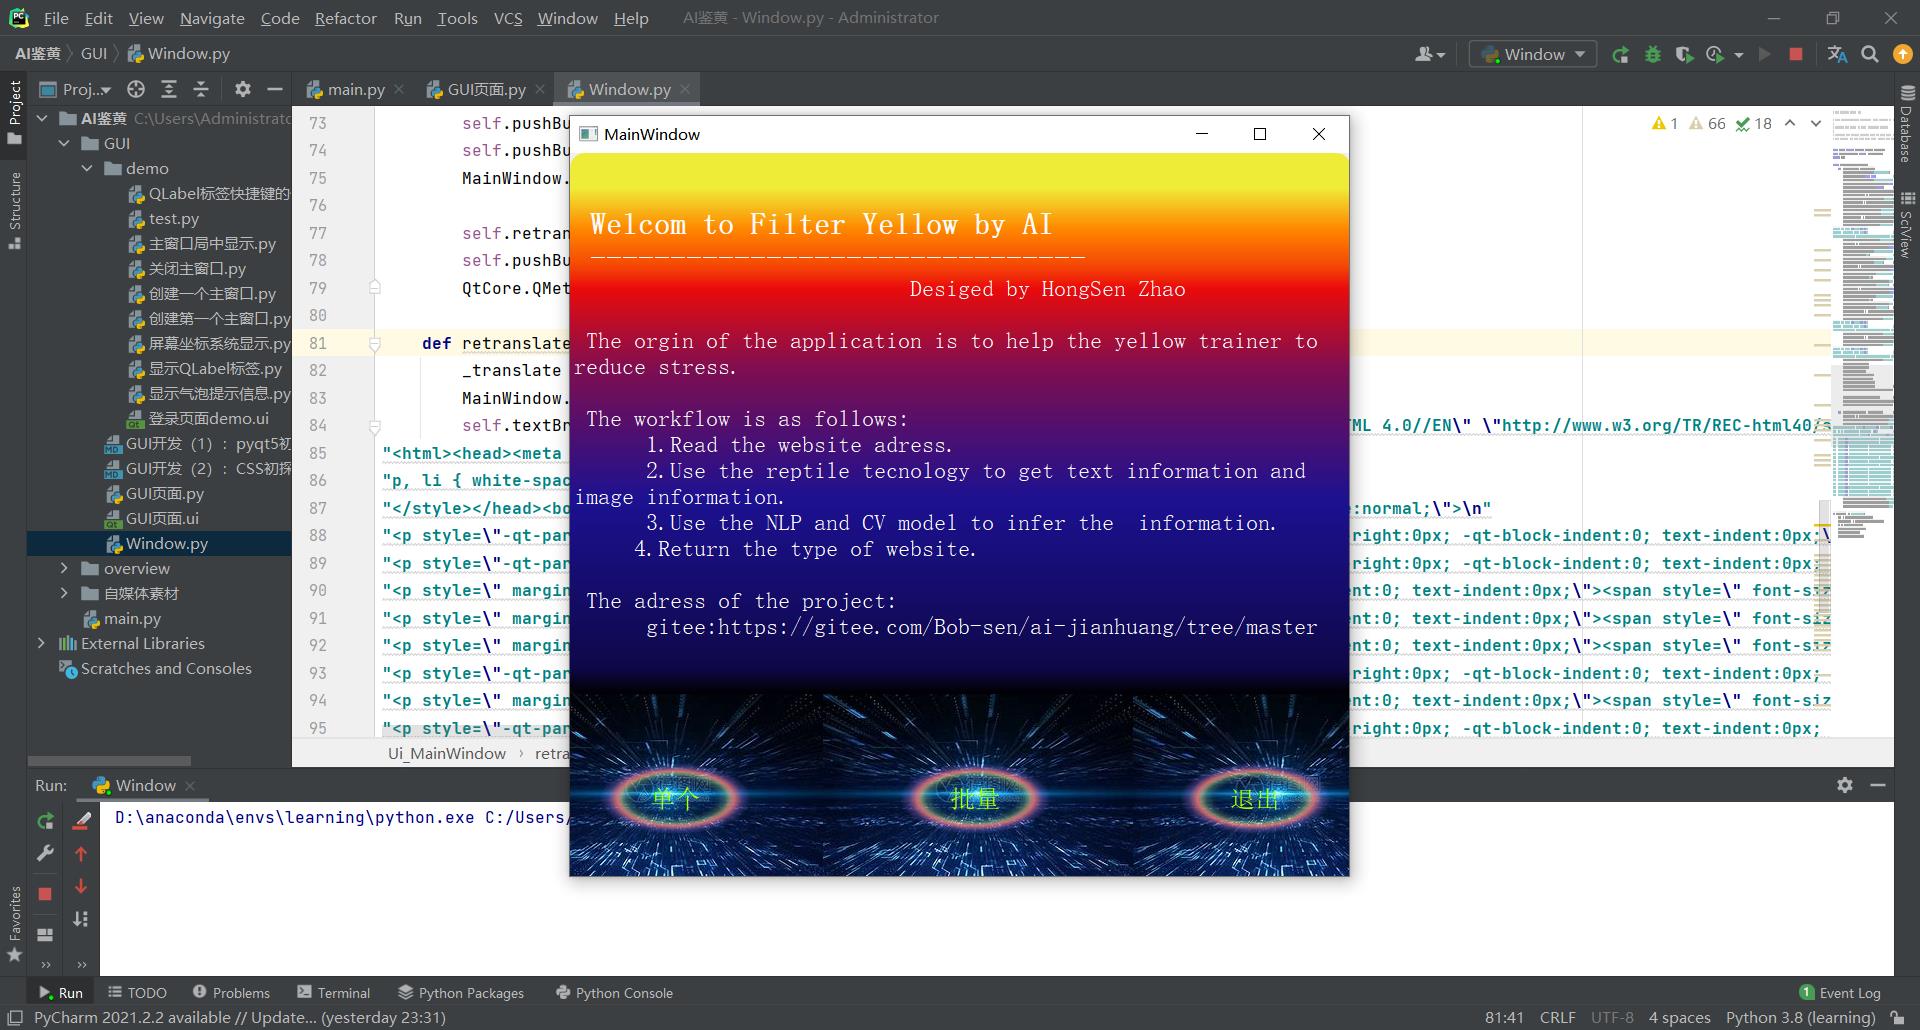
然后这里面我得固定窗口,否则窗口一拉就会变动,然后的话这里就是加了一个函数在设置大小的下面:
MainWindomw.setFixedSize(760,440)
先就这样吧,感觉还是差了一点,但又是说不上来
多窗口开发
其实这是一个很难得我感觉,感觉好像这个地方得写代码了,去代码开发吧,但是就是可能就有点费劲了,干就完了:
然后现在我要开发的功能就是点击单个,然后弹出一个窗口,然后输入文本,之后我这边就可以获取。
对话框开发
我们在使用完Qt Designer后编程的时候,先建立一个子类去继承父类,然后在里面加入功能,最后也只实例化一个子类对象即可
放上代码,开发完毕,下一步爬取页面
from PyQt5 import QtCore, QtGui, QtWidgets
from PyQt5.QtWidgets import QApplication,QInputDialog,QMainWindow,QFileDialog
import sys


my_text = ""

class Ui_MainWindow(object):
    def setupUi(self, MainWindow):
        MainWindow.setObjectName("MainWindow")
        MainWindow.resize(779, 723)
        MainWindow.setFixedSize(779,723)
        MainWindow.setStyleSheet("border-radius:15px")
        MainWindow.setIconSize(QtCore.QSize(640, 480))
        MainWindow.setDocumentMode(False)
        MainWindow.setTabShape(QtWidgets.QTabWidget.Triangular)

        self.centralwidget = QtWidgets.QWidget(MainWindow)
        self.centralwidget.setObjectName("centralwidget")
        self.textBrowser = QtWidgets.QTextBrowser(self.centralwidget)
        self.textBrowser.setGeometry(QtCore.QRect(0, 0, 781, 541))
        self.textBrowser.setStyleSheet("background-color:qlineargradient(spread:pad, x1:0, y1:1, x2:0, y2:0, stop:0 rgba(0, 0, 0, 255), stop:0.05 rgba(14, 8, 73, 255), stop:0.36 rgba(28, 17, 145, 255), stop:0.6 rgba(126, 14, 81, 255), stop:0.75 rgba(234, 11, 11, 255), stop:0.79 rgba(244, 70, 5, 255), stop:0.86 rgba(255, 136, 0, 255), stop:0.935 rgba(239, 236, 55, 255))")
        self.textBrowser.setObjectName("textBrowser")
        self.pushButton = QtWidgets.QPushButton(self.centralwidget)
        self.pushButton.setGeometry(QtCore.QRect(30, 610, 151, 71))
        self.pushButton.setStyleSheet("border-radius:35px;\\n"
"font: 87 15pt \\"Arial\\";\\n"
"color: rgb(170, 255, 0);\\n"
"background-color: qradialgradient(spread:pad, cx:0.5, cy:0.5, radius:0.5, fx:0.5, fy:0.5, stop:0 rgba(0, 0, 0, 0), stop:0.52 rgba(0, 0, 0, 0), stop:0.565 rgba(82, 121, 76, 33), stop:0.65 rgba(159, 235, 148, 64), stop:0.721925 rgba(255, 238, 150, 129), stop:0.77 rgba(255, 128, 128, 204), stop:0.89 rgba(191, 128, 255, 64), stop:1 rgba(0, 0, 0, 0))")
        self.pushButton.setObjectName("pushButton")

        self.label = QtWidgets.QLabel(self.centralwidget)
        self.label.setGeometry(QtCore.QRect(-110, 520, 371, 231))
        self.label.setStyleSheet("bonder-radius:5px")
        self.label.setText("")
        self.label.setPixmap(QtGui.QPixmap("../../../../Pictures/Saved Pictures/3.jpg"))
        self.label.setObjectName("label")
        self.label_2 = QtWidgets.QLabel(self.centralwidget)
        self.label_2.setGeometry(QtCore.QRect(200, 520, 421, 231))
        self.label_2.setStyleSheet("bonder-radius:5px")
        self.label_2.setText("")
        self.label_2.setPixmap(QtGui.QPixmap("../../../../Pictures/Saved Pictures/3.jpg"))
        self.label_2.setObjectName("label_2")
        self.label_3 = QtWidgets.QLabel(self.centralwidget)
        self.label_3.setGeometry(QtCore.QRect(500, 520, 371, 231))
        self.label_3.setStyleSheet("bonder-radius:5px")
        self.label_3.setText("")
        self.label_3.setPixmap(QtGui.QPixmap("../../../../Pictures/Saved Pictures/3.jpg"))
        self.label_3.setObjectName("label_3")
        self.pushButton_3 = QtWidgets.QPushButton(self.centralwidget)
        self.pushButton_3.setGeometry(QtCore.QRect(330, 610, 151, 71))
        self.pushButton_3.setStyleSheet("border-radius:35px;\\n"
"font: 87 15pt \\"Arial\\";\\n"
"color: rgb(170, 255, 0);\\n"
"background-color: qradialgradient(spread:pad, cx:0.5, cy:0.5, radius:0.5, fx:0.5, fy:0.5, stop:0 rgba(0, 0, 0, 0), stop:0.52 rgba(0, 0, 0, 0), stop:0.565 rgba(82, 121, 76, 33), stop:0.65 rgba(159, 235, 148, 64), stop:0.721925 rgba(255, 238, 150, 129), stop:0.77 rgba(255, 128, 128, 204), stop:0.89 rgba(191, 128, 255, 64), stop:1 rgba(0, 0, 0, 0))")
        self.pushButton_3.setObjectName("pushButton_3")
        self.pushButton_2 = QtWidgets.QPushButton(self.centralwidget)
        self.pushButton_2.setGeometry(QtCore.QRect(610, 610, 151, 71))
        self.pushButton_2.setStyleSheet("border-radius:35px;\\n"
"font: 87 15pt \\"Arial\\";\\n"
"color: rgb(170, 255, 0);\\n"
"background-color: qradialgradient(spread:pad, cx:0.5, cy:0.5, radius:0.5, fx:0.5, fy:0.5, stop:0 rgba(0, 0, 0, 0), stop:0.52 rgba(0, 0, 0, 0), stop:0.565 rgba(82, 121, 76, 33), stop:0.65 rgba(159, 235, 148, 64), stop:0.721925 rgba(255, 238, 150, 129), stop:0.77 rgba(255, 128, 128, 204), stop:0.89 rgba(191, 128, 255, 64), stop:1 rgba(0, 0, 0, 0))")
        self.pushButton_2.setObjectName("pushButton_2")
        self.label_3.raise_()
        self.label_2.raise_()
        self.label.raise_()
        self.textBrowser.raise_()
        self.pushButton.raise_()
        self.pushButton_3.raise_()
        self.pushButton_2.raise_()
        MainWindow.setCentralWidget(self.centralwidget)

        self.retranslateUi(MainWindow)
        self.pushButton_2.clicked.connect(MainWindow.close)
        #self.pushButton.clicked.connect(self.getStr)

        #self.pushButton_3.clicked.connect(self.)
        QtCore.QMetaObject.connectSlotsByName(MainWindow)


    def retranslateUi(self, MainWindow):
        _translate = QtCore.QCoreApplication.translate
        MainWindow.setWindowTitle(_translate("MainWindow", "MainWindow"))
        self.textBrowser.sethtml(_translate("MainWindow", "<!DOCTYPE HTML PUBLIC \\"-//W3C//DTD HTML 4.0//EN\\" \\"http://www.w3.org/TR/REC-html40/strict.dtd\\">\\n"
"<html><head><meta name=\\"qrichtext\\" content=\\"1\\" /><style type=\\"text/css\\">\\n"
"p, li  white-space: pre-wrap; \\n"
"</style></head><body style=\\" font-family:\\'SimSun\\'; font-size:9pt; font-weight:400; font-style:normal;\\">\\n"
"<p style=\\"-qt-paragraph-type:empty; margin-top:0px; margin-bottom:0px; margin-left:0px; margin-right:0px; -qt-block-indent:0; text-indent:0px;\\"><br /></p>\\n"
"<p style=\\"-qt-paragraph-type:empty; margin-top:0px; margin-bottom:0px; margin-left:0px; margin-right:0px; -qt-block-indent:0; text-indent:0px; font-size:18pt; color:#fafafa;\\"><br /></p>\\n"
"<p style=\\" margin-top:0px; margin-bottom:0px; margin-left:0px; margin-right:0px; -qt-block-indent:0; text-indent:0px;\\"><span style=\\" font-size:18pt; font-weight:600; color:#fafafa;\\"> Welcom to Filter Yellow by AI </span></p>\\n"
"<p style=\\" margin-top:0px; margin-bottom:0px; margin-left:0px; margin-right:0px; -qt-block-indent:0; text-indent:0px;\\"><span style=\\" font-size:18pt; font-weight:600; color:#fafafa;\\"> -------------------------------</span></p>\\n"
"<p style=\\" margin-top:0px; margin-bottom:0px; margin-left:0px; margin-right:0px; -qt-block-indent:0; text-indent:0px;\\"><span style=\\" font-size:14pt; color:#fafafa;\\">                            Desiged by HongSen Zhao</span></p>\\n"
"<p style=\\"-qt-paragraph-type:empty; margin-top:0px; margin-bottom:0px; margin-left:0px; margin-right:0px; -qt-block-indent:0; text-indent:0px; font-size:14pt; color:#fafafa;\\"><br /></p>\\n"
"<p style=\\" margin-top:0px; margin-bottom:0px; margin-left:0px; margin-right:0px; -qt-block-indent:0; text-indent:0px;\\"><span style=\\" font-size:14pt; color:#fafafa;\\"> The orgin of the application is to help the yellow trainer to reduce stress. </span></p>\\n"
"<p style=\\"-qt-paragraph-type:empty; margin-top:0px; margin-bottom:0px; margin-left:0px; margin-right:0px; -qt-block-indent:0; text-indent:0px; font-size:14pt; color:#fafafa;\\"><br /></p>\\n"
"<p style=\\" margin-top:0px; margin-bottom:0px; margin-left:0px; margin-right:0px; -qt-block-indent:0; text-indent:0px;\\"><span style=\\" font-size:14pt; color:#fafafa;\\"> The workflow is as follows: </span></p>\\n"
"<p style=\\" margin-top:0px; margin-bottom:0px; margin-left:0px; margin-right:0px; -qt-block-indent:0; text-indent:0px;\\"><span style=\\" font-size:14pt; color:#fafafa;\\">      1.Read the website adress. </span></p>\\n"
"<p style=\\" margin-top:0px; margin-bottom:0px; margin-left:0px; margin-right:0px; -qt-block-indent:0; text-indent:0px;\\"><span style=\\" font-size:14pt; color:#fafafa;\\">      2.Use the reptile tecnology to get text information and image information. </span></p>\\n"
"<p style=\\" margin-top:0px; margin-bottom:0px; margin-left:0px; margin-right:0px; -qt-block-indent:0; text-indent:0px;\\"><span style=\\" font-size:14pt; color:#fafafa;\\">      3.Use the NLP and CV model to infer the  information. </span></p>\\n"
"<p style=\\" margin-top:0px; margin-bottom:0px; margin-left:0px; margin-right:0px; -qt-block-indent:0; text-indent:0px;\\"><span style=\\" font-size:14pt; color:#fafafa;\\">     4.Return the type of website. </span></p>\\n"
"<p style=\\"-qt-paragraph-type:empty; margin-top:0px; margin-bottom:0px; margin-left:0px; margin-right:0px; -qt-block-indent:0; text-indent:0px; font-size:14pt; color:#fafafa;\\"><br /></p>\\n"
"<p style=\\" margin-top:0px; margin-bottom:0px; margin-left:0px; margin-right:0px; -qt-block-indent:0; text-indent:0px;\\"><span style=\\" font-size:14pt; color:#fafafa;\\"> The adress of the project: </span></p>\\n"
"<p style=\\" margin-top:0px; margin-bottom:0px; margin-left:0px; margin-right:0px; -qt-block-indent:0; text-indent:0px;\\"><span style=\\" font-size:14pt; color:#fafafa;\\">      gitee:https://gitee.com/Bob-sen/ai-jianhuang/tree/master </span></p></body></html>"))

        self.pushButton.setText(_translate("MainWindow", "单个"))
        self.pushButton_3.setText(_translate("MainWindow", "批量"))
        self.pushButton_2.setText(_translate("MainWindow", "退出"))

#我们在使用完Qt Designer后编程的时候,先建立一个子类去继承父类,然后在里面加入功能,最后也只实例化一个子类对象即可
class MyMainForm(QMainWindow,Ui_MainWindow):
    def __init__(self, parent=None):
        super(MyMainForm, self).__init__(parent)
        self.setupUi(self)
        self.pushButton.clicked.connect(self.getStr)
        self.pushButton_3.clicked.connect(self.get_file)

    def getStr(self):
        text, ok=QInputDialog.getText(self, 'Text Input Dialog', '输入网址:')
        my_text = str(text)
        print(my_text)
        #if ok and text:
        #    self.GetstrlineEdit.setText(str(text))

    def get_file(self):
        file_name = QFileDialog.getOpenFileName()
        print(file_name[0])


if __name__ == '__main__':
    app = QApplication(sys.argv)
    main_window = MyMainForm()
    main_window.show()
    sys.exit(app.exec_())
以上是关于GUI开发:窗口界面开发的主要内容,如果未能解决你的问题,请参考以下文章