用Json Template在Azure上创建Cisco CSR路由器
Posted hengzi
tags:
篇首语:本文由小常识网(cha138.com)小编为大家整理,主要介绍了用Json Template在Azure上创建Cisco CSR路由器相关的知识,希望对你有一定的参考价值。
Azure的ARM模式可以通过Json的模板创建VM。本文以Cisco的CSR的image为例,介绍如何用Json的创建VM。
一、Cisco CSR的Image
首先把Cisco CSR的image复制到一个存储账户中:
https://xxxx.blob.core.chinacloudapi.cn/image/CSR_3_16_4aS_CCO.vhd
创建VM的vhd文件也需要在这个存储账户中。
二、获得Json模板
在Github上找到From user image create VM的Json模板:
https://github.com/Azure/azure-quickstart-templates/tree/master/101-vm-from-user-image
把azuredeploy.json文件保存到本地:
为d:\\from_image.json文件。由于Global Azure的Disk目前已经prefer使用Management Disk了,Github上的template已经改成MD的template。
下面是采用普通存储账户的Json Template:
{
  "$schema": "https://schema.management.azure.com/schemas/2015-01-01/deploymentTemplate.json#",
  "contentVersion": "1.0.0.0",
  "parameters": {
    "customVmName": {
      "type": "string",
      "metadata": {
        "description": "This is the name of the your VM"
      }
    },
    "userImageStorageAccountName": {
      "type": "string",
      "metadata": {
        "description": "This is the name of the your storage account"
      }
    },
    "userImageStorageAccountResourceGroupName": {
      "type": "string",
      "metadata": {
        "description": "Resource group of the existing storage account"
      }
    },
    "osDiskVhdUri": {
      "type": "string",
      "metadata": {
        "description": "Uri of the your user image"
      }
    },
    "dnsLabelPrefix": {
      "type": "string",
      "metadata": {
        "description": "DNS Label for the Public IP. Must be lowercase. It should match with the following regular expression: ^[a-z][a-z0-9-]{1,61}[a-z0-9]$ or it will raise an error."
      }
    },
    "adminUserName": {
      "type": "string",
      "metadata": {
        "description": "User Name for the Virtual Machine"
      }
    },
    "adminPassword": {
      "type": "securestring",
      "metadata": {
        "description": "Password for the Virtual Machine"
      }
    },
    "osType": {
      "type": "string",
      "allowedValues": [
        "Windows",
        "Linux"
      ],
      "metadata": {
        "description": "This is the OS that your VM will be running"
      }
    },
    "vmSize": {
      "type": "string",
      "metadata": {
        "description": "This is the size of your VM"
      }
    },
    "newOrExistingVnet": {
      "allowedValues": [ "new", "existing" ],
      "type": "string",
      "metadata": {
        "description":  "Select if this template needs a new VNet or will reference an existing VNet"
      }
    },
    "newOrExistingVnetName": {
      "type": "string",
      "defaultValue": "",
      "metadata": {
        "description": "New or Existing VNet Name"
      }
    },
    "newOrExistingSubnetName": {
      "type": "string",
      "metadata": {
        "description": "New or Existing subnet Name"
      }
    },
    "existingVnetResourceGroupName": {
      "type": "string",
      "metadata": {
        "description": "Resource group of the existing VNET"
      }
    }
  },
  "variables": {
    "publicIPAddressName": "[concat(parameters(\'customVmName\'),\'IP\')]",
    "vmName": "[parameters(\'customVmName\')]",
    "nicName": "[concat(parameters(\'customVmName\'),\'Nic\')]",
    "publicIPAddressType": "Dynamic",
    "apiVersion": "2015-06-15",
    "templatelink": "[concat(\'https://raw.githubusercontent.com/singhkay/azure-quickstart-templates/master/101-vm-from-user-image/\',parameters(\'newOrExistingVnet\'),\'vnet.json\')]"
  },
  "resources": [
    {
            "apiVersion": "2015-01-01",
            "name": "vnet-template",
            "type": "Microsoft.Resources/deployments",
            "properties": {
                "mode": "incremental",
                "templateLink": {
                    "uri": "[variables(\'templatelink\')]",
                    "contentVersion": "1.0.0.0"
                },
                "parameters": {
                    "virtualNetworkName": {
                        "value": "[parameters(\'newOrExistingVnetName\')]"
                    },
                    "subnetName": {
                        "value": "[parameters(\'newOrExistingSubnetName\')]"
                    },
                    "existingVnetResourceGroupName": {
                        "value": "[parameters(\'existingVnetResourceGroupName\')]"
                    }
                }
            }
        },
    {
      "apiVersion": "[variables(\'apiVersion\')]",
      "type": "Microsoft.Network/publicIPAddresses",
      "name": "[variables(\'publicIPAddressName\')]",
      "location": "[resourceGroup().location]",
      "properties": {
        "publicIPAllocationMethod": "[variables(\'publicIPAddressType\')]",
        "dnsSettings": {
          "domainNameLabel": "[parameters(\'dnsLabelPrefix\')]"
        }
      }
    },
    {
      "apiVersion": "2016-03-30",
      "type": "Microsoft.Network/networkInterfaces",
      "name": "[variables(\'nicName\')]",
      "location": "[resourceGroup().location]",
      "dependsOn": [
        "[concat(\'Microsoft.Network/publicIPAddresses/\', variables(\'publicIPAddressName\'))]",
        "Microsoft.Resources/deployments/vnet-template"
      ],
      "properties": {
        "ipConfigurations": [
          {
            "name": "ipconfig1",
            "properties": {
              "privateIPAllocationMethod": "Dynamic",
              "publicIPAddress": {
                "id": "[resourceId(\'Microsoft.Network/publicIPAddresses\',variables(\'publicIPAddressName\'))]"
              },
              "subnet": {
                "id": "[reference(\'vnet-template\').outputs.subnet1Ref.value]"
              }
            }
          }
        ]
      }
    },
    {
      "apiVersion": "[variables(\'apiVersion\')]",
      "type": "Microsoft.Compute/virtualMachines",
      "name": "[variables(\'vmName\')]",
      "location": "[resourceGroup().location]",
      "dependsOn": [
        "[concat(\'Microsoft.Network/networkInterfaces/\', variables(\'nicName\'))]"
      ],
      "properties": {
        "hardwareProfile": {
          "vmSize": "[parameters(\'vmSize\')]"
        },
        "osProfile": {
          "computerName": "[variables(\'vmName\')]",
          "adminUsername": "[parameters(\'adminUsername\')]",
          "adminPassword": "[parameters(\'adminPassword\')]"
        },
        "storageProfile": {
          "osDisk": {
            "name": "[concat(variables(\'vmName\'),\'-osDisk\')]",
            "osType": "[parameters(\'osType\')]",
            "caching": "ReadWrite",
            "createOption": "FromImage",
            "image": {
              "uri": "[parameters(\'osDiskVhdUri\')]"
            },
            "vhd": {
              "uri": "[concat(reference(resourceId(parameters(\'userImageStorageAccountResourceGroupName\'), \'Microsoft.Storage/storageAccounts/\', parameters(\'userImageStorageAccountName\')), variables(\'apiVersion\')).primaryEndpoints.blob, \'vhds/\',variables(\'vmName\'), uniquestring(resourceGroup().id), \'osDisk.vhd\')]"
            }
          }
        },
        "networkProfile": {
          "networkInterfaces": [
            {
              "id": "[resourceId(\'Microsoft.Network/networkInterfaces\',variables(\'nicName\'))]"
            }
          ]
        },
        "diagnosticsProfile": {
          "bootDiagnostics": {
            "enabled": "true",
            "storageUri": "[concat(reference(resourceId(parameters(\'userImageStorageAccountResourceGroupName\'), \'Microsoft.Storage/storageAccounts/\', parameters(\'userImageStorageAccountName\')), variables(\'apiVersion\')).primaryEndpoints.blob)]"
          }
        }
      }
    }
  ]
}
三、通过模板创建Cisco CSR虚拟机
1. 登录Azure China的Portal
2. 在New中搜索template

如上图所示,点击Template Deployment。这里需要注意的是,目前必须是英文版本才可以使用这个功能。
3. 导入template

把刚刚的Json Template上传。
4. 填写相应的Parameters
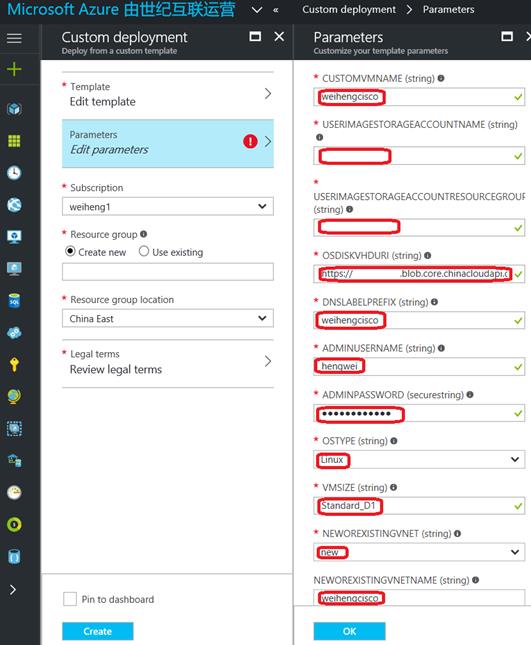
根据实际值,填写相应的参数。需要注意的是Resource Group和Storage Account都要和image所在的Storage Account相同。
4. Legal Terms
把Legal Terms相应的内容填写完整:
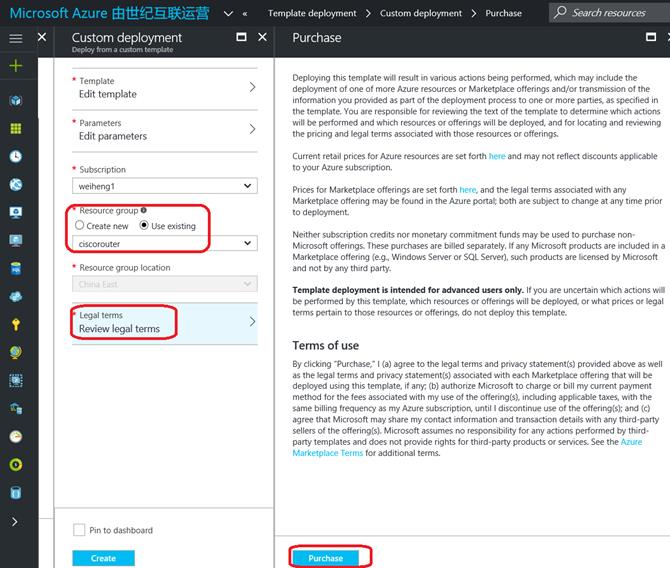
然后点击create,创建VM。
四、登录创建的Cisco CSR router
Connecting to 42.159.203.233:22...
Connection established.
To escape to local shell, press Ctrl+Alt+].
hengweicisco#sh runn
Building configuration...
Current configuration : 1294 bytes
!
! Last configuration change at 10:21:56 UTC Mon Apr 24 2017
!
version 15.5
service timestamps debug datetime msec
service timestamps log datetime msec
no platform punt-keepalive disable-kernel-core
platform console virtual
!
hostname hengweicisco
!
boot-start-marker
boot-end-marker
!
logging persistent size 1000000 filesize 8192 immediate
!
aaa new-model
!
aaa authentication login default local
aaa authorization exec default local none
!
aaa session-id common
......
以上是关于用Json Template在Azure上创建Cisco CSR路由器的主要内容,如果未能解决你的问题,请参考以下文章
在Azure上通过Powershell创建多Interface的Cisco CSR路由器
使用Json Template在Azure China创建ARM类型的虚拟机
来自 azure template.json 中流分析作业模板的服务总线的 sharedAccessPolicyKey