原生js实现放大镜效果
Posted heyujun-
tags:
篇首语:本文由小常识网(cha138.com)小编为大家整理,主要介绍了原生js实现放大镜效果相关的知识,希望对你有一定的参考价值。
放大镜效果主要涉及3个鼠标事件:
1.onmouseover,鼠标移入浮动小方块和显示放大的区域显示;
2.onmousemove,鼠标移动,小方块和放大区域一起移动;
3.onmouseout,鼠标移除小方块和放大区域消失。
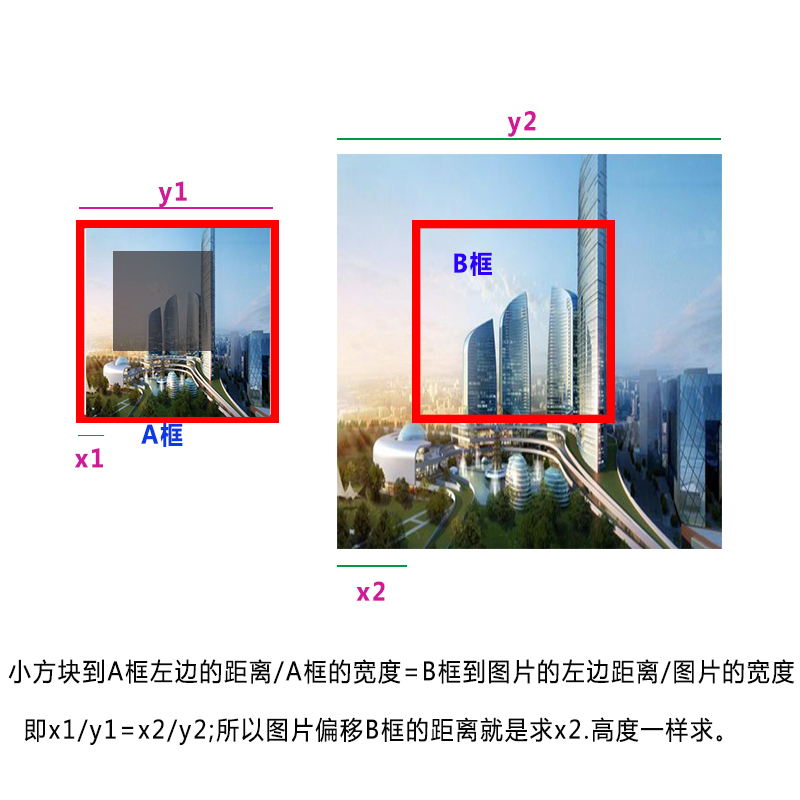
其实放大镜效果最主要的是小方块与放大区域的比例及位置:

	<div id="small_box">
		<div class="small_Pic">
			<div id="float_box"></div>
			<img src="1.png" alt="" />
		</div>
	</div>
	<div id="big_box">
		<div class="big_Pic">
			<img src="1.png" alt="" />
		</div>
	</div>
	*{padding: 0;margin: 0;}
	img{border: none;}
	#small_box{
		width: 350px;
		height: 175px;
		border: 1px solid #666;
		overflow: hidden;
		position: relative;
		top:200px;
		left: 100px;
		display: inline-block;
	}
	.small_Pic img{
		width: 350px;
		height: 175px;
	}
	#big_box{
		width: 350px;
		height: 175px;
		border: 1px solid #666;
		position: absolute;
		top:200px;
		left: 500px;
		overflow: hidden;
		display: none;
	}
	.big_Pic img{
		width: 1400px;
		height: 700px;
		position: absolute;
	}
	#float_box{
		width: 100px;
		height: 50px;
		background-color: #000;
		opacity: 0.5;
		position: absolute;
	    display: none;
		cursor: move;
		z-index: 99;
	}
js代码:
	window.onload=function(){
		/*获取页面元素*/
		var small_box=document.getElementById(\'small_box\');
		var float_box=document.getElementById(\'float_box\');
		var big_box=document.getElementById(\'big_box\');
		var big_box_img=big_box.getElementsByTagName(\'img\')[0];

        /*鼠标移入时,放快与放大区域显示*/
		small_box.onmouseover=function(e){
			float_box.style.display=\'block\';
			big_box.style.display=\'block\';
		}

		/*鼠标移动时触发*/
		small_box.onmousemove=function(e){
			e=e||window.event;
			//e.clientX是被触发时鼠标指针向对于浏览器页面的水平坐标
			var float_box_left=e.clientX-small_box.offsetLeft-50;  //求出鼠标位于浮动层的中心
			var float_box_top=e.clientY-small_box.offsetTop-25;

			var left=float_box.offsetLeft*big_box_img.offsetWidth/small_box.offsetWidth;//求上图的x2值,即图片偏移方框的左距
			var top=float_box.offsetTop*big_box_img.offsetHeight/small_box.offsetHeight;//求上图的x2值,即图片偏移方框的高度
			 big_box_img.style.left=-left+\'px\';
			 big_box_img.style.top=-top+\'px\';

			 /*控制浮动层不能超出方框的范围*/
			if(float_box_left<0){
				float_box.style.left=0;
			}
			else if(float_box_left>(small_box.offsetWidth-100)){
				float_box.style.left=small_box.offsetWidth-100+\'px\';
			}
			else{
				float_box.style.left=float_box_left+\'px\';
			}
			if(float_box_top<0){
				float_box.style.top=0;
			}
			else if(float_box_top>(small_box.offsetHeight-50)){
				float_box.style.top=small_box.offsetHeight-50+\'px\';
			}
			else{
				float_box.style.top=float_box_top+\'px\';
			}
		}

		/*鼠标移出时触发*/
		small_box.onmouseout=function(){
			float_box.style.display=\'none\';
			big_box.style.display=\'none\';
		}
	}
效果是实现了,但是由于除数时有小数点的偏差,可能效果也有一点偏差,大致就是这样。最重要的还是实现效果中的思维逻辑。
推荐网址:http://www.imooc.com/learn/32,放大镜教学视频。
以上是关于原生js实现放大镜效果的主要内容,如果未能解决你的问题,请参考以下文章