Docker-部署LNMP
Posted 袁❈晔
tags:
篇首语:本文由小常识网(cha138.com)小编为大家整理,主要介绍了Docker-部署LNMP相关的知识,希望对你有一定的参考价值。
安装docker
安装docker源
yum install -y yum-utils device-mapper-persistent-data lvm2		#依赖环境
yum-config-manager --add-repo https://mirrors.aliyun.com/docker-ce/linux/centos/docker-ce.repo		                                                    #docker源
安装docker
yum install -y docker-ce  #安装社区版docker
systemctl enable docker   #开机自启
Created symlink from /etc/systemd/system/multi-user.target.wants/docker.service to /usr/lib/systemd/system/docker.service.
systemctl start  docker   #启动
创建nginx-php 、mysq目录
mkdir docker && cd docker

创建创建nginx-php 、mysql目录
mkdir nignx mysql
创建nginx-dockfile、php
cd nginx
上传nginx-1.12.2.tar.gz、wordpress-4.9.4-zh_CN.tar、libmcrypt-2.5.7.tar.gz、nginx.conf、wp-config.php
tar zxvf wordpress-4.9.4-zh_CN.tar.gz
tar zxvf nginx-1.12.2.tar.gz
tar zxvf libmcrypt-2.5.7.tar.gz
tar zxvf php-5.5.38.tar.gz


vim Dockerfile
FROM docker.io/centos:7
RUN yum -y update
RUN yum -y install gcc gcc-c++ openssl-devel openssl autoconf cmake autoconf zlib zlib-devel libtool pcre pcre-devel wget net-tools make
RUN groupadd  -g 900 nginx && useradd nginx -g nginx -s /sbin/nologin
#ADD nginx-1.12.2 nginx-1.12.2
RUN cd /nginx-1.12.2/ && ./configure --prefix=/usr/local/nginx --with-http_dav_module  --with-http_stub_status_module --with-http_addition_module --with-http_sub_module --with-http_flv_module --with-http_mp4_module --with-http_ssl_module --with-http_gzip_static_module --user=nginx --group=nginx
RUN cd /nginx-1.12.2/ && make && make install
RUN ln -s /usr/local/nginx/sbin/nginx  /usr/local/sbin/
RUN sed -i '1afastcgi_param  SCRIPT_FILENAME    $document_root$fastcgi_script_name;' /usr/local/nginx/conf/fastcgi_params
ADD nginx.conf /usr/local/nginx/conf/
ADD wordpress /usr/local/nginx/html/wordpress
ADD wp-config.php /usr/local/nginx/html/wordpress
RUN yum -y install gcc gcc-c++ libxml2-devel libcurl-devel openssl-devel bzip2-devel  openssl automake make autoconf libtool zlib-devel make pcre-devel wget net-tools
ADD libmcrypt-2.5.7 libmcrypt-2.5.7
RUN cd libmcrypt-2.5.7/&& ./configure --prefix=/usr/local/libmcrypt && make && make install
ADD php-5.5.38 php-5.5.38
RUN  cd php-5.5.38/ && ./configure --prefix=/usr/local/php5.5 --with-mysql=mysqlnd --with-pdo-mysql=mysqlnd --with-mysqli=mysqlnd --with-openssl --enable-fpm --enable-sockets --enable-sysvshm --enable-mbstring --with-freetype-dir --with-jpeg-dir --with-png-dir --with-zlib --with-libxml-dir=/usr --enable-xml --with-mhash --with-mcrypt=/usr/local/libmcrypt --with-config-file-path=/etc --with-config-file-scan-dir=/etc/php.d --with-bz2 --enable-maintainer-zts && make && make install
RUN  cd php-5.5.38 && cp php.ini-production /etc/php.ini
RUN  cd /php-5.5.38 && cp sapi/fpm/init.d.php-fpm /etc/init.d/php-fpm
RUN  chmod +x /etc/init.d/php-fpm && chkconfig --add php-fpm && chkconfig php-fpm on
RUN  cp /usr/local/php5.5/etc/php-fpm.conf.default  /usr/local/php5.5/etc/php-fpm.conf
RUN sed -i 's*;pid = run/php-fpm.pid*pid = run/php-fpm.pid*g' /usr/local/php5.5/etc/php-fpm.conf
RUN sed -i 's/user = nobody/user = nginx/g' /usr/local/php5.5/etc/php-fpm.conf
RUN sed -i 's/group = nobody/group = nginx/g' /usr/local/php5.5/etc/php-fpm.conf
RUN sed -i 's/pm.max_children = 5/pm.max_children = 50/g' /usr/local/php5.5/etc/php-fpm.conf
RUN sed -i 's/pm.start_servers = 2/pm.start_servers = 5/g' /usr/local/php5.5/etc/php-fpm.conf
RUN sed -i 's/pm.min_spare_servers = 1/pm.min_spare_servers = 5/g' /usr/local/php5.5/etc/php-fpm.conf
RUN sed -i 's/pm.max_spare_servers = 3/pm.max_spare_servers = 30/g' /usr/local/php5.5/etc/php-fpm.conf
EXPOSE 9000
EXPOSE 80
部署nginx-php
docker build -t "centos:nginx-php" .   #构建nginx-php镜像

docker images   #列出镜像
docker run -dit -p 80:80 -m 500m --memory-swap 1G 07a4acbb016b /bin/bash  #容器能使用的内存和交换分区大小
docker ps        #查看当前运行容器
docker exec -it [CONTAINER ID]   /bin/bash  #进入容器
nginx  #开启服务
/etc/init.d/php-fpm start              #启动php
netstat -antp | grep nginx
netstat -antp | grep php
exit
创建mysql-Dockerfile
cd /docker/mysql
上传mysql-5.6.36.tar.gz软件包至目录内
tar xzvf mysql-5.6.36.tar.gz		#解压
vim Dockerfile
FROM docker.io/centos:7
RUN yum -y install gcc gcc-c++ make autoconf make cmake wget
RUN groupadd mysql; useradd -r -M -u 3306 -s /sbin/nologin -g mysql mysql
RUN mkdir /usr/local/mysql; mkdir /data/mysql -pv
RUN yum install gcc gcc-c++ ncurses-devel bison bison-devel -y
RUN wget -c http://dev.mysql.com/get/Downloads/MySQL-5.6/mysql-5.6.29.tar.gz
RUN tar xf mysql-5.6.36.tar.gz -C /usr/local/src/
WORKDIR /usr/local/src/mysql-5.6.36
RUN cmake . -DCMAKE_INSTALL_PREFIX=/usr/local/mysql -DMYSQL_DATADIR=/data/mysql -DSYSCONFDIR=/etc -DMYSQL_TCP_PORT=3306 -DMYSQL_UNIX_ADDR=/var/lib/mysql/mysql.sock -DWITH_INNOBASE_STORAGE_ENGINE=1 -DWITH_MYISAM_STORAGE_ENGINE=1 -DENABLED_LOCAL_INFILE=1 -DWITH_PARTITION_STORAGE_ENGINE=1 -DDEFAULT_CHARSET=utf8 -DEXTRA_CHARSETS=all -DDEFAULT_COLLATION=utf8_general_ci -DWITH-MYSQLD-LDFLAGS=-all-static -DWITH-CLIENT-LD-FLAGS=-all-static -DWITH_DEBUG=0 && gmake && gmake install
RUN chown -R root:mysql /usr/local/mysql/ && chown -R mysql:mysql /data/mysql
RUN chmod 755 /usr/local/src/mysql-5.6.36/scripts/mysql_install_db.sh
RUN /usr/local/src/mysql-5.6.36/scripts/mysql_install_db.sh --basedir=/usr/local/mysql --datadir=/data/mysql --no-defaults --user=mysql
RUN cp /usr/local/src/mysql-5.6.36/support-files/my-default.cnf  /etc/my.cnf
RUN cp /usr/local/src/mysql-5.6.36/support-files/mysql.server  /etc/init.d/mysqld
RUN chmod 775 /etc/init.d/mysqld && /etc/init.d/mysqld start
RUN echo -e '#!/bin/bash\\nexport PATH=$PATH:/usr/local/mysql/bin' >/etc/profile.d/mysql.sh
RUN source /etc/profile
EXPOSE 3306

构建mysql镜像和开启服务
docker build -t "centos:mysql-5.6" .
docker run -idt -p 3306:3306 --device-write-bps /dev/sda:10M 45949d7f9d2e /bin/bash
docker exec -it 04716b5e5b69  /bin/bash		#进入容器
/etc/init.d/mysqld start		#开启服务

进入数据库授权
mysqladmin -u root -p password		#创建数据库密码,123
mysql -uroot -p123 	##进入数据库
create database wordpress default charset utf8 COLLATE utf8_general_ci;	##创建wordpress 表
grant all privileges on wordpress.*  to 'wordpress'@'%' identified by '123' with grant option;	                      #授权
flush privileges;		      #刷新权限生效
exit		                  #退出数据库、退出容器
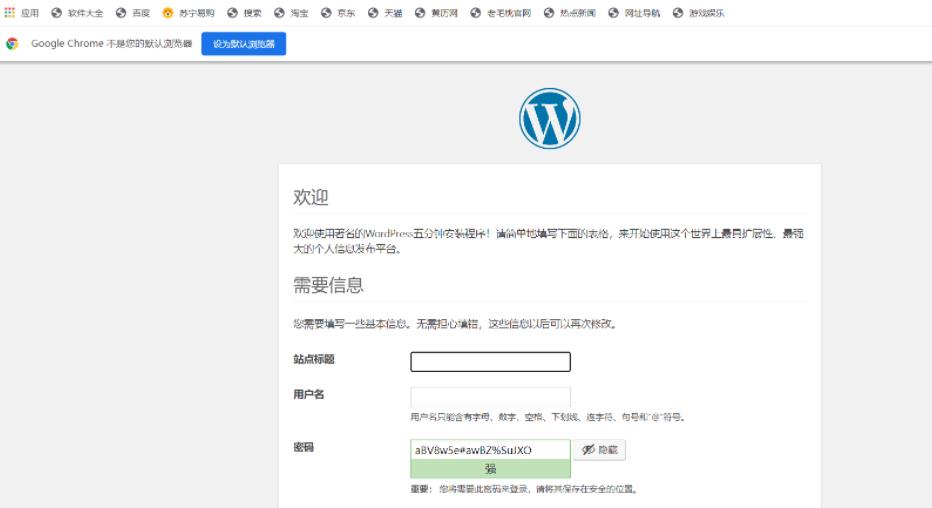
测试访问网页wordpress
http://192.168.220.35/wordpress/index.php
备份
将所有容器快照
docker ps		                            #查询容器
docker images		                        #查询镜像
docker export 04716b5e5b69 > test.tar		#导出备份
docker export 95e2167b5a54 > test1.tar
cat test1.tar | docker import - centos:new	#导入
docker images

将镜像保存成tar包
docker save -o mysql.tar centos:mysql-5.6
docker save -o nginx-php.tar centos:nginx-php
docker ps
docker stop [容器id]	#停止容器
docker rm [容器id]		#删除容器
docker rmi [镜像id]		#删除镜像
docker images		    #nginx-php已恢复
以上是关于Docker-部署LNMP的主要内容,如果未能解决你的问题,请参考以下文章