自定义UI 圆形头像
Posted Notzuonotdied
tags:
篇首语:本文由小常识网(cha138.com)小编为大家整理,主要介绍了自定义UI 圆形头像相关的知识,希望对你有一定的参考价值。
系列文章目录
文章目录
前言
这系列的文章主要是基于扔物线的HenCoderPlus课程的源码来分析学习。
- 扔物线课程源码:AvatarView.java
- android官方文档:自定义绘制
创建绘制对象
我们需要创建一个画笔🖌Paint来绘制我们的头像的边框,也需要提前加载我们的头像到内存(Bitmap)中。
public class AvatarView extends View
    // 头像的宽度
    private static final float WIDTH = Utils.dp2px(300);
    // 头像距离画布边界的填充量
    private static final float PADDING = Utils.dp2px(50);
    // 头像边框的宽度
    private static final float EDGE_WIDTH = Utils.dp2px(10);

    // 抗锯齿
    Paint paint = new Paint(Paint.ANTI_ALIAS_FLAG);
    // 头像的Bitmap
    Bitmap bitmap;

    public AvatarView(Context context, @Nullable AttributeSet attrs)
        super(context, attrs);


    	// 代码详见下一章介绍
        bitmap = getAvatar((int) WIDTH);
加载头像
为避免出现
java.lang.OutOfMemory异常,请先检查位图的尺寸,然后再对其进行解码,除非您绝对信任该来源可为您提供大小可预测的图片数据,以轻松适应可用的内存。——引用自Android官方文档:高效加载大型位图
下述源码的分析请见官方的说明:将按比例缩小的版本加载到内存中。
/**
 * 获取头像
 *
 * @param width 按照width读取图片
 */
Bitmap getAvatar(int width)
    BitmapFactory.Options options = new BitmapFactory.Options();
    options.inJustDecodeBounds = true;
    // 这是一个耗时操作,在配置了options.inJustDecodeBounds = true后,仅会从资源中解析出来图片的宽高。
    BitmapFactory.decodeResource(getResources(), R.drawable.avatar_rengwuxian, options);
    // 开始读取Bitmap
    options.inJustDecodeBounds = false;
    options.inDensity = options.outWidth;
    options.inTargetDensity = width;
    return BitmapFactory.decodeResource(getResources(), R.drawable.avatar_rengwuxian, options);
自定义绘制内容
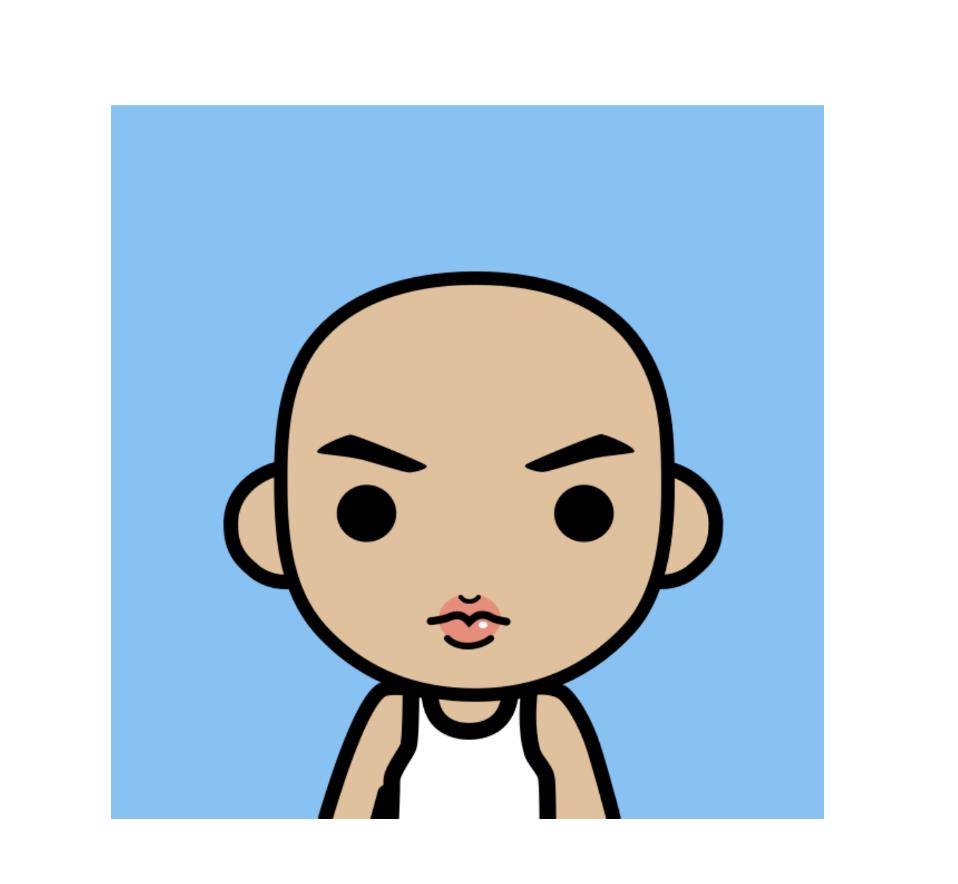
先上一下我们绘制圆形头像的效果图。

绘制头像边框
public class AvatarView extends View
    // 头像的宽度
    private static final float WIDTH = Utils.dp2px(300);
    // 头像距离画布边界的填充量
    private static final float PADDING = Utils.dp2px(50);
    // 头像边框的宽度
    private static final float EDGE_WIDTH = Utils.dp2px(10);
    // 头像边框的点坐标
    private final float BORDER_UPPER = PADDING;
    private final float BORDER_LOWER = PADDING + WIDTH;
    // 头像圆底的点坐标
    private final float UPPER = BORDER_UPPER + EDGE_WIDTH;
    private final float LOWER = BORDER_LOWER - EDGE_WIDTH;

    // 抗锯齿
    Paint paint = new Paint(Paint.ANTI_ALIAS_FLAG);

    public AvatarView(Context context, @Nullable AttributeSet attrs)
        super(context, attrs);


    @Override
    protected void onDraw(Canvas canvas)
        super.onDraw(canvas);
		// 绘制边框
        canvas.drawOval(BORDER_UPPER, BORDER_UPPER, BORDER_LOWER, BORDER_LOWER, paint);
        // 绘制头像的展示区域
        paint.setColor(Color.WHITE);
        canvas.drawOval(UPPER, UPPER, LOWER, LOWER, paint);
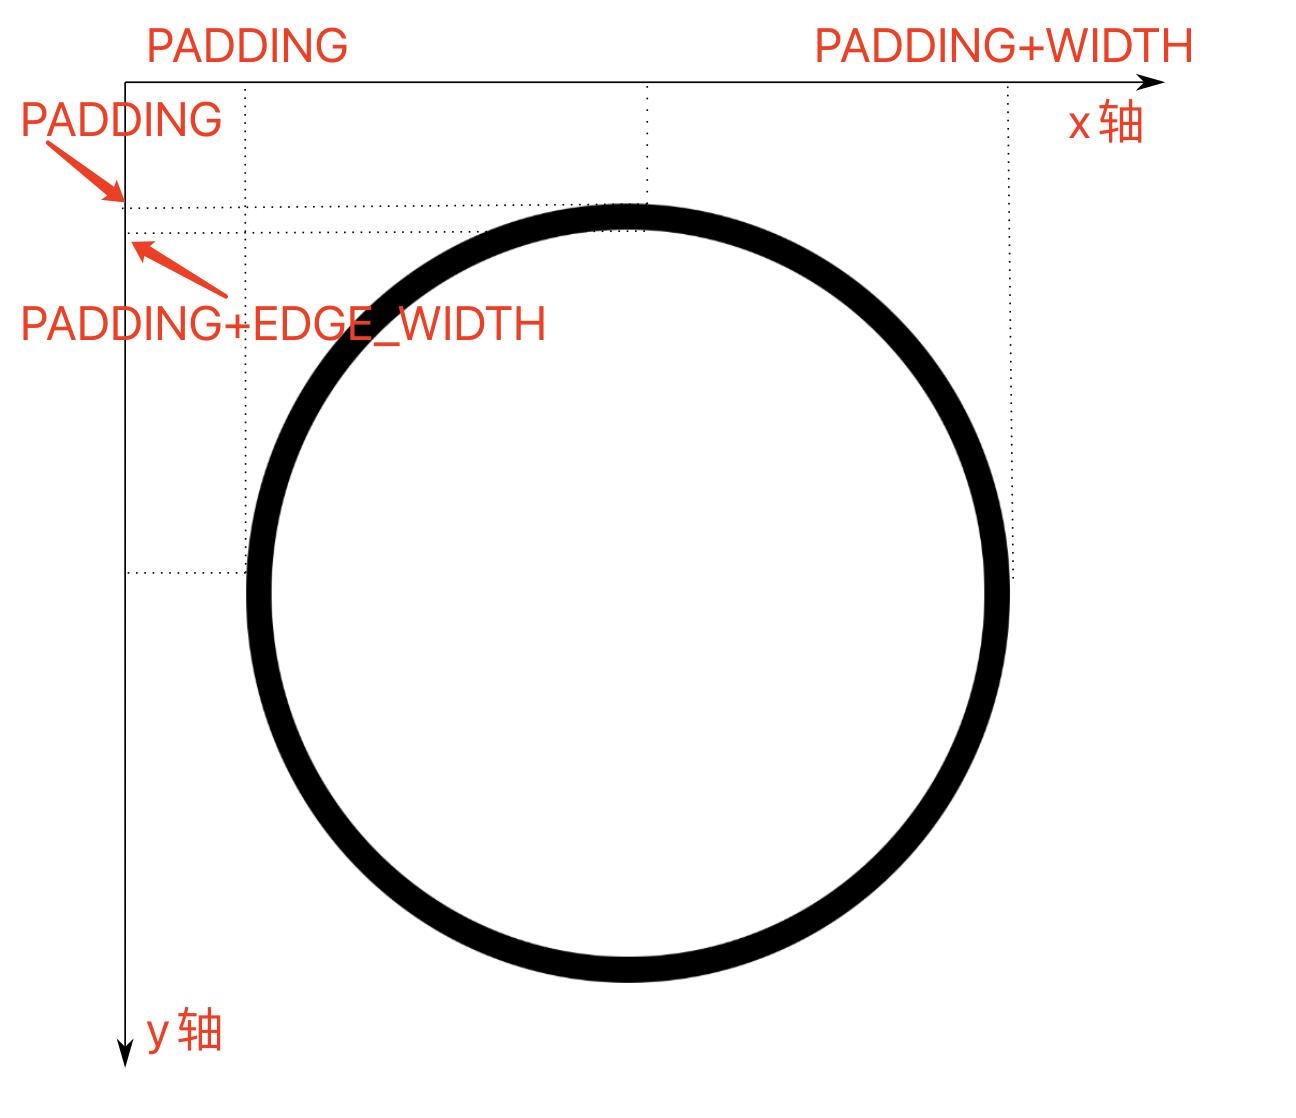
- 圆环的上下边距均为
PADDING; - 圆环的环宽为
EDGE_WIDTH; - 圆环的外圆的直径为
WIDTH。
绘制头像
public class AvatarView extends View
    // 头像的宽度
    private static final float WIDTH = Utils.dp2px(300);
    // 头像距离画布边界的填充量
    private static final float PADDING = Utils.dp2px(50);
    // 头像边框的宽度
    private static final float EDGE_WIDTH = Utils.dp2px(10);
    // 头像边框的点坐标
    private final float BORDER_UPPER = PADDING;
    private final float BORDER_LOWER = PADDING + WIDTH;
    // 头像圆底的点坐标
    private final float UPPER = BORDER_UPPER + EDGE_WIDTH;
    private final float LOWER = BORDER_LOWER - EDGE_WIDTH;

    // 抗锯齿
    Paint paint = new Paint(Paint.ANTI_ALIAS_FLAG);
    // 头像的Bitmap
    Bitmap bitmap;

    public AvatarView(Context context, @Nullable AttributeSet attrs)
        super(context, attrs);


        bitmap = getAvatar((int) WIDTH);


    @Override
    protected void onDraw(Canvas canvas)
        super.onDraw(canvas);

        canvas.drawOval(BORDER_UPPER, BORDER_UPPER, BORDER_LOWER, BORDER_LOWER, paint);
        paint.setColor(Color.WHITE);
        canvas.drawOval(UPPER, UPPER, LOWER, LOWER, paint);
        // 绘制头像
        // paint.setAlpha(120); 下图二
        canvas.drawBitmap(bitmap, PADDING, PADDING, paint);


    /**
     * 获取头像
     *
     * @param width 按照width读取图片
     */
    Bitmap getAvatar(int width)
        BitmapFactory.Options options = new BitmapFactory.Options();
        options.inJustDecodeBounds = true;
        // 这是一个耗时操作,在配置了options.inJustDecodeBounds = true后,仅会从资源中解析出来图片的宽高。
        BitmapFactory.decodeResource(getResources(), R.drawable.avatar_rengwuxian, options);
        // 开始读取Bitmap
        options.inJustDecodeBounds = false;
        options.inDensity = options.outWidth;
        options.inTargetDensity = width;
        return BitmapFactory.decodeResource(getResources(), R.drawable.avatar_rengwuxian, options);
- 为了方便说明问题,第二张图加了
paint.setAlpha(120);。
为了达到文章前的效果,我们需要将头像和环的内圆相结合,且仅仅保留内圆区域的头像部分。扔物线的朱凯大佬已经给咱们指了一条明路——Xfermode。
融合图层
这里需要说明下,加载进内存的图片的宽度是WIDTH。
Xfermode
PorterDuff.Mode.SRC_IN:以Destination Image为模,裁剪Source Image(以圆环的内圆为模,裁剪头像)。
 Paint paint = new Paint();
 canvas.drawBitmap(destinationImage, 0, 0, paint);

 PorterDuff.Mode mode = // choose a mode
 paint.setXfermode(new PorterDuffXfermode(mode));

 canvas.drawBitmap(sourceImage, 0, 0, paint);

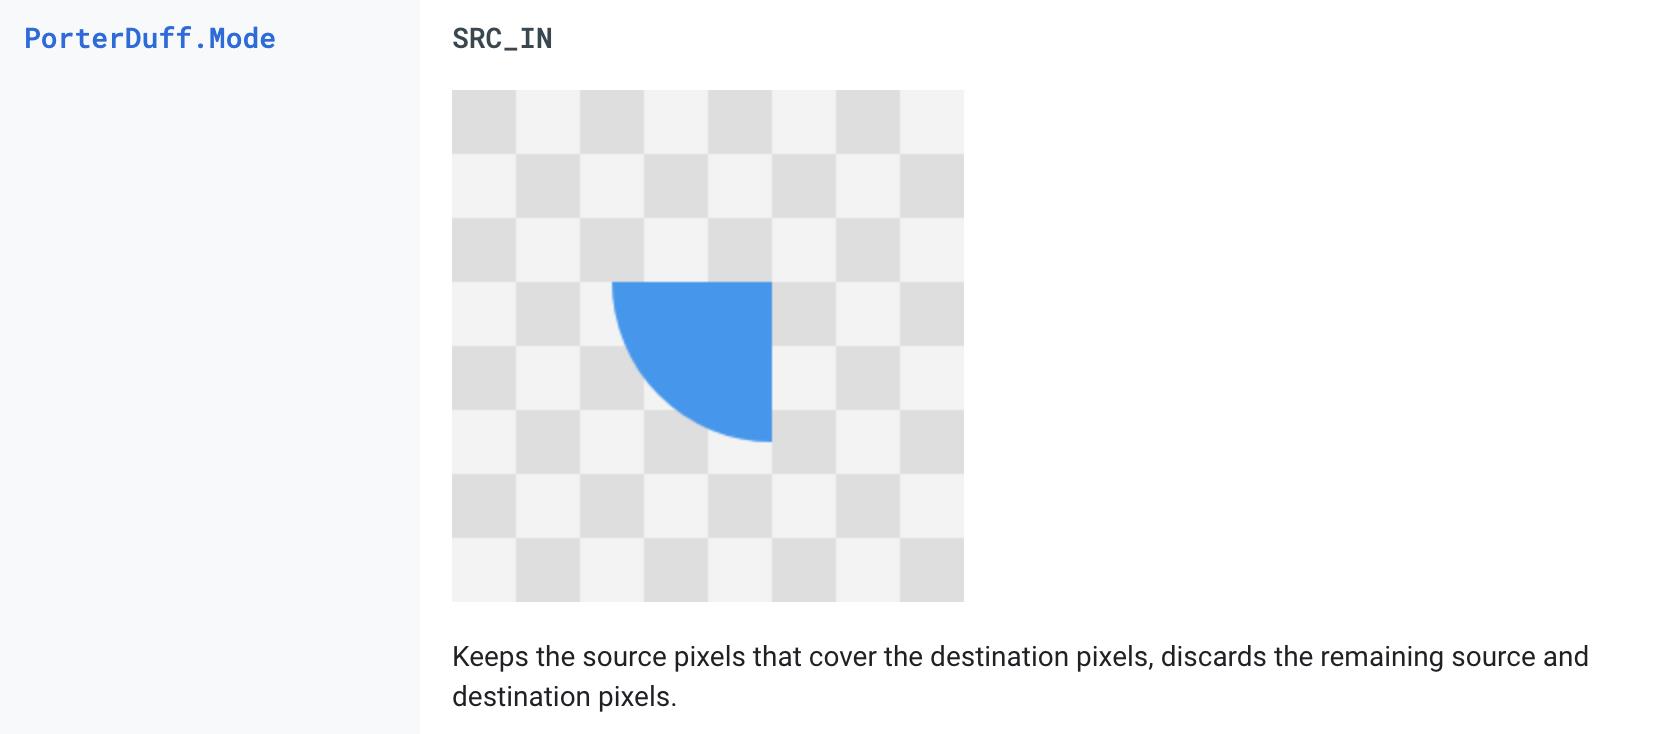
- 详细请参见官方文档 PorterDuff.Mode.SRC_IN 介绍。
PorterDuff名字的由来:(这里还是要致敬下前辈)
The name of the parent class is an homage to the work of Thomas Porter and Tom Duff, presented in their seminal 1984 paper titled “Compositing Digital Images”. In this paper, the authors describe 12 compositing operators that govern how to compute the color resulting of the composition of a source (the graphics object to render) with a destination (the content of the render target).
“Compositing Digital Images” was published in Computer Graphics Volume 18, Number 3 dated July 1984.
Because the work of Porter and Duff focuses solely on the effects of the alpha channel of the source and destination, the 12 operators described in the original paper are called alpha compositing modes here.
For convenience, this class also provides several blending modes, which similarly define the result of compositing a source and a destination but without being constrained to the alpha channel. These blending modes are not defined by Porter and Duff but have been included in this class for convenience purposes.
融合图片验证1
public class AvatarView extends View
    // 两个Bitmap融合的方式
    Xfermode xfermode = new PorterDuffXfermode(PorterDuff.Mode.SRC_IN);

    @Override
    protected void onDraw(Canvas canvas)
        super.onDraw(canvas);

        canvas.drawOval(BORDER_UPPER, BORDER_UPPER, BORDER_LOWER, BORDER_LOWER, paint);
        paint.setColor(Color.WHITE);
        canvas.drawOval(UPPER, UPPER, LOWER, LOWER, paint);
        // 设置图像融合的模式
        paint.setXfermode(xfermode);
        // 图片的宽度和圆环的外圆的直径一样
        canvas.drawBitmap(bitmap, PADDING, PADDING, paint);
        paint.setXfermode(null);
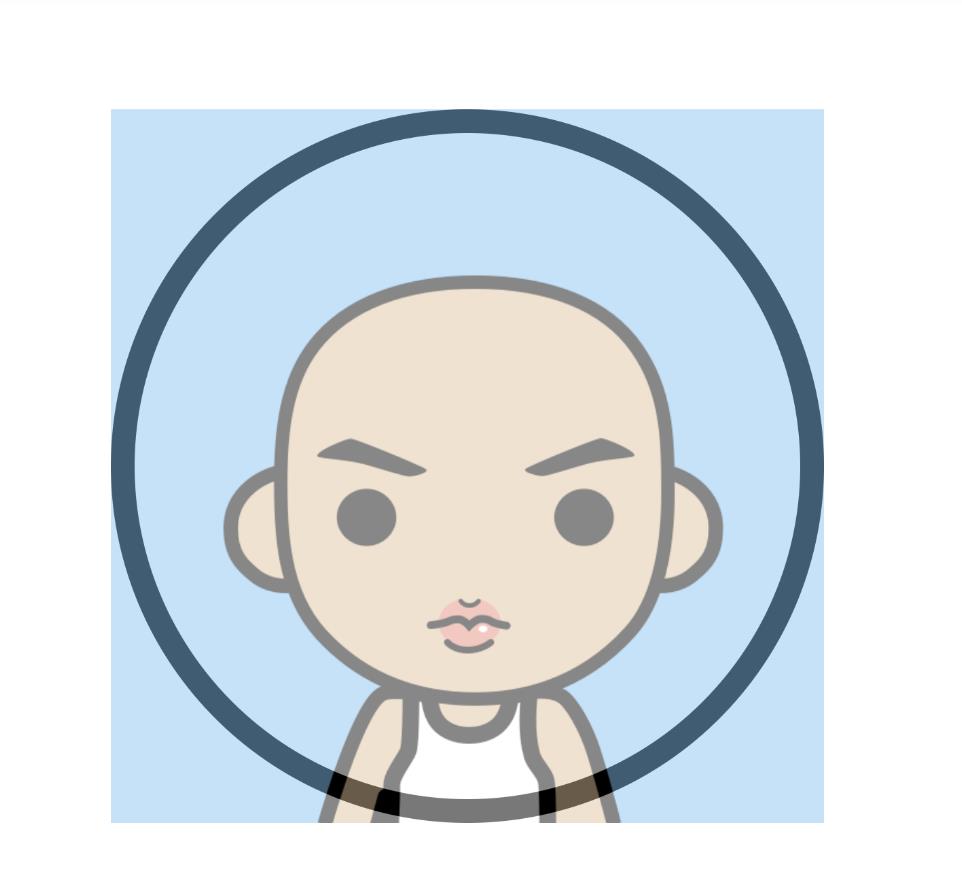
╮(╯▽╰)╭,翻车了,并没有想象中融合了。让我们把环放大看看。
public class AvatarView extends View
    // 两个Bitmap融合的方式
    Xfermode xfermode = new PorterDuffXfermode(PorterDuff.Mode.SRC_IN);

    @Override
    protected void onDraw(Canvas canvas)
        super.onDraw(canvas);
        canvas.drawOval(0, 0, BORDER_LOWER, BORDER_LOWER, paint);
        paint.setColor(Color.WHITE);
        canvas.drawOval(EDGE_WIDTH, EDGE_WIDTH, LOWER, LOWER, paint);
        paint.setXfermode(xfermode);
        // 图片的宽度和圆环的外圆的直径一样
        canvas.drawBitmap(bitmap, PADDING, PADDING, paint);
        paint.setXfermode(null);

- 具体原因:
- 按照逻辑我们会认为,在第二步画头像的时候,跟它共同计算(setXfermode)的是第一步绘制的内圆。但实际上,却是整个
View的显示区域都在画头像的时候参与计算,导致绘制的是完整的头像内容。——参考自:HenCoder Android 开发进阶: 自定义 View 1-2 Paint 详解的 Xfermode 注意事项。
- 按照逻辑我们会认为,在第二步画头像的时候,跟它共同计算(setXfermode)的是第一步绘制的内圆。但实际上,却是整个
- 解决方案:
- 使用离屏缓冲(an offscreen rendering target):将内环和头像Bitmap在离屏缓冲中融合,最后将融合后的图层贴到屏幕即可。
设置离屏缓冲
public class AvatarView extends View
    // 两个Bitmap融合的方式
    Xfermode xfermode = new PorterDuffXfermode(PorterDuff.Mode.SRC_IN);
    // 保存的区域
    RectF savedArea = new RectF();

    @Override
    protected void onDraw(Canvas canvas)
        super.onDraw(canvas);

        canvas.drawOval(BORDER_UPPER, BORDER_UPPER, BORDER_LOWER, BORDER_LOWER, paint);
        paint.setColor(Color.WHITE);
        // 离屏缓冲(Bitmap)
        int saved = canvas.saveLayer(savedArea, paint);
        canvas.drawOval(UPPER, UPPER, LOWER, LOWER, paint);
        paint.setXfermode(xfermode);
        // 图片的宽度和圆环的外圆的直径一样
        canvas.drawBitmap(bitmap, PADDING, PADDING, paint);
        paint.setXfermode(null);
        // 将离屏缓冲数据绘制到屏幕上
        canvas.restoreToCount(saved);
canvas.saveLayer(savedArea, paint)为后续的绘制分配了一个离屏缓冲(an offscreen rendering target)。canvas.restoreToCount(saved);前的操作都讲绘制在离屏缓冲(an offscreen rendering target)上。- 执行
canvas.restoreToCount(saved);时,将离屏缓冲(an offscreen rendering target)的内容一起绘制到屏幕上。
canvas#saveLayer
- Android开发者文档:Canvas
/**
 * The Canvas class holds the "draw" calls. To draw something, you need
 * 4 basic components: A Bitmap to hold the pixels, a Canvas to host
 * the draw calls (writing into the bitmap), a drawing primitive (e.g. Rect,
 * Path, text, Bitmap), and a paint (to describe the colors and styles for the
 * drawing).
 */
public class Canvas extends BaseCanvas
    /**
     * This behaves the same as save(), but in addition it allocates and
     * redirects drawing to an offscreen rendering target.
     * <p class="note"><strong>Note:</strong> this method is very expensive,
     * incurring more than double rendering cost for contained content. Avoid
     * using this method when possible and instead use a
     * @link android.view.View#LAYER_TYPE_HARDWARE hardware layer on a View
     * to apply an xfermode, color filter, or alpha, as it will perform much
     * better than this method.
     * <p>
     * All drawing calls are directed to a newly allocated offscreen rendering target.
     * Only when the balancing call to restore() is made, is that offscreen
     * buffer drawn back to the current target of the Canvas (which can potentially be a previous
     * layer if these calls are nested).
     * <p>
     * Attributes of the Paint - @link Paint#getAlpha() alpha,
     * @link Paint#getXfermode() Xfermode, and
     * @link Paint#getColorFilter() ColorFilter are applied when the
     * offscreen rendering target is drawn back when restore() is called.
     *
     * @param bounds May be null. The maximum size the offscreen render target
     *               needs to be (in local coordinates)
     * @param paint  This is copied, and is applied to the offscreen when
     *               restore() is called.
     * @return       value to pass to restoreToCount() to balance this save()
     */
    public int saveLayer(@Nullable RectF bounds, @Nullable Paint paint)
        return saveLayer(bounds, paint, ALL_SAVE_FLAG);
canvas#restoreToCount
public class Canvas extends BaseCanvas
	/**
     * Efficient way to pop any calls to save() that happened after the save
     * count reached saveCount. It is an error for saveCount to be less than 1.
     *
     * Example:
     *    int count = canvas.save();
     *    ... // more calls potentially to save()
     *    canvas.restoreToCount(count);
     *    // now the canvas is back in the same state it was before the initial
     *    // call to save().
     *
     * @param saveCount The save level to restore to.
     */
    public void restoreToCount(int saveCount)
        if (saveCount < 1)
            if (!sCompatibilityRestore || !isHardwareAccelerated())
                // do nothing and throw without restoring
                throw new IllegalArgumentException(
                        "Underflow in restoreToCount - more restores than saves");

            // compat behavior - restore as far as possible
            saveCount = 1;

        nRestoreToCount(mNativeCanvasWrapper, saveCount);
设置离屏缓冲位置
public class AvatarView extends View
    // 保存的区域
    RectF savedArea = new RectF();

    @Override
    protected void onSizeChanged(int w, int h, int oldw, int oldh)
        super.onSizeChanged(w, h, oldw, oldh);
        // 设置离屏缓冲的区域
        savedArea.set(PADDING, PADDING, PADDING + WIDTH, PADDING + WIDTH);
融合图片验证2
- 大功告成,O(∩_∩)O哈哈~
附录
- 高效加载大型位图
- Android Developer:自定义视图组件
- Compositing Digital Images(图像融合):PorterDuff.Mode
- 扔物线官网:扔物线
- 很感谢大佬提供的教程和源码,才能好好系统学习下自定义UI的内容。
- rengwuxian/HenCoderPlus
- rengwuxian/HenCoderPlus3
- HenCoder Android 开发进阶: 自定义 View 1-2 Paint 详解
源码
public class AvatarView extends View
// 头像的宽度
private static final float WIDTH = Utils.dp2px(300);
// 头像距离画布边界的填充量
private static final float PADDING = Utils.dp2px(50);
// 头像边框的宽度
private static final float EDGE_WIDTH = Utils.dp2px(10);
// 头像边框的点坐标
private final float BORDER_UPPER = PADDING;
private final float BORDER_LOWER = PADDING + WIDTH;
// 头像圆底的点坐标
private final float UPPER = BORDER_UPPER + EDGE_WIDTH;
private final float LOWER = BORDER_LOWER - EDGE_WIDTH;
// 抗锯齿
Paint paint = new Paint(Paint.ANTI_ALIAS_FLAG);
// 两个Bitmap融合的方式
Xfermode xfermode = new PorterDuffXfermode(PorterDuff.Mode.SRC_IN);
// 头像的Bitmap
Bitmap bitmap;
// 保存的区域
RectF savedArea = new RectF();
public AvatarView(Context context, @Nullable AttributeSet attrs)
super(context, attrs);
bitmap = getAvatar((int) WIDTH);
@Override
protected void onSizeChanged(int w, int h, int oldw, int oldh)
super.onSizeChanged(w, h, oldw, oldh);
// 设置离屏缓冲的区域
savedArea.