mybatis专题-----mybatis源码学习
Posted 阿里-马云的学习笔记
tags:
篇首语:本文由小常识网(cha138.com)小编为大家整理,主要介绍了mybatis专题-----mybatis源码学习相关的知识,希望对你有一定的参考价值。
源码分析概述
源码包分析
下载地址
MyBatis 源码下载地址:https://github.com/mybatis/mybatis-3
导入过程
1. 下载MyBatis的源码
2. 检查maven的版本,必须是3.25以上,建议使用maven的最新版本
3. mybatis的工程是maven工程,在开发工具中导入,工程必须使用jdk1.8以上版本;
4. 把mybatis源码的pom文件中true,全部改为false,或者直接删除这行;
5. 在工程目录下执行 mvn clean install -Dmaven.test.skip=true,将当前工程安装到本地仓库(pdf插件报 错的话,需要将这个插件屏蔽);
6. 其他工程依赖此工程
其实就是把mybatis源码install本地仓库中,然后在自己的项目中去依赖mybatis源码工程。
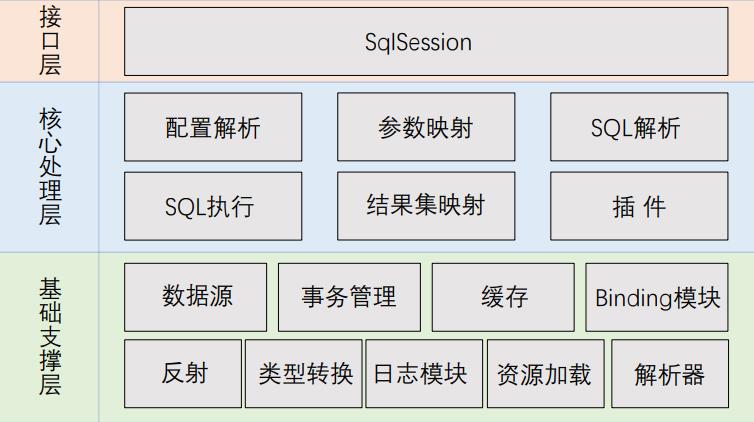
mybatis整体架构
谈谈设计模式的几个原则
单一职责原则:一个类或者一个接口只负责唯一项职责,尽量设计出功能单一的接口;
依赖倒转原则:高层模块不应该依赖低层模块具体实现,解耦高层与低层。既面向接口编程,当实现发生变化 时,只需提供新的实现类,不需要修改高层模块代码;
开放-封闭原则:程序对外扩展开放,对修改关闭;换句话说,当需求发生变化时,我们可以通过添加新模块 来满足新需求,而不是通过修改原来的实现代码来满足新需求;
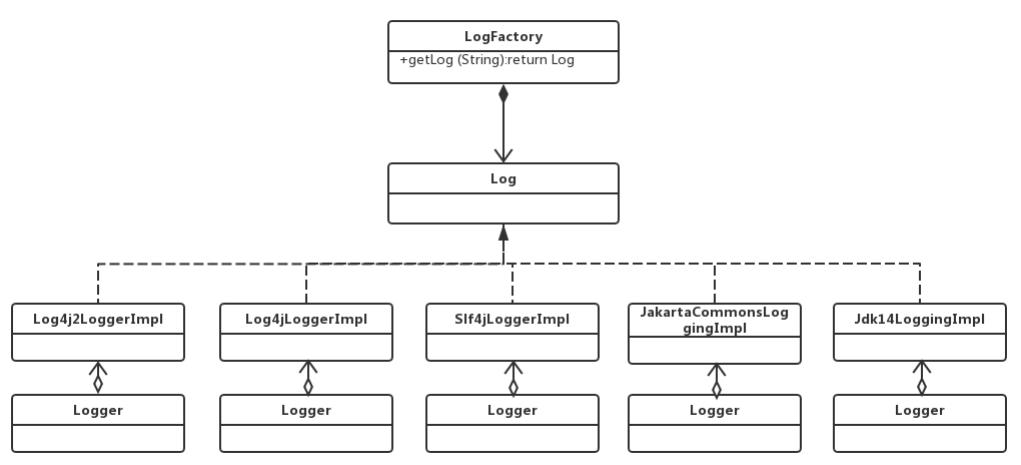
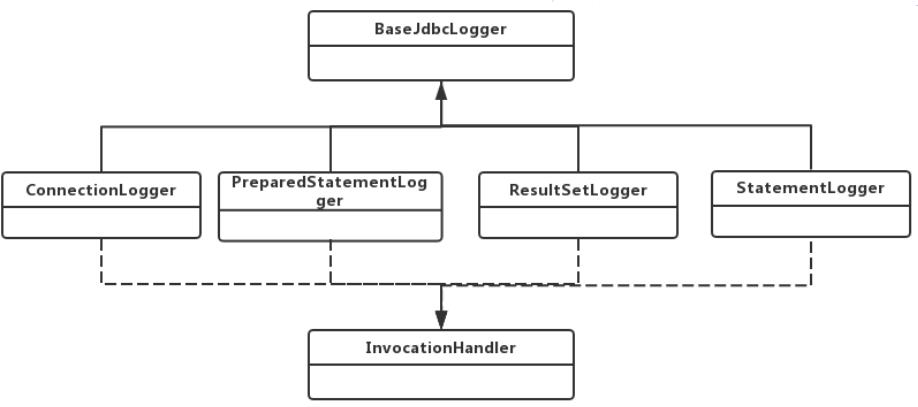
日志模块分析
基础支撑层源码分析
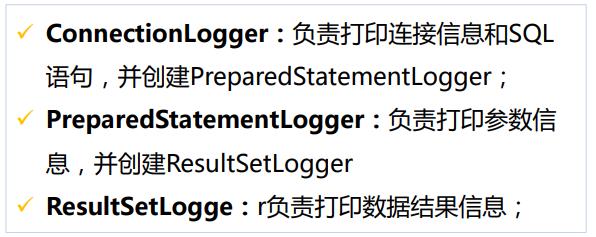
- MyBatis没有提供日志的实现类,需要接入第三方的日志组件,但第三方日志组件都有各自的Log级别,且各 不相同,二MyBatis统一提供了trace、debug、warn、error四个级别;
- 自动扫描日志实现,并且第三方日志插件加载优先级如下:slf4J → commonsLoging → Log4J2 → Log4J → JdkLog;
- 日志的使用要优雅的嵌入到主体功能中;
适配器模式
适配器模式(Adapter Pattern)是作为两个不兼容的接口之间的桥梁,将一个类的接口转换成客户希望的 另外一个接口。适配器模式使得原本由于接口不兼容而不能一起工作的那些类可以一起工作;
解释如下:
姚明刚去NBA打球,英文不行,队友也听不懂他说啥,于是请了个翻译,翻译从中起到桥梁的作用,将姚明说的话适配给队友以及教练听,这样才能愉快的打球!
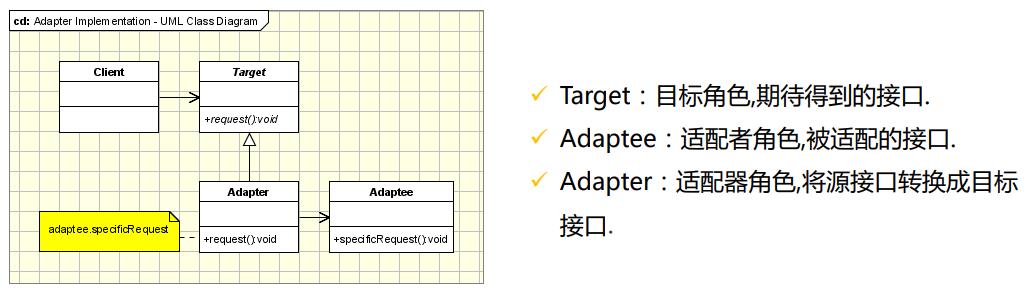
适用场景:当调用双方都不太容易修改的时候,为了复用现有组件可以使用适配器模式;在系统中接入第三方组 件的时候经常被使用到;
注意:如果系统中存在过多的适配器,会增加系统的复杂性,设计人员应考虑对系统进行重构;
代码示例:
a、需求:将电源输入220V(适配者)转换为5V输出(目标)。

b、目标角色(PowerTarget.java):
public interface PowerTarget {
    public int output5V();
}
电源目标。
c、适配者角色(PowerAdaptee.java):
public class PowerAdaptee {
    private int output =  220;
    public int output220V() {
        System.out.println("电源输出电压:" + output);
        return output;
    }
}
d、电源适配者。
适配器角色(PowerAdapter.java):
public class PowerAdapter extends PowerAdaptee implements PowerTarget{

    @Override
    public int output5V() {
        int output = output220V();
        System.out.println("电源适配器开始工作,此时输出电压是:" + output);
        output = output/44;
        System.out.println("电源适配器工作完成,此时输出电压是:" + output);
        return output;
    }

}
电源适配器类实现了电源目标,继承了适配者。其实如果没有我打印的那些提示或者说日志,output5V方法可以直接写成:
public int output5V() {
    return output220V()/44;
}
这样就适配了。
e、类适配器模式测试类(ClassAdapterPatternTest.java):
public class ClassAdapterPatternTest {

    public static void main(String[] args) {
        PowerTarget target = new PowerAdapter();
        target.output5V();
    }
}
测试结果:

日志模块类图
代理模式那些事
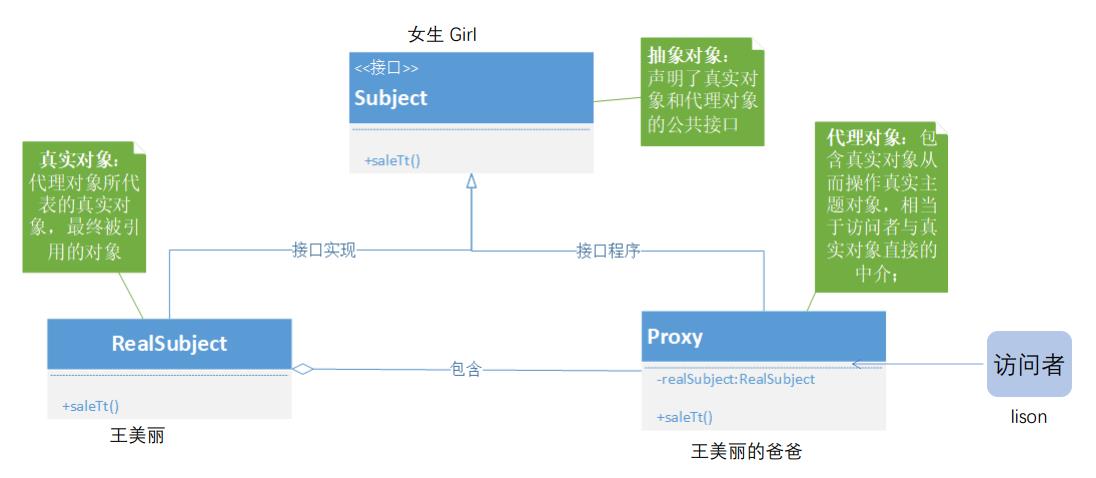
定义:给目标对象提供一个代理对象,并由代理对象控制对目标对象的引用;
目的:
- (1)通过引入代理对象的方式来间接访问目标对象,防止直接访问目标对象给系统带来的 不必要复杂性;
- (2)通过代理对象对原有的业务增强;
代理模式给我们带来的便利:
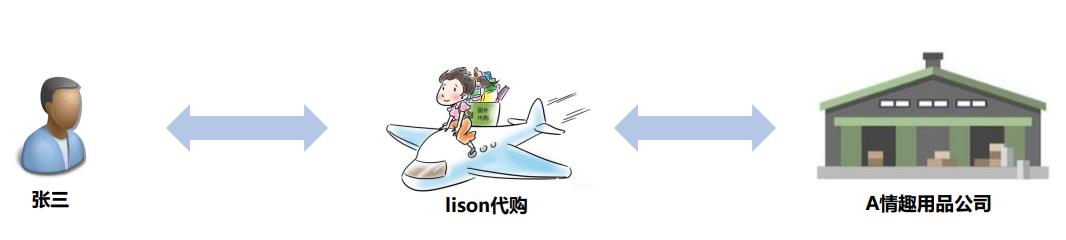
- 作为中介解耦客户端和真实对象,保护真实对象安全;(房屋中介)
- 防止直接访问目标对象给系统带来的不必要复杂性;(海外代购,SSH)
- 对业务进行增强,增强点多样化如:前入、后入、异常;(AOP)
代理模式类图
动态代理图示
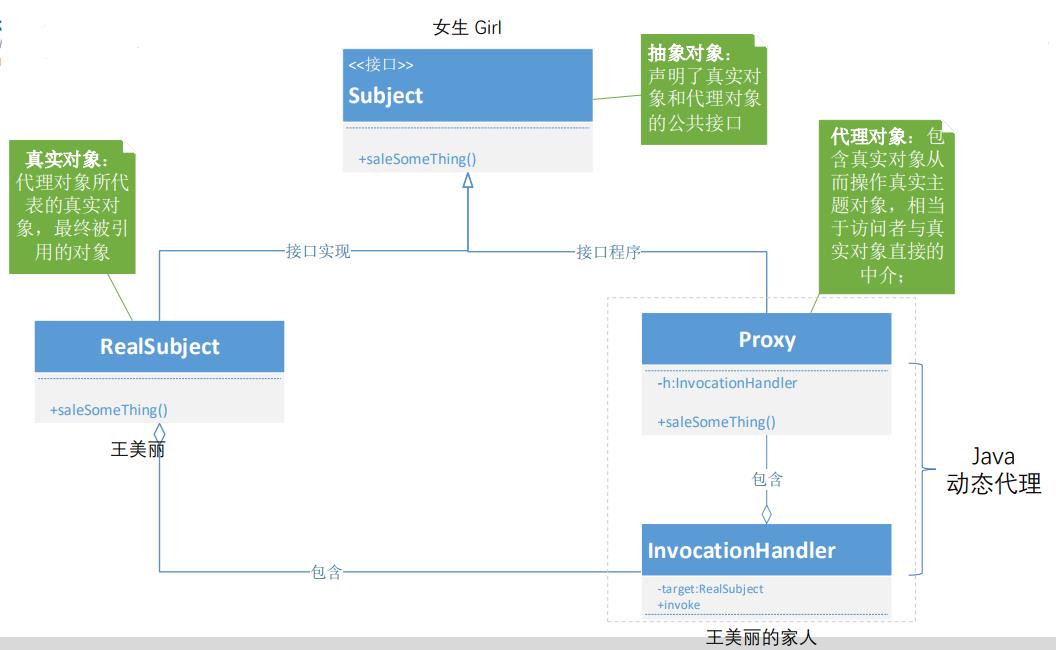
解密动态代理
静态代理和动态代理的区别
1、静态代理通常只代理一个类,动态代理是代理一个接口下的多个实现类。
2、静态代理事先知道要代理的是什么,而动态代理不知道要代理什么东西,只有在运行时才知道。
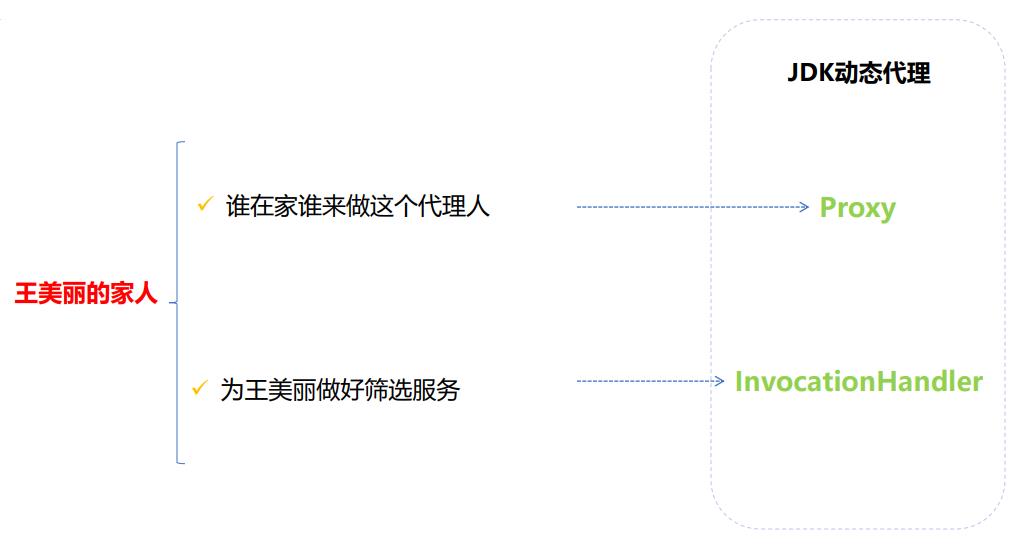
3、动态代理是实现 JDK 里的 InvocationHandler 接口的 invoke 方法,但注意的是代理的是接口,也就是你的业务类必须要实现接口,通过 Proxy 里的 newProxyInstance 得到代理对象。还有一种动态代理 CGLIB,代理的是类,不需要业务类继承接口,通过派生的子类来实现代理。通过在运行
时,动态修改字节码达到修改类的目的。
日志模块JDBC包类图
数据源模块
- 常见的数据源组件都实现了javax.sql.DataSource接口;
- MyBatis不但要能集成第三方的数据源组件,自身也提供了数据源的实现;
- 一般情况下,数据源的初始化过程参数较多,比较复杂;
工厂模式uml类图
工厂模式(Factory Pattern)属于创建型模式,它提供了一种创建对象的最佳方式。定义一个创建对象的接 口,让其子类自己决定实例化哪一个工厂类,工厂模式使其创建过程延迟到子类进行

工厂接口(Factory):工厂接口是工厂方法模式的核心接口,调用者会直接和工厂接口交互用于获取具体的 产品实现类;
具体工厂类(ConcreteFactory):是工厂接口的实现类,用于实例化产品对象,不同的具体工厂类会根据需求 实例化不同的产品实现类;
产品接口(Product):产品接口用于定义产品类的功能,具体工厂类产生的所有产品都必须实现这个接口。 调用者与产品接口直接交互,这是调用者最关心的接口;
具体产品类(ConcreteProduct):实现产品接口的实现类,具体产品类中定义了具体的业务逻辑;
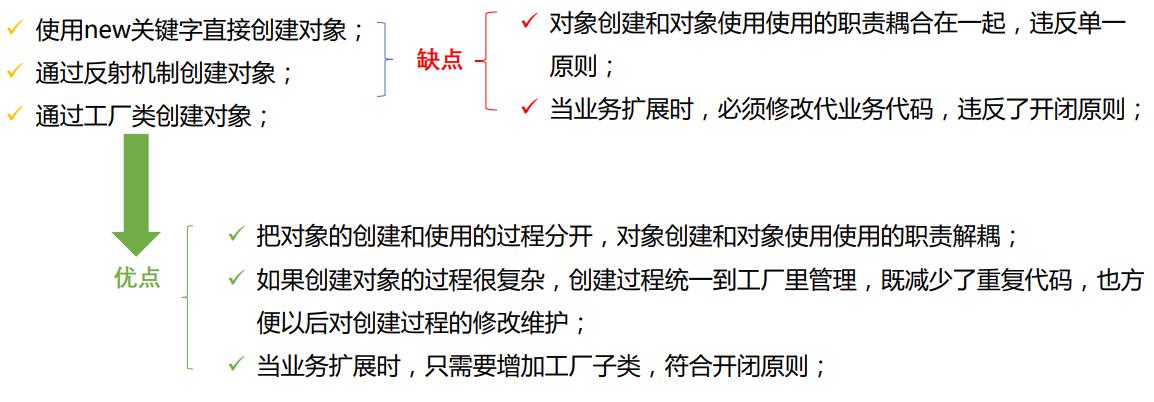
为什么要使用工厂模式?
创建对象的方式:
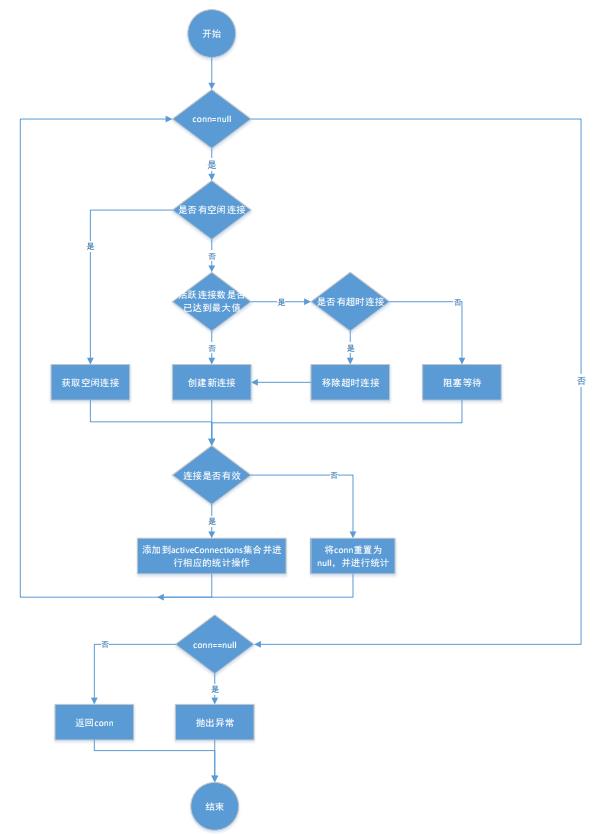
数据源模块类图
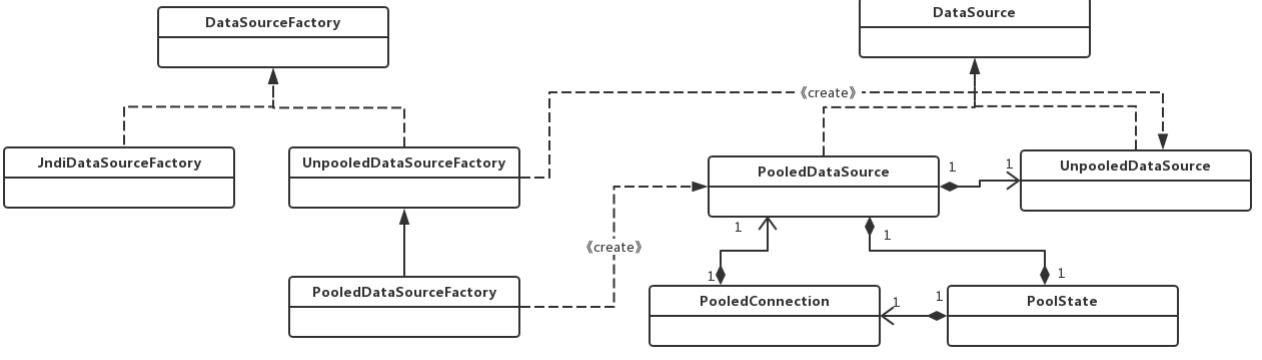
PooledConnection:使用动态代理封装了真正的数据库连接对象;
PoolState:用于管理PooledConnection对象状态的组件,通过两个list分别 管理空闲状态的连接资源和活跃状态的连 接资源
PooledDataSource:一个简单,同步的、线程安全的数据库连接池
PooledDataSource 获取和归还连接过程

PooledDatasource源码
成员变量
//使用连接池的数据源
public class PooledDataSource implements DataSource {

  private static final Log log = LogFactory.getLog(PooledDataSource.class);

  private final PoolState state = new PoolState(this);

  //真正用于创建连接的数据源
  private final UnpooledDataSource dataSource;

  // OPTIONAL CONFIGURATION FIELDS
  //最大活跃连接数
  protected int poolMaximumActiveConnections = 10;
  //最大闲置连接数
  protected int poolMaximumIdleConnections = 5;
  //最大checkout时长(最长使用时间)
  protected int poolMaximumCheckoutTime = 20000;
  //无法取得连接是最大的等待时间
  protected int poolTimeToWait = 20000;
  //最多允许几次无效连接
  protected int poolMaximumLocalBadConnectionTolerance = 3;
  //测试连接是否有效的sql语句
  protected String poolPingQuery = "NO PING QUERY SET";
  //是否允许测试连接
  protected boolean poolPingEnabled;
  //配置一段时间,当连接在这段时间内没有被使用,才允许测试连接是否有效
  protected int poolPingConnectionsNotUsedFor;
  //根据数据库url、用户名、密码生成一个hash值,唯一标识一个连接池,由这个连接池生成的连接都会带上这个值
  private int expectedConnectionTypeCode;

  public PooledDataSource() {
    dataSource = new UnpooledDataSource();
  }

  public PooledDataSource(UnpooledDataSource dataSource) {
    this.dataSource = dataSource;
  }
}
获取数据库连接
private PooledConnection popConnection(String username, String password) throws SQLException {
    boolean countedWait = false;
    PooledConnection conn = null;
    long t = System.currentTimeMillis();//记录尝试获取连接的起始时间戳
    int localBadConnectionCount = 0;//初始化获取到无效连接的次数

    while (conn == null) {
      synchronized (state) {//获取连接必须是同步的
        if (!state.idleConnections.isEmpty()) {//检测是否有空闲连接
          // Pool has available connection
          //有空闲连接直接使用
          conn = state.idleConnections.remove(0);
          if (log.isDebugEnabled()) {
            log.debug("Checked out connection " + conn.getRealHashCode() + " from pool.");
          }
        } else {// 没有空闲连接
          if (state.activeConnections.size() < poolMaximumActiveConnections) {//判断活跃连接池中的数量是否大于最大连接数
            // 没有则可创建新的连接
            conn = new PooledConnection(dataSource.getConnection(), this);
            if (log.isDebugEnabled()) {
              log.debug("Created connection " + conn.getRealHashCode() + ".");
            }
          } else {// 如果已经等于最大连接数,则不能创建新连接
            //获取最早创建的连接
            PooledConnection oldestActiveConnection = state.activeConnections.get(0);
            long longestCheckoutTime = oldestActiveConnection.getCheckoutTime();
            if (longestCheckoutTime > poolMaximumCheckoutTime) {//检测是否已经以及超过最长使用时间
              // 如果超时,对超时连接的信息进行统计
              state.claimedOverdueConnectionCount++;//超时连接次数+1
              state.accumulatedCheckoutTimeOfOverdueConnections += longestCheckoutTime;//累计超时时间增加
              state.accumulatedCheckoutTime += longestCheckoutTime;//累计的使用连接的时间增加
              state.activeConnections.remove(oldestActiveConnection);//从活跃队列中删除
              if (!oldestActiveConnection.getRealConnection().getAutoCommit()) {//如果超时连接未提交,则手动回滚
                try {
                  oldestActiveConnection.getRealConnection().rollback();
                } catch (SQLException e) {//发生异常仅仅记录日志
                  /*
                     Just log a message for debug and continue to execute the following
                     statement like nothing happend.
                     Wrap the bad connection with a new PooledConnection, this will help
                     to not intterupt current executing thread and give current thread a
                     chance to join the next competion for another valid/good database
                     connection. At the end of this loop, bad {@link @conn} will be set as null.
                   */
                  log.debug("Bad connection. Could not roll back");
                }
              }
              //在连接池中创建新的连接,注意对于数据库来说,并没有创建新连接;
              conn = new PooledConnection(oldestActiveConnection.getRealConnection(), this);
              conn.setCreatedTimestamp(oldestActiveConnection.getCreatedTimestamp());
              conn.setLastUsedTimestamp(oldestActiveConnection.getLastUsedTimestamp());
              //让老连接失效
              oldestActiveConnection.invalidate();
              if (log.isDebugEnabled()) {
                log.debug("Claimed overdue connection " + conn.getRealHashCode() + ".");
              }
            } else {
              // 无空闲连接,最早创建的连接没有失效,无法创建新连接,只能阻塞
              try {
                if (!countedWait) {
                  state.hadToWaitCount++;//连接池累计等待次数加1
                  countedWait = true;
                }
                if (log.isDebugEnabled()) {
                  log.debug("Waiting as long as " + poolTimeToWait + " milliseconds for connection.");
                }
                long wt = System.currentTimeMillis();
                state.wait(poolTimeToWait);//阻塞等待指定时间
                state.accumulatedWaitTime += System.currentTimeMillis() - wt;//累计等待时间增加
              } catch (InterruptedException e) {
                break;
              }
            }
          }
        }
        if (conn != null) {//获取连接成功的,要测试连接是否有效,同时更新统计数据
          // ping to server and check the connection is valid or not
          if (conn.isValid()) {//检测连接是否有效
            if (!conn.getRealConnection().getAutoCommit()) {
              conn.getRealConnection().rollback();//如果遗留历史的事务,回滚
            }
            //连接池相关统计信息更新
            conn.setConnectionTypeCode(assembleConnectionTypeCode(dataSource.getUrl(), username, password));
            conn.setCheckoutTimestamp(System.currentTimeMillis());
            conn.setLastUsedTimestamp(System.currentTimeMillis());
            state.activeConnections.add(conn);
            state.requestCount++;
            state.accumulatedRequestTime += System.currentTimeMillis() - t;
          } else {//如果连接无效
            if (log.isDebugEnabled()) {
              log.debug("A bad connection (" + conn.getRealHashCode() + ") was returned from the pool, getting another connection.");
            }
            state.badConnectionCount++;//累计的获取无效连接次数+1
            localBadConnectionCount++;//当前获取无效连接次数+1
            conn = null;
            //拿到无效连接,但如果没有超过重试的次数,允许再次尝试获取连接,否则抛出异常
            if (localBadConnectionCount > (poolMaximumIdleConnections + poolMaximumLocalBadConnectionTolerance)) {
              if (log.isDebugEnabled()) {
                log.debug("PooledDataSource: Could not get a good connection to the database.");
              }
              throw new SQLException("PooledDataSource: Could not get a good connection to the database.");
            }
          }
        }
      }

    }

    if (conn == null) {
      if (log.isDebugEnabled()) {
        log.debug("PooledDataSource: Unknown severe error condition.  The connection pool returned a null connection.");
      }
      throw new SQLException("PooledDataSource: Unknown severe error condition.  The connection pool returned a null connection.");
    }

    return conn;
  }
归还连接
//回收连接资源
  protected void pushConnection(PooledConnection conn) throws SQLException {

    synchronized (state) {//回收连接必须是同步的
      state.activeConnections.remove(conn);//从活跃连接池中删除此连接
      if (conn.isValid()) {
          //判断闲置连接池资源是否已经达到上限
        if (state.idleConnections.size() < poolMaximumIdleConnections && conn.getConnectionTypeCode() == expectedConnectionTypeCode) {
            //没有达到上限,进行回收
          state.accumulatedCheckoutTime += conn.getCheckoutTime();
          if (!conn.getRealConnection().getAutoCommit()) {
            conn.getRealConnection().rollback();//如果还有事务没有提交,进行回滚操作
          }
          //基于该连接,创建一个新的连接资源,并刷新连接状态
          PooledConnection newConn = new PooledConnection(conn.getRealConnection(), this);
          state.idleConnections.add(newConn);
          newConn.setCreatedTimestamp(conn.getCreatedTimestamp());
          newConn.setLastUsedTimestamp(conn.getLastUsedTimestamp());
          //老连接失效
          conn.invalidate();
          if (log.isDebugEnabled()) {
            log.debug("Returned connection " + newConn.getRealHashCode() + " to pool.");
          }
          //唤醒其他被阻塞的线程,因为获取连接过程中,有些线程是阻塞的
          state.notifyAll();
        } else {//如果闲置连接池已经达到上限了,将连接真实关闭
          state.accumulatedCheckoutTime += conn.getCheckoutTime();
          if (!conn.getRealConnection().getAutoCommit()) {
            conn.getRealConnection().rollback();
          }
          //关闭真的数据库连接
          conn.getRealConnection().close();
          if (log.isDebugEnabled()) {
            log.debug("Closed connection " + conn.getRealHashCode() + ".");
          }
          //将连接对象设置为无效
          conn.invalidate();
        }
      } else {
        if (log.isDebugEnabled()) {
          log.debug("A bad connection (" + conn.getRealHashCode() + ") attempted to return to the pool, discarding connection.");
        }
        state.badConnectionCount++;
      }
    }
  }
PoolState
/**
 * PoolState:用于管理PooledConnection对象状态的组件,通过两个list分别
 * 管理空闲状态的连接资源和活跃状态的连接资源
 *
 * @author Clinton Begin
 */
public class PoolState {

  protected PooledDataSource dataSource;
  //空闲的连接池资源集合
  protected final List<PooledConnection> idleConnections = new ArrayList<>();
  //活跃的连接池资源集合
  protected final List<PooledConnection> activeConnections = new ArrayList<>();
  //请求的次数
  protected long requestCount = 0;
  //累计的获得连接的时间
  protected long accumulatedRequestTime = 0;
  //累计的使用连接的时间。从连接取出到归还,算一次使用的时间;
  protected long accumulatedCheckoutTime = 0;
  //使用连接超时的次数
  protected long claimedOverdueConnectionCount = 0;
  //累计超时时间
  protected long accumulatedCheckoutTimeOfOverdueConnections = 0;
  //累计等待时间
  protected long accumulatedWaitTime = 0;
  //等待次数
  protected long hadToWaitCount = 0;
  //无效的连接次数
  protected long badConnectionCount = 0;

  public PoolState(PooledDataSource dataSource) {
    this.dataSource = dataSource;
  }
}
缓存模块
概述

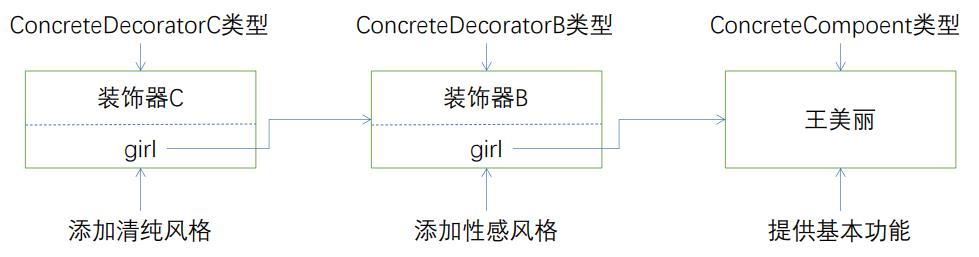
装饰器模式是一种用于代替继承的技术,无需通过继承增 加子类就能扩展对象的新功能。使用对象的关联关系代替 继承关系,更加灵活,同时避免类型体系的快速膨胀。
装饰器模式uml类图
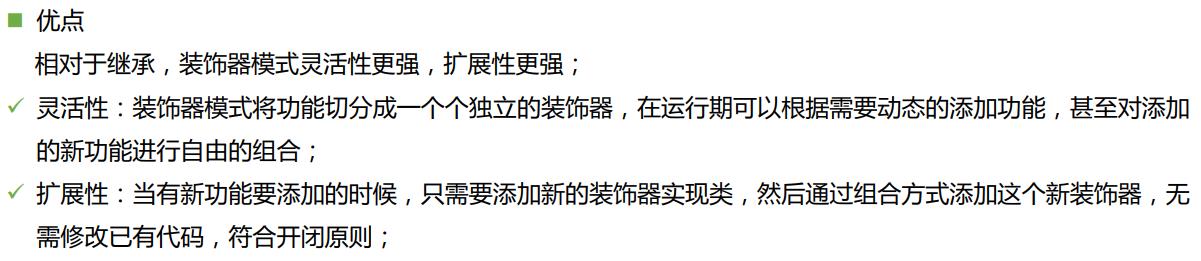
装饰器模式(Decorator Pattern)允许向一个现有的对象添加新的功能,是一种用于代替继承的技术,无需通过继 承增加子类就能扩展对象的新功能。使用对象的关联关系代替继承关系,更加灵活,同时避免类型体系的快速膨胀;
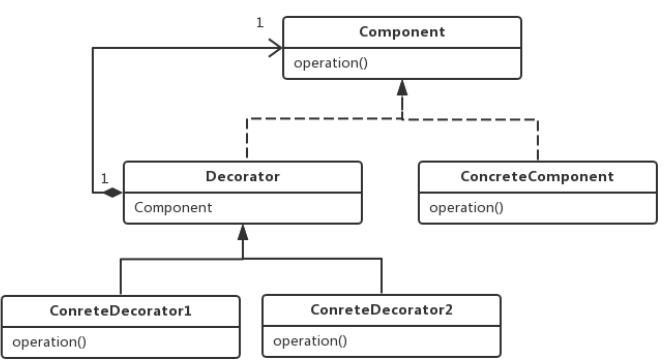
组件(Component):组件接口定义了全部组件类 和装饰器实现的行为;
组件实现类(ConcreteComponent):实现 Component接口,组件实现类就是被装饰器装饰的 原始对象,新功能或者附加功能都是通过装饰器添加到该类的对象上的;
装饰器抽象类(Decorator):实现Component接口的抽象类,在其中封装了一个Component 对象,也就是被装饰的对象;
具体装饰器类(ConcreteDecorator):该实现类 要向被装饰的对象添加某些功能;
装饰器模式使用图示
装饰器模式使用举例
1、IO中输入流和输出流的设计
BufferedReader bufferedReader = new BufferedReader(new InputStreamReader(new FileInputStream("c://a.txt")));
2、Servlet API中提供了一个request对象的Decorator设计模式的默认实现类HttpServletRequestWrapper, HttpServletRequestWrapper类增强了request对象的功能。
3、Mybatis的缓存组件
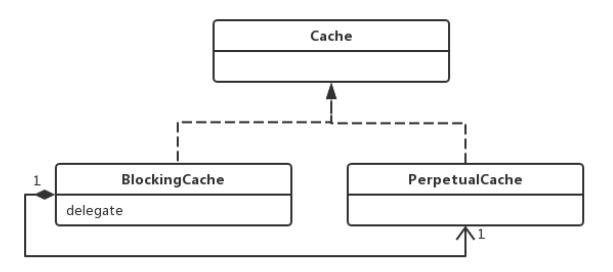
Cache:Cache接口是缓存模块的核心接口,定义了缓存的基 本操作;
PerpetualCache:在缓存模块中扮演ConcreteComponent 角色,使用HashMap来实现cache的相关操作;
BlockingCache:阻塞版本的缓存装饰器,保证只有一个线程 到数据库去查找指定的key对应的数据;
缓存源码分析
cache接口
public interface Cache {

  String getId();//缓存实现类的id

  void putObject(Object key, Object value);//往缓存中添加数据,key一般是CacheKey对象

  Object getObject(Object key);//根据指定的key从缓存获取数据

  Object removeObject(Object key);//根据指定的key从缓存删除数据

  void clear();//清空缓存

  int getSize();//获取缓存的个数

  ReadWriteLock getReadWriteLock();//获取读写锁

}
PerpetualCache实现类
public class PerpetualCache implements Cache {

  private final String id;

  private Map<Object, Object> cache = new HashMap<>();

  public PerpetualCache(String id) {
    this.id = id;
  }

  @Override
  public String getId() {
    return id;
  }

  @Override
  public int getSize() {
    return cache.size();
  }

  @Override
  public void putObject(Object key, Object value) {
    cache.put(key, value);
  }

  @Override
  public Object getObject(Object key) {
    return cache.get(key);
  }

  @Override
  public Object removeObject(Object key) {
    return cache.remove(key);
  }

  @Override
  public void clear() {
    cache.clear();
  }

  @Override
  public ReadWriteLock getReadWriteLock() {
    return null;
  }

  @Override
  public boolean equals(Object o) {
    if (getId() == null) {
      throw new CacheException("Cache instances require an ID.");
    }
    if (this == o) {
      return true;
    }
    if (!(o instanceof Cache)) {
      return false;
    }

    Cache otherCache = (Cache) o;
    return getId().equals(otherCache.getId());
  }

  @Override
  public int hashCode() {
    if (getId() == null) {
      throw new CacheException("Cache instances require an ID.");
    }
    return getId().hashCode();
  }

}
BlockingCache-----装饰器类
public class BlockingCache implements Cache {

  //阻塞的超时时长
  private long timeout;
  //被装饰的底层对象,一般是PerpetualCache
  private final Cache delegate;
  //锁对象集,粒度到key值
  private final ConcurrentHashMap<Object, ReentrantLock> locks;

  public BlockingCache(Cache delegate) {
    this.delegate = delegate;
    this.locks = new ConcurrentHashMap<>();
  }

  @Override
  public String getId() {
    return delegate.getId();
  }

  @Override
  public int getSize() {
    return delegate.getSize();
  }

  @Override
  public void putObject(Object key, Object value) {
    try {
      delegate.putObject(key, value);
    } finally {
      releaseLock(key);
    }
  }

  @Override
  public Object getObject(Object key) {
    acquireLock(key);//根据key获得锁对象,获取锁成功加锁,获取锁失败阻塞一段时间重试
    Object value = delegate.getObject(key);
    if (value != null) {//获取数据成功的,要释放锁
      releaseLock(key);
    }
    return value;
  }

  @Override
  public Object removeObject(Object key) {
    // despite of its name, this method is called only to release locks
    releaseLock(key);
    return null;
  }

  @Override
  public void clear() {
    delegate.clear();
  }

  @Override
  public ReadWriteLock getReadWriteLock() {
    return null;
  }

  private ReentrantLock getLockForKey(Object key) {
    ReentrantLock lock = new ReentrantLock();//创建锁
    ReentrantLock previous = locks.putIfAbsent(key, lock);//把新锁添加到locks集合中,如果添加成功使用新锁,如果添加失败则使用locks集合中的锁
    return previous == null ? lock : previous;
  }

//根据key获得锁对象,获取锁成功加锁,获取锁失败阻塞一段时间重试
  private void acquireLock(Object key) {
    //获得锁对象
    Lock lock = getLockForKey(key);
    if (timeout > 0) {//使用带超时时间的锁
      try {
        boolean acquired = lock.tryLock(timeout, TimeUnit.MILLISECONDS);
        if (!acquired) {//如果超时抛出异常
          throw new CacheException("Couldn\'t get a lock in " + timeout + " for the key " +  key + " at the cache " + delegate.getId());
        }
      } catch (InterruptedException e) {
        throw new CacheException("Got interrupted while trying to acquire lock for key " + key, e);
      }
    } else {//使用不带超时时间的锁
      lock.lock();
    }
  }

  private void releaseLock(Object key) {
    ReentrantLock lock = locks.get(key);
    if (lock.isHeldByCurrentThread()) {
      lock.unlock();
    }
  }

  public long getTimeout() {
    return timeout;
  }

  public void setTimeout(long timeout) {
    this.timeout = timeout;
  }
}
锁粒度的问题 粗粒度锁
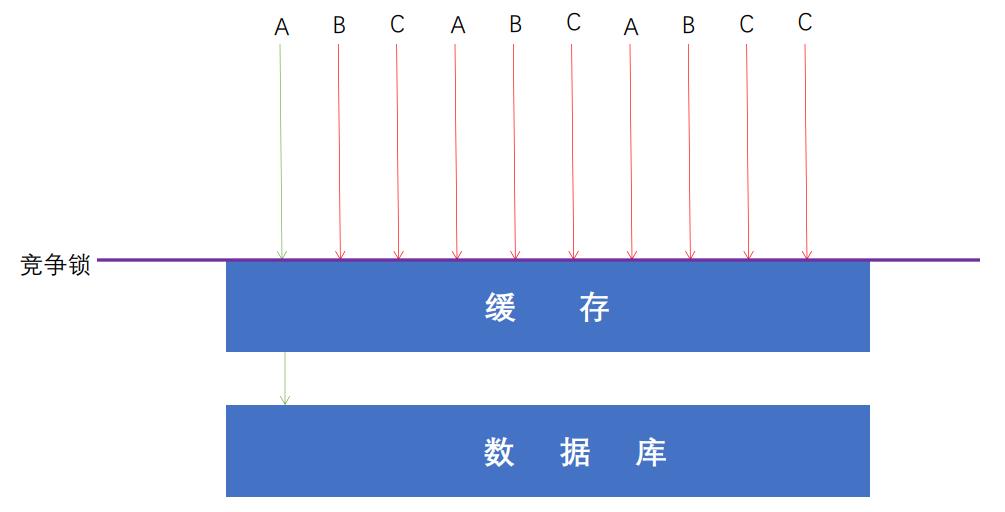
当缓存中暂时没有数据时,如果不加锁,那么将会有多个线程同时访问数据库,通过加锁的操作就可以保证只有一个线程请求数据库,降低压力,不过锁粒度太大。
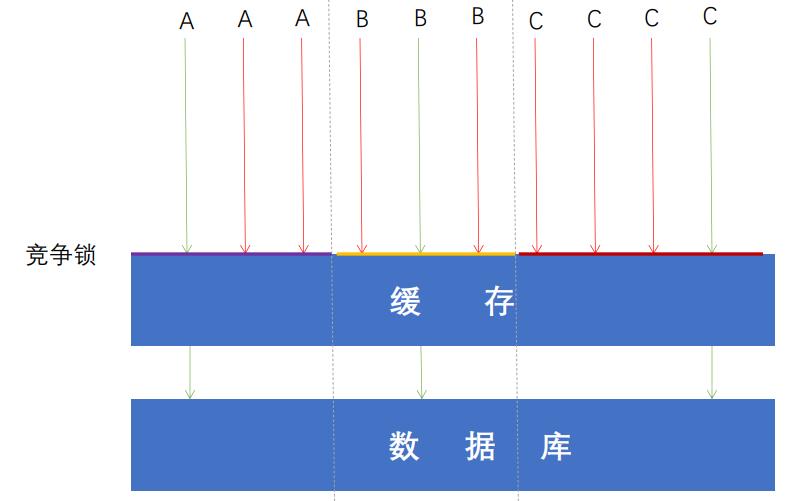
锁粒度的问题 细粒度锁(按key)
缓存装饰器解读
1、FifoCache
2、LoggingCache
3、ScheduledCache
4、BlockingCache

CacheKey解读
Mybatis中涉及到动态SQL的原因,缓存项的key不能仅仅通过一个String来表示,所以通过CacheKey来封装缓存的 Key值,CacheKey可以封装多个影响缓存项的因素;判断两个CacheKey是否相同关键是比较两个对象的hash值是 否一致;
构成CacheKey的对象
1、mappedStatment的id-----包括Mapper路径、名称是否相同,以及Mapper中id是否一致
2、指定查询结果集的范围(分页信息)
3、查询所使用的SQL语句
4、用户传递给SQL语句的实际参数值
源码分析
public class CacheKey implements Cloneable, Serializable { private static final long serialVersionUID = 1146682552656046210L; public static final CacheKey NULL_CACHE_KEY = new NullCacheKey(); private static final int DEFAULT_MULTIPLYER = 37; private static final int DEFAULT_HASHCODE = 17; private final int multiplier;//参与hash计算的乘数 private int hashcode;//CacheKey的hash值,在update函数中实时运算出来的 private long checksum;//校验和,hash值的和 private int count;//updateList的中元素个数 // 8/21/2017 - Sonarlint flags this as needing to be marked transient. While true if content is not serializable, this is not always true and thus should not be marked transient. //该集合中的元素觉得两个CacheKey是否相等 private List<Object> updateList; public CacheKey() { this.hashcode = DEFAULT_HASHCODE; this.multiplier = DEFAULT_MULTIPLYER; this.count = 0;