写在前面的话
相关背景及资源:
曹工说Spring Boot源码(1)-- Bean Definition到底是什么,附spring思维导图分享
曹工说Spring Boot源码(2)-- Bean Definition到底是什么,咱们对着接口,逐个方法讲解
曹工说Spring Boot源码(3)-- 手动注册Bean Definition不比游戏好玩吗,我们来试一下
曹工说Spring Boot源码(4)-- 我是怎么自定义ApplicationContext,从json文件读取bean definition的?
曹工说Spring Boot源码(5)-- 怎么从properties文件读取bean
曹工说Spring Boot源码(6)-- Spring怎么从xml文件里解析bean的
曹工说Spring Boot源码(7)-- Spring解析xml文件,到底从中得到了什么(上)
曹工说Spring Boot源码(8)-- Spring解析xml文件,到底从中得到了什么(util命名空间)
曹工说Spring Boot源码(9)-- Spring解析xml文件,到底从中得到了什么(context命名空间上)
曹工说Spring Boot源码(10)-- Spring解析xml文件,到底从中得到了什么(context:annotation-config 解析)
曹工说Spring Boot源码(11)-- context:component-scan,你真的会用吗(这次来说说它的奇技淫巧)
曹工说Spring Boot源码(12)-- Spring解析xml文件,到底从中得到了什么(context:component-scan完整解析)
曹工说Spring Boot源码(13)-- AspectJ的运行时织入(Load-Time-Weaving),基本内容是讲清楚了(附源码)
曹工说Spring Boot源码(14)-- AspectJ的Load-Time-Weaving的两种实现方式细细讲解,以及怎么和Spring Instrumentation集成
曹工说Spring Boot源码(15)-- Spring从xml文件里到底得到了什么(context:load-time-weaver 完整解析)
工程结构图:

概要
本篇是spring源码的第16篇,前面已经把context命名空间下,常用的几个元素讲解差不多了,包括:
context:property-placeholder
context:property-override
context:annotation-config
context:component-scan
context:load-time-weaver
接下来,着重讲解aop命名空间。该命名空间下,有以下几个元素:
<aop:config></aop:config>
<aop:aspectj-autoproxy></aop:aspectj-autoproxy>
<aop:scoped-proxy></aop:scoped-proxy>
本讲讲解aop:config,在没有注解的时代,大家的aop就是这么配的,如下所示:
<!--目标对象-->
    <bean id="performer" class="foo.Performer"/>

    <!--切面-->
    <bean id="performAspect" class="foo.PerformAspect"/>

    <!--配置切入点-->
    <aop:config>
        <aop:pointcut id="mypointcut" expression="execution(public * foo.Perform.sing(..))"/>

        <aop:aspect ref="performAspect">
            <aop:after method="afterPerform" pointcut-ref="mypointcut"/>
        </aop:aspect>
    </aop:config>
大家可能觉得xml落伍了,没错,我也这么觉得,但我深入了解后发现,通过注解配置切面,和通过xml配置切面,最终其实殊途同归,最终都转变为了内部结构List<org.springframework.aop.Advisor>,无非是读取配置的方式不同。
public interface Advisor {

   Advice getAdvice();
}
Advice这个东西,通俗来说是"通知",我截取了spring官网说明:
- Join point: A point during the execution of a program, such as the execution of a method or the handling of an exception. In Spring AOP, a join point always represents a method execution.
- Advice: Action taken by an aspect at a particular join point. Different types of advice include “around”, “before” and “after” advice. (Advice types are discussed later.) Many AOP frameworks, including Spring, model an advice as an interceptor and maintain a chain of interceptors around the join point.
大概翻译就是:
连接点:程序执行过程中的一个执行点,比如方法调用,或者异常处理。在spring aop里,永远指方法调用
通知:切面在一个特定的连接点所采取的动作。advice包含了多种类型,包括"around"、“before”、“after”。很多aop框架,包括spring,将advice建模为一个拦截器,在切点处维护一个拦截器链。
Advice,在文档里,都是说,表示的是在连接点所采取的动作,比如性能检测、记录日志、事务等。
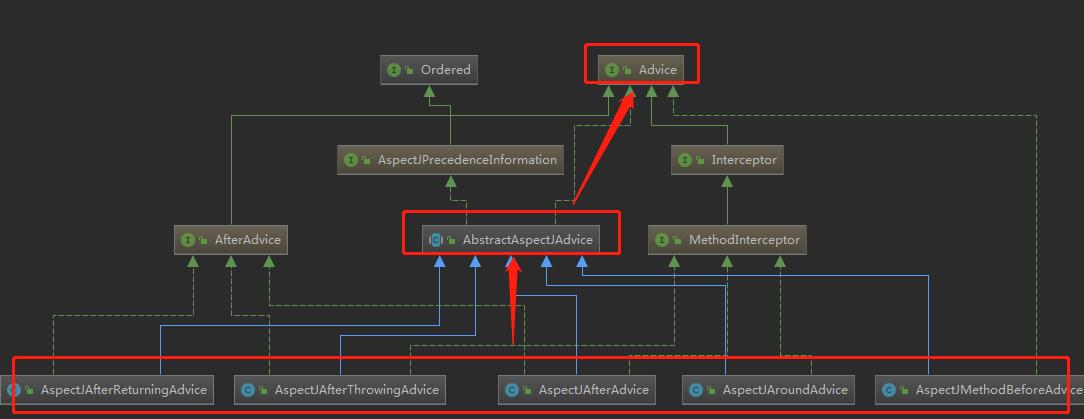
但是,我要说明的是,在源码里,是不太一样的。针对前面提到的各种类型的advice,"around"、“before”、“after”等,其在spring里,是使用以下几个类来表示的。

我们随便找个org.springframework.aop.aspectj.AspectJAfterAdvice来看看,这个是代表after类型的advice:
public AspectJAfterAdvice(
      Method aspectJBeforeAdviceMethod, AspectJExpressionPointcut pointcut, AspectInstanceFactory aif) {

   super(aspectJBeforeAdviceMethod, pointcut, aif);
}
以上是该类,唯一的构造函数,其中将3个参数,直接传给了父类的构造函数。
	protected final Method aspectJAdviceMethod;

	private final AspectJExpressionPointcut pointcut;

	private final AspectInstanceFactory aspectInstanceFactory;

public AbstractAspectJAdvice(
      Method aspectJAdviceMethod, AspectJExpressionPointcut pointcut, AspectInstanceFactory aspectInstanceFactory) {
   this.aspectJAdviceMethod = aspectJAdviceMethod;
   this.pointcut = pointcut;
   this.aspectInstanceFactory = aspectInstanceFactory;
}
这里面,三个字段,其中,aspectJAdviceMethod就是我们的通知方法,其类型是JDK里的Method,即我们自定义的那些性能、日志等aop业务逻辑所在之处;pointcut,代表了切点,我们默认写的表达式是使用AspectJ的语法写的,想想,是不是不会写的时候,有时候查着查着,就查到aspectJ的官网去了;aspectInstanceFactory,里面封装了切面对象。
这几个属性,有啥关系?
切面 = 切点 + 通知,即,在什么时间,干什么事。
那用这几个属性,怎么表达呢? 简单来说,是不是,在每个方法执行时,匹配是否和pointcut匹配,如果匹配,则执行:
return this.aspectJAdviceMethod.invoke(this.aspectInstanceFactory.getAspectInstance(), actualArgs);
没错,上面那个代码其实就是spring里来的,spring在"干什么事"这部分,就是这么做的:
#org.springframework.aop.aspectj.AbstractAspectJAdvice
protected Object invokeAdviceMethodWithGivenArgs(Object[] args) throws Throwable {
		Object[] actualArgs = args;
		if (this.aspectJAdviceMethod.getParameterTypes().length == 0) {
			actualArgs = null;
		}
		try {
			ReflectionUtils.makeAccessible(this.aspectJAdviceMethod);
			return this.aspectJAdviceMethod.invoke(this.aspectInstanceFactory.getAspectInstance(), actualArgs);
		}
	}
说了半天,主要就是说,spring aop源码里的advice,不只是文档里提到的advice,而是包含了完整的切点和切面的逻辑,这里的advice,其实也是狭义的,即spring aop里的方法级别的advice。
啰嗦了半天,我们马上进入正题。
使用
目标类和接口如下:
package foo;


public class Performer implements Perform {
    @Override
    public void sing() {
        System.out.println("男孩在唱歌");

    }
}

package foo;

public interface Perform {
    void sing();
}
切面如下:
package foo;

public class PerformAspect {

    public void afterPerform() {
        System.out.println("表演之后要行礼");
    }
}
xml配置文件如下:
<?xml version="1.0" encoding="UTF-8"?>
<beans xmlns="http://www.springframework.org/schema/beans"
       xmlns:xsi="http://www.w3.org/2001/XMLSchema-instance"
       xmlns:aop="http://www.springframework.org/schema/aop"
       xsi:schemaLocation="http://www.springframework.org/schema/beans
        http://www.springframework.org/schema/beans/spring-beans.xsd
        http://www.springframework.org/schema/aop
        http://www.springframework.org/schema/aop/spring-aop.xsd">


    <!--目标对象-->
    <bean id="performer" class="foo.Performer"/>

    <!--切面-->
    <bean id="performAspect" class="foo.PerformAspect"/>

    <!--配置切入点-->
    <aop:config>
        <aop:pointcut id="mypointcut" expression="execution(public * foo.Perform.sing(..))"/>

        <aop:aspect ref="performAspect">
            <aop:after method="afterPerform" pointcut-ref="mypointcut"/>
        </aop:aspect>
    </aop:config>
</beans>
测试代码如下:
package foo;

public final class Main {

    public static void main(String[] args) {
        ClassPathXmlApplicationContext ctx = new ClassPathXmlApplicationContext(
                "context-namespace-test-aop.xml");
        // json输出bean definition
        List<BeanDefinition> list =
                ctx.getBeanFactory().getBeanDefinitionList();
        MyFastJson.printJsonStringForBeanDefinitionList(list);

        Perform performer = (Perform) ctx.getBean(Perform.class);
        performer.sing();
    }
}
执行结果如下:
男孩在唱歌
表演之后要行礼
简略源码说明
上面那个例子,很简单就实现了aop,但是spring为此做了很多工作,总结起来,有以下几步:
步骤1:解析xml文件,获取bean definition
| bean definition 中bean class | 备注 |
|---|---|
| PerformAspect | 通知 |
| Performer | 要切的目标 |
| AspectJExpressionPointcut | 切点,即<aop:pointcut />那一行 |
| org.springframework.aop.aspectj.AspectJPointcutAdvisor | advisor,请翻到文章开头,实际表达一个:切点+切面方法; |
| AspectJAwareAdvisorAutoProxyCreator | 实现了BeanPostProcessor接口,在spring getBean过程中,检查是否匹配切点,匹配则创建代理,并使用代理对象替换ioc容器中真实的bean |
步骤2:AspectJAwareAdvisorAutoProxyCreator 狸猫换太子
这个bean definition,本来也很普通,但让它变得不普通的是,这个bean class,实现了BeanPostProcessor接口。BeanPostProcessor接口的功能,看下面就明白:
public interface BeanPostProcessor {

   Object postProcessBeforeInitialization(Object bean, String beanName) throws BeansException;

   Object postProcessAfterInitialization(Object bean, String beanName) throws BeansException;
}
这两个方法,在spring创建bean时,被调用,一个是在初始化之前,一个是初始化之后。

关于生命周期,大家可以看上图,一定要搞明白,什么叫实例化,什么叫初始化,什么叫属性注入,我们这里,
AspectJAwareAdvisorAutoProxyCreator 生效的地方,主要是在 初始化之后。它实现了postProcessAfterInitialization方法,这个方法,其return的结果,就会取代原有的bean,来存放到ioc容器中。
后续,如果有其他bean,依赖这个bean的话,拿到的也是代理之后的了。
大家可以看看其实现:
AspectJAwareAdvisorAutoProxyCreator.java
public Object postProcessAfterInitialization(Object bean, String beanName) throws BeansException {
	if (bean != null) {
		Object cacheKey = getCacheKey(bean.getClass(), beanName);
		if (!this.earlyProxyReferences.contains(cacheKey)) {
		     // 这里根据原来的bean,创建动态代理,并返回给ioc容器,完成狸猫换太子操作
			return wrapIfNecessary(bean, beanName, cacheKey);
		}
	}
	return bean;
}
而我们创建的代理对象,其实是会包含要应用的advisor的,大家看下图,其中specificInterceptors的第二个元素,就是前面我们步骤1解析的那个bean definition。

当然了,大家熟知的,有接口时创建jdk代理,没接口时创建cglib代理,就是在这个步骤发生的,下一篇会细讲。
步骤3:花非花,雾非雾
运行时,看似调用target,实际调用代理的对应方法:

可以看到,这里拿到的,已经是代理对象,而不是真实对象了,调用代理对象时,就会像tomcat的filter链那样,tomcat是filter链进行链式处理,直到最后调用servlet;这里是interceptor链先挨个调用自己在target方法之前要执行的逻辑,然后调用target,最后调用要在target之后执行的逻辑。
总结
今天这篇算是aop的开胃菜,前面只说了大概的步骤,并没有讲透,详细的源码分析实在不适合揉到一篇来讲,所以会分到下一讲或两讲。
希望对大家有所帮助,谢谢。