Springboot+自定义注解+自定义AOP前置增强+自定义异常+自定义异常捕获
Posted doge-elder
tags:
篇首语:本文由小常识网(cha138.com)小编为大家整理,主要介绍了Springboot+自定义注解+自定义AOP前置增强+自定义异常+自定义异常捕获相关的知识,希望对你有一定的参考价值。
想要在一些方法执行之前要进行一个逻辑判断,
本来想使用拦截器来进行拦截但是后来还是说声算了.
想到使用AOP的前置增强和自定义异常和自定义异常捕获可以解决这个问题,
一次性用了这么多,就是想把之前比较模糊的东西重新拿起来
1.我们先自定义一个注解
 1 /**
 2  * @program: shiro-demo
 3  * @description: 自定义注解
 4  * @author: @DogElder
 5  * @create: 2020-04-18 20:42
 6  **/
 7 ?
 8 @Target(ElementType.METHOD)
 9 @Retention(RetentionPolicy.RUNTIME)
10 public @interface TestAnnotation {
11 }
2.自定义一个异常类
我们首先要先导入AOP依赖
1 <!--aop-->
2 <dependency>
3     <groupId>org.springframework.boot</groupId>
4     <artifactId>spring-boot-starter-aop</artifactId>
5 </dependency>
 1 import lombok.Data;
 2 ?
 3 /**
 4  * @program: shiro-demo
 5  * @description: 自定义异常类
 6  * @author: @DogElder
 7  * @create: 2020-04-18 21:11
 8  * 要继承RuntimeException
 9  **/
10 @Data
11 public class TestExcption extends RuntimeException {
12
13     private String code;
14     private String message;
15
16 //    这个地方需要写一个有参构造
17     public TestExcption(String code, String message) {
18         this.code = code;
19         this.message = message;
20     }
21 }
异常捕获
 1 /**
 2  * @program: shiro-demo
 3  * @description: 异常处理
 4  * @author: @DogElder
 5  * @create: 2020-04-18 21:20
 6  **/
 7 @RestControllerAdvice
 8 public class TestExceptionHandler {
 9 ?
10 ?
11     /**
12     * @Description: 异常捕获
13     * @Param: java.util.Map<java.lang.String,java.lang.Object>
14     * @return: java.util.Map<java.lang.String,java.lang.Object>
15     * @Author:@Dog_Elder
16     * @Date: 2020/4/18
17     */
18     @ExceptionHandler(TestExcption.class)
19     public Map<String, Object> handleCustomException(TestExcption customException) {
20         Map<String, Object> error = new HashMap<>();
21         error.put("code", customException.getCode());
22         error.put("message", customException.getMessage());
23         return error;
24     }
25 }
26 ?
3.然后我们自定义一个切面类
 1 /**
 2  * @program: shiro-demo
 3  * @description: 自定义切面
 4  * @author: @DogElder
 5  * @create: 2020-04-18 20:49
 6  **/
 7 @Configuration
 8 @Aspect
 9 public class TestAop {
10 ?
11
12     /**
13      * @Description: 声明一个切入点
14      * @Param: void
15      * @return: void
16      * @Author:@Dog_Elder
17      * @Date: 2020/4/18
18      * @Pointcut 声明一个切入点 参数为切点表达式
19      * 注意: 这里的切入点是@annotation注解类的全路名 (看你们声明的切入点是在那里进行更换)
20      */
21     @Pointcut("@annotation(com.shiro.shiro_demo.config.annotation.TestAnnotation)")
22     public void testPointCut() {
23 ?
24     }
25 ?
26     /**
27      * @Description: 声明一个前置增强
28      * @Param: void
29      * @return: void
30      * @Author:@Dog_Elder
31      * @Date: 2020/4/18
32      * @Before 前置增强 参数为切点方法
33      * 注意:抛异常 抛异常 抛异常 throws RuntimeException   和 throw
34      *
35      */
36     @Before("testPointCut()")
37     public void testBefore() throws RuntimeException{
38 //        这里可以实现你的逻辑代码 (因为是demo)
39 //        我就写一个简单的小例子
40         int n=1;
41         if (n!=0) {
42             //这个地方就是我们写的自定义的异常
43            throw  new TestExcption("401","无权限");
44         }
45     }
46
47 }
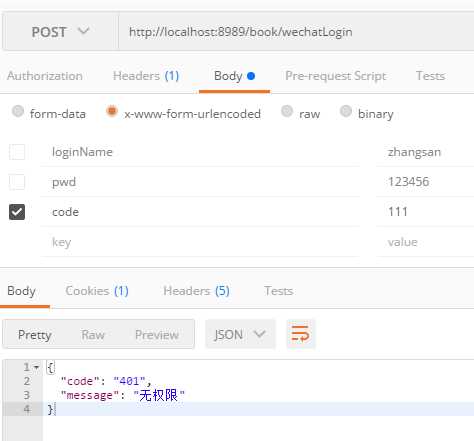
测试


END
以上是关于Springboot+自定义注解+自定义AOP前置增强+自定义异常+自定义异常捕获的主要内容,如果未能解决你的问题,请参考以下文章