MyBatis 3源码解析
Posted xpz-python
tags:
篇首语:本文由小常识网(cha138.com)小编为大家整理,主要介绍了MyBatis 3源码解析相关的知识,希望对你有一定的参考价值。
Mybatis是支持定制化SQL、存储过程和高级映射的持久层框架。主要完成两件事:
- 封装JDBC的操作
- 利用反射完成Java类和SQL之间的转换
mybatis的主要目的就是管理执行SQL是参数的输入和输出,编写SQL和结果集的映射是mybatis的主要优点
mybatis中主要类和接口
- Configuration:将mybatis配置文件中的信息保存到该类中
- SqlSessionFactory:解析Configuration类中的配置信息,获取SqlSession
- SqlSession:负责和数据库交互,完成增删改查
- Executor:mybatis的调度核心,负责SQL的生成
- StatementHandler:封装了JDBC的statement操作
- ParameterHandler:负责完成JavaType到jdbcType的转换
- ResultSetHandler:负责完成结果集到Java Bean的转换
- MappedStatement:代表一个select|update|insert|delete元素
- SqlSource:根据传入的ParamterObject生成SQL
- BoundSql:包含SQL和参数信息
SqlSessionFactory和SqlSession源码
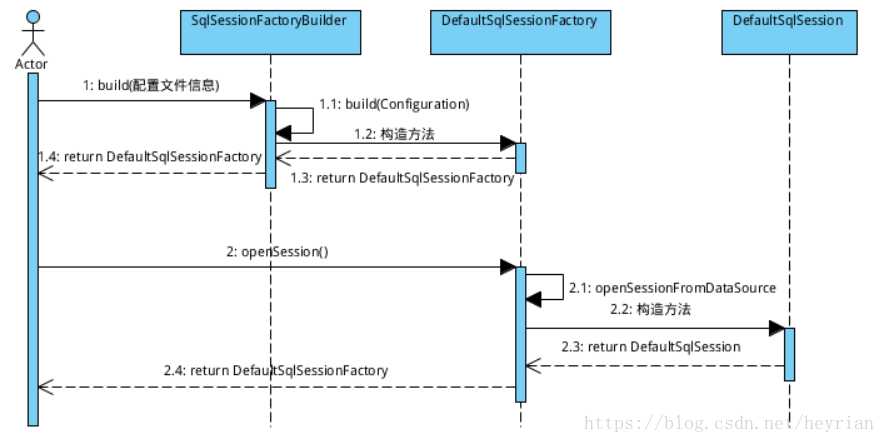
SqlSessionFactory的创建是mybatis的第一步,SqlSession完成数据库增删改查。我们先来看看二者的创建

首先创建SqlSessionFactoryBudiler对象,在调用builder方法读取mybatis配置文件,并创建SqlSessionFactory:
public class SqlSessionFactoryBuilder {

  public SqlSessionFactory build(Reader reader, String environment, Properties properties) {
    try {
      XMLConfigBuilder parser = new XMLConfigBuilder(reader, environment, properties);
      return build(parser.parse());
    } catch (Exception e) {
      throw ExceptionFactory.wrapException("Error building SqlSession.", e);
    } finally {
      ErrorContext.instance().reset();
      try {
        reader.close();
      } catch (IOException e) {
        // Intentionally ignore. Prefer previous error.
      }
    }
  }

  public SqlSessionFactory build(InputStream inputStream, String environment, Properties properties) {
    try {
      XMLConfigBuilder parser = new XMLConfigBuilder(inputStream, environment, properties);
      return build(parser.parse());
    } catch (Exception e) {
      throw ExceptionFactory.wrapException("Error building SqlSession.", e);
    } finally {
      ErrorContext.instance().reset();
      try {
        inputStream.close();
      } catch (IOException e) {
        // Intentionally ignore. Prefer previous error.
      }
    }
  }

  public SqlSessionFactory build(Configuration config) {
    return new DefaultSqlSessionFactory(config);
  }

}
不管是调用SqlSessionFactoryBuilder哪个build重载方法,最后调用的都是上面的两种,这两种的区别只是采用不同的流读取配置文件,最后都会调用build(Configuration config)创建SqlSessionFactory接口的实现类对象,返回的是DefaultSqlSessionFactory 对象。
当创建SqlSessionFactory完成后下一步就是创建SqlSession:
public class DefaultSqlSessionFactory implements SqlSessionFactory {

  private final Configuration configuration;

  private SqlSession openSessionFromDataSource(ExecutorType execType, TransactionIsolationLevel level, boolean autoCommit) {
    Transaction tx = null;
    try {
      final Environment environment = configuration.getEnvironment();
      final TransactionFactory transactionFactory = getTransactionFactoryFromEnvironment(environment);
      tx = transactionFactory.newTransaction(environment.getDataSource(), level, autoCommit);
      //这一步可以发现每个SqlSession会配一个Executor
      final Executor executor = configuration.newExecutor(tx, execType);
      return new DefaultSqlSession(configuration, executor, autoCommit);
    } catch (Exception e) {
      closeTransaction(tx); // may have fetched a connection so lets call close()
      throw ExceptionFactory.wrapException("Error opening session.  Cause: " + e, e);
    } finally {
      ErrorContext.instance().reset();
    }
  }
}
接下来我们看看SqlSession的源码:
public class DefaultSqlSession implements SqlSession {

  private final Configuration configuration;
  private final Executor executor;

  private final boolean autoCommit;

  @Override
  public <E> List<E> selectList(String statement, Object parameter, RowBounds rowBounds) {
    try {
      MappedStatement ms = configuration.getMappedStatement(statement);
      return executor.query(ms, wrapCollection(parameter), rowBounds, Executor.NO_RESULT_HANDLER);
    } catch (Exception e) {
      throw ExceptionFactory.wrapException("Error querying database.  Cause: " + e, e);
    } finally {
      ErrorContext.instance().reset();
    }
  }

  @Override
  public void select(String statement, Object parameter, RowBounds rowBounds, ResultHandler handler) {
    try {
      MappedStatement ms = configuration.getMappedStatement(statement);
      executor.query(ms, wrapCollection(parameter), rowBounds, handler);
    } catch (Exception e) {
      throw ExceptionFactory.wrapException("Error querying database.  Cause: " + e, e);
    } finally {
      ErrorContext.instance().reset();
    }
  }

  @Override
  public int update(String statement, Object parameter) {
    try {
      dirty = true;
      MappedStatement ms = configuration.getMappedStatement(statement);
      return executor.update(ms, wrapCollection(parameter));
    } catch (Exception e) {
      throw ExceptionFactory.wrapException("Error updating database.  Cause: " + e, e);
    } finally {
      ErrorContext.instance().reset();
    }
  }
}
SqlSession的所有增删改查操作,最后都会落到上面三个方法,而最后的SQL执行都是使用Executor执行。
接下来我们在看看Executor中的query()和update方法,Executor接口有一个抽象实现类BaseExecutor,我们调用的query()和update()方法实际属于该类,而该类的query()和update()最后都落到三个子类SimpleExecutor、ReuseExecutor、BatchExecutor中。这里我们选SimpleExecutor看看
public class SimpleExecutor extends BaseExecutor {

  @Override
  public int doUpdate(MappedStatement ms, Object parameter) throws SQLException {
    Statement stmt = null;
    try {
      Configuration configuration = ms.getConfiguration();
      StatementHandler handler = configuration.newStatementHandler(this, ms, parameter, RowBounds.DEFAULT, null, null);
      stmt = prepareStatement(handler, ms.getStatementLog());
      //把锅甩给StatementHandler
      return handler.update(stmt);
    } finally {
      closeStatement(stmt);
    }
  }

  @Override
  public <E> List<E> doQuery(MappedStatement ms, Object parameter, RowBounds rowBounds, ResultHandler resultHandler, BoundSql boundSql) throws SQLException {
    Statement stmt = null;
    try {
      Configuration configuration = ms.getConfiguration();
      StatementHandler handler = configuration.newStatementHandler(wrapper, ms, parameter, rowBounds, resultHandler, boundSql);
      stmt = prepareStatement(handler, ms.getStatementLog());
      //把锅甩给StatementHandler
      return handler.<E>query(stmt, resultHandler);
    } finally {
      closeStatement(stmt);
    }
  }

}
上面prepareStatement()方法内部调用StatementHandler的prepare()方法,这一般是我们定制插件的拦截方法。
可以发现最后都交给StatementHandler处理。StatementHandler有三个实现类:PreparedStatementHandler、CallableStatementHandler、RoutingStatementHandler,我们选择PreparedStatementHandler看一下:
public class PreparedStatementHandler extends BaseStatementHandler {

  @Override
  public int update(Statement statement) throws SQLException {
    PreparedStatement ps = (PreparedStatement) statement;
    ps.execute();
    int rows = ps.getUpdateCount();
    Object parameterObject = boundSql.getParameterObject();
    KeyGenerator keyGenerator = mappedStatement.getKeyGenerator();
    keyGenerator.processAfter(executor, mappedStatement, ps, parameterObject);
    return rows;
  }

  @Override
  public <E> List<E> query(Statement statement, ResultHandler resultHandler) throws SQLException {
    PreparedStatement ps = (PreparedStatement) statement;
    ps.execute();
    return resultSetHandler.<E> handleResultSets(ps);
  }

}
好了,这里就是我们熟悉的JDBC操作了。
以上是关于MyBatis 3源码解析的主要内容,如果未能解决你的问题,请参考以下文章