Spring AOP源码分析
Posted toov5
tags:
篇首语:本文由小常识网(cha138.com)小编为大家整理,主要介绍了Spring AOP源码分析相关的知识,希望对你有一定的参考价值。
核心类:AbstractAutoProxyCreator

继续看:

流程说明
1)AOP标签的定义解析刘彻骨肯定是从NamespaceHandlerSupport的实现类开始解析的,这个实现类就是AopNamespaceHandler。至于为什么会是从NamespaceHandlerSupport的实现类开始解析的,这个的话我想读者可以去在回去看看Spring自定义标签的解析流程,里面说的比较详细。
2)要启用AOP,我们一般会在Spring里面配置<aop:aspectj-autoproxy/> ,所以在配置文件中在遇到aspectj-autoproxy标签的时候我们会采用AspectJAutoProxyBeanDefinitionParser解析器
3)进入AspectJAutoProxyBeanDefinitionParser解析器后,调用AspectJAutoProxyBeanDefinitionParser已覆盖BeanDefinitionParser的parser方法,然后parser方法把请求转交给了AopNamespaceUtils的registerAspectJAnnotationAutoProxyCreatorIfNecessary去处理
4)进入AopNamespaceUtils的registerAspectJAnnotationAutoProxyCreatorIfNecessary方法后,先调用AopConfigUtils的registerAspectJAnnotationAutoProxyCreatorIfNecessary方法,里面在转发调用给registerOrEscalateApcAsRequired,注册或者升级AnnotationAwareAspectJAutoProxyCreator类。对于AOP的实现,基本是靠AnnotationAwareAspectJAutoProxyCreator去完成的,它可以根据@point注解定义的切点来代理相匹配的bean。
5)AopConfigUtils的registerAspectJAnnotationAutoProxyCreatorIfNecessary方法处理完成之后,接下来会调用useClassProxyingIfNecessary() 处理proxy-target-class以及expose-proxy属性。如果将proxy-target-class设置为true的话,那么会强制使用CGLIB代理,否则使用jdk动态代理,expose-proxy属性是为了解决有时候目标对象内部的自我调用无法实现切面增强。
6)最后的调用registerComponentIfNecessary 方法,注册组建并且通知便于监听器做进一步处理。
创建AOP代理
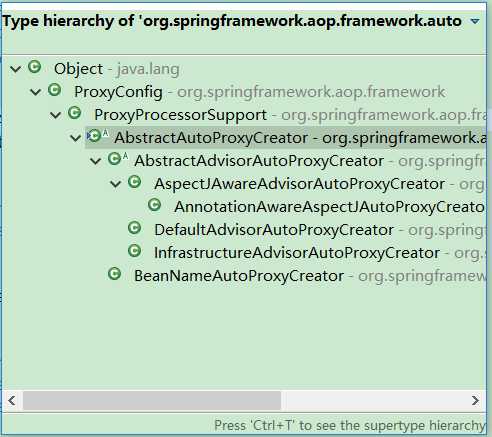
上面说到AOP的核心逻辑是在AnnotationAwareAspectJAutoProxyCreator类里面实现,那么我们先来看看这个类的层次关系
流程说明
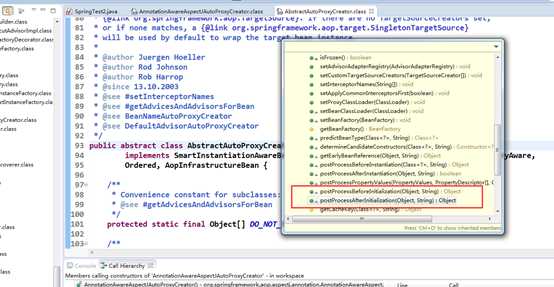
1) spring 容器启动,每个bean的实例化之前都会先经过AbstractAutoProxyCreator类的postProcessAfterInitialization()这个方法,然后接下来是调用wrapIfNecessary方法。

public Object postProcessAfterInitialization(Object bean, String beanName) throws BeansException {
        if (bean != null) {
            Object cacheKey = getCacheKey(bean.getClass(), beanName);
            if (!this.earlyProxyReferences.contains(cacheKey)) {
                return wrapIfNecessary(bean, beanName, cacheKey);
            }
        }
        return bean;
    }
protected Object wrapIfNecessary(Object bean, String beanName, Object cacheKey) {
        if (this.targetSourcedBeans.contains(beanName)) {
            return bean;
        }
        if (this.nonAdvisedBeans.contains(cacheKey)) {
            return bean;
        }
        if (isInfrastructureClass(bean.getClass()) || shouldSkip(bean.getClass(), beanName)) {
            this.nonAdvisedBeans.add(cacheKey);
            return bean;
        }

        // Create proxy if we have advice.
        Object[] specificInterceptors = getAdvicesAndAdvisorsForBean(bean.getClass(), beanName, null);
        if (specificInterceptors != DO_NOT_PROXY) {
            this.advisedBeans.add(cacheKey);
            Object proxy = createProxy(bean.getClass(), beanName, specificInterceptors, new SingletonTargetSource(bean));
            this.proxyTypes.put(cacheKey, proxy.getClass());
            return proxy;
        }

        this.nonAdvisedBeans.add(cacheKey);
        return bean;
    }
创建代理对象
protected Object createProxy(
            Class<?> beanClass, String beanName, Object[] specificInterceptors, TargetSource targetSource) {

        ProxyFactory proxyFactory = new ProxyFactory();
        // Copy our properties (proxyTargetClass etc) inherited from ProxyConfig.
        proxyFactory.copyFrom(this);

        if (!shouldProxyTargetClass(beanClass, beanName)) {
            // Must allow for introductions; can‘t just set interfaces to
            // the target‘s interfaces only.
            Class<?>[] targetInterfaces = ClassUtils.getAllInterfacesForClass(beanClass, this.proxyClassLoader);
            for (Class<?> targetInterface : targetInterfaces) {
                proxyFactory.addInterface(targetInterface);
            }
        }

        Advisor[] advisors = buildAdvisors(beanName, specificInterceptors);
        for (Advisor advisor : advisors) {
            proxyFactory.addAdvisor(advisor);
        }

        proxyFactory.setTargetSource(targetSource);
        customizeProxyFactory(proxyFactory);

        proxyFactory.setFrozen(this.freezeProxy);
        if (advisorsPreFiltered()) {
            proxyFactory.setPreFiltered(true);
        }

        return proxyFactory.getProxy(this.proxyClassLoader);
    }

以上是关于Spring AOP源码分析的主要内容,如果未能解决你的问题,请参考以下文章