@ComponentScan springboot启动类配置扫描
Posted 走叉月月鸟飞
tags:
篇首语:本文由小常识网(cha138.com)小编为大家整理,主要介绍了@ComponentScan springboot启动类配置扫描相关的知识,希望对你有一定的参考价值。
作为一个springboot初学者,在探索过程中难免遇到一些坑,边看书边动手,发现书本中的版本是1.0,而我使用的是最新版2.0,所以有些东西不能完全按照书本进行操作,因为2.0中已经不支持1.0中的部分配置了,比如2.0中的注解@SpringBootApplication是注解@SpringBootConfiguration、@EnableAutoConfiguration和@ComponentScan的组合,而1.0中它是@SpringBootConfiguration、@EnableAutoConfiguration和@ComponentScan等。而且在入门教程中将启动类和controller放在同一个类中,但是这样的配置随着业务的扩展controller会越来越多,随之而来的问题就是启动类越来越大,考虑到这点,我想将启动类和controller分开配置,参考网络资源,并在一番恶斗之后终于实现了这个想法,因为遇到了一些坑,所以必须记录下来!!
一、controller和启动类在同一个class中
使用IntellJ IDEA创建springboot项目时,会在默认的包下自动创建一个*Application.java的类,其中*一般是artifact名称,即项目名称,然后可以直接在这个类中配置controller并使用这个类启动项目。
@Controller
@SpringBootApplication
public class WebdemoApplication {

    @RequestMapping("/")
    public String index(Model model) {
        Person person = new Person("张三", 26);

        List<Person> people = new ArrayList<>();
        Person p1 = new Person("李四", 27);
        Person p2 = new Person("王五", 27);
        Person p3 = new Person("赵六", 27);
        people.add(p1);
        people.add(p2);
        people.add(p3);

        model.addAttribute("singlePerson", person);
        model.addAttribute("people", people);
        return "/hello/index";
    }

    public static void main(String[] args) {
        SpringApplication.run(WebdemoApplication.class, args);
    }
}
这就是将controller和启动类放在一个类中的配置,直接点右键运行这个类就可以访问了!
二、将controller和启动类分开配置
因为将controller和启动类分开,所以首先要新建一个controller类
@Controller
public class HelloController {

    @RequestMapping("/hello")
    public String index(Model model) {
        Person person = new Person("张三", 26);

        List<Person> people = new ArrayList<>();
        Person p1 = new Person("李四", 27);
        Person p2 = new Person("王五", 27);
        Person p3 = new Person("赵六", 27);
        people.add(p1);
        people.add(p2);
        people.add(p3);

        model.addAttribute("singlePerson", person);
        model.addAttribute("people", people);
        return "/hello/index";
    }
}
我不改变启动类的位置,但是启动类中只要一个main方法即可,如下:
@SpringBootApplication
public class MyWebdemoApplication {

    public static void main(String[] args) {
        SpringApplication.run(MyWebdemoApplication.class, args);
    }
}
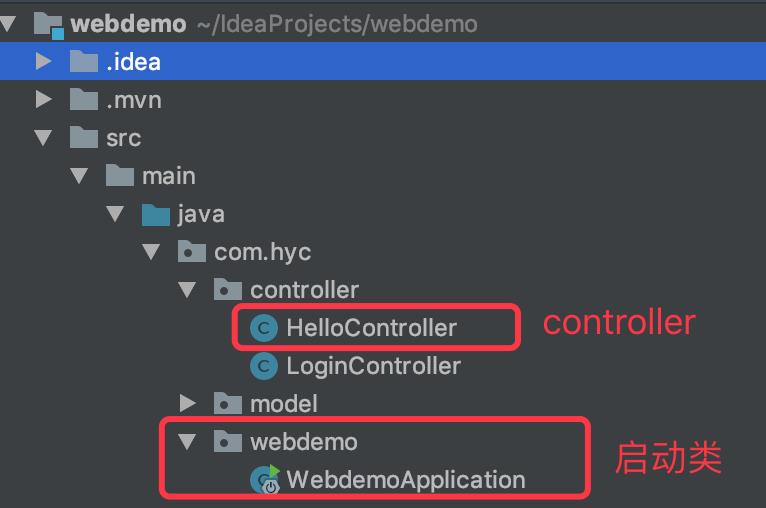
此时不改变启动类位置,目录如下:

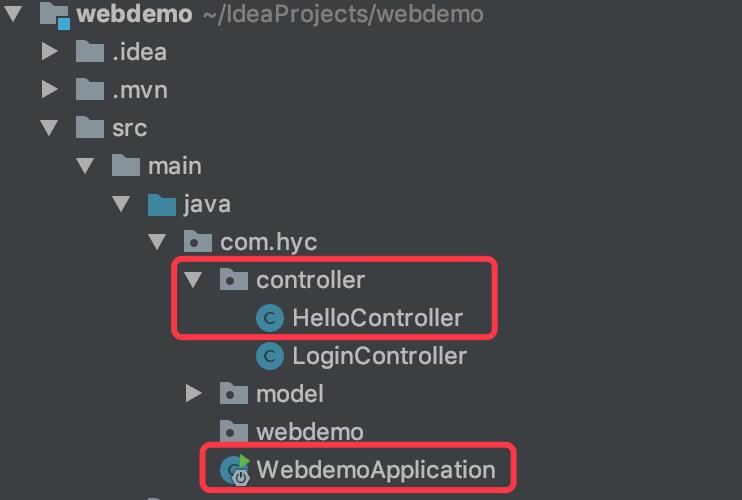
此时我访问http://127.0.0.1:8080/hello时总是包404,排除视图文件的因素之后我将启动类放到com.hyc下,目录如下:

此时再重启服务,访问http://127.0.0.1:8080/hello时才正常了!
所以这种方式一定要将启动类放在root目录下,这样才能扫描到controller、service,如果想让启动类放在任何地方都生效的话,可以使用下面的配置方法
@ComponentScan(basePackages = {"com.hyc"})
@SpringBootApplication
public class WebdemoApplication {

    public static void main(String[] args) {
        SpringApplication.run(WebdemoApplication.class, args);
    }
}
这种方法中,controller不变,启动类放在任意包下面,我是放在创建项目默认包中,这样只需在启动类上增加注解@ComponentScan即可,其中的(basePackages = {"com.hyc"})是需要扫描的包名,可以是多个,如(basePackages = {"com.hyc.controller","com.hyc.service"})等,这就意味着mvc容器会去这些包下面扫描,进而找到controller等资源。
三、总结
综上所述,springboot的配置有以下三种:
1、当启动类和controller在同一类中时,需要在该类上添加注解@Controller;
2、当启动类和controller分开时,启动类要放在根目录下,启动类上只有注解@SpringBootApplication;
3、当启动类和controller分开时,如果启动类在某个包下,需要在启动类中增加注解@ComponentScan,配置需要扫描的包名;
以上是关于@ComponentScan springboot启动类配置扫描的主要内容,如果未能解决你的问题,请参考以下文章
