SpringBoot2.0之整合Apollo
Posted toov5
tags:
篇首语:本文由小常识网(cha138.com)小编为大家整理,主要介绍了SpringBoot2.0之整合Apollo相关的知识,希望对你有一定的参考价值。
Spring Boot客户端对接阿波罗服务器端

核心源码都在这个压缩包里面

封装好了环境 运行shell脚本就ok了
下面进入到本地maven仓库:

远程仓库apollo的jar包 只能打包到本地或者公司的私服了
首先引入pom:
<parent>
		<groupId>org.springframework.boot</groupId>
		<artifactId>spring-boot-starter-parent</artifactId>
		<version>2.0.1.RELEASE</version>
		<relativePath /> <!-- lookup parent from repository -->
	</parent>

	<properties>
		<project.build.sourceEncoding>UTF-8</project.build.sourceEncoding>
		<project.reporting.outputEncoding>UTF-8</project.reporting.outputEncoding>
		<java.version>1.8</java.version>
		<spring-cloud.version>Finchley.RC1</spring-cloud.version>
	</properties>
	<dependencies>
		<dependency>
			<groupId>org.springframework.boot</groupId>
			<artifactId>spring-boot-starter</artifactId>
		</dependency>
		<dependency>
			<groupId>org.springframework.cloud</groupId>
			<artifactId>spring-cloud-starter-netflix-eureka-client</artifactId>
		</dependency>
		<dependency>
			<groupId>org.springframework.boot</groupId>
			<artifactId>spring-boot-starter-web</artifactId>
			<!-- <exclusions> <exclusion> <groupId>com.fasterxml.jackson.core</groupId>
				<artifactId>jackson-databind</artifactId> </exclusion> </exclusions> -->
		</dependency>

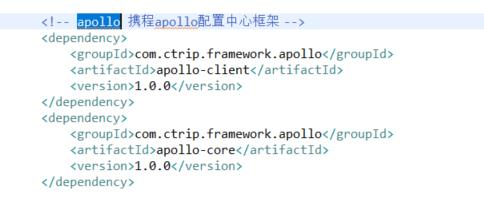
		<!-- apollo 携程apollo配置中心框架 -->
		<dependency>
			<groupId>com.ctrip.framework.apollo</groupId>
			<artifactId>apollo-client</artifactId>
			<version>1.0.0</version>
		</dependency>
		<dependency>
			<groupId>com.ctrip.framework.apollo</groupId>
			<artifactId>apollo-core</artifactId>
			<version>1.0.0</version>
		</dependency>


		<dependency>
			<groupId>org.projectlombok</groupId>
			<artifactId>lombok</artifactId>
			<optional>true</optional>
		</dependency>
		<dependency>
			<groupId>com.alibaba</groupId>
			<artifactId>fastjson</artifactId>
			<version>1.2.3</version>
		</dependency>
		<dependency>
			<groupId>org.springframework.boot</groupId>
			<artifactId>spring-boot-starter-test</artifactId>
			<scope>test</scope>
		</dependency>
	</dependencies>

	<dependencyManagement>
		<dependencies>
			<dependency>
				<groupId>org.springframework.cloud</groupId>
				<artifactId>spring-cloud-dependencies</artifactId>
				<version>${spring-cloud.version}</version>
				<type>pom</type>
				<scope>import</scope>
			</dependency>
		</dependencies>
	</dependencyManagement>

	<build>
		<plugins>
			<plugin>
				<groupId>org.springframework.boot</groupId>
				<artifactId>spring-boot-maven-plugin</artifactId>
			</plugin>
			<plugin>
				<groupId>org.apache.maven.plugins</groupId>
				<artifactId>maven-compiler-plugin</artifactId>
				<configuration>
					<source>1.8</source>
					<target>1.8</target>
				</configuration>
			</plugin>
			<plugin>
				<groupId>org.apache.maven.plugins</groupId>
				<artifactId>maven-resources-plugin</artifactId>
				<version>3.0.1</version>
				<executions>
					<execution>
						<id>copy-conf</id>
						<phase>package</phase>
						<goals>
							<goal>copy-resources</goal>
						</goals>
						<configuration>
							<encoding>UTF-8</encoding>
							<outputDirectory>${project.build.directory}/ext/conf</outputDirectory>
							<resources>
								<resource>
									<directory>ext/conf</directory>
									<includes>
										<include>logback.xml</include>
									</includes>
									<filtering>true</filtering>
								</resource>
							</resources>
						</configuration>
					</execution>
				</executions>
			</plugin>
			<plugin>
				<groupId>org.jacoco</groupId>
				<artifactId>jacoco-maven-plugin</artifactId>
				<version>0.7.5.201505241946</version>
				<executions>
					<execution>
						<id>default-prepare-agent</id>
						<goals>
							<goal>prepare-agent</goal>
						</goals>
					</execution>
					<execution>
						<id>default-prepare-agent-integration</id>
						<goals>
							<goal>prepare-agent-integration</goal>
						</goals>
					</execution>
				</executions>
			</plugin>
			<plugin>
				<groupId>com.spotify</groupId>
				<artifactId>docker-maven-plugin</artifactId>
				<version>0.4.3</version>
				<configuration>
					<imageName>hy_uav_gateway</imageName>
					<dockerDirectory>src/main/docker</dockerDirectory>
					<resources>
						<resource>
							<targetPath>/</targetPath>
							<directory>${project.build.directory}</directory>
							<include>${project.build.finalName}.jar</include>
							<include>ext/conf/logback.xml</include>
						</resource>
					</resources>
				</configuration>
			</plugin>
		</plugins>
	</build>

	<repositories>
		<repository>
			<id>spring-milestones</id>
			<name>Spring Milestones</name>
			<url>https://repo.spring.io/milestone</url>
			<snapshots>
				<enabled>false</enabled>
			</snapshots>
		</repository>
	</repositories>
远程仓库没有:


把解压出来的 apollo master


运行成功
然后 maven update下创建的maven 项目
本地仓库就有了
yml:
server:
  port: 8001
spring:
  application:
    name: toov5_apl
eureka:
  client:
    service-url:
      defaultZone: http://192.168.212.162:8080/eureka
什么信息需要上传到配置中心的?
经常需要变化 修改的!
修改环境
创建并且修改 /opt/settings/server.properties(Mac/Linux)文件,
C:\\opt\\settings\\server.properties(Windows)文件,设置env为DEV:
默认读取这个文件
创建apollo-env配置文件信息
source下面: apollo-env.properties
local.meta=http://192.168.91.7:8080
dev.meta=http://192.168.91.7:8080
fat.meta=${fat_meta}
uat.meta=${uat_meta}
lpt.meta=${lpt_meta}
pro.meta=${pro_meta}
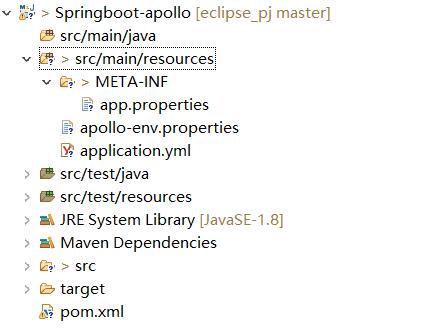
source下面:
创建 META-INF
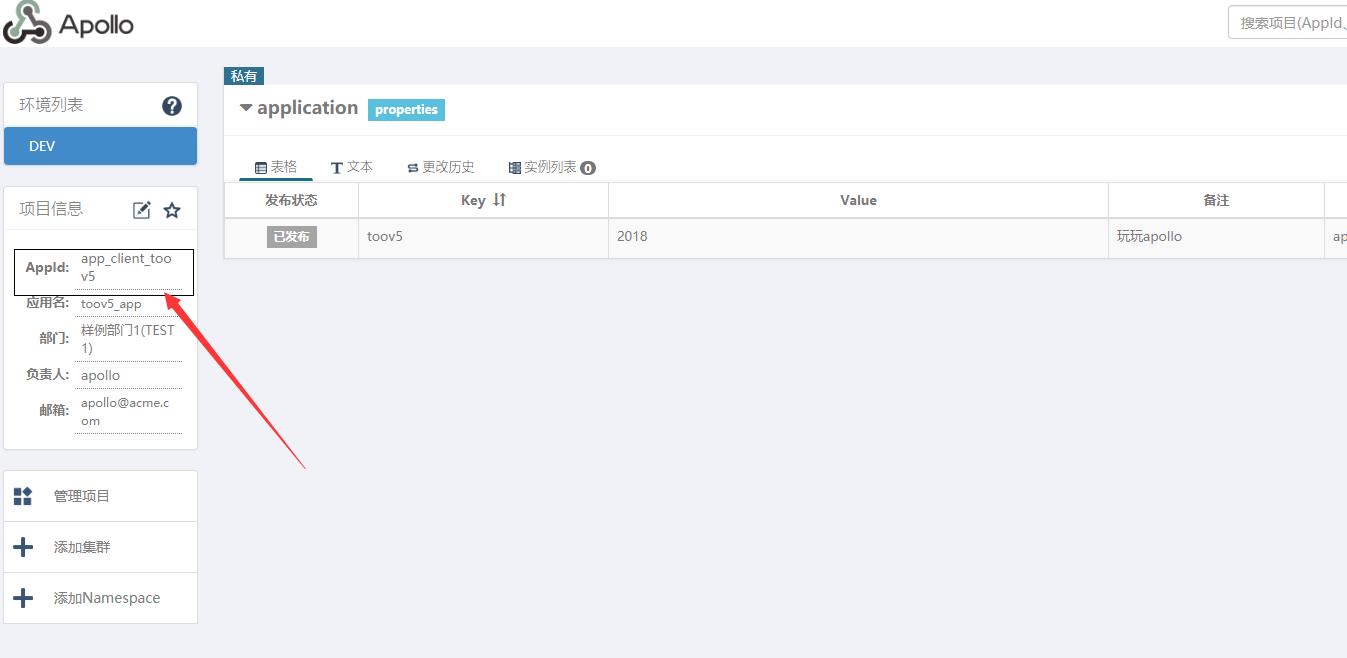
在META-INF文件夹创建app.properties 指定appid

与之对应
app.id=app_client_toov5
当前目录:

apollo自己整合了eureka 所以我们也需要写配置文件时候 写上它的端口好和ip
下面写代码:
package com.toov5.api.controller;

import org.springframework.beans.factory.annotation.Value;
import org.springframework.web.bind.annotation.RequestMapping;
import org.springframework.web.bind.annotation.RestController;

@RestController
public class IndexController {

    @Value("${toov5-test:ins}")  //默认值test 读不到的情况下 就是ins
    private String toov5;

    @RequestMapping("/getName")
    public String getName() {
        return toov5;
    }
启动类:
package com.toov5.api.controller;

import org.springframework.boot.SpringApplication;
import org.springframework.boot.autoconfigure.SpringBootApplication;

import com.ctrip.framework.apollo.spring.annotation.EnableApolloConfig;


@EnableApolloConfig
@SpringBootApplication
public class App {
  public static void main(String[] args) {
    SpringApplication.run(App.class, args);
}
}
app.properties
app.id=app_client_toov5
apollo-env.properties
local.meta=http://192.168.91.7:8080
dev.meta=http://192.168.91.7:8080
fat.meta=${fat_meta}
uat.meta=${uat_meta}
lpt.meta=${lpt_meta}
pro.meta=${pro_meta}
yml:
server:
  port: 8001
spring:
  application:
    name: toov5_a
eureka:
  client:
    service-url:
      defaultZone: http://192.168.91.7:8080/eureka
启动访问:

一定要记得 设置 dev 环境配置
以上是关于SpringBoot2.0之整合Apollo的主要内容,如果未能解决你的问题,请参考以下文章