jenkins+svn+Ant+tomcat+非maven项目构建
Posted yyk1226
tags:
篇首语:本文由小常识网(cha138.com)小编为大家整理,主要介绍了jenkins+svn+Ant+tomcat+非maven项目构建相关的知识,希望对你有一定的参考价值。
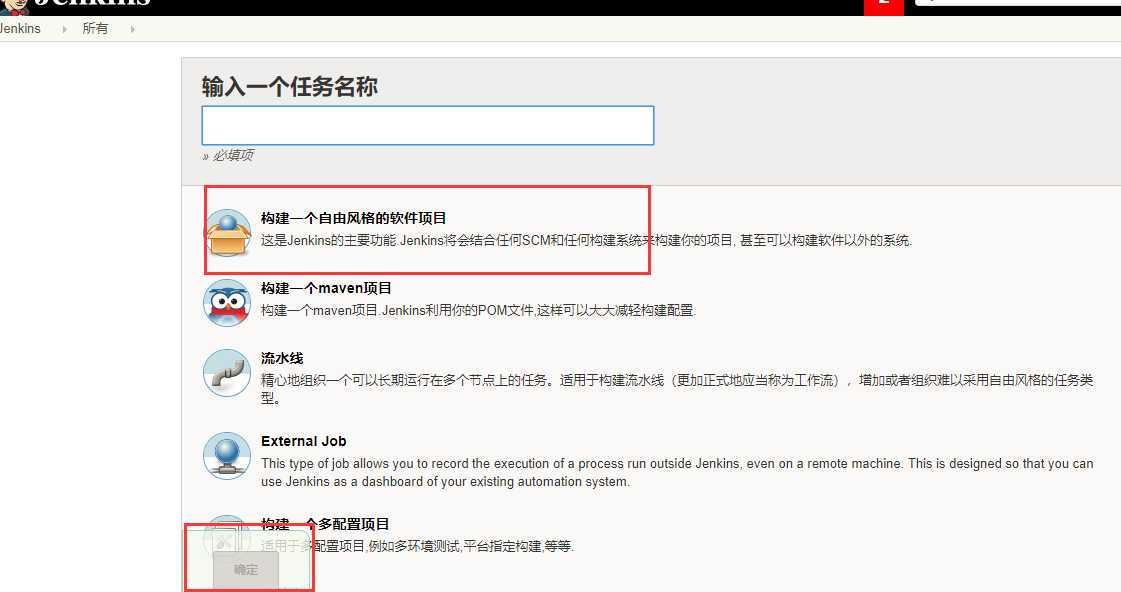
首先,输入项目名称,创建一个自由风格的项目;
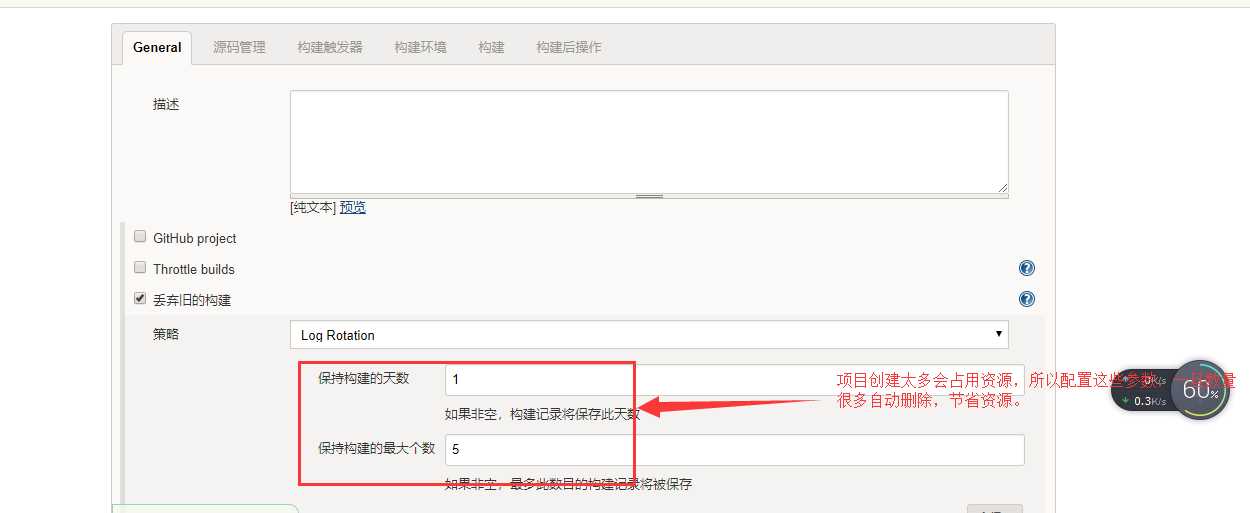
然后,配置旧项目的策略参数,目的是防止构建项目太多,占用资源。
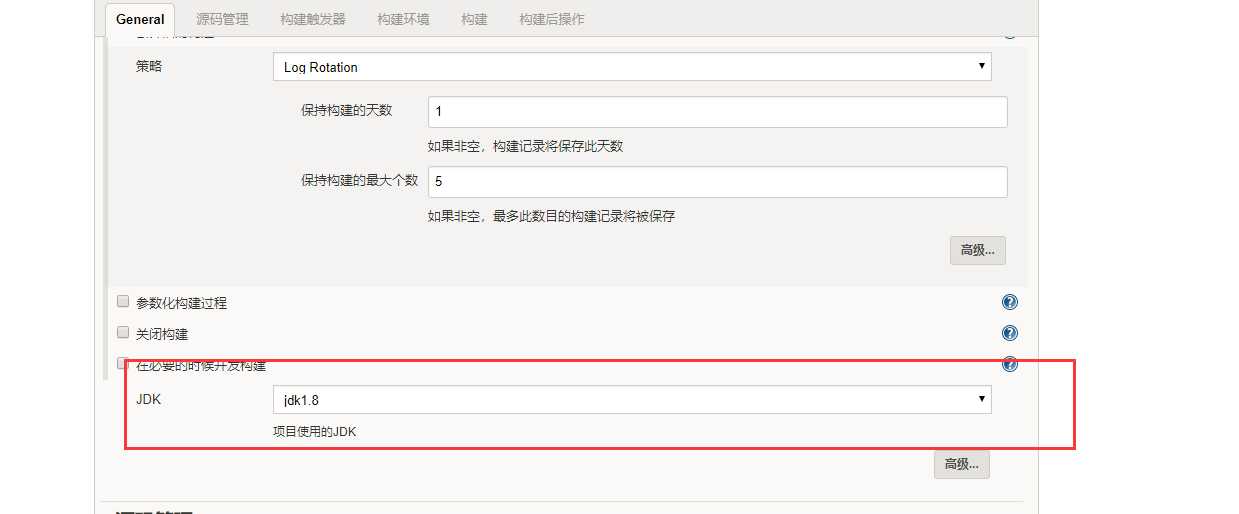
下一步,jdk版本选择:
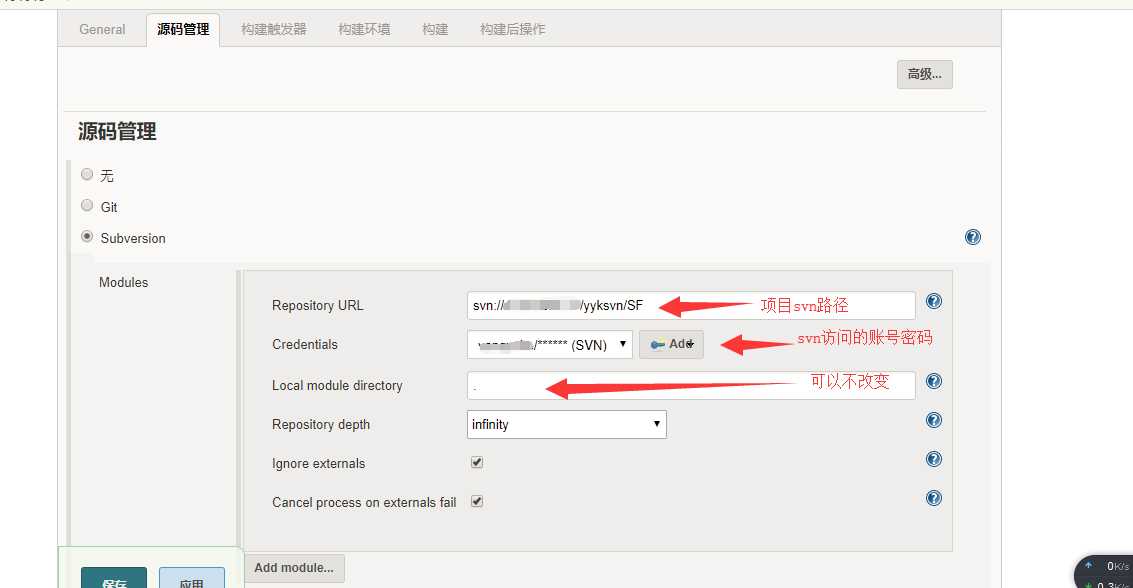
下一步,关联svn项目。
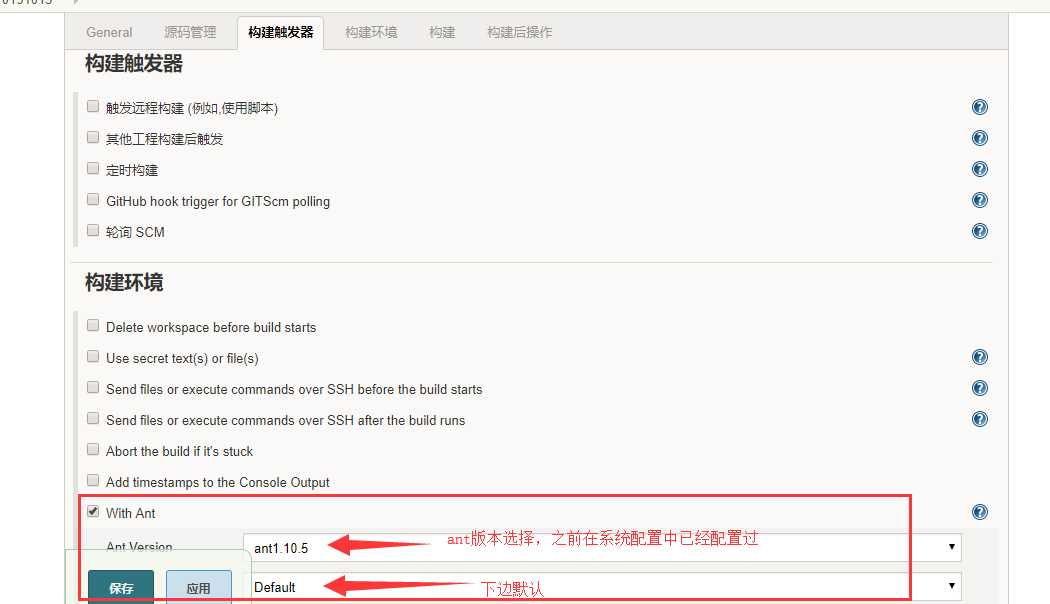
下一步:配置ant
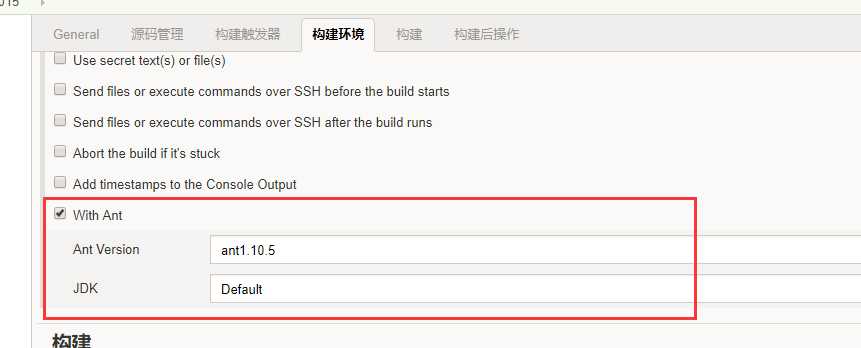
看不清,再来一张。
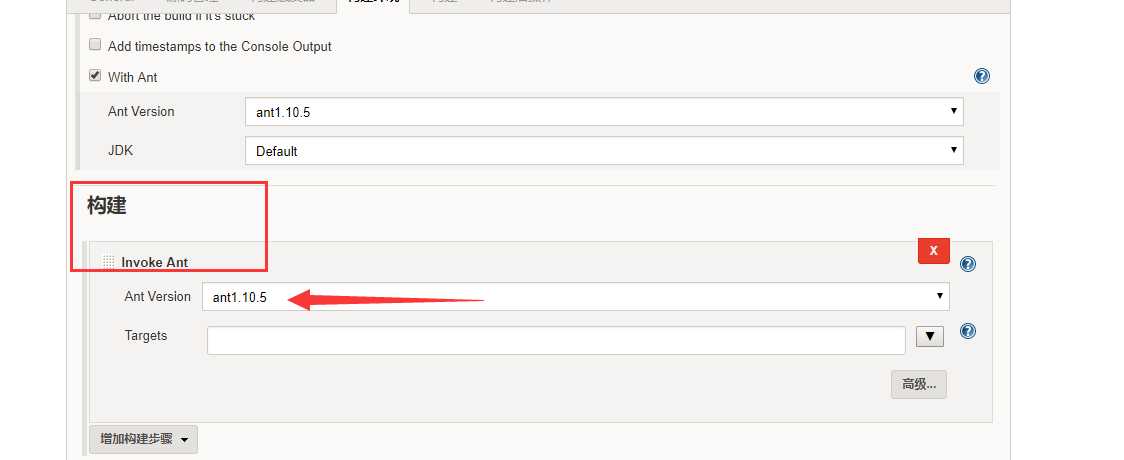
下一步,构建:
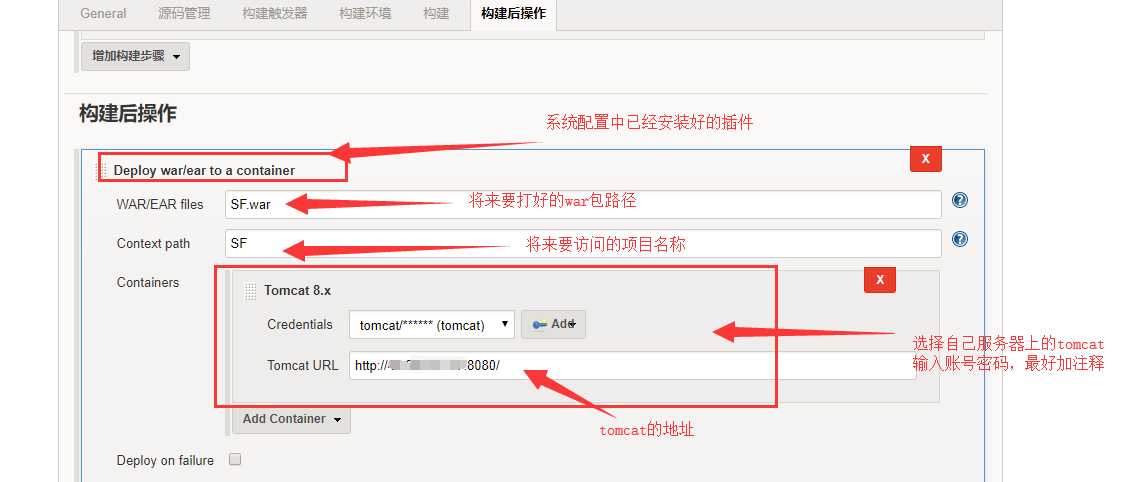
下一步,配置tomcat:
最后,点击应用-》保存。
然后我们选择【立即构建】
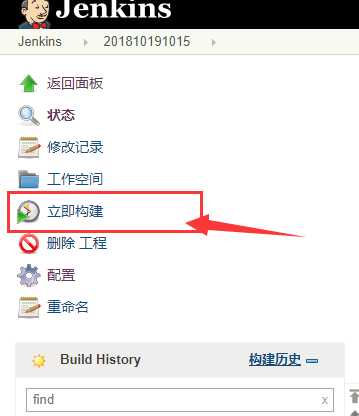
运行起来,肯定会报错,因为我们使用ant发布,需要配置build.xml文件。
我的build.xml文件在项目根目录下,如图:
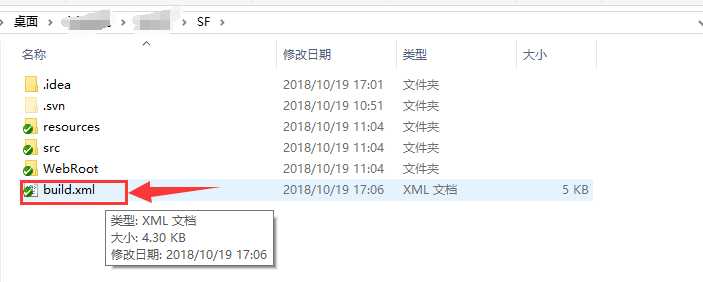
内容如下(该文件中的路径是根据自己项目路径为准,会进行个别的变动,要不然会报错或者是构建成功之后访问项目报404错误,哈哈,我就是):
<?xml version="1.0" encoding="GBK"?>
<project name="SF" default="deploy" basedir=".">
    <property environment="env" />
    <property name="webapp.name" value="SF" />
    <property name="catalina.home" value="/usr/local/apache-tomcat-8.0.20/" />
    <property name="dist.dir" value="${basedir}/dist" />
    <property name="ant.dir" value="/usr/local/apache-ant-1.10.5" />
    <property name="webRoot.dir" value="${basedir}/WebRoot" />
    <property name="src.dir" value="${basedir}/src" />
    <property name="resources.dir" value="${basedir}/resources" />
    <property name="lib.dir" value="${webRoot.dir}/WEB-INF/lib" />
    <property name="build.dir" value="${basedir}/build" />
    <!-- 使用eclipse jdt进行编译,而不使用JDK编译  -->
    <!-- <property name="build.compiler" value="org.eclipse.jdt.core.JDTCompilerAdapter" />  -->
    <!-- <property name="build.compiler" value="/usr/lib/jvm/java-1.8.0-openjdk-1.8.0.181-3.b13.el6_10.x86_64" /> -->

    <!-- 初始化classpath -->
    <path id="project.classpath">
        <fileset dir="${lib.dir}">
            <include name="**/*.jar" />
        </fileset>
        <!-- 添加tomcat类路径 -->
        <fileset dir="${catalina.home}/lib">
            <include name="*.jar" />
        </fileset>
        <!-- ant lib包  -->
        <fileset dir="${ant.dir}">
            <include name="**/*.jar" />
        </fileset>
    </path>

    <!-- get the source compile classpath in a printable form -->
    <pathconvert pathsep="${line.separator}|   |-- "
             property="echo.path.compile"
             refid="project.classpath">
    </pathconvert>

    <!-- show classpath jars -->
    <target name="print_classpath">
        <echo message="|-- compile classpath"/>
        <echo message="|   |"/>
        <echo message="|   |-- ${echo.path.compile}"/>
    </target>


    <!-- 删除之前的目录结构 -->
    <target name="clear" description="清理旧文件">
        <delete dir="${build.dir}" />
        <delete dir="${dist.dir}" />
        <delete file="${catalina.home}/webapps/${webapp.name}.war" />
        <delete dir="${catalina.home}/webapps/${webapp.name}" />
    </target>

    <!-- 创建目录结构 -->
    <target name="init" depends="clear" description="创建初始化目录结构">
        <mkdir dir="${build.dir}/classes" />
        <mkdir dir="${dist.dir}" />
    </target>

    <!-- 编译java -->
    <target name="compile" depends="init" description="编译java文件">
        <echo message="begin compile..." />
        <javac srcdir="${src.dir}" destdir="${build.dir}/classes"
            includeantruntime="false" nowarn="on"
            source="1.8" target="1.8" deprecation="true" debug="true"
            encoding="UTF-8" classpathref="project.classpath"
            >
            <!-- <compilerarg line="-XDignore.symbol.file"/> -->
            <compilerarg line="-Xlint:unchecked" />
            <!-- <classpath refid="project.classpath" /> -->
        </javac>
        <copydir dest="${build.dir}/classes" src="${resources.dir}" />
        <!-- <copy todir="${build.dir}">
            <fileset dir="${resources.dir}">
                <include name="**/**/*.xml" />
                <include name="**/**/*.ftl" />
                <include name="**/*.xml" />
                <include name="*.xml" />
                <include name="*.properties" />
            </fileset>
        </copy> -->
        <echo message="end compile..." />
    </target>

    <!-- 将class文件打成 jar包 -->
    <!--
        <target name="pack" depends="compile">
            <jar jarfile="${build.dir}/${webapp.name}.jar">
                <fileset dir="${build.dir}/classes">
                    <include name="**/*.class"/>
                </fileset>
            </jar>
        </target>
    -->

    <!-- 打成war包, 名称默认为 项目名 -->
    <target name="war" depends="compile" description="将工程打成war包">
        <echo message="begin war..." />
        <war destfile="${dist.dir}/${webapp.name}.war" basedir="${webRoot.dir}"
            webxml="${webRoot.dir}/WEB-INF/web.xml">
            <lib dir="${lib.dir}" />
            <classes dir="${build.dir}/classes" />
            <fileset dir="${webRoot.dir}">
                <include name="***.*" />
            </fileset>
        </war>
        <echo message="end war..." />
    </target>

    <!-- copy war包 tomcat的deploy目录 -->
    <target name="deploy" depends="war" description="部署项目">
        <echo message="begin deploy..." />
        <copy file="${dist.dir}/${webapp.name}.war" todir="${catalina.home}/webapps" />
        <echo message="end deploy..." />
    </target>

</project>
修改好build.xml文件之后,提交到svn。在jenkins中重新构建,构建成功之后,无需重启tomcat,即可访问到项目。
例如:http://ip地址:8080/项目名称
下一节我们介绍build.xml需要变动哪些地方!
以上是关于jenkins+svn+Ant+tomcat+非maven项目构建的主要内容,如果未能解决你的问题,请参考以下文章