Java基础加强之多线程篇(线程创建与终止互斥通信本地变量)
Posted 学习、改良、极致
tags:
篇首语:本文由小常识网(cha138.com)小编为大家整理,主要介绍了Java基础加强之多线程篇(线程创建与终止互斥通信本地变量)相关的知识,希望对你有一定的参考价值。
线程创建与终止
线程创建
Thread类与Runnable接口的关系
public interface Runnable {
  public abstract void run();
}

public class Thread implements Runnable {
    /* What will be run. */
  private Runnable target;
  ......
  /**
   * Causes this thread to begin execution; the Java Virtual Machine
   * calls the <code>run</code> method of this thread.
   */
  public synchronized void start() {......}

  ......
    @Override
    public void run() {
        if (target != null) {
            target.run();
        }
  }
  ......
}
Thread类与Runnable接口都位于java.lang包中。从上面我们可以看出,Runnable接口中只定义了run()方法,Thread类实现了Runnable 接口并重写了run()方法。当调用Thread 类的start()方法时,实际上Java虚拟机就去调用Thread 类的run()方法,而Thread 类的run()方法中最终调用的是Runnable类型对象的run()方法。
继承Thread并重写run方法
public class ThreadTest1 extends Thread {
    @Override
    public void run() {
        while(true) {
            try {
                Thread.sleep(1000);
            } catch (InterruptedException e) {
                e.printStackTrace();
            }
            System.out.println("thread 1:" + Thread.currentThread().getName());
        }
    }

    public static void main(String[] args) {
        ThreadTest1 thread = new ThreadTest1 ();
        thread.start();
    }//main end
}
可以写成内部类的形式,new Thread(){@Override run(...)}.start();
实现Runnable接口并重写run方法
public class ThreadTest2  implements Runnable {
    @Override
    public void run() {
        while(true) {
            try {
                Thread.sleep(1000);
            } catch (InterruptedException e) {
                e.printStackTrace();
            }
            System.out.println("thread 3:" + Thread.currentThread().getName());
        }
    }
    public static void main(String[] args) {
        ThreadTest2  thread3 = new ThreadTest2();
        Thread thread = new Thread(thread3);
        thread.start();
    }//main end
}
可以写成内部类的形式,new Thread(new Runnable(){@Override run(...)}).start();
线程终止
当调用Thread类的start()方法时,将会创建一个线程,这时刚创建的线程处于就绪状态(可运行状态),并没有运行,处于就绪状态的线程就可以等JVM调度。当JVM调度该线程时,该线程进入运行状态,即执行Thread类的run()方法中的内容。run()方法执行完,线程结束,线程进入死亡状态。这是线程自然终止的过程,我们也可以通过Thread类提供的一些方法来终止线程。
interrupt()\\isInterrupted()\\interrupted()方法介绍
stop()方法没有做任何的清除操作就粗暴终止线程,释放该线程所持有的对象锁(下文将介绍),受该对象锁保护的其它对象对其他线程可见,因此具有不安全性。
suspend()方法会使目标线程会停下来,但仍然持有在这之前获得的对象锁,对任何线程来说,如果它们想恢复目标线程,同时又试图使用任何一个锁定的资源,就会造成死锁。
终上所述,不建议使用stop()方法和suspend()方法来终止线程,通常我们通过interrupt()方法来终止处于阻塞状态和运行状态的线程。
需要注意的是,interrupt()方法不会中断一个正在运行的线程,仅仅是将线程的中断标记设为true,当调用了阻塞方法之后,线程会不断监听中断标志,如果为true,则产生一个InterruptedException异常,将InterruptedException放在catch中就能终止线程。
isInterrupted()方法可以返回中断标记,常用循环判断条件。
interrupted()方法测试当前线程是否已经中断,线程的中断标志由该方法清除。interrupted()除了返回中断标记之外,它还会清除中断标记。
interrupt()用法
看下面例子
public class ThreadInterruptedTest extends Thread {
    @Override
    public void run() {
            try {
                int i = 0;
                while(!isInterrupted()) {
                    i ++ ;
                    Thread.sleep(1000);
                    System.out.println(this.getName() + " is looping,i=" + i);
                }
            } catch (InterruptedException e) {
                System.out.println(this.getName() +
                        " catch InterruptedException,state:" + this.getState());
                e.printStackTrace();
            }
    }

    public static void main(String[] args) throws Exception {

        ThreadInterruptedTest thread = new ThreadInterruptedTest();
        System.out.println(thread.getName()
                + " state:" + thread.getState());

        thread.start();
        System.out.println(thread.getName()
                + " state:" + thread.getState());

        Thread.sleep(5000);

        System.out.println("flag: " + thread.isInterrupted());

        //发出中断指令
        thread.interrupt();

        System.out.println("flag: " + thread.isInterrupted());

        System.out.println(thread.getName()
                + " state:" + thread.getState());

        System.out.println(thread.interrupted());
    }
}
运行结果
Thread-0 state:NEW
Thread-0 state:RUNNABLE
Thread-0 is looping,i=1
Thread-0 is looping,i=2
Thread-0 is looping,i=3
Thread-0 is looping,i=4
flag: false
flag: true
Thread-0 state:TIMED_WAITING
Thread-0 catch InterruptedException,state:RUNNABLE
false
java.lang.InterruptedException: sleep interrupted
    at java.lang.Thread.sleep(Native Method)
    at com.itpsc.thread.ThreadInterruptedTest.run(ThreadInterruptedTest.java:11)
从运行结果可以看出,调用interrupt() 发出中断指令前,中断标志位false,发出中断指令后中断标志位为true,而调用interrupted()方法后则中断标志被清除。从发出的异常来看,是在一个sleep interrupted,且发出异常后线程被唤醒,以便线程能从异常中正常退出。
线程运行状态图
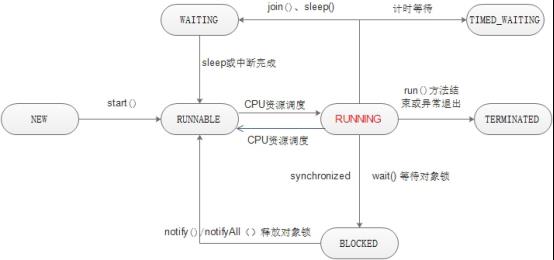
线程从创建到终止可能会经历各种状态。在java.lang.Thread.State类的源码中,可以看到线程有以下几种状态:NEW、RUNNABLE、BLOCKED、WAITING、TIMED_WAITING、TERMINATED。各种状态的转换如下:
当通过Thread t = new Thread()方式创建线程时,线程处于新建状态;当调用t.start()方法时,线程进入可运行状态(注意,还没有运行);处于可运行状态的线程将在适当的时机被CPU资源调度器调度,进入运行状态,也就是线程执行run()方法中的内容;run()方法执行完或者程序异常退出线程进入终止状态。线程从运行状态也有可能进入阻塞状态,如调用wait()方法后进入等待对象锁(下文将介绍),调用sleep()方法后进行入计时等待。
线程互斥
现在我们已经知道线程的创建与终止了。互斥,是指系统中的某些共享资源,一次只允许一个线程访问,当一个线程正在访问该临界资源时,其它线程必须等待。
对象锁
在java中,每一个对象有且仅有一个锁,锁也称为对象监视器。通过对象的锁,多个线程之间可以实现对某个方法(临界资源)的互斥访问。那么,如何获取对象的锁呢?当我们调用对象的synchronized修饰的方法或者synchronized修饰的代码块时,锁住的是对象实例,就获取了该对象的锁。
全局锁
Java中有实例对象也有类对象,竟然有对象锁,那么久有类锁,也称全局锁。当synchronized修饰静态方法或者静态代码块时,锁住的是该类的Class实例(字节码对象),获取的便是该类的全局锁。看下面获取对象锁实现线程互斥的两种方式。
线程互斥的两种方式
先看下面这个没有实现线程互斥的例子。
public class SynchronizedTest {

    public static void main(String[] args) {
        new SynchronizedTest().init();
    }

    private void init() {
        final Outputer output = new Outputer();
        //线程1打印"hello,i am thread 1"
        new Thread(new Runnable(){
            @Override
            public void run() {
                while(true) {
                     try{
                         Thread.sleep(1000);
                     }catch(InterruptedException e) {
                         e.printStackTrace();
                     }
                     output.output("hello,i am thread 1");
                }
            }
        }).start();

        //线程2打印"hello,i am thread 2"
        new Thread(new Runnable(){
            @Override
            public void run() {
                while(true) {
                     try{
                         Thread.sleep(1000);
                     }catch(InterruptedException e) {
                         e.printStackTrace();
                     }
                     output.output("hello,i am thread 2");
                }
            }
        }).start();
    }

    class Outputer {
        public void output(String name) {
            for(int i=0; i<name.length(); i++) {
                System.out.print(name.charAt(i));
            }
            System.out.println();
        }
    }
}
运行结果
hello,i am thread 1
hello,i am thread 2
hello,i am hellthread 1
o,i am thread 2
hello,i am thread 2
hello,i am thread 1
hello,i am thread 2
hello,i am threadhel 2lo,i am thread
1
线程1和线程2同时调用output方法进行输出,从运行结果可以看出,线程之间没有执行完各自的输出任务就被交替了运行了。下面通过对象的锁实现线程1和线程2对output方法的互斥访问。
synchronized修饰方法
使用synchronized 对output方法进行修饰,可以让调用者获得锁。synchronized 修饰方法没有显示声明锁的对象,默认是当前方法所在类的对象this。
public synchronized void output(String name) {
    for(int i=0; i<name.length(); i++) {
        System.out.print(name.charAt(i));
    }
    System.out.println();
}
synchronized修饰代码块
使用synchronized 对output方法中的代码块进行修饰,也可以让调用者获得锁。
public void output(String name) {
    synchronized(this){
        for(int i=0; i<name.length(); i++) {
            System.out.print(name.charAt(i));
        }
        System.out.println();
    }
}
使用synchronized之后,线程1和线程2对output方法实现了互斥访问。
hello,i am thread 1
hello,i am thread 2
hello,i am thread 1
hello,i am thread 2
hello,i am thread 1
hello,i am thread 2
hello,i am thread 1
synchronized用法
先看下面的例子,我们来总结下synchronized的一些常用用法。
public class SynchronizedTest {

    public static void main(String[] args) {
        new SynchronizedTest().init();
    }

    private void init() {
        final Outputer output = new Outputer();
        //线程1打印"hello,i am thread 1"
        new Thread(new Runnable(){
            @Override
            public void run() {
                output.output("hello,i am thread 1");
            }
        }).start();

        //线程2打印"hello,i am thread 2"
        new Thread(new Runnable(){
            @Override
            public void run() {
                output.output("hello,i am thread 2");
            }
        }).start();
    }

    static class Outputer {
        public synchronized void output(String name) {
            for(int i=0; i<5; i++) {
                try {
                    Thread.sleep(1000);
                } catch (InterruptedException e) {
                    e.printStackTrace();
                }
                System.out.println(name);
            }
        }

        public void output2(String name) {
            synchronized(this) {
                for(int i=0; i<5; i++) {
                    try {
                        Thread.sleep(1000);
                    } catch (InterruptedException e) {
                        e.printStackTrace();
                    }
                    System.out.println(name);
                }
            }
        }

        public void output3(String name) {
            for(int i=0; i<5; i++) {
                try {
                    Thread.sleep(1000);
                } catch (InterruptedException e) {
                    e.printStackTrace();
                }
                System.out.println(name);
            }
        }

        public static synchronized void output4(String name) {
            for(int i=0; i<5; i++) {
                try {
                    Thread.sleep(1000);
                } catch (InterruptedException e) {
                    e.printStackTrace();
                }
                System.out.println(name);
            }
        }

        public void output5(String name) {
            synchronized(Outputer.class) {
                for(int i=0; i<5; i++) {
                    try {
                        Thread.sleep(1000);
                    } catch (InterruptedException e) {
                        e.printStackTrace();
                    }
                    System.out.println(name);
                }
            }
        }
    }
}
运行结果
hello,i am thread 1
hello,i am thread 1
hello,i am thread 1
hello,i am thread 1
hello,i am thread 1
hello,i am thread 2
hello,i am thread 2
hello,i am thread 2
hello,i am thread 2
hello,i am thread 2
