jmeter测试dubbo接口
Posted 秒秒开心
tags:
篇首语:本文由小常识网(cha138.com)小编为大家整理,主要介绍了jmeter测试dubbo接口相关的知识,希望对你有一定的参考价值。
本文讲解jmeter测试dubbo接口的实现方式,文章以一个dubbo的接口为例子进行讲解,该dubbo接口实现的功能为:

- 一:首先我们看服务端代码
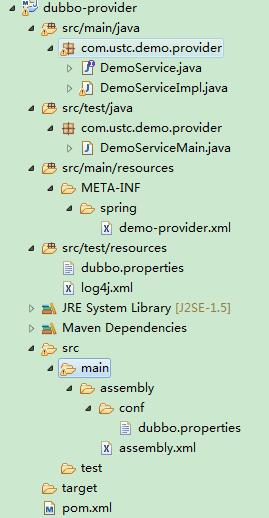
代码架构为:

1:新建一个maven工程,pom文件为:
 1 <project xmlns="http://maven.apache.org/POM/4.0.0" xmlns:xsi="http://www.w3.org/2001/XMLSchema-instance"
 2     xsi:schemaLocation="http://maven.apache.org/POM/4.0.0 http://maven.apache.org/xsd/maven-4.0.0.xsd">
 3     <modelVersion>4.0.0</modelVersion>
 4
 5     <groupId>com.ustc.demo</groupId>
 6     <artifactId>dubbo-provider</artifactId>
 7     <version>0.0.1-SNAPSHOT</version>
 8     <packaging>jar</packaging>
 9
10     <name>dubbo-provider</name>
11     <url>http://maven.apache.org</url>
12
13     <properties>
14         <project.build.sourceEncoding>UTF-8</project.build.sourceEncoding>
15     </properties>
16
17     <dependencies>
18         <dependency>
19             <groupId>junit</groupId>
20             <artifactId>junit</artifactId>
21             <version>3.8.1</version>
22             <scope>test</scope>
23         </dependency>
24         <dependency>
25             <groupId>com.alibaba</groupId>
26             <artifactId>dubbo</artifactId>
27             <version>2.4.9</version>
28         </dependency>
29         <dependency>
30             <groupId>com.github.sgroschupf</groupId>
31             <artifactId>zkclient</artifactId>
32             <version>0.1</version>
33         </dependency>
34     </dependencies>
35     <build>
36         <plugins>
37             <plugin>
38                 <artifactId>maven-dependency-plugin</artifactId>
39                 <executions>
40                     <execution>
41                         <id>unpack</id>
42                         <phase>package</phase>
43                         <goals>
44                             <goal>unpack</goal>
45                         </goals>
46                         <configuration>
47                             <artifactItems>
48                                 <artifactItem>
49                                     <groupId>com.alibaba</groupId>
50                                     <artifactId>dubbo</artifactId>
51                                     <version>${project.parent.version}</version>
52                                     <outputDirectory>${project.build.directory}/dubbo</outputDirectory>
53                                     <includes>META-INF/assembly/**</includes>
54                                 </artifactItem>
55                             </artifactItems>
56                         </configuration>
57                     </execution>
58                 </executions>
59             </plugin>
60             <plugin>
61                 <artifactId>maven-assembly-plugin</artifactId>
62                 <configuration>
63                     <descriptor>src/main/assembly/assembly.xml</descriptor>
64                 </configuration>
65                 <executions>
66                     <execution>
67                         <id>make-assembly</id>
68                         <phase>package</phase>
69                         <goals>
70                             <goal>single</goal>
71                         </goals>
72                     </execution>
73                 </executions>
74             </plugin>
75         </plugins>
76     </build>
77 </project>
2:在src/main下新建文件夹assembly,然后在assembly文件夹下新建assembly.xml文件
 1 <assembly>
 2     <id>assembly</id>
 3     <formats>
 4         <format>tar.gz</format>
 5     </formats>
 6     <includeBaseDirectory>true</includeBaseDirectory>
 7     <fileSets>
 8         <fileSet>
 9             <directory>${project.build.directory}/dubbo/META-INF/assembly/bin
10             </directory>
11             <outputDirectory>bin</outputDirectory>
12             <fileMode>0755</fileMode>
13         </fileSet>
14         <fileSet>
15             <directory>src/main/assembly/conf</directory>
16             <outputDirectory>conf</outputDirectory>
17             <fileMode>0644</fileMode>
18         </fileSet>
19     </fileSets>
20     <dependencySets>
21         <dependencySet>
22             <outputDirectory>lib</outputDirectory>
23         </dependencySet>
24     </dependencySets>
25 </assembly>
3:在src/main/assembly文件夹下新建conf文件夹,然后在conf文件夹下新建dubbo.properties文件,此处的zookeeper的地址根据实际进行修改
 1 dubbo.container=log4j,spring
 2 dubbo.application.name=demo-caiya
 3 dubbo.application.owner=william
 4 #dubbo.registry.address=multicast://224.5.x.7:1234
 5 dubbo.registry.address=zookeeper://134.xx.xx.xx:2181
 6 #dubbo.registry.address=redis://127.0.0.1:6379
 7 #dubbo.registry.address=dubbo://127.0.0.1:9090
 8 #dubbo.monitor.protocol=registry
 9 dubbo.protocol.name=dubbo
10 dubbo.protocol.port=20880
11 #dubbo.service.loadbalance=roundrobin
12 #dubbo.log4j.file=logs/dubbo-demo-consumer.log
13 #dubbo.log4j.level=WARN
4:在src/test/resources包路径下,新建dubbo.properties文件,内容和上面的3中dubbo.properties文件内容相同
5:编写provider的接口sayHello,新建DemoService.java类
1 package com.ustc.demo.provider;
2 public interface DemoService {
3     public String sayHello(String name);
4 }
6:编写sayHello接口的实现类,新建DemoServiceImpl.java类
package com.ustc.demo.provider;

import java.text.SimpleDateFormat;
import java.util.Date;
public class DemoServiceImpl implements DemoService{

    public String sayHello(String name) {
        String time = new SimpleDateFormat("HH:mm:ss").format(new Date());
        System.out.println("from consumer:"+name);
        return "The current time is:"+time;
    }
7:编写spring的配置文件,在META-INF/spring文件夹下的demo-provider.xml文件
1 <?xml version="1.0" encoding="UTF-8" ?>
2 <beans xmlns="http://www.springframework.org/schema/beans" xmlns:xsi="http://www.w3.org/2001/XMLSchema-instance" xmlns:dubbo="http://code.alibabatech.com/schema/dubbo" xsi:schemaLocation="http://www.springframework.org/schema/beans http://www.springframework.org/schema/beans/spring-beans.xsd http://code.alibabatech.com/schema/dubbo http://code.alibabatech.com/schema/dubbo/dubbo.xsd">
3 <bean id="demoService" class="com.ustc.demo.provider.DemoServiceImpl" />
4 <dubbo:service interface="com.ustc.demo.provider.DemoService" ref="demoService"/>
5 </beans>
8:编写main方法,新建DemoServiceMain.java类
1 package com.ustc.demo.provider;
2 public class DemoServiceMain {
3     public static void main(String[] args) {
4         com.alibaba.dubbo.container.Main.main(args);
5     }
6 }
这样服务端的代码就写好了,实现的功能是当消费者来询问当前时间是几点的时候,返回当前时间
- 二:然后我们看消费端代码

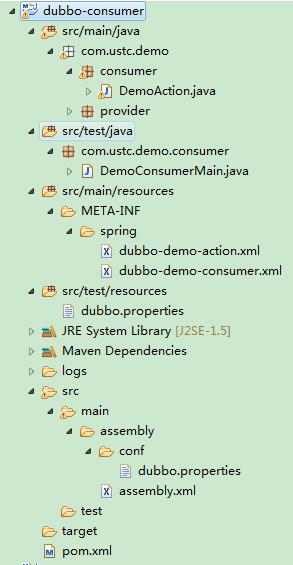
1:新建一个maven工程,pom文件为:
 1 <project xmlns="http://maven.apache.org/POM/4.0.0" xmlns:xsi="http://www.w3.org/2001/XMLSchema-instance"
 2     xsi:schemaLocation="http://maven.apache.org/POM/4.0.0 http://maven.apache.org/xsd/maven-4.0.0.xsd">
 3     <modelVersion>4.0.0</modelVersion>
 4     <groupId>com.ustc.demo</groupId>
 5     <artifactId>consumer</artifactId>
 6     <version>0.0.1-SNAPSHOT</version>
 7     <packaging>jar</packaging>
 8     <name>consumer</name>
 9     <url>http://maven.apache.org</url>
10     <properties>
11         <project.build.sourceEncoding>UTF-8</project.build.sourceEncoding>
12     </properties>
13     <dependencies>
14         <dependency>
15             <groupId>junit</groupId>
16             <artifactId>junit</artifactId>
17             <version>3.8.1</version>
18             <scope>test</scope>
19         </dependency>
20         <dependency>
21             <groupId>com.alibaba</groupId>
22             <artifactId>dubbo</artifactId>
23             <version>2.4.9</version>
24         </dependency>
25         <dependency>
26             <groupId>com.github.sgroschupf</groupId>
27             <artifactId>zkclient</artifactId>
28             <version>0.1</version>
29         </dependency>
30     </dependencies>
31     <build>
32         <plugins>
33             <plugin>
34                 <artifactId>maven-dependency-plugin</artifactId>
35                 <executions>
36                     <execution>
37                         <id>unpack</id>
38                         <phase>package</phase>
39                         <goals>
40                             <goal>unpack</goal>
41                         </goals>
42                         <configuration>
43                             <artifactItems>
44                                 <artifactItem>
45                                     <groupId>com.alibaba</groupId>
46                                     <artifactId>dubbo</artifactId>
47                                     <version>${project.parent.version}</version>
48                                     <outputDirectory>${project.build.directory}/dubbo</outputDirectory>
49                                     <includes>META-INF/assembly/**</includes>
50                                 </artifactItem>
51                             </artifactItems>
52                         </configuration>
53                     </execution>
54                 </executions>
55             </plugin>
56             <plugin>
57                 <artifactId>maven-assembly-plugin</artifactId>
58                 <configuration>
59                     <descriptor>src/main/assembly/assembly.xml</descriptor>
60                 </configuration>
61                 <executions>
62                     <execution>
63                         <id>make-assembly</id>
64                         <phase>package</phase>
65                         <goals>
66                             <goal>single</goal>
67                         </goals>
68                     </execution>
69                 </executions>
70             </plugin>
71         </plugins>
72     </build>
73 </project>
2:在src/main下新建文件夹assembly,然后在assembly文件夹下新建assembly.xml文件
 1 <assembly>
 2     <id>assembly</id>
 3     <formats>
 4         <format>tar.gz</format>
 5     </formats>
 6     <includeBaseDirectory>true</includeBaseDirectory>
 7     <fileSets>
 8         <fileSet>
 9             <directory>${project.build.directory}/dubbo/META-INF/assembly/bin
10             </directory>
11             <outputDirectory>bin</outputDirectory>
12             <fileMode>0755</fileMode>
13         </fileSet>
14         <fileSet>
15             <directory>src/main/assembly/conf</directory>
16             <outputDirectory>conf</outputDirectory>
17             <fileMode>0644</fileMode>
18         </fileSet>
19     </fileSets>
20     <dependencySets>
21         <dependencySet>
22             <outputDirectory>lib</outputDirectory>
23         </dependencySet>
24     </dependencySets>
25 </assembly>
3:在src/main/assembly文件夹下新建conf文件夹,然后在conf文件夹下新建dubbo.properties文件,此处的zookeeper的地址根据实际进行修改
 1 dubbo.container=log4j,spring
 2 dubbo.application.name=demo-consumer
 3 dubbo.application.owner=
 4 #dubbo.registry.address=multicast://224.5.6.7:1234
 5 dubbo.registry.address=zookeeper://134.64.xx.xx:2181
 6 #dubbo.registry.address=redis://127.0.0.1:6379
 7 #dubbo.registry.address=dubbo://127.0.0.1:9090
 8 dubbo.monitor.protocol=registry
 9 dubbo.log4j.file=logs/dubbo-demo-consumer.log
10 dubbo.log4j.level=WARN
4:在src/test/resources包路径下,新建dubbo.properties文件,内容和上面的3中dubbo.properties文件内容相同
5:编写provider的接口sayHello,新建DemoService.java类
1 package com.ustc.demo.provider;
2
3 public interface DemoService {
4      public String sayHello(String name);
5 }
6:编写消费端请求类调用sayHello方法,新建DemoAction.java类
 1 package com.ustc.demo.consumer;
 2 import com.ustc.demo.provider.DemoService;
 3 public class DemoAction {
 4
 5     private DemoService demoService;
 6
 7     public void setDemoService(DemoService demoService) {
 8         this.demoService = demoService;
 9     }
10
11     public void start() throws Exception {
12         for (int i = 0; i < Integer.MAX_VALUE; i ++) {
13             try {
14                 String hello = demoService.sayHello("hello,How much is the current time?");
15                 System.out.println("from provider:"+hello);
16             } catch (Exception e) {
17                 e.printStackTrace();
18             }
19             Thread.sleep(2000);
20         }
21     }
22 }
7:编写spring的配置文件,在META-INF/spring文件夹下的dubbo-demo-action.xml文件
1 <?xml version="1.0" encoding="UTF-8" ?>
2 <beans xmlns="http://www.springframework.org/schema/beans" xmlns:xsi="http://www.w3.org/2001/XMLSchema-instance" xmlns:dubbo="http://code.alibabatech.com/schema/dubbo" xsi:schemaLocation="http://www.springframework.org/schema/beans http://www.springframework.org/schema/beans/spring-beans-2.5.xsd http://code.alibabatech.com/schema/dubbo http://code.alibabatech.com/schema/dubbo/dubbo.xsd">
3  <bean class="com.ustc.demo.consumer.DemoAction" init-method="start">
4   <property name="demoService" ref="demoService" />
5   </bean>
6 </beans>
8:编写spring的配置文件,在META-INF/spring文件夹下的dubbo-demo-consumer.xml文件
1 <?xml version="1.0" encoding="UTF-8" ?>
2 <beans xmlns="http://www.springframework.org/schema/beans"
3     xmlns:xsi="http://www.w3.org/2001/XMLSchema-instance" xmlns:dubbo="http://code.alibabatech.com/schema/dubbo"
4     xsi:schemaLocation="http://www.springframework.org/schema/beans http://www.springframework.org/schema/beans/spring-beans-2.5.xsd http://code.alibabatech.com/schema/dubbo http://code.alibabatech.com/schema/dubbo/dubbo.xsd">
5     <dubbo以上是关于jmeter测试dubbo接口的主要内容,如果未能解决你的问题,请参考以下文章