spring boot redis(连接,增删改查,集群,和session一起使用)
Posted 蜗牛的坚持
tags:
篇首语:本文由小常识网(cha138.com)小编为大家整理,主要介绍了spring boot redis(连接,增删改查,集群,和session一起使用)相关的知识,希望对你有一定的参考价值。
1.建立连接

1.1 pom.xml
 <!-- redis 相关支持 -->
        <dependency>
            <groupId>org.springframework.boot</groupId>
            <artifactId>spring-boot-starter-redis</artifactId>
            <version>1.3.2.RELEASE</version>
        </dependency>
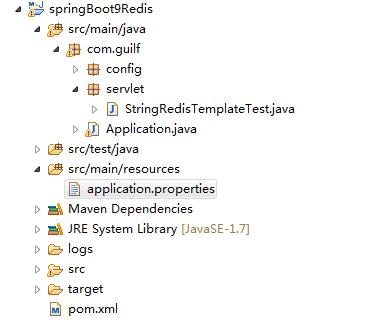
1.2 application.properties
#Servlet端口号
server.port=8088


# REDIS (RedisProperties)
# Redis数据库索引(默认为0)
spring.redis.database=0
# Redis服务器地址
spring.redis.host=192.168.88.134
# Redis服务器连接端口
spring.redis.port=6379
# Redis服务器连接密码(默认为空)
spring.redis.password=123456
# 连接池最大连接数(使用负值表示没有限制)
spring.redis.pool.max-active=8
# 连接池最大阻塞等待时间(使用负值表示没有限制)
spring.redis.pool.max-wait=-1
# 连接池中的最大空闲连接
spring.redis.pool.max-idle=8
# 连接池中的最小空闲连接
spring.redis.pool.min-idle=0
# 连接超时时间(毫秒)
spring.redis.timeout=0
1.3 StringRedisTemplateTest.java
package com.guilf.servlet;

import org.junit.Test;
import org.junit.runner.RunWith;
import org.slf4j.Logger;
import org.slf4j.LoggerFactory;
import org.springframework.beans.factory.annotation.Autowired;
import org.springframework.boot.test.context.SpringBootTest;
import org.springframework.data.redis.core.StringRedisTemplate;
import org.springframework.test.context.junit4.SpringJUnit4ClassRunner;

/**
 * Created by hong on 2017/5/2.
 */
@RunWith(SpringJUnit4ClassRunner.class)
@SpringBootTest
public class StringRedisTemplateTest {

    private final Logger logger = LoggerFactory.getLogger(this.getClass());

    @Autowired
    private StringRedisTemplate stringRedisTemplate;

    @Test
    public  void test(){
        stringRedisTemplate.opsForValue().set("aaa","aaa111");
        logger.info(stringRedisTemplate.opsForValue().get("aaa"));
    }
}
1.4 运行测试

2,对增删改查 redis的操作
package com.hong.service.impl;

import com.hong.domain.City;
import com.hong.mapper.CityMapper;
import com.hong.service.CityService;
import org.slf4j.Logger;
import org.slf4j.LoggerFactory;
import org.springframework.beans.factory.annotation.Autowired;
import org.springframework.data.redis.core.RedisTemplate;
import org.springframework.data.redis.core.ValueOperations;
import org.springframework.stereotype.Service;

import java.util.concurrent.TimeUnit;

/**
 *
 */
@Service
public class CityServiceImpl implements CityService {

    private final Logger logger = LoggerFactory.getLogger(this.getClass());


    @Autowired
    private CityMapper cityMapper;

    @Autowired
    private RedisTemplate redisTemplate;

    private final String KEY_PREFIX = "city_";


    /**
     * 获取城市逻辑:
     * 如果缓存存在,从缓存中获取城市信息
     * 如果缓存不存在,从 DB 中获取城市信息,然后插入缓存
     */
    @Override
    public City findOneCity(Integer id) {
        ValueOperations<String, City> valueOperations = redisTemplate.opsForValue();

        //缓存存在
        String key = KEY_PREFIX + id;
        boolean hasKey = redisTemplate.hasKey(key);
        if (hasKey) {
            City city = valueOperations.get(key);
            logger.info("CityServiceImpl.findOneCity() : 从缓存中获取了城市 >> " + city.toString());
            return city;
        }

        //从mysql 数据库中获取数据
        City city = cityMapper.selectByPrimaryKey(id);

        //存入缓存中.
        valueOperations.set(key, city, 10, TimeUnit.SECONDS);
        logger.info("CityServiceImpl.findOneCity() : 城市加入了缓存 >> " + city.toString());
        return city;
    }

    @Override
    public int saveCity(City city) {
        return cityMapper.insert(city);
    }

    @Override
    public int modifyCity(City city) {
        //更新DB中的数据
        int count = cityMapper.updateByPrimaryKey(city);

        //如果缓存中存在,移除。
        String key = KEY_PREFIX + city.getId();
        boolean hasKey = redisTemplate.hasKey(key);
        if (hasKey) {
            redisTemplate.delete(key);
            logger.info("CityServiceImpl.modifyCity 从缓存中移除了城市" + city.toString());
        }
        return count;
    }

    @Override
    public int deleteCity(Integer id) {
        //删除DB中的数据
        int count = cityMapper.deleteByPrimaryKey(id);

        //如果缓存中存在,移除。
        String key = KEY_PREFIX + id;
        boolean hasKey = redisTemplate.hasKey(key);
        if (hasKey) {
            redisTemplate.delete(key);
            logger.info("CityServiceImpl.modifyCity 从缓存中移除了城市 ID:" + id);
        }
        return count;
    }


}
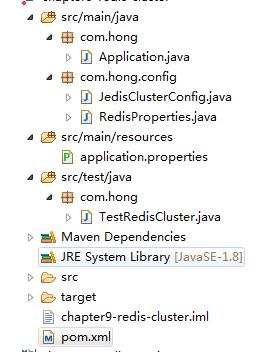
3.如果是集群

pom.xml
 <!-- redis 相关支持, 默认包含了Jedis依赖 -->
        <dependency>
            <groupId>org.springframework.boot</groupId>
            <artifactId>spring-boot-starter-redis</artifactId>
            <version>1.3.2.RELEASE</version>
        </dependency>
application.properties
#redis cluster
spring.redis.cluster.nodes=127.0.0.1:7000,127.0.0.1:7001,127.0.0.1:7002
spring.redis.cluster.commandTimeout=5000
RedisProperties.java
package com.guilf.config;

import org.springframework.boot.context.properties.ConfigurationProperties;
import org.springframework.stereotype.Component;

/**
 *
 */

@Component
@ConfigurationProperties(prefix = "spring.redis.cluster")
public class RedisProperties {


    private String nodes;

    private Integer   commandTimeout;

    public String getNodes() {
        return nodes;
    }

    public void setNodes(String nodes) {
        this.nodes = nodes;
    }

    public Integer getCommandTimeout() {
        return commandTimeout;
    }

    public void setCommandTimeout(Integer commandTimeout) {
        this.commandTimeout = commandTimeout;
    }
}
JedisClusterConfig.java
package com.guilf.config;

import org.springframework.beans.factory.annotation.Autowired;
import org.springframework.boot.autoconfigure.condition.ConditionalOnClass;
import org.springframework.boot.context.properties.EnableConfigurationProperties;
import org.springframework.context.annotation.Bean;
import org.springframework.context.annotation.Configuration;
import org.springframework.core.env.MapPropertySource;
import org.springframework.data.redis.connection.RedisClusterConfiguration;
import org.springframework.data.redis.connection.jedis.JedisConnectionFactory;
import org.springframework.data.redis.core.RedisTemplate;
import org.springframework.data.redis.serializer.StringRedisSerializer;
import redis.clients.jedis.HostAndPort;
import redis.clients.jedis.JedisCluster;

import java.util.HashMap;
import java.util.HashSet;
import java.util.Map;
import java.util.Set;

/**
 *
 */
@Configuration
@ConditionalOnClass({JedisCluster.class})
@EnableConfigurationProperties(RedisProperties.class)
public class JedisClusterConfig {

    @Autowired
    private RedisProperties redisProperties;

    @Bean
    public JedisCluster jedisClusterFactory() {
        String[] serverArray = redisProperties.getNodes().split(",");
        Set<HostAndPort> nodes = new HashSet<>();
        for (String ipPort: serverArray) {
            String[] ipPortPair = ipPort.split(":");
            nodes.add(new HostAndPort(ipPortPair[0].trim(),Integer.valueOf(ipPortPair[1].trim())));
        }
        return new JedisCluster(nodes, redisProperties.getCommandTimeout());
    }

    @Bean
    public RedisTemplate redisTemplateFactory(){
        RedisTemplate redisTemplate =new RedisTemplate();
        redisTemplate.setConnectionFactory(jedisConnectionFactory());

        //指定具体序列化方式  不过这种方式不是很好,一个系统中可能对应值的类型不一样,如果全部使用StringRedisSerializer 序列化
        //会照成其他类型报错,所以还是推荐使用第一种,直接指定泛型的类型,spring 会根据指定类型序列化。
        //redisTemplate.setKeySerializer( new StringRedisSerializer());
        //redisTemplate.setValueSerializer(new StringRedisSerializer());
        //redisTemplate.setHashKeySerializer(new StringRedisSerializer());
        //redisTemplate.setHashValueSerializer(new StringRedisSerializer());
        return redisTemplate;
    }


    /**
     * redisCluster配置
     * @return
     */
    @Bean
    public RedisClusterConfiguration redisClusterConfiguration() {
        Map<String, Object> source = new HashMap<String, Object>();
        source.put("spring.redis.cluster.nodes", redisProperties.getNodes());
        source.put("spring.redis.cluster.timeout", redisProperties.getCommandTimeout());
        return new RedisClusterConfiguration(new MapPropertySource("RedisClusterConfiguration", source));
    }


    /**
     * 其实在JedisConnectionFactory的afterPropertiesSet()方法 中
     * if(cluster !=null) this.cluster =createCluster();
     * 也就是当
     * spring.redis.cluster.nodes 配置好的情况下,就可以实例化 JedisCluster.
     * 也就是说,我们使用JedisCluster 的方式只需要在application.properties 配置文件中
     *
     * #redis cluster
     *  spring.redis.cluster.nodes=127.0.0.1:7000,127.0.0.1:7001,127.0.0.1:7002
     *
     * RedisTemplate.afterPropertiesSet() 中查看到最终方法中使用了JedisCluster 对象。
     * 也就是说 redisTemplate依赖jedis ,内部操作的就是jedis,同理内部也操作jedisCluster.
     *
     *
     * @return
     */
    @Bean
    public JedisConnectionFactory jedisConnectionFactory() {
        return new JedisConnectionFactory(redisClusterConfiguration());
    }
}
TestRedisCluster.java
package com.guilf;

import org.junit.Assert;
import org.junit.Test;
import org.junit.runner.RunWith;
import org.slf4j.Logger;
import org.slf4j.LoggerFactory;
import org.springframework.beans.factory.annotation.Autowired;
import org.springframework.boot.test.context.SpringBootTest;
import org.springframework.data.redis.core.RedisTemplate;
import org.springframework.test.context.junit4.SpringJUnit4ClassRunner;
import org.springframework.test.context.web.WebAppConfiguration;
import redis.clients.jedis.JedisCluster;

/**
 *
 */
@RunWith(SpringJUnit4ClassRunner.class)
@SpringBootTest(classes ={Application.class})
@WebAppConfiguration
public class TestRedisCluster {

    private final Logger logger = LoggerFactory.getLogger(this.getClass());


    @Autowired
    private JedisCluster jedisCluster;


    /**
     * 注: 我们在使用RedisTemplate 时,在不指定<K, V> 具体值时,
     * spring默认采用defaultSerializer = new JdkSerializationRedisSerializer();来对key,value进行序列化操作,
     * 所以这时候redis 的可以 就会出来一堆的\\xac\\xed\\x00\\x05t\\x00\\tb 这种东西;
     *
     * 所以我们可以选择两种处理方法:
     * 1.直接使用RedisTemplate<String,String>  指定。
     * 2.
     *
     */
    @Autowired
    private RedisTemplate<String,String> redisTemplate;


    @Test
    public void test(){
        jedisCluster.set("test_jedis_cluster","123456");
        Assert.assertEquals("123456",jedisCluster.get("test_jedis_cluster"));
        String value = jedisCluster.get("test_jedis_cluster");
        logger.info(value);

        redisTemplate.opsForValue().set("kkk","kkk");
        redisTemplate.opsForValue().set("k2","v2");

        logger.info(redisTemplate.opsForValue().get("kkk"));
        logger.info(redisTemplate.opsForValue().get("test_jedis_cluster"));

    }
}
4.与session一起用

pom.xml
  <!-- redis 相关支持 -->
        <dependency>
            <groupId>org.springframework.boot</groupId>
            <artifactId>spring-boot-starter-redis</artifactId>
            <version>1.3.2.RELEASE</version>
        </dependency>
         <!-- Spring Redis Session相关依赖  -->
        <dependency>
            <groupId>org.springframework.session</groupId>
            <artifactId>spring-session-data-redis</artifactId>
        </dependency>
application.properties
#Servlet端口号
server.port=8088


# REDIS (RedisProperties)
# Redis数据库索引(默认为0)
spring.redis.database=0
# Redis服务器地址
#spring.redis.host-name=192.168.88.134
spring.redis.host=192.168.88.134
# Redis服务器连接端口
spring.redis.port=6379
# Redis服务器连接密码(默认为空)
spring.redis.password=123456
# 连接池最大连接数(使用负值表示没有限制)
spring.redis.pool.max-active=8
# 连接池最大阻塞等待时间(使用负值表示没有限制)
spring.redis.pool.max-wait=-1
# 连接池中的最大空闲连接
spring.redis.pool.max-idle=8
# 连接池中的最小空闲连接
spring.redis.pool.min-idle=0
# 连接超时时间(毫秒)
spring.redis.timeout=0


#若想知道SpringBoot为我们做了哪些自动配置,可以在application.properties里添加参?数
#运行Spring Boot 项目时,就会看到Positive matches 列表;
# 包括本例使用redis session 相关配置.
#debug=true
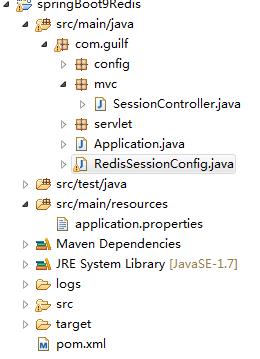
RedisSessionConfig.java
package com.guilf;

import org.springframework.context.annotation.Bean;
import org.springframework.context.annotation.Configuration;
import org.springframework.data.redis.connection.jedis.JedisConnectionFactory;
import org.springframework.session.data.redis.config.ConfigureRedisAction;
import org.springframework.session.data.redis.config.annotation.web.http.EnableRedisHttpSession;

/**
 *
 */
//@Configuration
/**
 *  通过加上@EnableRedisHttpSession注解,开启redis集中式session管理,所有的session都存放到了redis中
 *  maxInactiveIntervalInSeconds 配置session 失效时间
 * **/
//@EnableRedisHttpSession(maxInactiveIntervalInSeconds = 86400 * 30)
@Configuration
@EnableRedisHttpSession(maxInactiveIntervalInSeconds = 86400 * 30)
public class RedisSessionConfig {

    /**
     * 配置实用Jedis 连接池的方式 连接Redis服务(默认就是使用的這种方式,所以可以不配)
     * @return
     */
//    @Bean
//    public JedisConnectionFactory connectionFactory(){
//        return  new JedisConnectionFactory();
//    }
}
SessionController.java
package com.guilf.mvc;

import org.springframework.web.bind.annotation.RequestMapping;
import org.springframework.web.bind.annotation.RestController;

import javax.servlet.http.HttpSession;
import java.util.UUID;

/**
 *
 */
@RestController
public class SessionController {

    @RequestMapping("/helloSession")
    public String helloSession(HttpSession session) {
        UUID uuid = (UUID) session.getAttribute("uuid");
        if (uuid == null) {
            uuid =UUID.randomUUID();
        }
        session.setAttribute("uuid",uuid);
        return session.getId();
    }
}
启动

以上是关于spring boot redis(连接,增删改查,集群,和session一起使用)的主要内容,如果未能解决你的问题,请参考以下文章