SpringBoot------JPA连接数据库
Posted 玉天恒
tags:
篇首语:本文由小常识网(cha138.com)小编为大家整理,主要介绍了SpringBoot------JPA连接数据库相关的知识,希望对你有一定的参考价值。
步骤:
1.在pom.xml文件下添加相应依赖包
<project xmlns="http://maven.apache.org/POM/4.0.0" xmlns:xsi="http://www.w3.org/2001/XMLSchema-instance"
  xsi:schemaLocation="http://maven.apache.org/POM/4.0.0 http://maven.apache.org/maven-v4_0_0.xsd">
  <modelVersion>4.0.0</modelVersion>
  <groupId>cn.itsource</groupId>
  <artifactId>springboot-shop</artifactId>
  <packaging>war</packaging>
  <version>0.0.1-SNAPSHOT</version>
  <name>springboot-shop Maven Webapp</name>
  <url>http://maven.apache.org</url>

  <!-- 如果添加了Parent,则dependency中可以不加入version,会自动匹配parent的版本 -->
  <parent>
      <groupId>org.springframework.boot</groupId>
      <artifactId>spring-boot-starter-parent</artifactId>
      <version>1.5.9.RELEASE</version>
  </parent>

  <properties>
      <java.version>1.8</java.version>
      <project.build.sourceEncoding>UTF-8</project.build.sourceEncoding>
    <maven.compiler.encoding>UTF-8</maven.compiler.encoding>
  </properties>

  <dependencies>
    <dependency>
          <groupId>org.springframework.boot</groupId>
          <artifactId>spring-boot-starter-web</artifactId>
      </dependency>
      <dependency>
          <groupId>javax.servlet</groupId>
          <artifactId>javax.servlet-api</artifactId>
          <scope>provided</scope>
      </dependency>
      <dependency>
          <groupId>javax.servlet</groupId>
          <artifactId>jstl</artifactId>
      </dependency>

      <dependency>
          <groupId>org.springframework.boot</groupId>
          <artifactId>spring-boot-starter-tomcat</artifactId>
          <scope>provided</scope>
      </dependency>
      <dependency>
          <groupId>org.apache.tomcat.embed</groupId>
        <artifactId>tomcat-embed-jasper</artifactId>
      </dependency>

      <dependency>
          <groupId>com.alibaba</groupId>
          <artifactId>fastjson</artifactId>
          <version>1.2.15</version>
      </dependency>

      <!-- 添加mysql依赖 -->
      <dependency>
          <groupId>mysql</groupId>
          <artifactId>mysql-connector-java</artifactId>
      </dependency>

      <!-- 添加spring-data-jpa依赖 -->
      <dependency>
          <groupId>org.springframework.boot</groupId>
          <artifactId>spring-boot-starter-data-jpa</artifactId>
      </dependency>

      <!-- 引入spring-data-jpa依赖,则不需要引入jdbc
      <dependency>
          <groupId>org.springframework.boot</groupId>
          <artifactId>spring-boot-starter-jdbc</artifactId>
      </dependency>
      -->

      <!-- 使用thymeleaf -->
      <dependency>
          <groupId>org.springframework.boot</groupId>
          <artifactId>spring-boot-starter-thymeleaf</artifactId>
      </dependency>

      <!-- 使用devtool热部署插件(推荐) -->
      <dependency>
          <groupId>org.springframework.boot</groupId>
          <artifactId>spring-boot-devtools</artifactId>
          <optional>true</optional>
          <scope>true</scope>
      </dependency>
  </dependencies>

  <build>
    <finalName>myshop</finalName>
    <!-- 热部署插件 -->
    <plugins>
        <plugin>
            <groupId>org.springframework.boot</groupId>
            <artifactId>spring-boot-maven-plugin</artifactId>
            <configuration>
                <!-- 这里得设置为true -->
                <fork>true</fork>
            </configuration>
        </plugin>
    </plugins>
  </build>
</project>
2.在src/main/resources/application.properties文件下添加配置信息
server.port=8080

spring.datasource.url=jdbc:mysql://localhost:3306/shop?useUnicode=true&characterEncoding=utf-8&useSSL=false
spring.datasource.username=root
spring.datasource.password=123456
spring.datasource.driver-class-name=com.mysql.jdbc.Driver
spring.datasource.tomcat.max-active=20
spring.datasource.tomcat.max-idle=8
spring.datasource.tomcat.min-idle=8
spring.datasource.tomcat.initial-size=10


spring.jpa.database=MYSQL
spring.jpa.show-sql=true
spring.jpa.hibernate.ddl-auto=update
spring.jpa.hibernate.naming.strategy=org.hibernate.cfg.ImprovedNamingStrategy
spring.jpa.properties.hibernate.dialect=org.hibernate.dialect.MySQL5Dialect
3.创建一个实体类,例如:UserInfo
package myshop.bean;

import javax.persistence.Entity;
import javax.persistence.GeneratedValue;
import javax.persistence.GenerationType;
import javax.persistence.Id;

import org.hibernate.annotations.GenericGenerator;

/**
 * 使用@Entity进行实体类的持久化操作,当JPA检测到实体类中有@Entity注解时,
 * 会在数据库中生成相应的表结构
 */
@Entity
public class UserInfo {
    @Id
    @GeneratedValue(strategy=GenerationType.AUTO)
    private int id;
    private String username;
    private String password;

    public int getId() {
        return id;
    }
    public void setId(int id) {
        this.id = id;
    }
    public String getUsername() {
        return username;
    }
    public void setUsername(String username) {
        this.username = username;
    }
    public String getPassword() {
        return password;
    }
    public void setPassword(String password) {
        this.password = password;
    }
}
4.创建接口继承CrudRepository
package myshop.repository;

import org.springframework.data.repository.CrudRepository;

import myshop.bean.UserInfo;

public interface UserInfoRepository extends CrudRepository<UserInfo, Integer> {

}
6.创建一个Controller
package myshop.controller;

import javax.annotation.Resource;

import org.springframework.web.bind.annotation.RequestMapping;
import org.springframework.web.bind.annotation.RestController;

import myshop.bean.UserInfo;
import myshop.service.UserInfoService;

@RestController
@RequestMapping("/userinfo")
public class UserInfoController {
    @Resource
    private UserInfoService userInfoService;

    @RequestMapping("/save")
    private String save()
    {
        UserInfo user = new UserInfo();
        user.setUsername("陈超");
        user.setPassword("2277092");
        userInfoService.save(user);
        return "save ok!";
    }

    @RequestMapping("/update")
    private String update()
    {
        userInfoService.update(2);
        return "update ok!";
    }

    @RequestMapping("/delete")
    private String delete()
    {
        userInfoService.delete(1);
        return "delete ok!";
    }

    @RequestMapping("/getall")
    private Iterable<UserInfo> getAll()
    {
        return userInfoService.getAll();
    }
}
7.创建一个Service
package myshop.service;

import javax.annotation.Resource;
import javax.transaction.Transactional;

import org.springframework.stereotype.Service;

import myshop.bean.UserInfo;
import myshop.repository.UserInfoRepository;

@Service
public class UserInfoService {
    @Resource
    private UserInfoRepository userInfoRepository;

    /*
     * save, update, delete方法需要绑定事物
     */
    @Transactional
    public void save(UserInfo user)
    {
        userInfoRepository.save(user);
    }

    @Transactional
    public void update(int id)
    {
        UserInfo user = userInfoRepository.findOne(id);
        user.setUsername("玉天恒");
        userInfoRepository.save(user);
    }

    @Transactional
    public void delete(int id)
    {
        userInfoRepository.delete(id);
    }

    public Iterable<UserInfo> getAll()
    {
        return userInfoRepository.findAll();
    }
}
8.创建启动类
package myshop;

import org.springframework.boot.SpringApplication;
import org.springframework.boot.autoconfigure.SpringBootApplication;
import org.springframework.boot.autoconfigure.web.HttpMessageConverters;
import org.springframework.context.annotation.Bean;
import org.springframework.http.converter.HttpMessageConverter;

import com.alibaba.fastjson.serializer.SerializerFeature;
import com.alibaba.fastjson.support.config.FastJsonConfig;
import com.alibaba.fastjson.support.spring.FastJsonHttpMessageConverter;

@SpringBootApplication
public class App {

    @Bean
    public HttpMessageConverters fastJsonHttpMessageConverter()
    {
        FastJsonHttpMessageConverter fastConverter = new FastJsonHttpMessageConverter();
        FastJsonConfig fastConfig = new FastJsonConfig();
        fastConfig.setSerializerFeatures(SerializerFeature.PrettyFormat);
        fastConverter.setFastJsonConfig(fastConfig);

        HttpMessageConverter<?> converts = fastConverter;
        return new HttpMessageConverters(converts);
    }

    public static void main(String[] args) {
        // TODO Auto-generated method stub
        SpringApplication.run(App.class, args);
    }

}
9.代码测试
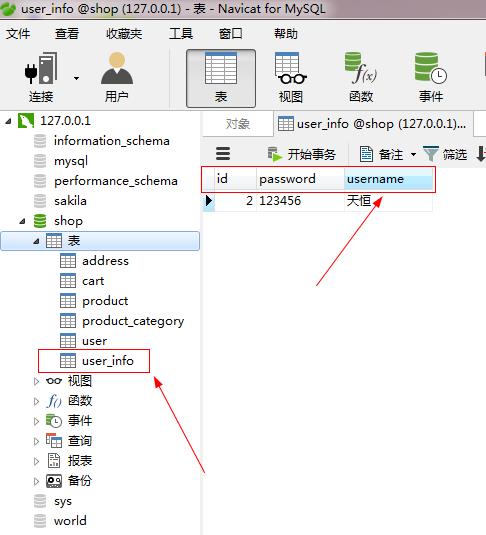
运行结果:
数据库shop会自动生成一张UserInfo的表

在地址栏输入以下地址进行测试
http://localhost:8080/userinfo/getall
http://localhost:8080/userinfo/save
http://localhost:8080/userinfo/update
http://localhost:8080/userinfo/delete
以上是关于SpringBoot------JPA连接数据库的主要内容,如果未能解决你的问题,请参考以下文章