SpringBoot的web部署, SpringBoot开发非Web程序
Posted 木心
tags:
篇首语:本文由小常识网(cha138.com)小编为大家整理,主要介绍了SpringBoot的web部署, SpringBoot开发非Web程序相关的知识,希望对你有一定的参考价值。
1、SpringBoot的web项目部署为war
2、SpringBoot的web项目部署为jar
3、SpringBoot开发非Web程序
3.1、方式一:利用 main()方法
3.2、方式二:通过springboot启动加载类 CommandLineRunner#run()
1、SpringBoot的web项目部署为war <--返回目录
项目结构
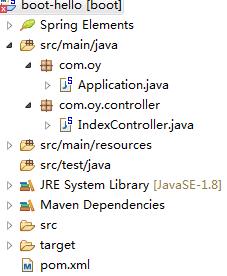
继承 SpringBootServletInitializer,重写configure()方法

@SpringBootApplication
public class Application extends SpringBootServletInitializer {

    public static void main(String[] args) {
        SpringApplication.run(Application.class, args);
    }

    @Override
    protected SpringApplicationBuilder configure(SpringApplicationBuilder builder) {
        return builder.sources(Application.class);
    }

}
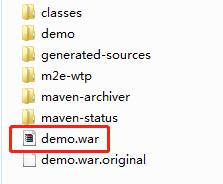
将pom.xml的项目打包方式改为 war, <packaging>war</packaging>;在 pom.xml 添加springboot打包插件;<finalName>demo</finalName> 配置了最终打包为demo.war。具体pom.xml为:
<?xml version="1.0" encoding="UTF-8"?>
<project xmlns="http://maven.apache.org/POM/4.0.0"
    xmlns:xsi="http://www.w3.org/2001/XMLSchema-instance"
    xsi:schemaLocation="http://maven.apache.org/POM/4.0.0 https://maven.apache.org/xsd/maven-4.0.0.xsd">
    <modelVersion>4.0.0</modelVersion>
    <parent>
        <groupId>org.springframework.boot</groupId>
        <artifactId>spring-boot-starter-parent</artifactId>
        <version>2.1.1.RELEASE</version>
    </parent>

    <groupId>com.oy</groupId>
    <artifactId>boot-hello</artifactId>
    <version>0.0.1-SNAPSHOT</version>
    <packaging>war</packaging>
    <name>boot-hello</name>
    <description>project for Spring Boot</description>

    <properties>
        <java.version>1.8</java.version>
    </properties>

    <dependencies>
        <dependency>
            <groupId>org.springframework.boot</groupId>
            <artifactId>spring-boot-starter-web</artifactId>
        </dependency>
    <dependency>
      <groupId>org.springframework.boot</groupId>
      <artifactId>spring-boot-starter-tomcat</artifactId>
      <scope>provided</scope>
    </dependency>
    </dependencies>

    <build>
        <finalName>demo</finalName>
        <plugins>
            <plugin>
                <groupId>org.springframework.boot</groupId>
                <artifactId>spring-boot-maven-plugin</artifactId>
            </plugin>
        </plugins>
    </build>

</project>
选中项目 -> 右键 -> Run as... -> Maven build... ->输入命令 clean package -DskipTests
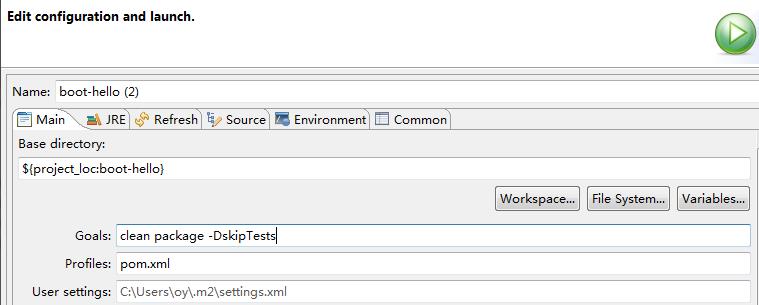
选中项目 -> 右键 -> Properties

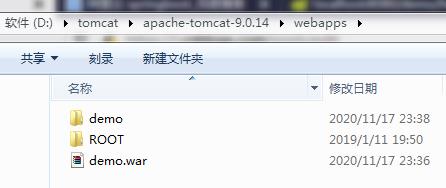
将demo.war放到tomcat,启动tomcat
访问 http://localhost:8080/demo/hello。
2、SpringBoot的web项目部署为jar <--返回目录
另外可以参考:netty-socketio(一)之helloworld,与springboot整合(linux注册服务启动jar服务)
将pom.xml的项目打包方式改为 jar, <packaging>jar</packaging>;在 pom.xml 添加springboot打包插件;<finalName>demo</finalName> 配置了最终打包为demo.jar。
选中项目 -> 右键 -> Run as... -> Maven build... ->输入命令 clean package -DskipTests
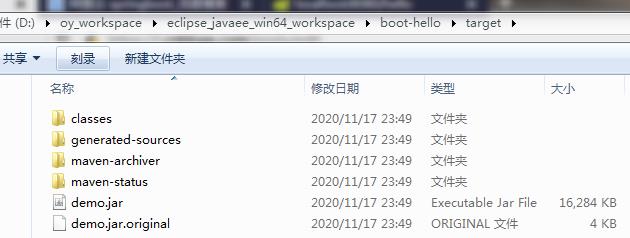
进入到 target 目录, shift + 右键 ->在此处打开命令行窗口 或 Git Bash Here
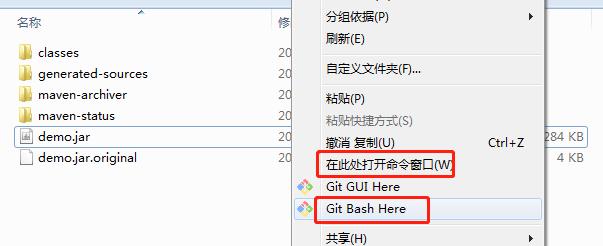
在打开的命令行窗口输入 java -jar demo.jar。
访问http://localhost:8080/hello。
3、SpringBoot开发非Web程序 <--返回目录
3.1、方式一:利用 main()方法 <--返回目录
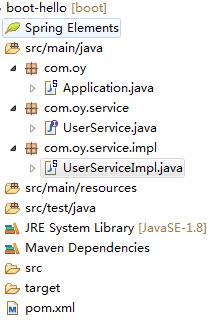
pom.xml
<?xml version="1.0" encoding="UTF-8"?>
<project xmlns="http://maven.apache.org/POM/4.0.0"
    xmlns:xsi="http://www.w3.org/2001/XMLSchema-instance"
    xsi:schemaLocation="http://maven.apache.org/POM/4.0.0 https://maven.apache.org/xsd/maven-4.0.0.xsd">
    <modelVersion>4.0.0</modelVersion>
    <parent>
        <groupId>org.springframework.boot</groupId>
        <artifactId>spring-boot-starter-parent</artifactId>
        <version>2.1.1.RELEASE</version>
    </parent>

    <groupId>com.oy</groupId>
    <artifactId>boot-hello</artifactId>
    <version>0.0.1-SNAPSHOT</version>
    <packaging>jar</packaging>
    <name>boot-hello</name>
    <description>project for Spring Boot</description>

    <properties>
        <java.version>1.8</java.version>
    </properties>

    <dependencies>
        <dependency>
            <groupId>org.springframework.boot</groupId>
            <artifactId>spring-boot-starter</artifactId>
        </dependency>
    </dependencies>

    <build>
        <finalName>demo</finalName>
        <plugins>
            <plugin>
                <groupId>org.springframework.boot</groupId>
                <artifactId>spring-boot-maven-plugin</artifactId>
            </plugin>
        </plugins>
    </build>

</project>
UserServiceImpl
@Service
public class UserServiceImpl implements UserService {

    @Override
    public void getUser(Integer id) {
        System.out.println("id = " + id);
    }

}
Application
@SpringBootApplication
public class Application {

    public static void main(String[] args) {
        ConfigurableApplicationContext context = SpringApplication.run(Application.class, args);
        UserService userService = (UserService)context.getBean(UserService.class);
        userService.getUser(1);
    }

}
运行:Application#main()方法,选中main, 右键 -> run as -> java application。当然也可以打成jar包,通过java -jar demo.jar运行。
3.2、方式二:通过springboot启动加载类 CommandLineRunner#run() <--返回目录
依赖
<dependency>
    <groupId>org.springframework.boot</groupId>
    <artifactId>spring-boot-starter</artifactId>
</dependency>
Application
@SpringBootApplication
public class Application implements CommandLineRunner {

    @Autowired
    private UserService userService;

    public static void main(String[] args) {
         SpringApplication.run(Application.class, args);
    }

    @Override
    public void run(String... args) throws Exception {
        userService.getUser(2);
    }

}
运行:Application#main()方法,选中main, 右键 -> run as -> java application。当然也可以打成jar包,通过java -jar demo.jar运行。
以上是关于SpringBoot的web部署, SpringBoot开发非Web程序的主要内容,如果未能解决你的问题,请参考以下文章
