Bean的配置
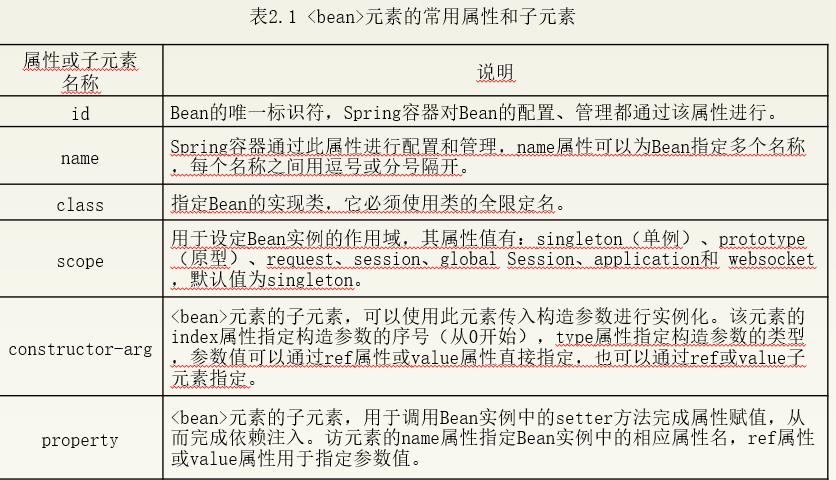
Spring如同一个工厂,用于生产和管理Spring容器中的Bean。使用这个工厂,需要开发者对Spring的配置文件进行配置。在实际开发中,最常采用XML格式的配置方式,即通过XML文件来注册并管理Bean之间的依赖关系。
Bean的作用域
- singleton
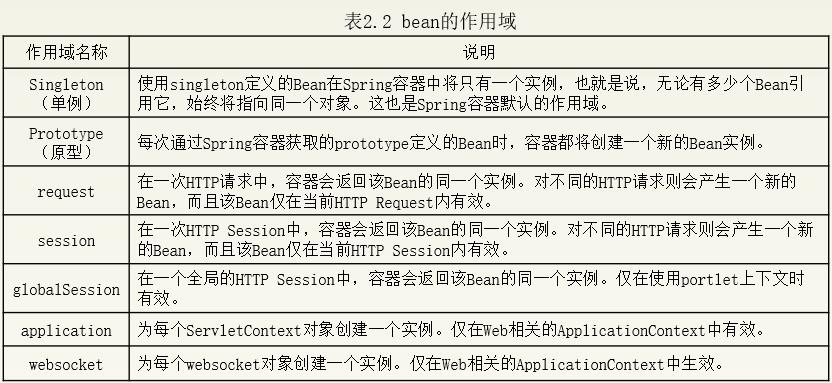
singleton是Spring容器默认的作用域,当Bean的作用域为singleton时,Spring容器就只会存在一个共享的Bean实例,并且所有对Bean的请求,只要id与该Bean的id属性相匹配,就会返回同一个Bean的实例。singleton作用域对于无会话状态的Bean(如Dao组件、Service组件)来说,是最理想的选择。
<!-- scope作用域 单例(singleton)-->
		<bean id="scope" class="com.ssm.scope.Scope" scope="singleton"/>
- prototype
对需要保持会话状态的Bean应用使用prototype作用域。在使用prototype作用域时,Spring容器会为每个对该Bean的请求都创建一个新的实例。
<!-- scope作用域 原型(prototype)-->
		<bean id="scope1" class="com.ssm.scope.Scope" scope="prototype"/>
- 测试
package com.ssm.scope;

import org.springframework.context.ApplicationContext;
import org.springframework.context.support.ClassPathXmlApplicationContext;

public class ScopeTest {
	public static void main(String[] args) {
		ApplicationContext applicationContext = new
				ClassPathXmlApplicationContext("applicationContext.xml");

		// 如果是单例模式,则创建同一个实例
		System.out.println("singleton创建的对象:");
		System.out.println(applicationContext.getBean("scope"));
		System.out.println(applicationContext.getBean("scope"));
		// 如果是原型模式,则创建不同实例
		System.out.println("prototype创建的对象:");
		System.out.println(applicationContext.getBean("scope1"));
		System.out.println(applicationContext.getBean("scope1"));
	}
}
Bean的三种装配方式
1.xml装配
Spring提供了两种基于XML的装配方式:设值注入(Setter Injection)和构造注入(Constructor Injection)。下面就读讲解如何在XML配置文件中使用这两种注入方式来实现基于XML的装配。
在Spring实例化Bean的过程中,Spring首先会调用Bean的默认构造方法来实例化Bean对象,然后通过反射的方式调用setter方法来注入属性值。因此,设值注入要求一个Bean必须满足以下两点要求。
- Bean类必须提供一个默认的无参构造方法。
- Bean类必须为需要注入的属性提供对应的setter方法。
使用设值注入时,在Spring配置文件中,需要使用
package com.ssm.assemble;

import java.util.List;

public class User {
	private String username;
	private String password;
	private List<String> list;

	/**
	 * 构造注入,需要提供带所有参数的构造方法
	 */
	public User(String username, String password, List<String> list) {
		super();
		this.username = username;
		this.password = password;
		this.list = list;
	}

	@Override
	public String toString() {
		return "User [username=" + username + ", password=" + password + ", list=" + list + "]";
	}

	/**
	 * 设值注入,提供空构造方法,为所有属性提供setter()方法
	 */
	public User() {
		super();
	}

	public void setUsername(String username) {
		this.username = username;
	}

	public void setPassword(String password) {
		this.password = password;
	}

	public void setList(List<String> list) {
		this.list = list;
	}

}
<!-- 构造注入 -->
		<bean id="user1" class="com.ssm.assemble.User">
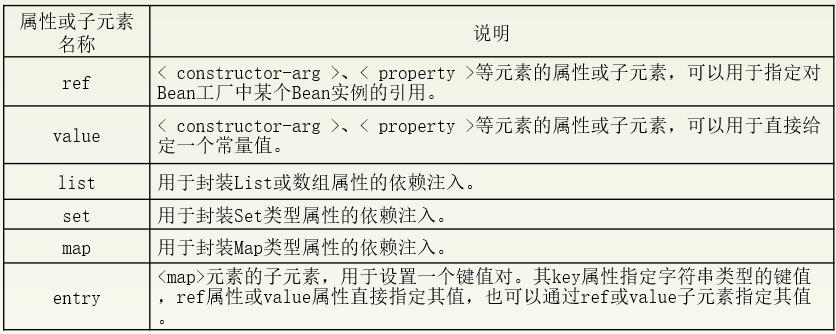
			<constructor-arg index="0" value="user1"></constructor-arg>
			<constructor-arg index="1" value="password1"></constructor-arg>
			<constructor-arg index="2">
				<list>
					<value>list1</value>
					<value>list2</value>
				</list>
			</constructor-arg>
		</bean>

		<!-- 设值注入 -->
		<bean id="user2" class="com.ssm.assemble.User">
			<property name="username" value="user2"></property>
			<property name="password" value="password2"></property>
			<property name="list">
				<list>
					<value>list1</value>
					<value>list2</value>
				</list>
			</property>
		</bean>
package com.ssm.assemble;

import org.springframework.context.ApplicationContext;
import org.springframework.context.support.ClassPathXmlApplicationContext;

public class XmlAssembleTest {
	public static void main(String[] args) {
		ApplicationContext applicationContext = new
				ClassPathXmlApplicationContext("applicationContext.xml");

		System.out.println(applicationContext.getBean("user1"));
		System.out.println(applicationContext.getBean("user2"));
	}
}
2.注解装配
package com.ssm.annotation;

import org.springframework.stereotype.Repository;

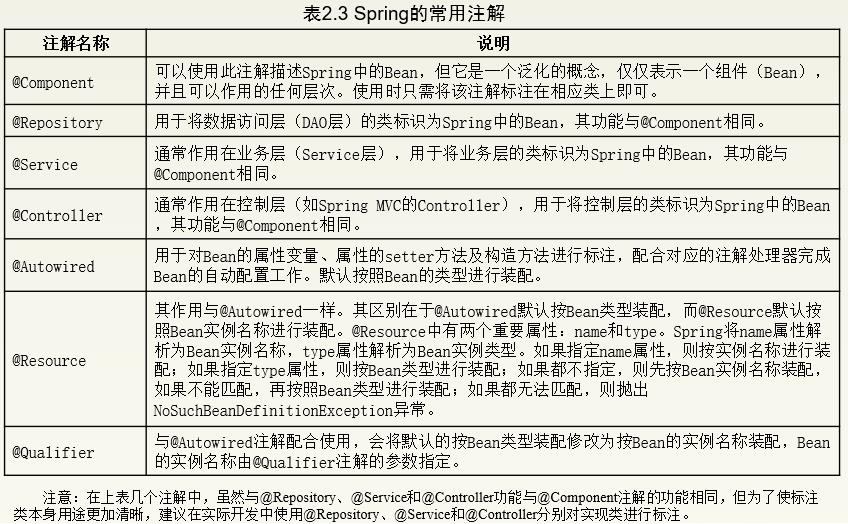
@Repository("userDao")
public class UserDaoImpl implements UserDao {
	@Override
	public void save() {
		System.out.println("userDao.save()");

	}

}
package com.ssm.annotation;

import javax.annotation.Resource;

import org.springframework.stereotype.Service;

@Service("userService")
public class UserServiceImpl implements UserService {

	@Resource(name="userDao")
	private UserDao userDao;

//	public void setUserDao(UserDao userDao) {
//		this.userDao = userDao;
//	}

	@Override
	public void save() {
		this.userDao.save();
		System.out.println("userService.save()");
	}

}
package com.ssm.annotation;

import javax.annotation.Resource;

import org.springframework.stereotype.Controller;

@Controller("UserController")
public class UserController {
	@Resource(name="userService")
	private UserService userService;


//	public void setUserService(UserService userService) {
//		this.userService = userService;
//	}


	public void save(){
		userService.save();
		System.out.println("UserController.save()");
	}
}
<?xml version="1.0" encoding="UTF-8"?>
<beans xmlns="http://www.springframework.org/schema/beans"
   xmlns:xsi="http://www.w3.org/2001/XMLSchema-instance"
   xmlns:context="http://www.springframework.org/schema/context"
   xsi:schemaLocation="http://www.springframework.org/schema/beans
   http://www.springframework.org/schema/beans/spring-beans-4.3.xsd
   http://www.springframework.org/schema/context
   http://www.springframework.org/schema/context/spring-context-4.3.xsd">

   <!-- 使用context命名空间,在配置文件中开启相应的注解处理器 -->
   <context:annotation-config />
   <!-- 分别定义3个Bean实例 -->
   <bean id="userDao" class="com.ssm.annotation.UserDaoImpl" />
   <bean id="userService" class="com.ssm.annotation.UserServiceImpl" />
   <bean id="UserController" class="com.ssm.annotation.UserController" />


   <!-- 也可以通过以下代码,实现扫描指定的包下的所有bean,从而替换掉上面的三行代码,还需引入spring aop 的jar包
   <context: component-scan base-package="com.ssm.annotation"/>
    -->


</beans>
package com.ssm.annotation;

import org.springframework.context.ApplicationContext;
import org.springframework.context.support.ClassPathXmlApplicationContext;

public class AnnotationAssembleTest {
	private static ApplicationContext applicationContext;
	public static void main(String[] args) {
		applicationContext = new ClassPathXmlApplicationContext("com/ssm/annotation/annotation.xml");

		UserController userController = (UserController)applicationContext.getBean("UserController");
		userController.save();
	}
}
3.自动装配
虽然使用注解的方式装配Bean,在一定程度上减少了配置文件中的代码量,但是也有企业项目中是没有使用注解方式开发的,那么有没有什么办法既可以减少代码量,又能够实现Bean的装配呢?答案是肯定的, Spring的
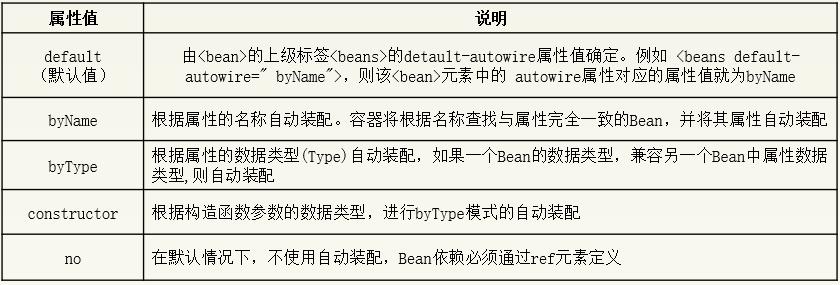
<!-- 自动装配 -->
    <bean id="userDao" class="com.ssm.annotation.UserDaoImpl" />
    <bean id="userService" class="com.ssm.annotation.UserServiceImpl" autowire="byName"/>
    <bean id="UserController" class="com.ssm.annotation.UserController" autowire="byName"/>