如何安装zabbix-java-gateway-2.2.2-1.el6.x86
Posted
tags:
篇首语:本文由小常识网(cha138.com)小编为大家整理,主要介绍了如何安装zabbix-java-gateway-2.2.2-1.el6.x86相关的知识,希望对你有一定的参考价值。
参考技术A 一,zabbix server安装1.rpm -ivh
2. yum localinstall zabbix-server-2.2.6-2.el6.zbx.x86_64.rpm
yum localinstall zabbix-web-nginx-2.2.6-2.el6.zbx.noarch.rpm
yum localinstall zabbix-java-gateway-2.2.6-2.el6.zbx.x86_64.rpm
yum localinstall php-5.4.36-1.el6.x86_64.rpm
yum -y install mysql-server
#vi /etc/my.cnf
[mysqld]
datadir=/var/lib/mysql
socket=/var/lib/mysql/mysql.sock
user=mysql
# Disabling symbolic-links is recommended to prevent assorted security risks
symbolic-links=0
[mysqld_safe]
log-error=/var/log/mysqld.log
pid-file=/var/run/mysqld/mysqld.pid
character-set-server=utf8
innodb_file_per_table=1
#yum localinstall zabbix-mysql-2.2.6-2.el6.zbx.x86_64.rpm
root@localhost 0721]# mysqladmin -uroot password admin
[root@localhost 0721]# mysql -uroot -padmin
Welcome to the MySQL monitor. Commands end with ; or \g.
Your MySQL connection id is 4
Server version: 5.1.73 Source distribution
Copyright (c) 2000, 2013, Oracle and/or its affiliates. All rights reserved.
Oracle is a registered trademark of Oracle Corporation and/or its
affiliates. Other names may be trademarks of their respective
owners.
Type 'help;' or '\h' for help. Type '\c' to clear the current input statement.
mysql> create database zabbix character set utf8;
Query OK, 1 row affected (0.00 sec)
mysql> grant all privileges on zabbix.* to zabbix@localhost identified by 'zabbix';
Query OK, 0 rows affected (0.00 sec)
mysql> flush privileges;
Query OK, 0 rows affected (0.00 sec)
source /usr/share/zabbix-database/mysql/schema.sql;
source /usr/share/zabbix-database/mysql/images.sql;
source /usr/share/zabbix-database/mysql/data.sql;
#egrep -v "(^#|^$)" /etc/zabbix/zabbix_server.conf
LogFile=/var/log/zabbix/zabbix_server.log
LogFileSize=0
PidFile=/var/run/zabbix/zabbix_server.pid
DBHost=localhost
DBName=zabbix
DBUser=zabbix
DBPassword=zabbix
DBSocket=/var/lib/mysql/mysql.sock
StartPollers=5
SNMPTrapperFile=/var/log/snmptt/snmptt.log
AlertScriptsPath=/etc/zabbix/alertscripts
ExternalScripts=/etc/zabbix/externalscripts
#/etc/init.d/zabbix-server start
#/etc/init.d/nginx restart
#vi zabbix-server.conf
server
listen 80;
server_name 10.0.251.84;
#xg-infra-0-zabbix.elenet.me xg-infra-0.elenet.me;
charset utf-8;
access_log /var/log/nginx/zabbix.access.log main;
error_log /var/log/nginx/zabbix.error.log;
root /usr/share/zabbix;
location ~ (/.svn/|etc/passwd|etc/shadow|etc/group|etc/gshadow|etc/sudoers|nginx/nginx.conf|etc/my.cnf|sshd_config|
ifconfig|bin/rm|bin/mkdir|bin/rmdir|bin/touch|usr/bin/vim|rsync.conf|redis.conf)
deny all;
location ~ .*\.(php|php5)?$
#fastcgi_pass 127.0.0.1:9000;
fastcgi_pass unix:/var/run/php/php-fpm.sock;
fastcgi_read_timeout 150;
fastcgi_index index.php;
fastcgi_param SCRIPT_FILENAME $document_root$fastcgi_script_name;
include fastcgi_params;
location /
index index.php;
#if (!-f $request_filename)
# rewrite ^(.*)$ http://$http_host/index.html last;
# break;
#
error_page 500 502 503 504 /50x.html;
location = /50x.html
root /usr/share/nginx/html;
# location ~ .*\.(php|php5)?$
#
# #fastcgi_pass 127.0.0.1:9000;
# fastcgi_pass unix:/var/run/php-fpm.sock;
# fastcgi_read_timeout 150;
# fastcgi_index index.php;
# fastcgi_param SCRIPT_FILENAME $document_root$fastcgi_script_name;
# include fastcgi_params;
#
#location ~ /zabbix
# index index.php;
# root /usr/share/zabbix;
#
location /nginxstatus
stub_status on;
access_log off;
allow 127.0.0.1;
deny all;
location ~ .*\.(gif|jpg|jpeg|png|bmp|swf)$
expires 10d;
location ~ .*\.(js|css|txt|xml|html|htm)?$
expires 12h;
#chown -R nginx.nginx /var/run/php
#http://ip
zabbix使用zabbix-java-gateway监控jvm/tomcat性能
JAVA-GATEWAY
Zabbix本身不支持直接监控Java,在zabbix 1.8以前,只能使用Zapcat来做代理监控,而且要修改源代码,非常麻烦。所有后来为了解决这个监控问题,Zabbix和Java双方应运生成了各自的代理监控程序:zabbix 2.0以后添加了服务进程zabbix-java-gateway;Java有了JMX,全称是Java Management Extensions,即Java管理扩展。
双方的工作原理
比如:当Zabbix-Server需要知道java应用程序的某项性能的时候,会启动自身的一个Zabbix-JavaPollers进程去连接Zabbix-JavaGateway请求数据,而ZabbixJavagateway收到请求后使用“JMXmanagementAPI”去查询特定的应用程序,而前提是应用程序这端在开启时需要“-Dcom.sun.management.jmxremote”参数来开启JMX远程查询就行。Java程序会启动自身的一个简单的小程序端口12345向Zabbix-JavaGateway提供请求数据。
开始监控部署
从上面的原理图中我们可以看出,配置Zabbix监控Java应用程序的关键点在于:配置Zabbix-JavaGateway、让Zabbix-Server能够连接Zabbix-JavaGateway、Tomcat开启JVM远程监控功能等
1)环境准备
系统环境
[[email protected] ~]# cat /etc/redhat-release
CentOS Linux release 7.2.1511 (Core)
[[email protected] ~]# /application/zabbix/sbin/zabbix_server -V
zabbix_server (Zabbix) 3.0.3
特别注意:
编译安装zabbix server需要加上--enable-java以支持jmx监控,如果之前的zabbix server没加,那么请重新编译安装,参考编译参数
./configure --prefix=/application/zabbix-3.0.3 --enable-server --enable-agent --enable-java --enable-ipv6 --with-mysql=/application/mysql-5.5.49/bin/mysql_config --with-net-snmp --with-libcurl --with-libxml2 --with-openipmi --with-unixodbc --with-openssl
由于要使用到tomcat作为监控示例,所以简单部署一个tomcat环境
[[email protected] tools]# tar xf jdk-8u73-linux-x64.gz
[[email protected] tools]# tar xf apache-tomcat-8.0.36.tar.gz
[[email protected] tools]# mv jdk1.8.0_73 /application/
[[email protected] tools]# ln -s /application/jdk1.8.0_73/ /application/jdk
[[email protected] tools]# sed -i.ori ‘$a export JAVA_HOME=/application/jdk\nexport PATH=$JAVA_HOME/bin:$JAVA_HOME/jre/bin:$PATH\nexport CLASSPATH=.$CLASSPATH:$JAVA_HOME/lib:$JAVA_HOME/jre/lib:$JAVA_HOME/lib/tools.jar‘ /etc/profile
[[email protected] tools]# source /etc/profile
[[email protected] tools]# java -version
java version "1.8.0_73"
Java(TM) SE Runtime Environment (build 1.8.0_73-b02)
Java HotSpot(TM) 64-Bit Server VM (build 25.73-b02, mixed mode)
[[email protected] ~]# ln -s /application/apache-tomcat-8.0.36/ tomcat
[[email protected] ~]# echo ‘export TOMCAT_HOME=/application/tomcat‘>>/etc/profile
[[email protected] ~]# source /etc/profile
[[email protected] ~]# chown -R root.root /application/jdk/ /application/tomcat/
[[email protected] ~]# tail -4 /etc/profile
export JAVA_HOME=/application/jdk
export PATH=$JAVA_HOME/bin:$JAVA_HOME/jre/bin:$PATH
export CLASSPATH=.$CLASSPATH:$JAVA_HOME/lib:$JAVA_HOME/jre/lib:$JAVA_HOME/lib/tools.jar
export TOMCAT_HOME=/application/tomcat
[[email protected] ~]# /application/tomcat/bin/startup.sh #开启tomcat
[[email protected] ~]# lsof -i:8080
COMMAND   PID USER   FD   TYPE DEVICE SIZE/OFF NODE NAME
java    40859 root   47u  IPv6  71038      0t0  TCP *:webcache (LISTEN)
2)安装软件
yum install -y java java-devel zabbix-java-gateway
3)配置zabbix_java_gateway端口10052
[[email protected] zabbix]# vim /etc/zabbix/zabbix_java_gateway.conf
#zabbix_java_gateway配置文件里有默认端口等设置,这里我们保持默认即可
[[email protected] zabbix]# systemctl start zabbix-java-gateway.service
[[email protected] ~]# lsof -i:10052
USER   FD   TYPE  DEVICE SIZE/OFF NODE NAME
java    92222 root   11u  IPv6 1360516      0t0  TCP *:10052 (LISTEN)
4)配置zabbix-server访问gateway
[[email protected] ~]# vim /application/zabbix/etc/zabbix_server.conf
JavaGateway=172.16.2.150 #gateway地址
StartJavaPollers=5  #预启动进程轮训个数
[[email protected] ~]# systemctl restart zabbix_server.service
5)开启JMX远程监控
[[email protected] application]# vim /application/tomcat/bin/catalina.sh #tomcat的远程调用脚本
CATALINA_OPTS="$CATALINA_OPTS -Dcom.sun.management.jmxremote #开启远程监控
  -Dcom.sun.management.jmxremote.port=12345 #远程监控端口
  -Dcom.sun.management.jmxremote.ssl=false #远程ssl验证为false
  -Dcom.sun.management.jmxremote.authenticate=false #关闭权限认证
  -Djava.rmi.server.hostname=172.16.2.150" #提供数据的的主机地址(由于我是用的一台机器,所以IP相同,如果是生产环境不同的机器,这个地址是部署了tomcat的主机地址)
[[email protected] application]# /application/tomcat/bin/shutdown.sh
[[email protected] application]# /application/tomcat/bin/startup.sh
[[email protected] application]# lsof -i:12345 #JVM监听端口
COMMAND   PID USER   FD   TYPE DEVICE SIZE/OFF NODE NAME
java    41062 root   20u  IPv6  72478      0t0  TCP *:ddi-tcp-1 (LISTEN)
注意:
如果端口起不来,看日志
[[email protected] logs]# tail /application/tomcat/logs/catalina.out
…
Error: Exception thrown by the agent : java.net.MalformedURLException: Local host name unknown: java.net.UnknownHostException: linux-node1.lichengbing.cn: linux-node1.lichengbing.cn: unknown error
添加主机名解析解决
[[email protected] logs]# cat /etc/hosts
172.16.2.150 linux-node1.lichengbing.cn
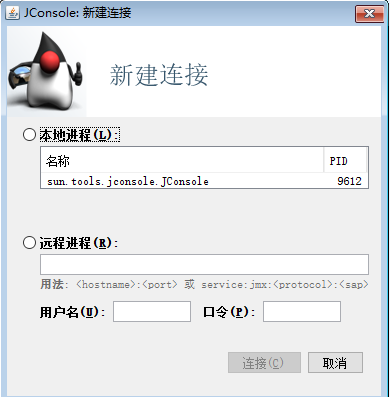
6)此时我们就也可以使用windowsJava工具JConsole测试(提前安装好java)
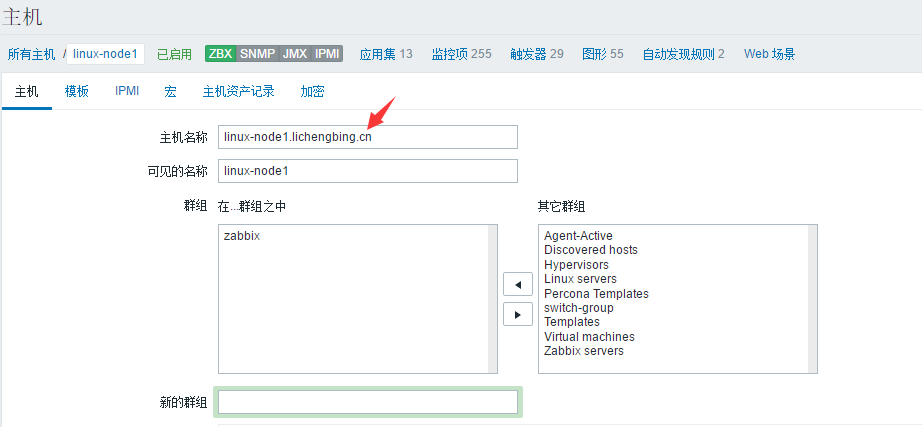
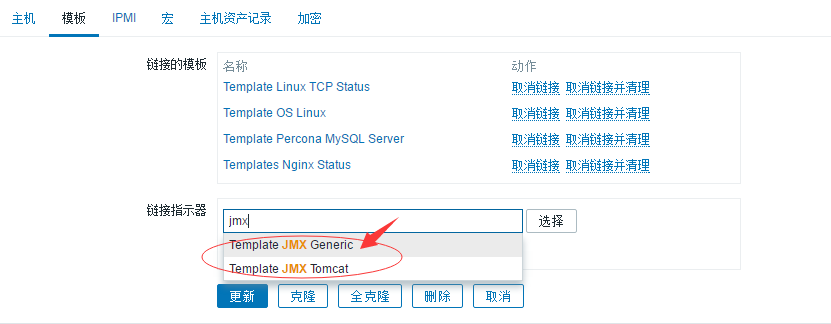
7)在zabbix中添加主机和模板开始监控Java
添加主机
模板中添加两个JMX模板
本文出自 “改变从每一天开始” 博客,请务必保留此出处http://lilongzi.blog.51cto.com/5519072/1850669
以上是关于如何安装zabbix-java-gateway-2.2.2-1.el6.x86的主要内容,如果未能解决你的问题,请参考以下文章


