Spring-事务
Posted 流氓大队长
tags:
篇首语:本文由小常识网(cha138.com)小编为大家整理,主要介绍了Spring-事务相关的知识,希望对你有一定的参考价值。
Spring 的事务管理是基于 AOP 实现的,而 AOP 是以方法为单位的。Spring 的事务属性分别为传播行为、隔离级别、只读和超时属性,这些属性提供了事务应用的方法和描述策略。
在 Java EE 开发经常采用的分层模式中,Spring 的事务处理位于业务逻辑层,它提供了针对事务的解决方案。
在 Spring 解压包的 libs 目录中,包含一个名称为 spring-tx-3.2.13.RELEASE.jar 的文件,该文件是 Spring 提供的用于事务管理的 JAR 包,其中包括事务管理的三个核心接口:PlatformTransactionManager、TransactionDefinition 和 TransactionStatus。
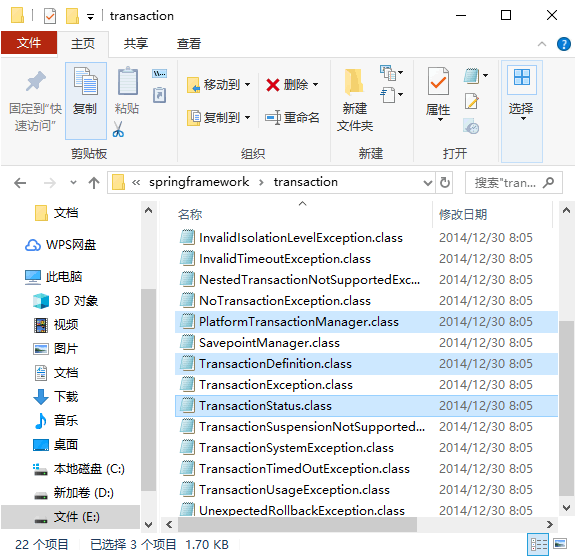
将该 JAR 包的后缀名 jar 改成 zip 的形式后,解压压缩包,进入解压文件夹中的 orgspringframework ransaction 目录后,该目录中的文件如图 1 所示。

图 1 事务管理核心接口
在图 1 中,方框所标注的三个文件就是本节将要讲解的核心接口。这三个核心接口的作用及其提供的方法如下。
1. PlatformTransactionManager
PlatformTransactionManager 接口是 Spring 提供的平台事务管理器,用于管理事务。该接口中提供了三个事务操作方法,具体如下。
- TransactionStatus getTransaction(TransactionDefinition definition):用于获取事务状态信息。
- void commit(TransactionStatus status):用于提交事务。
- void rollback(TransactionStatus status):用于回滚事务。
在项目中,Spring 将 xml 中配置的事务详细信息封装到对象 TransactionDefinition 中,然后通过事务管理器的 getTransaction() 方法获得事务的状态(TransactionStatus),并对事务进行下一步的操作。
2. TransactionDefinition
TransactionDefinition 接口是事务定义(描述)的对象,它提供了事务相关信息获取的方法,其中包括五个操作,具体如下。
- String getName():获取事务对象名称。
- int getIsolationLevel():获取事务的隔离级别。
- int getPropagationBehavior():获取事务的传播行为。
- int getTimeout():获取事务的超时时间。
- boolean isReadOnly():获取事务是否只读。
在上述五个方法的描述中,事务的传播行为是指在同一个方法中,不同操作前后所使用的事务。传播行为的种类如表 1 所示。
| 属性名称 | 值 | 描 述 |
|---|---|---|
| PROPAGATION_REQUIRED | required | 支持当前事务。如果 A 方法已经在事务中,则 B 事务将直接使用。否则将创建新事务 |
| PROPAGATION_SUPPORTS | supports | 支持当前事务。如果 A 方法已经在事务中,则 B 事务将直接使用。否则将以非事务状态执行 |
| PROPAGATION_MANDATORY | mandatory | 支持当前事务。如果 A 方法没有事务,则抛出异常 |
| PROPAGATION_REQUIRES_NEW | requires_new | 将创建新的事务,如果 A 方法已经在事务中,则将 A 事务挂起 |
| PROPAGATION_NOT_SUPPORTED | not_supported | 不支持当前事务,总是以非事务状态执行。如果 A 方法已经在事务中,则将其挂起 |
| PROPAGATION_NEVER | never | 不支持当前事务,如果 A 方法在事务中,则抛出异常 |
| PROPAGATION.NESTED | nested | 嵌套事务,底层将使用 Savepoint 形成嵌套事务 |
在事务管理过程中,传播行为可以控制是否需要创建事务以及如何创建事务。
通常情况下,数据的查询不会改变原数据,所以不需要进行事务管理,而对于数据的增加、修改和删除等操作,必须进行事务管理。如果没有指定事务的传播行为,则 Spring3 默认的传播行为是 required。
3. TransactionStatus
TransactionStatus 接口是事务的状态,它描述了某一时间点上事务的状态信息。其中包含六个操作,具体如表 2 所示。
| 名称 | 说明 |
|---|---|
| void flush() | 刷新事务 |
| boolean hasSavepoint() | 获取是否存在保存点 |
| boolean isCompleted() | 获取事务是否完成 |
| boolean isNewTransaction() | 获取是否是新事务 |
| boolean isRollbackOnly() | 获取是否回滚 |
| void setRollbackOnly() | 设置事务回滚 |
1.Dao层
public interface AccountDao {
    // 汇款
    public int out(String cname, int pid);
    // 收款
    public int in(String cname, int pid);
}
2.Dao实现类
@Repository
public class AccountDaoImpl implements AccountDao {
    @Resource
    private JdbcTemplate jdbcTemplate;
    @Override
    public int out(String cname, int pid) {
        int update = jdbcTemplate.update("update city set pid=pid-? where cid=?", pid,cname);
        return update;
    }

    @Override
    public int in(String cname, int pid) {
        int update = jdbcTemplate.update("update city set pid=pid+? where cid=?", pid,cname);
        return update;
    }
}
3.entity实体
public class City implements Serializable {
    private Integer cid;
    private String cname;
    private Integer pid;

    public Integer getCid() {
        return cid;
    }

    public void setCid(Integer cid) {
        this.cid = cid;
    }

    public String getCname() {
        return cname;
    }

    public void setCname(String cname) {
        this.cname = cname;
    }

    public Integer getPid() {
        return pid;
    }

    public void setPid(Integer pid) {
        this.pid = pid;
    }
}
4.service层
public interface AccountService {
    //转账
    public int transfet(String outUser, String inUser, Integer money);
}
5.service实现类
//@Transactional(propagation = Propagation.REQUIRED, isolation = Isolation.DEFAULT, readOnly = false)
@Service("accountService")
public class AccountServiceImpl implements AccountService {
    @Resource
    private AccountDao accountDao;
    public void setAccountDao(AccountDao accountDao) {
        this.accountDao = accountDao;
    }
    @Override
    public int transfet(String outUser, String inUser, Integer money) {
        int out = accountDao.out(outUser, money);
        int in = accountDao.in(inUser, money);
        return out+in;
    }
}
6.c3p0-db.properties
jdbc.driverClass =com.mysql.jdbc.Driver
jdbc.jdbcUrl = jdbc:mysql://localhost:3306/test?serverTimezone=UTC
jdbc.user = root
jdbc.password = root
7.applicationContext.xml,讲述了三种实现方法,希望对你有些帮助,谢谢
<?xml version="1.0" encoding="UTF-8"?> <!--根节点是我们的beans节点--> <beans xmlns="http://www.springframework.org/schema/beans" xmlns:xsi="http://www.w3.org/2001/XMLSchema-instance" xmlns:context="http://www.springframework.org/schema/context" xmlns:tx="http://www.springframework.org/schema/tx" xmlns:aop="http://www.springframework.org/schema/aop" xsi:schemaLocation="http://www.springframework.org/schema/beans http://www.springframework.org/schema/beans/spring-beans-2.5.xsd http://www.springframework.org/schema/context http://www.springframework.org/schema/context/spring-context.xsd http://www.springframework.org/schema/tx http://www.springframework.org/schema/tx/spring-tx-2.5.xsd http://www.springframework.org/schema/aop http://www.springframework.org/schema/aop/spring-aop-2.5.xsd"> <!--扫描包--> <context:component-scan base-package="cn.spring"/> <!--加载properties文件--> <context:property-placeholder location="classpath:c3p0-db.properties"/> <!--配置数据源。读取properties文件信息--> <bean id="dataSource" class="com.mchange.v2.c3p0.ComboPooledDataSource"> <property name="driverClass" value="${jdbc.driverClass}" /> <property name="jdbcUrl" value="${jdbc.jdbcUrl}" /> <property name="user" value="${jdbc.user}" /> <property name="password" value="${jdbc.password}" /> </bean> <!-- 配置dao --> <bean id="jdbcTemplate" class="org.springframework.jdbc.core.JdbcTemplate"> <property name="dataSource" ref="dataSource" /> </bean> <!-- 事务管理器,依赖于数据源 --> <bean id="txManager" class="org.springframework.jdbc.datasource.DataSourceTransactionManager"> <property name="dataSource" ref="dataSource" /> </bean> <!--第一种:事务代理工厂Bean--> <bean id="transactionProxyFactoryBean" class="org.springframework.transaction.interceptor.TransactionProxyFactoryBean"> <!--事务管理器--> <property name="transactionManager" ref="txManager"></property> <!--目标对象--> <property name="target" ref="accountService"></property> <!--设置方法--> <property name="transactionAttributes"> <props> <!--方法对应的隔离级别和传播行为--> <prop key="transfer">PROPAGATION_REQUIRED,ISOLATION_DEFAULT</prop> </props> </property> </bean> <!--第二种:注册事务管理驱动 --> <!-- <tx:annotation-driven transaction-manager="txManager"/>--> <!--第三种:--> <!-- 编写通知:对事务进行增强(通知),需要编写切入点和具体执行事务的细节 --> <!-- <tx:advice id="txAdvice" transaction-manager="txManager"> <tx:attributes> <!– 给切入点方法添加事务详情,name表示方法名称,*表示任意方法名称,propagation用于设置传播行为,read-only表示隔离级别,是否只读 –> <tx:method name="find*" propagation="SUPPORTS" rollback-for="Exception" /> <tx:method name="*" propagation="REQUIRED" isolation="DEFAULT" read-only="false" /> </tx:attributes> </tx:advice> <!– aop编写,让Spring自动对目标生成代理,需要使用AspectJ的表达式 –> <aop:config> <!– 切入点 –> <aop:pointcut expression="execution(* cn.spring.service.*.*(..))" id="txPointCut" /> <!– 切面:将切入点与通知整合 –> <aop:advisor pointcut-ref="txPointCut" advice-ref="txAdvice" /> </aop:config>--> </beans>
以上是关于Spring-事务的主要内容,如果未能解决你的问题,请参考以下文章