SpringBootSpringBoot Web开发
Posted H__D
tags:
篇首语:本文由小常识网(cha138.com)小编为大家整理,主要介绍了SpringBootSpringBoot Web开发相关的知识,希望对你有一定的参考价值。
本周介绍SpringBoot项目Web开发的项目内容,及常用的CRUD操作,阅读本章前请阅读【SpringBoot】SpringBoot与Thymeleaf模版(六)的相关内容
Web开发
项目搭建
1、新建一个SpringBoot的web项目。pom.xml文件如下:

 1 <?xml version="1.0" encoding="UTF-8"?>
 2 <project xmlns="http://maven.apache.org/POM/4.0.0"
 3          xmlns:xsi="http://www.w3.org/2001/XMLSchema-instance"
 4          xsi:schemaLocation="http://maven.apache.org/POM/4.0.0 http://maven.apache.org/xsd/maven-4.0.0.xsd">
 5     <modelVersion>4.0.0</modelVersion>
 6
 7     <groupId>com.test</groupId>
 8     <artifactId>test-springboot-web2</artifactId>
 9     <version>1.0-SNAPSHOT</version>
10
11     <parent>
12         <groupId>org.springframework.boot</groupId>
13         <artifactId>spring-boot-starter-parent</artifactId>
14         <version>2.1.8.RELEASE</version>
15     </parent>
16
17     <properties>
18
19         <project.build.sourceEncoding>UTF-8</project.build.sourceEncoding>
20         <project.reporting.outputEncoding>UTF-8</project.reporting.outputEncoding>
21         <java.version>1.8</java.version>
22     </properties>
23
24     <dependencies>
25
26         <dependency>
27             <groupId>org.springframework.boot</groupId>
28             <artifactId>spring-boot-starter-web</artifactId>
29         </dependency>
30
31         <dependency>
32             <groupId>org.springframework.boot</groupId>
33             <artifactId>spring-boot-starter-thymeleaf</artifactId>
34         </dependency>
35
36         <dependency>
37             <groupId>org.springframework.boot</groupId>
38             <artifactId>spring-boot-starter-test</artifactId>
39             <scope>test</scope>
40         </dependency>
41
42     </dependencies>
43
44
45     <!-- SpringBoot打包插件,可以将代码打包成一个可执行的jar包 -->
46     <build>
47         <plugins>
48             <plugin>
49                 <groupId>org.springframework.boot</groupId>
50                 <artifactId>spring-boot-maven-plugin</artifactId>
51             </plugin>
52         </plugins>
53     </build>
54
55 </project>
2、配置文件application.properties如下:
 1 # 项目端口
 2 server.port=8081
 3 # 项目访问路径
 4 server.servlet.context-path=/test
 5
 6 # 禁用thymeleaf缓存
 7 spring.thymeleaf.cache=false
 8
 9 # mvc参数日期格式
10 spring.mvc.date-format=yyyy-MM-dd
3、在浏览器中使用地址http://localhost:8081/test/即可访问项目
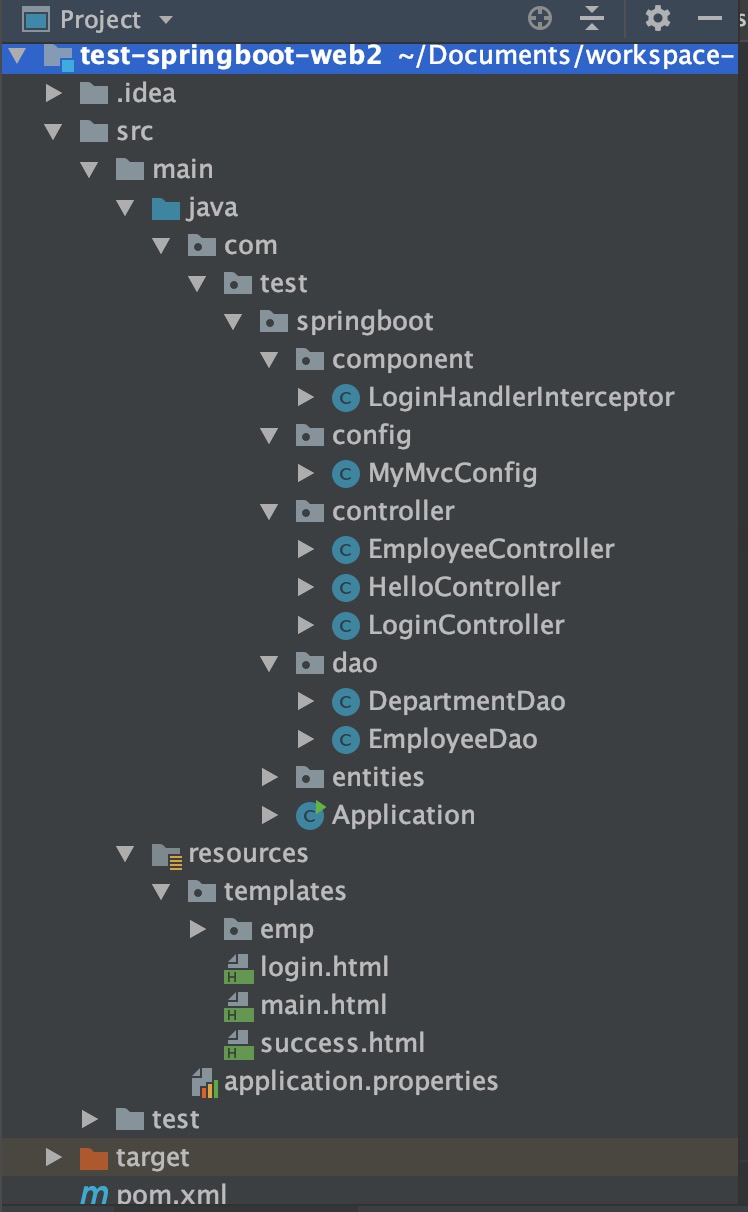
4、项目目录结构

登录功能
1、编写登录LoginController.java;逻辑验证用户名和密码,登录成功后在session中存入熟悉loginUser
 1 package com.test.springboot.controller;
 2
 3 import org.springframework.stereotype.Controller;
 4 import org.springframework.util.StringUtils;
 5 import org.springframework.web.bind.annotation.PostMapping;
 6 import org.springframework.web.bind.annotation.RequestParam;
 7
 8 import javax.servlet.http.HttpServletRequest;
 9 import java.util.Map;
10
11 @Controller
12 public class LoginController {
13
14     @PostMapping(value = "/user/login")
15     public String login(@RequestParam("username") String username,
16                         @RequestParam("password") String password,
17                         Map<String, Object> map, HttpServletRequest request){
18         System.out.println("======");
19         if(!StringUtils.isEmpty(username) && "123456".equals(password)) {
20             // 登陆成功
21             // 防止表单重复提交,可以重定向到主页
22             request.getSession().setAttribute("loginUser", username);
23             return "redirect:/main.html";
24         }else {
25             // 登陆失败
26             map.put("msg", "用户名或密码错误");
27             return "login";
28         }
29
30     }
31
32 }
2、新建拦截器LoginHandlerInterceptor.java;逻辑:在session中判断是否存在属性loginUser,存在即已登录,不存在未登录
 1 package com.test.springboot.component;
 2
 3
 4 import org.springframework.web.servlet.HandlerInterceptor;
 5
 6 import javax.servlet.ServletException;
 7 import javax.servlet.http.HttpServletRequest;
 8 import javax.servlet.http.HttpServletResponse;
 9 import java.io.IOException;
10
11 public class LoginHandlerInterceptor implements HandlerInterceptor {
12
13     @Override
14     public boolean preHandle(HttpServletRequest request, HttpServletResponse response, Object handler) throws ServletException, IOException {
15         Object user = request.getSession().getAttribute("loginUser");
16         if(user == null) {
17             // 未登录
18             request.setAttribute("msg", "没有权限请先登录");
19             request.getRequestDispatcher("/index.html").forward(request, response);
20         }else{
21             // 已登录
22             return true;
23         }
24         return false;
25     }
26 }
3、在SpringMvc中添加拦截器
 1 package com.test.springboot.config;
 2
 3 import com.test.springboot.component.LoginHandlerInterceptor;
 4 import org.springframework.context.annotation.Configuration;
 5 import org.springframework.web.servlet.config.annotation.InterceptorRegistry;
 6 import org.springframework.web.servlet.config.annotation.ViewControllerRegistry;
 7 import org.springframework.web.servlet.config.annotation.WebMvcConfigurer;
 8
 9
10 // @EnableWebMvc // 全面接管SpringMVC,所有的WebMvc自动配置都失效,如静态资源的访问都失效
11 @Configuration
12 public class MyMvcConfig implements WebMvcConfigurer {
13
14     // 添加视图映射
15     @Override
16     public void addViewControllers(ViewControllerRegistry registry) {
17 //        // 浏览器访问 "/success2" 重定向到 "/success"
18 //        registry.addRedirectViewController("/success2", "/success");
19 //        // 浏览器访问 "/success2" 转发 "/success"
20 //        registry.addViewController("/success3").setViewName("/success");
21
22         // 首页
23         registry.addViewController("/").setViewName("login");
24         registry.addViewController("/index.html").setViewName("login");
25
26         registry.addViewController("/main.html").setViewName("main");
27
28     }
29
30     // 添加拦截器
31     @Override
32     public void addInterceptors(InterceptorRegistry registry) {
33
34         // springboot静态映射已做好,无需在拦截器中处理静态资源
35         registry.addInterceptor(new LoginHandlerInterceptor()).addPathPatterns("/**")
36                 .excludePathPatterns("/", "/index.html", "/user/login");
37     }
38 }
4、编辑登录界面login.html
 1 <!DOCTYPE html>
 2 <html lang="en" xmlns:th="http://www.thymeleaf.org">
 3 <head>
 4     <meta charset="UTF-8">
 5     <title>login</title>
 6 </head>
 7 <body style="text-align: center;">
 8 <h3>登录</h3>
 9 <form th:action="@{/user/login}" method="post">
10     <p>用户名:<input type="text" name="username" /></p>
11     <p>密  码: <input type="password" name="password" /></p>
12     <input type="submit" value="提交" />
13 </form>
14     提示1:[[${msg}]]
15 </body>
16 </html>
5、编辑主页面main.html
 1 <!DOCTYPE html>
 2 <html lang="en" xmlns:th="http://www.thymeleaf.org">
 3 <head>
 4     <meta charset="UTF-8">
 5     <title>main</title>
 6 </head>
 7 <body style="text-align: center;">
 8     <h3>主页</h3>
 9     <br>
10     [[${session.loginUser}]]
11     <h4><a  th:href="@{/emps}">员工列表</a></h4>
12     提示-:[[${msg}]]
13 </body>
14 </html>
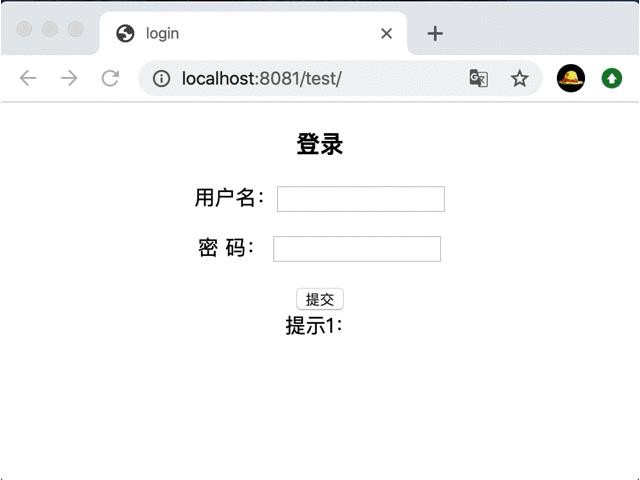
6、测试,在浏览器中打开地址:http://localhost:8081/test

CURD功能
1、新建员工Controller,内容如下:
package com.test.springboot.controller;

import com.test.springboot.dao.DepartmentDao;
import com.test.springboot.dao.EmployeeDao;
import com.test.springboot.entities.Department;
import com.test.springboot.entities.Employee;
import org.springframework.beans.factory.annotation.Autowired;
import org.springframework.stereotype.Controller;
import org.springframework.ui.Model;
import org.springframework.web.bind.annotation.*;

import java.util.Collection;

@Controller
public class EmployeeController {

    @Autowired
    private EmployeeDao employeeDao;

    @Autowired
    private DepartmentDao departmentDao;

    // 查询所有员工列表
    @GetMapping("/emps")
    public String list(Model model){
        Collection<Employee> employees = employeeDao.getAll();

        // 放在请求域中
        model.addAttribute("emps", employees);

        return "emp/list";
    }

    // 添加员工页面
    @GetMapping("/emp")
    public String toAddPage(Model model){
        // 查询所有部门
        Collection<Department> departments = departmentDao.getDepartments();
        model.addAttribute("depts", departments);
        return "emp/add";
    }

    @GetMapping("/emp/{id}")
    public String toEditPage(@PathVariable("id") Integer id , Model model){

        Employee employee = employeeDao.get(id);
        model.addAttribute("emp", employee);

        Collection<Department> departments = departmentDao.getDepartments();
        model.addAttribute("depts", departments);
        return "emp/add";
    }

    // 员工添加
    @PostMapping("/emp")
    public String addEmp(Employee employee){
        System.out.println("员工信息:" + employee);
        // 返回员工列表界面
        // redirect:表示重定向到某个界面
        // forward:表示转发到某个界面
        employeeDao.save(employee);
        return "redirect:/emps";
    }

    //员工修改;需要提交员工id;
    @PutMapping("/emp")
    public String updateEmployee(Employee employee){
        System.out.println("修改的员工数据:"+employee);
        employeeDao.save(employee);
        return "redirect:/emps";
    }

    //员工删除
    @DeleteMapping("/emp/{id}")
    public String deleteEmployee(@PathVariable("id") Integer id){
        employeeDao.delete(id);
        return "redirect:/emps";
    }

}
2、员工DAO

 1 package com.test.springboot.dao;
 2
 3 import java.util.Collection;
 4 import java.util.HashMap;
 5 import java.util.Map;
 6
 7 import com.test.springboot.entities.Department;
 8 import com.test.springboot.entities.Employee;
 9 import org.springframework.beans.factory.annotation.Autowired;
10 import org.springframework.stereotype.Repository;
11
12 @Repository
13 public class EmployeeDao {
14
15     private static Map<Integer, Employee> employees = null;
16
17     @Autowired
18     private DepartmentDao departmentDao;
19
20     static{
21         employees = new HashMap<Integer, Employee>();
22
23         employees.put(1001, new Employee(1001, "E-AA", "aa@163.com", 1, new Department(101, "D-AA")));
24         employees.put(1002, new Employee(1002, "E-BB", "bb@163.com", 1, new Department(102, "D-BB")));
25         employees.put(1003, new Employee(1003, "E-CC", "cc@163.com", 0, new Department(103, "D-CC")));
26         employees.put(1004, new Employee(1004, "E-DD", "dd@163.com", 0, new Department(104, "D-DD")));
27         employees.put(1005, new Employee(1005, "E-EE", "ee@163.com", 1, new Department(105, "D-EE")));
28     }
29
30     private static Integer initId = 1006;
31
32     public void save(Employee employee){
33         if(employee.getId() == null){
34             employee.setId(initId++);
35         }
36
37         employee.setDepartment(departmentDao.getDepartment(employee.getDepartment().getId()));
38         employees.put(employee.getId(), employee);
39     }
40
41     //查询所有员工
42     public Collection<Employee> getAll(){
43         return employees.values();
44     }
45
46     public Employee get(Integer id){
47         return employees.get(id);
48     }
49
50     public void delete(Integer id){
51         employees.remove(id);
52     }
53 }
3、部门DAO

 1 package com.test.springboot.dao;
 2
 3 import java.util.Collection;
 4 import java.util.HashMap;
 5 import java.util.Map;
 6
 7 import com.test.springboot.entities.Department;
 8 import org.springframework.stereotype.Repository;
 9
10
11 @Repository
12 public class DepartmentDao {
13
14     private static Map<Integer, Department> departments = null;
15
16     static{
17         departments = new HashMap<Integer, Department>();
18
19         departments.put(101, new Department(101, "D-AA"));
20         departments.put(102, new Department(102, "D-BB"));
21         departments.put(103, new Department(103, "D-CC"));
22         departments.put(104, new Department(104, "D-DD"));
23         departments.put(105, new Department(105, "D-EE"));
24     }
25
26     public Collection<Department> getDepartments(){
27         return departments.values();
28     }
29
30     public Department getDepartment(Integer id){
31         return departments.get(id);
32     }
33
34 }
4、员工对象

 1 package com.test.springboot.entities;
 2
 3 import java.util.Date;
 4
 5 public class Employee {
 6
 7     private Integer id;
 8     private String lastName;
 9
10     private String email;
11     //1 male, 0 female
12     private Integer gender;
13     private Department department;
14     private Date birth;
15
16     public Integer getId() {
17         return id;
18     }
19
20     public void setId(Integer id) {
21         this.id = id;
22     }
23
24     pu以上是关于SpringBootSpringBoot Web开发的主要内容,如果未能解决你的问题,请参考以下文章
