springboot集成swagger
Posted 天际星痕
tags:
篇首语:本文由小常识网(cha138.com)小编为大家整理,主要介绍了springboot集成swagger相关的知识,希望对你有一定的参考价值。
1.简介
本章介绍 SpringBoot2.1.9 集成 Swagger2 生成在线的API接口文档。
2. pom依赖:
通过对比了swagger的几个版本,发现还是2.6.1问题最少
<!-- swagger2 依赖 -->
    <dependency>
        <groupId>io.springfox</groupId>
        <artifactId>springfox-swagger2</artifactId>
        <version>2.6.1</version>
    </dependency>
    <dependency>
        <groupId>io.springfox</groupId>
        <artifactId>springfox-swagger-ui</artifactId>
        <version>2.6.1</version>
    </dependency>
3. swaggerconfig配置类:
3.1 SwaggerConfig 配置类
package cn.com.wjqhuaxia.config;

import org.springframework.context.annotation.Bean;
import org.springframework.context.annotation.Configuration;

import springfox.documentation.builders.ApiInfoBuilder;
import springfox.documentation.builders.PathSelectors;
import springfox.documentation.builders.RequestHandlerSelectors;
import springfox.documentation.service.ApiInfo;
import springfox.documentation.spi.DocumentationType;
import springfox.documentation.spring.web.plugins.Docket;

/**
 * @Description: swagger配置类
 */
@Configuration
// 开启swagger2
// 选择不同的环境启用 swagger 以下两种方式,推荐第一种
// @Profile({"dev","test"})
// @ConditionalOnProperty(name = "swagger.enable", havingValue = "true")
public class SwaggerConfig {
	@Bean
	public Docket createRestApi() {
		return new Docket(DocumentationType.SWAGGER_2)
				.groupName("用户权限项目") // 设置项目名
				.apiInfo(apiInfo())
				.pathMapping("/")	 // 设置api根路径
				.select()				 // 初始化并返回一个API选择构造器
				.apis(RequestHandlerSelectors.basePackage("cn.com.wjqhuaxia"))	// swagger api扫描的路径
				.paths(PathSelectors.any())	// 设置路径筛选
				.build();					// 构建
	}

	private ApiInfo apiInfo() {
		return new ApiInfoBuilder()
				.title("user-auth服务")
				.description("提供用户权限功能服务接口")
				.license("")
				.licenseUrl("")
				.termsOfServiceUrl("")
				.version("1.0.0")
				.build();
	}
}
3.2 配置说明
一、Docket类的方法:
Docket groupName(String var):设置栏目名

Docket apiInfo(ApiInfo apiInfo):设置文档信息

Docket pathMapping(String path):设置api根路径

Docket protocols(Set<String> protocols):设置协议,Sets为com.goolge.common下的类,Sets.newHashSet("https","http")相当于new HashSet(){{add("https");add("http");}};

ApiSelectorBuilder select():初始化并返回一个API选择构造器

二、ApiSelectorBuilder类的方法:

ApiSelectorBuilder apis(Predicate<RequestHandler> selector):添加选择条件并返回添加后的ApiSelectorBuilder对象

ApiSelectorBuilder paths(Predicate<String> selector):设置路径筛选,该方法中含一句pathSelector = and(pathSelector, selector);表明条件为相与

RequestHandlerSelectors类的方法:

Predicate<RequestHandler> any():返回包含所有满足条件的请求处理器的断言,该断言总为true

Predicate<RequestHandler> none():返回不满足条件的请求处理器的断言,该断言总为false

Predicate<RequestHandler> basePackage(final String basePackage):返回一个断言(Predicate),该断言包含所有匹配basePackage下所有类的请求路径的请求处理器

三、PathSelectors类的方法:

Predicate<String> any():满足条件的路径,该断言总为true

Predicate<String> none():不满足条件的路径,该断言总为false

Predicate<String> regex(final String pathRegex):符合正则的路径
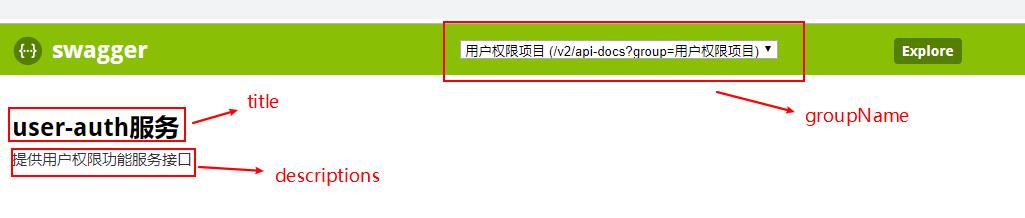
3.3 对应图示
对应以上3.1配置的简单图示
4. controller类api设置
4.1 controller配置
package cn.com.wjqhuaxia.controller;

import java.util.List;

import org.springframework.beans.factory.annotation.Autowired;
import org.springframework.web.bind.annotation.PathVariable;
import org.springframework.web.bind.annotation.RequestBody;
import org.springframework.web.bind.annotation.RequestMapping;
import org.springframework.web.bind.annotation.RequestMethod;
import org.springframework.web.bind.annotation.RestController;

import cn.com.wjqhuaxia.dao.IUserDao;
import cn.com.wjqhuaxia.model.UserEntity;
import io.swagger.annotations.Api;
import io.swagger.annotations.ApiImplicitParam;
import io.swagger.annotations.ApiImplicitParams;
import io.swagger.annotations.ApiOperation;

@RestController
@RequestMapping(value = "/user")
@Api(description = "用户管理接口")
public class UserManageController {

	@Autowired
	private IUserDao userDao;

	@ApiOperation(value = "获取用户列表", notes = "获取用户列表")
	@RequestMapping(value = "/getUsers", method = RequestMethod.GET)
	public List<UserEntity> getUsers() {
		List<UserEntity> users=userDao.getAll();
		return users;
	}

	@ApiOperation(value = "根据用户id获取用户信息", notes = "根据用户id获取用户信息")
	@ApiImplicitParams({
			@ApiImplicitParam(name = "id", value = "用户标识", required = true, paramType = "path", dataType = "Long") })
    @RequestMapping(value = "/getUser/{id}", method = RequestMethod.GET)
    public UserEntity getUser(@PathVariable Long id) {
    	UserEntity user=userDao.getOne(id);
        return user;
    }

	@ApiOperation(value = "新增用户" ,  notes="新增用户")
    @RequestMapping(value = "/add", method = RequestMethod.POST)
    public String save(@RequestBody UserEntity user) {
    	userDao.insert(user);
    	return "用户添加成功!";
    }

	@ApiOperation(value = "修改用户" ,  notes="修改用户")
    @RequestMapping(value="update", method = RequestMethod.POST)
    public void update(@RequestBody UserEntity user) {
    	userDao.update(user);
    }

	@ApiOperation(value = "删除用户" ,  notes="删除用户")
    @RequestMapping(value="/delete/{id}", method = RequestMethod.GET)
    public void delete(@PathVariable("id") Long id) {
    	userDao.delete(id);
    }
}
4.2 配置说明
@Api()用于类; 表示标识这个类是swagger的资源
@ApiOperation()用于方法; 表示一个http请求的操作
@ApiParam()用于方法,参数,字段说明; 表示对参数的添加元数据(说明或是否必填等) 【暂时没用,当前使用SpringMVC@RequestParam】
@ApiIgnore()用于类,方法,方法参数 表示这个方法或者类被忽略
@ApiImplicitParam() 用于方法 表示单独的请求参数
@ApiImplicitParams() 用于方法,包含多个 @ApiImplicitParam
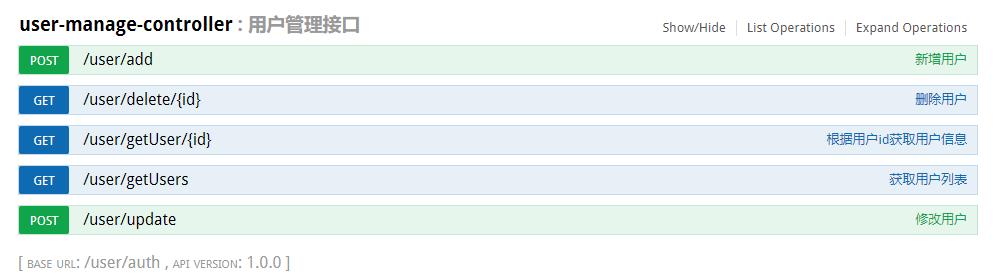
4.3 图示
5. 实体类配置
5.1 实体类
/**
 * 用户对象
 * @author wjqhuaxia
 */
@ApiModel(value="UserEntity", description="用户对象")
public class UserEntity implements Serializable {

	private static final long serialVersionUID = 1L;
	@ApiModelProperty(value="用户id",name="id",example="1")
	private Long id;
	@ApiModelProperty(value="用户名",name="userName",example="mao2080")
	private String userName;
	@ApiModelProperty(value="密码",name="passWord",example="123456")
	private String passWord;
	@ApiModelProperty(value="性别",name="userSex",example="MAN")
	private UserSexEnum userSex;
	@ApiModelProperty(value="昵称",name="nickName",example="天际星痕")
	private String nickName;

	....get/set方法略。

}
5.2 配置说明
@ApiModel()用于类 表示对类进行说明,用于参数用实体类接收
@ApiModelProperty()用于方法,字段 表示对model属性的说明或者数据操作更改
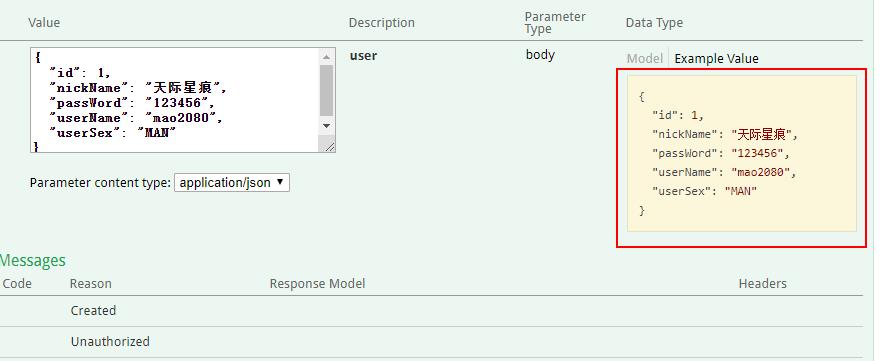
5.3 简单图示
6. 测试:
访问http://localhost:8080/swagger-ui.html
注意: 访问路径有配置工程名的带上工程名,避免404。此处未配置工程名。
参考:
https://blog.csdn.net/cp026la/article/details/86501095
https://www.cnblogs.com/mao2080/p/9021714.html
https://blog.csdn.net/z28126308/article/details/71126677
以上是关于springboot集成swagger的主要内容,如果未能解决你的问题,请参考以下文章
springboot系列十springboot集成swaggerUI
SpringBoot——SpringBoot集成Swagger生成API文档