springboot融合mybatis+mysql
Posted andsoso
tags:
篇首语:本文由小常识网(cha138.com)小编为大家整理,主要介绍了springboot融合mybatis+mysql相关的知识,希望对你有一定的参考价值。
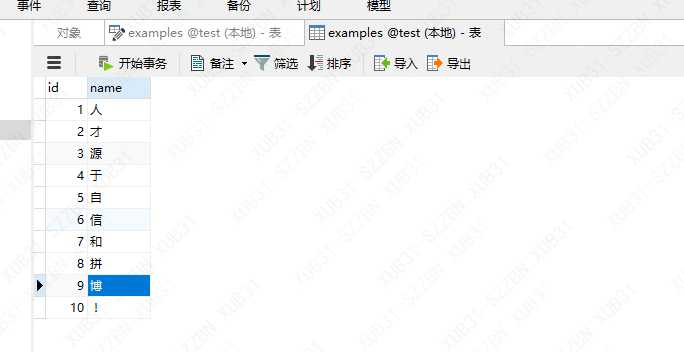
目标 : 将如下数据表中的数据提供接口查询出来 。 表名 : examples

步骤
一、配置mybatis依赖jar包 ,mysql驱动jar包
<dependency>
            <groupId>org.mybatis.spring.boot</groupId>
            <artifactId>mybatis-spring-boot-starter</artifactId>
            <version>2.1.1</version>
        </dependency>

        <dependency>
            <groupId>mysql</groupId>
            <artifactId>mysql-connector-java</artifactId>
            <scope>runtime</scope>
        </dependency>
二、配置mybatis-config文件 。 直接配置在resource的资源文件夹下 。 文件内容如下
<?xml version="1.0" encoding="UTF-8" ?>
<!DOCTYPE configuration PUBLIC "-//mybatis.org//DTD Config 3.0//EN" "http://mybatis.org/dtd/mybatis-3-config.dtd" >

<configuration>

    <!--  mybatis全局配置属性  https://blog.csdn.net/drxRose/article/details/85710850 -->
    <settings>
        <setting name="logImpl" value="SLF4J"></setting>
    </settings>

    <typeAliases>
        <typeAlias type="com.example.helloworld.model.Examples" alias="Examples"></typeAlias>
    </typeAliases>

</configuration>
三、在application.yml中指定数据库源、mybatis配置文件路径、sql文件路径
spring:
  profiles:
    active: dev
  datasource:
    url: jdbc:mysql://localhost:3306/test?useUnicode=true&useSSL=false&zeroDateTimeBehavior=convertToNull&characterEncoding=UTF8&serverTimezone=GMT%2B8
    username: root
    password:

mybatis:
  config-location: classpath:mybatis-config.xml
  mapper-locations: classpath:mappers/*_mapper.xml


server:
  port: 8293
四、在resource文件夹下添加mappers文件夹,与第三部的mybatis配置一致 。 然后添加examples_mapper.xml 。内容如下
<?xml version="1.0" encoding="UTF-8" ?>
<!DOCTYPE mapper  PUBLIC "-//mybatis.org//DTD Mapper 3.0//EN" "http://mybatis.org/dtd/mybatis-3-mapper.dtd">

<!-- springboot 强制使用namespace . 不配置namespace保证id唯一性也可 -->
<mapper namespace="com.example.helloworld.dao.ExamplesMapper">

    <resultMap id="ExamplesMap" type="Examples">
        <id column="id" property="id" jdbcType="BIGINT"></id>
        <result column="name" property="name" jdbcType="VARCHAR"></result>
    </resultMap>

    <select id="getAll" resultMap="ExamplesMap">
        select id,name from examples
    </select>


</mapper>
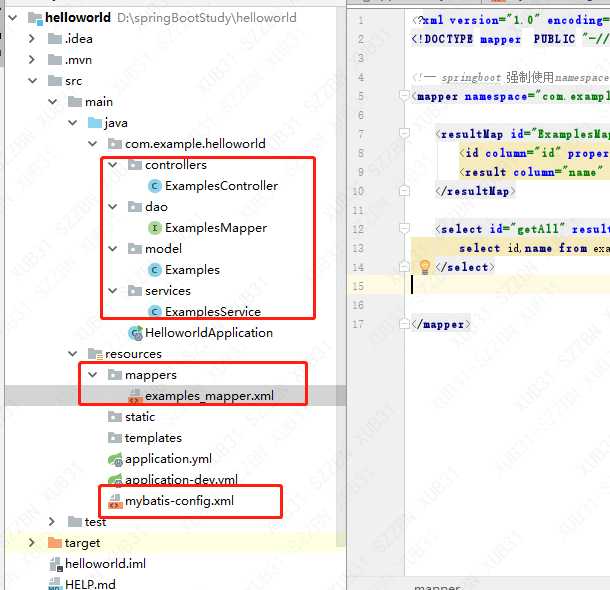
五、在项目路径下添加包controllers 、services 、dao、model ,最终目录结构如下

六、编写model、dao 、service、 controller类 ,对应代码如下
package com.example.helloworld.model;

import java.util.Objects;

public class Examples {

    private Long id;
    private String name;

    public Long getId() {
        return id;
    }

    public void setId(Long id) {
        this.id = id;
    }

    public String getName() {
        return name;
    }

    public void setName(String name) {
        this.name = name;
    }

}
package com.example.helloworld.dao;

import com.example.helloworld.model.Examples;
import org.springframework.stereotype.Repository;

import java.util.List;

@Repository
public interface ExamplesMapper {

    /**
     * 获取所有的数据
     * @return
     */
    public List<Examples> getAll();
}
package com.example.helloworld.services;

import com.example.helloworld.dao.ExamplesMapper;
import com.example.helloworld.model.Examples;
import org.springframework.beans.factory.annotation.Autowired;
import org.springframework.stereotype.Service;

import java.util.List;

@Service
public class ExamplesService {

    @Autowired
    private ExamplesMapper examplesMapper;

    /**
     * 获取所有的数据
     * @return
     */
    public List<Examples> getAll(){
        return examplesMapper.getAll();
    }
}
package com.example.helloworld.controllers;

import com.example.helloworld.model.Examples;
import com.example.helloworld.services.ExamplesService;
import org.springframework.beans.factory.annotation.Autowired;
import org.springframework.web.bind.annotation.RequestMapping;
import org.springframework.web.bind.annotation.RestController;

import java.util.List;

@RestController
@RequestMapping("/examples")
public class ExamplesController {

    @Autowired
    private ExamplesService examplesService;

    /**
     * 获取所有的数据
     * @return
     */
    @RequestMapping("/getAll")
    public List<Examples> getAll(){
        return examplesService.getAll();
    }
}
七、在启动类helloworldApplication.java类中,添加mapper映射路径mapperScan,用于mybatis自动为接口类添加实现类
package com.example.helloworld;

import org.mybatis.spring.annotation.MapperScan;
import org.springframework.boot.SpringApplication;
import org.springframework.boot.autoconfigure.SpringBootApplication;
import org.springframework.scheduling.annotation.EnableScheduling;
import org.springframework.web.bind.annotation.RequestMapping;
import org.springframework.web.bind.annotation.RestController;

@SpringBootApplication(scanBasePackages = "com.example.helloworld")
@RestController
@EnableScheduling
@MapperScan(basePackages = "com.example.helloworld.dao")
public class HelloworldApplication {

    public static void main(String[] args) {
        SpringApplication.run(HelloworldApplication.class, args);
    }

    @RequestMapping("/")
    public String home(){
        return "hello world ,girl !" ;
    }

}
八、工作已经完成,启动服务,在浏览器输入 http://127.0.0.1:8293/examples/getAll ,查看数据

以上是关于springboot融合mybatis+mysql的主要内容,如果未能解决你的问题,请参考以下文章