Spring__bean的装配
Posted 开拖拉机的蜡笔小新
tags:
篇首语:本文由小常识网(cha138.com)小编为大家整理,主要介绍了Spring__bean的装配相关的知识,希望对你有一定的参考价值。
Bean的装配:
在spring容器内拼凑bean叫做装配。装 配bean的时候,需要告诉容器哪些bean 以及容器如何使用依赖注入将它们配合在一起。
上下文定义文件的根元素是<beans>.<beans>有多个<bean>子元素。每个<bean>元素定义了一个 bean如何被装配到spring容器中。
<beans>
<bean id="foo" class="...Foo"/>
<bean id="bar" class="...Bar"/>
</beans>
对bean的最基本的配置包括bean的ID和他的 全称类名(类的全路径)。 <bean id="foo" class="com.xidian.Foo"/> bean的id是foo。
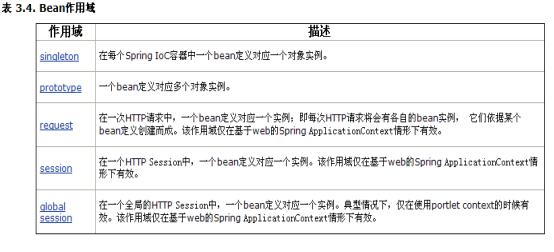
bean的scope 的说明:

spring中的bean缺省情况下是单例模式。始终返回一个实 例。若想返回不同的实例的话需要定义成原型模式。
☞ 尽量使用 scope=”singleton” ,不要使用prototype,因为这样对我们的性能影响较大.
一、set方式给bean注入值
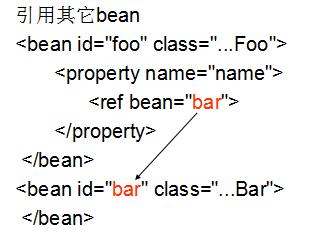
(1)注入依赖,引用其它bean

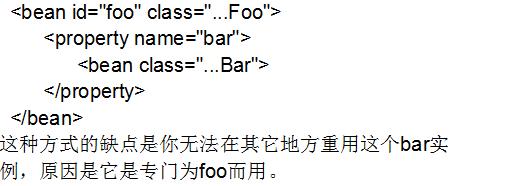
(2)内部bean

这种方式用的比较少。
(3)继承配置
public class Student
public class Gradate extends Student
在beans.xml文件中体现配置
<!-- 配置一个学生对象 -->
<bean id="student" class="com.hsp.inherit.Student">
<property name="name" value="顺平" />
<property name="age" value="30"/>
</bean>
<!-- 配置Grdate对象 -->
<bean id="grdate" parent="student" class="com.hsp.inherit.Gradate">
<!-- 如果自己配置属性name,age,则会替换从父对象继承的数据 -->
<!-- <property name="name" value="小明"/> -->
<property name="degree" value="学士"/>
</bean>
特别注意:parent="student"属性应该是bean id名,而不是类名Student
1.配置bean的简单属性,基本数据类型和string
<bean id="foo" class="...Foo">
<property name="name">
<value>tom</value>
</property>
</bean>
2.给集合类型注入值
<!-- 给数组注入值 -->
<property name="empName">
    <list>
        <value>小明</value>
        <value>小明小明</value>
        <value>小明小明小明小明</value>
    </list>
</property>

<!-- 给list注入值 list 中可以有相当的对象 -->
<property name="empList">
    <list>
        <ref bean="emp2" />
        <ref bean="emp1"/>
        <ref bean="emp1"/>
    </list>
</property>

<!-- 给set注入值 set不能有相同的对象 -->
<property name="empsets">
    <set>
        <ref bean="emp1" />
        <ref bean="emp2"/>
        <ref bean="emp2"/>
    </set>
</property>

<!-- 给map注入值 map只有key不一样,就可以装配value -->
<property name="empMaps">
    <map>
        <entry key="11" value-ref="emp1" />
        <entry key="22" value-ref="emp2"/>
        <entry key="33" value-ref="emp1"/>
    </map>
</property>

<!-- 给属性集合配置 --><property name="pp">
    <props>
        <prop key="pp1">abcd</prop>
        <prop key="pp2">hello</prop>
    </props>
</property>
</bean>

<bean id="emp1" class="com.hsp.collection.Employee">
<property name="name" value="北京"/>
<property name="id" value="1"/>
</bean>
<bean id="emp2" class="com.hsp.collection.Employee">
<property name="name" value="天津"/>
<property name="id" value="2"/>
</bean>
</beans>
二、构造函数注入
public Employee(String name, Integer age) {
this.name = name;
this.age = age;
}
<bean id="employee" class="com.hsp.constructor.Employee">
<!-- 通过构造函数来注入属性值 -->
<constructor-arg index="0" type="java.lang.String" value="大明" />
<constructor-arg index="1" type="java.lang.Integer" value="22" />
</bean>
注意:spring反射机制中不支持自动装箱和拆箱。类型一定要严格指定。
String、Integer这种包装类只能用 type="java.lang.Integer"不可以是 type="Integer"或其他。
将构造函数中age的类型改成int基本数据类型,只能 type="int"不能使用type="java.lang.Integer"
比较:
set注入的缺点是无法清晰表达哪些属性是必须的,哪些是可选的,构造注入的优势是通过构造强制依赖关系,不可能实例化不 完全的或无法使用的bean。
虽然如此,还是常用set注入的方法。
三、自动装配属性值
强调:自动装配是在没有显示设置属性值的时候,根据匹配规则进行自动装配。如已经设置,则按显示设置。
<bean id="foo" class="com.xidian.Foo" autowire="autowire type">
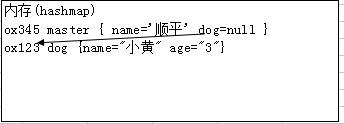
1.byName寻找和属性名相同的bean,若找不到,则装不上。
一定要将bean id和属性名设置一致
public class Master {
private String name;
private Dog dog;
<!-- 配置一个master对象 -->
<bean id="master" class="com.hsp.autowire.Master" autowire="byName">
<property name="name" value="xkj"/>
</bean>

<!-- 配置dog对象 -->
<bean id="dog"  class="com.hsp.autowire.Dog">
<property name="name" value="小黄"/>
<property name="age" value="3"/>

2.byType:寻找和属性类型相同的bean,找不到,装不上,找到多个抛异常。
public class Master {
private String name;
private Dog dog;
<!-- 配置一个master对象 -->
<bean id="master" class="com.hsp.autowire.Master" autowire="byType">
<property name="name" value="xkj"/>
</bean>

<!-- 配置dog对象 -->
<bean id="dog2"  class="com.hsp.autowire.Dog">
<property name="name" value="小黄"/>
<property name="age" value="3"/>
</bean>
3.constructor:查找和bean的构造参数一致的一个或 多个bean,若找不到或找到多个,抛异常。按照参数的类型装配
autowire="constructor"
public class Master {
private String name;
private Dog dog;
//构造函数注入dog
public Master(Dog dog) {
this.dog=dog;
}
4.autodetect
说明 : autowire="autodetect"
3和2之间选一个方式。优先选择3,没有则选择2.
5.defualt
这个需要在<beans defualt-autorwire=“指定” />
当你在<beans >指定了 default-atuowrite后, 所有的bean的 默认的autowire就是 指定的装配方法;
如果没有在<beans defualt-autorwire=“指定” /> 没有 defualt-autorwire=“指定” ,则默认是defualt-autorwire=”no”
<bean autorwire=”default”>则根据defualt-autorwire指定。
6. no: 不自动装配
讨论:自动装配能不用就不用,相对set方式,不够清晰明确,太绕。除非有特殊要求。
四、从属性文件中读取信息
如果不同的bean需要读取相同的信息,可以使用分散配置。使用占位符变量代替bean装配文件中的硬编码配置。
beans.xml
说明: 当通过 context:property-placeholder 引入 属性文件的时候,有多个需要使用 , 号间隔.
<!-- 引入我们的db.properties文件 -->
<context:property-placeholder location="classpath:com/hsp/dispatch/db.properties,classpath:com/hsp/dispatch/db2.properties"/>-

<!-- 配置一DBUtil对象 $占位符号 -->
<bean id="dbutil" class="com.hsp.dispatch.DBUtil">
<property name="name" value="${name}" />
<property name="drivername" value="${drivername}" />
<property name="url" value="${url}" />
<property name="pwd" value="${pwd}" />
</bean>

<!-- 配置一DBUtil对象 -->
<bean id="dbutil2" class="com.hsp.dispatch.DBUtil">
<property name="name" value="${db2.name}" />
<property name="drivername" value="${db2.drivername}" />
<property name="url" value="${db2.url}" />
<property name="pwd" value="${db2.pwd}" />
</bean>
db.properties:
name=scott
drivername=oracle:jdbc:driver:OracleDirver
url=jdbc:oracle:thin:@127.0.0.1:1521:hsp
pwd=tiger
补充:
class A{
private String name;
public viod setName(String name){
this.name=name;
System.out.println(“name”+name);
}
}
beans.xml
<bean id=”a” class=”...A”>
<property name=”name” value=”顺平” /> //看set方法,不是属性。不要属性也行
</bean>
底层实现:
A a=new A();
a.setName(“顺平”);
以上是关于Spring__bean的装配的主要内容,如果未能解决你的问题,请参考以下文章