springboot打war包部署tomcat服务器,以及表单提交数据乱码处理
Posted 细雨笑澄风
tags:
篇首语:本文由小常识网(cha138.com)小编为大家整理,主要介绍了springboot打war包部署tomcat服务器,以及表单提交数据乱码处理相关的知识,希望对你有一定的参考价值。
小白觉得springboot打成jar包直接使用内嵌的tomcat或jetty容器(java -jar xxx.jar)运行项目不利于定位问题,我还是习惯于查看tomcat或nginx的日志来定位问题,今天小白就讲讲springboot打成war部署JavaWeb项目于tomcat。
新建web项目 helloboot
开发工具:Spring Tool Suite(STS)
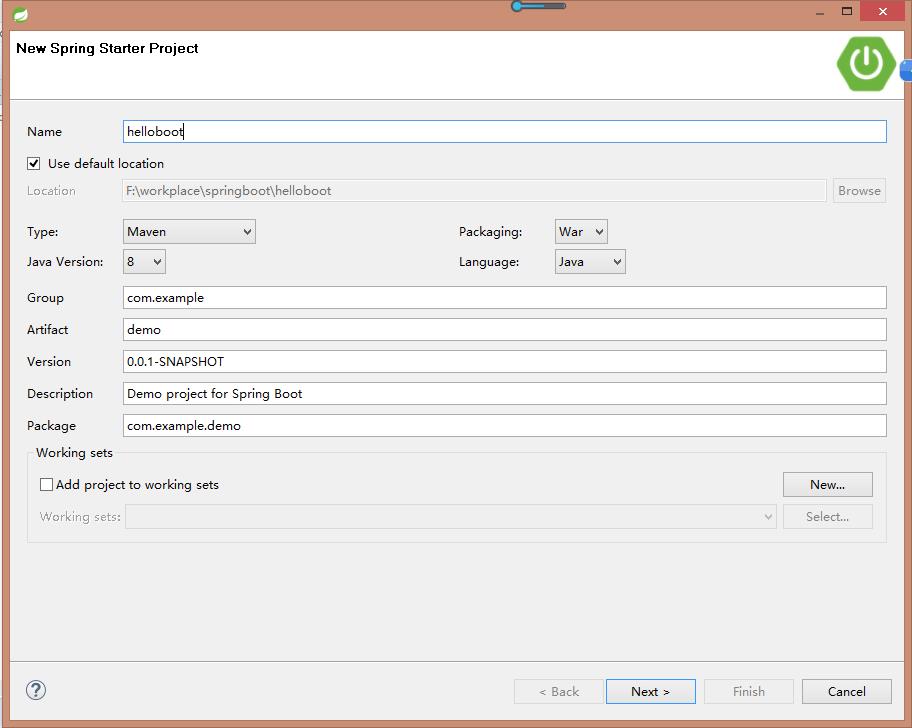
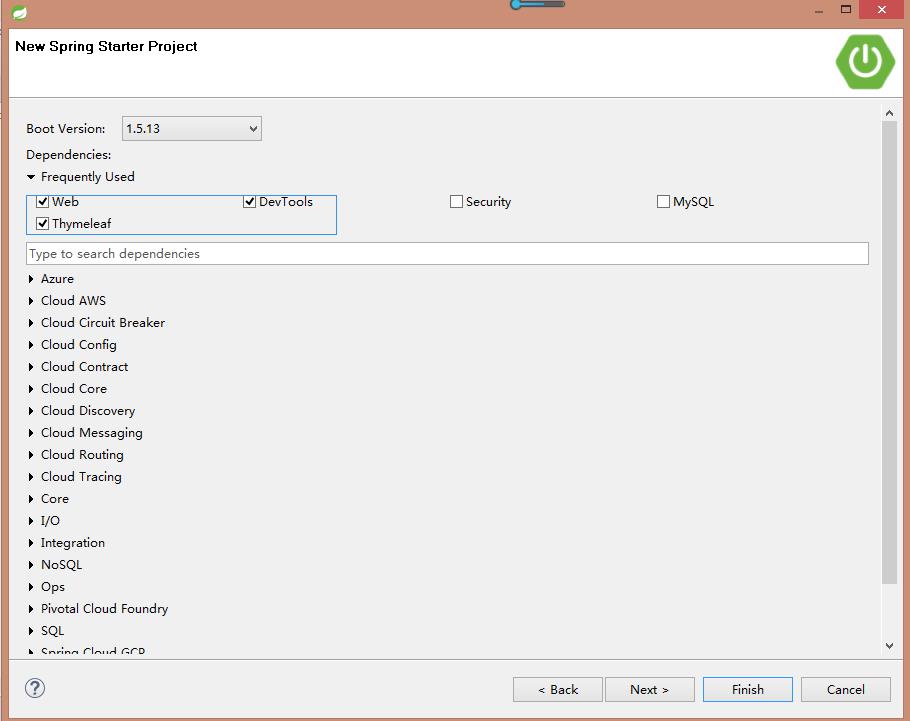
File->New->Spring Starter Project,如下图所示:


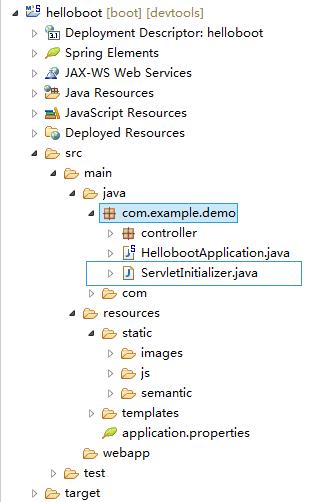
项目结构如下所示:

application.properties配置:
server.port=8082
server.context-path=/helloboot

spring.devtools.restart.additional-exclude=non-restart/**
spring.resources.static-locations=classpath:/resources/static/,classpath:/static/
spring.thymeleaf.cache=false

logging.level.org.springframework.security=INFO
pox.xml(自动生成的,未作修改):
<?xml version="1.0" encoding="UTF-8"?>
<project xmlns="http://maven.apache.org/POM/4.0.0" xmlns:xsi="http://www.w3.org/2001/XMLSchema-instance"
    xsi:schemaLocation="http://maven.apache.org/POM/4.0.0 http://maven.apache.org/xsd/maven-4.0.0.xsd">
    <modelVersion>4.0.0</modelVersion>

    <groupId>com.example</groupId>
    <artifactId>demo</artifactId>
    <version>0.0.1-SNAPSHOT</version>
    <packaging>war</packaging>

    <name>helloboot</name>
    <description>Demo project for Spring Boot</description>

    <parent>
        <groupId>org.springframework.boot</groupId>
        <artifactId>spring-boot-starter-parent</artifactId>
        <version>1.5.13.RELEASE</version>
        <relativePath/> <!-- lookup parent from repository -->
    </parent>

    <properties>
        <project.build.sourceEncoding>UTF-8</project.build.sourceEncoding>
        <project.reporting.outputEncoding>UTF-8</project.reporting.outputEncoding>
        <java.version>1.8</java.version>
    </properties>

    <dependencies>
        <dependency>
            <groupId>org.springframework.boot</groupId>
            <artifactId>spring-boot-starter-thymeleaf</artifactId>
        </dependency>
        <dependency>
            <groupId>org.springframework.boot</groupId>
            <artifactId>spring-boot-starter-web</artifactId>
        </dependency>

        <dependency>
            <groupId>org.springframework.boot</groupId>
            <artifactId>spring-boot-devtools</artifactId>
            <scope>runtime</scope>
        </dependency>
        <dependency>
            <groupId>org.springframework.boot</groupId>
            <artifactId>spring-boot-starter-tomcat</artifactId>
            <scope>provided</scope>
        </dependency>
        <dependency>
            <groupId>org.springframework.boot</groupId>
            <artifactId>spring-boot-starter-test</artifactId>
            <scope>test</scope>
        </dependency>
    </dependencies>

    <build>
        <plugins>
            <plugin>
                <groupId>org.springframework.boot</groupId>
                <artifactId>spring-boot-maven-plugin</artifactId>
            </plugin>
        </plugins>
    </build>
</project>
项目打包
1)在项目的启动类HellobootApplication.java的同级目录下新建ServletInitializer.java,代码如下,其位置可参考项目结构图:
package com.example.demo;

import org.springframework.boot.builder.SpringApplicationBuilder;
import org.springframework.boot.web.support.SpringBootServletInitializer;

public class ServletInitializer extends SpringBootServletInitializer {

    @Override
    protected SpringApplicationBuilder configure(SpringApplicationBuilder application) {
        return application.sources(HellobootApplication.class);
    }

}
2)用maven进行打包:Run AS -> Maven install,如下图所示打包成功,会在target目录下生成demo-0.0.1-SNAPSHOT.war

项目部署
进入tomcat的webapps子目录上传,上传完成后重命名为helloboot.war:
cd /root/tomcat/webapps
rz
mv demo-0.0.1-SNAPSHOT.war helloboot.war
修改tomcat的配置文件server.xml文件将8080端口改为8082,当然8080端口也是可以,由于本服务的8080端口已被占用。
进入tomcat的bin目录,启动tomcat:
cd /root/tomcat/bin
sh startup.sh
查看tomcat的日志:
cd /root/tomcat/logs
tail -f catalina.out
从日志可以看出启动成功:

项目访问
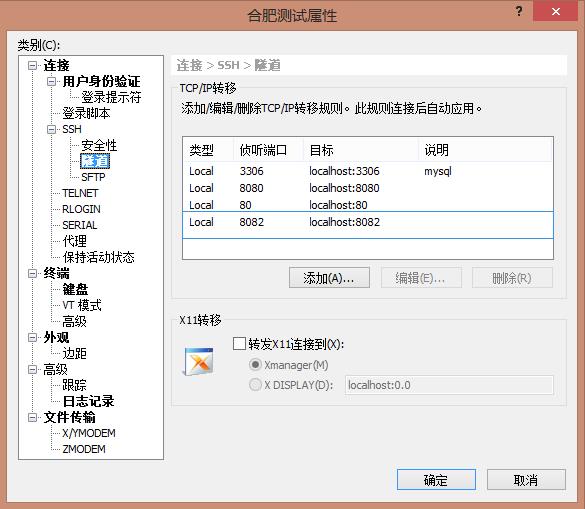
访问内网,可以通过xshell的通道访问:

在浏览器地址栏中输入:http://127.0.0.1:8082/helloboot/index,可见项目打包发布成功。

乱码处理
今天小白在测试demo是发现通过表单提交的数据乱码,原因可能有两种,一种前端提交到后台的数据后台解析乱码,另一种是解析正常但是在写入数据库的时候由于数据库编码导致的乱码。小白就这两种情况进行测试,第一种情况通过日志发现打印出来的前端传到后台的数据正常,于是小白查看了mysql数据库的编码,如下所示:
mysql> show variables like \'character_set_database\';
+------------------------+--------+
| Variable_name          | Value  |
+------------------------+--------+
| character_set_database | latin1 |
+------------------------+--------+
1 row in set (0.01 sec)
收集资料尝试发现只要在mysql的my.cnf的中添加一行代码character-set-server=utf8,重新启动mysql即可
[root@localhost etc]# vi /etc/my.cnf
[root@localhost etc]# service mysqld restart
my.cnf:
[root@localhost etc]# cat /etc/my.cnf
# For advice on how to change settings please see
# http://dev.mysql.com/doc/refman/5.7/en/server-configuration-defaults.html

[mysqld]
#
# Remove leading # and set to the amount of RAM for the most important data
# cache in MySQL. Start at 70% of total RAM for dedicated server, else 10%.
# innodb_buffer_pool_size = 128M
#
# Remove leading # to turn on a very important data integrity option: logging
# changes to the binary log between backups.
# log_bin
#
# Remove leading # to set options mainly useful for reporting servers.
# The server defaults are faster for transactions and fast SELECTs.
# Adjust sizes as needed, experiment to find the optimal values.
# join_buffer_size = 128M
# sort_buffer_size = 2M
# read_rnd_buffer_size = 2M
datadir=/var/lib/mysql
socket=/var/lib/mysql/mysql.sock

# Disabling symbolic-links is recommended to prevent assorted security risks
symbolic-links=0

character-set-server=utf8

log-error=/var/log/mysqld.log
pid-file=/var/run/mysqld/mysqld.pid
修改后的mysql数据库的编码,表单提交数据也正常了。
mysql> show variables like \'character_set_database\';
+------------------------+-------+
| Variable_name          | Value |
+------------------------+-------+
| character_set_database | utf8  |
+------------------------+-------+
1 row in set (0.06 sec)
以上是关于springboot打war包部署tomcat服务器,以及表单提交数据乱码处理的主要内容,如果未能解决你的问题,请参考以下文章