struts2学习1
Posted escapist
tags:
篇首语:本文由小常识网(cha138.com)小编为大家整理,主要介绍了struts2学习1相关的知识,希望对你有一定的参考价值。
struts2使用优势
自动封装参数
参数校验
结果的处理(转发|重定向)
国际化
显示等待页面
表单的防止重复提交
struts2具有更加先进的架构以及思想
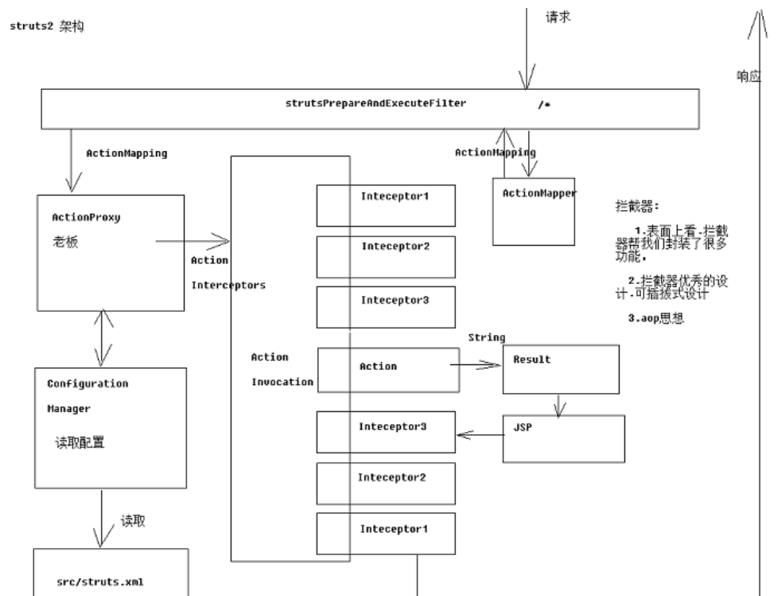
使用拦截器
struts2的历史
struts2与struts1区别就是技术上没有什么关系.
struts2的前身是webwork框架.
搭建struts2框架搭建
1.导包 在项目中找
2.书写Action类(处理请求的类) 无需继承什么类
public class Hello {
    public String hello() {
        System.out.println("hello");
        return "success";
    }
}
3.书写src/struts.xml dtd约束
<struts>
    <package name="hello" namespace="/hello" extends="struts-default">  注意:继承的 不能加上 xml 后缀
        <action name="HelloAction" class="com.action.HelloAction"
            method="hello">
            <result name="success">/index.jsp</result>
        </action>
    </package>
</struts>
4.将struts2核心过滤器配置到web.xml 因为struct2就是基于过滤器的
<filter>
      <filter-name>struts</filter-name>
      <filter-class>org.apache.struts2.dispatcher.ng.filter.StrutsPrepareAndExecuteFilter</filter-class>
  </filter>
  <filter-mapping>
      <filter-name>struts</filter-name>
      <url-pattern>/*</url-pattern>
  </filter-mapping>
struts2访问流程&struts2架构

配置详解
struts.xml配置
<package name=”hello” namespace=”/hello” extends=”struts-default”>
package:将action配置封装 就是可以在package 中配置很多action
     name属性:给包起个名字,起到标识的作用,不能和其他的包名重复
namespace属性:给action的访问路径中定义一个命名空间
extends属性 继承一个包
abstract属性 包是否为抽象的 标识性属性,标识该包不能被独立运行 专门被别人继承

action元素 配置action类
name属性:决定了action访问资源名
class属性:action所在的完成类名
method属性:指定调用action中指定的方法来处理请求
result元素 结果配置
    name属性:标识结果处理的名称  与action方法的返回值对应
    type属性:指定调用哪一个result类来处理结果,默认使用转发
     标签体:填写页面的相对路径文件
<result name=”success” type=”dispatcher”>/a.jsp</result>
引入其他struts配置
<include file=”/…/…/file.xml”></include>
struts2常量配置
struts2默认常量配置位置 struts-core/default.properties 文件
修改struts2常量配置(方式先后也是加载顺序)
方式1:src/struts.xml里面添加
<constant name="struts.i18n.encoding" value="UTF-8"></constant>
方式2:在src下创建struts.properties
struts.i18n.encoding=utf-8
方式3:在项目的web.xml中
<context-param>
      <param-name>struts.i18n.encoding</param-name>
      <param-value>utf-8</param-value>
  </context-param>
配置文件加载顺序
default.properties struts-default.xml struts-plugin.xml struts.xml struts.properties web.xml
常量配置 struct.xml文件中配置
<constant name="struts.i18n.encoding" value="utf-8"></constant>
解决post提交中文乱码问题

<constant name="struts.action.extension" value="action"></constant>
指定访问action时的后缀名  action
<constant name=”struts.devMode” value=”true”></constant>
指定struts2是否以开发模式运行
    1.热加载主配置(不需要重启即可生效)
    2.提供更多错误信息输出,方便调试
动态方法调用
方式1 不利于SEO优化
配置动态方法调用是否开启常量
默认是关闭的,需要开启
<constant name="struts.enable.DynamicMethodInvocation" value="true"></constant>
访问 Demo!find.action
方式2 和是否开启常量无关 _ 不是必须的
使用通配符: 使用{1} 取出第一个 星号通配的内容
<action name=”Demo_*” method=”{1}”>
访问 Demo_find
struts2中的默认配置(了解)
<package name="default" namespace="/default" extends="struts-default">
        <default-action-ref name=”DemoAction”></default-action-ref>
        <action name="abcAction" class="com.action.Demo" method="find">
            <result name="success">/Hello.jsp</result>
        </action>
    </package>
找不到包下的action,会使用 默认的action来处理请求
默认 method属性 execute
     name属性 success
     type属性 dispatcher 转发
     class 属性 com.opensymphony.xwork2.ActionSupport
Action类的书写方式
方式1(理想状态 开发不常用)
不用继承任何父类 也不需要实现任何接口 似的Struts2框架的代码侵入性更低
public class DemoAction
方式2:实现Action接口
里面定义了execute方法,提供了action方法的规范
Action接口里面预值了一些字符串 可以在返回结果的时候使用
Public class DemoAction implements Action
方式3:继承一个类 ActionSupport
帮我们实现了Validateable ValidationAware TextProvider LocaleProvider等接口
如果我们需要用到这些接口的实现时,不需要自己来实现了
而且在写配置文件的时候 action里面不需要写method
结果跳转方式
转发:type="dispatcher"
重定向:type="redirect" url 会变成 /hello.jsp
<!-- 重定向 -->
<action name="Demo2Action" class="cn.itheima.a_result.Demo2Action" method="execute" >
     <result name="success" type="redirect" >/hello.jsp</result>
</action>
转发到Action:type = "chain"
<!-- 转发到Action -->
<action name="Demo3Action" class="cn.itheima.a_result.Demo3Action" method="execute" >
     <result name="success" type="chain">
                     <!-- action的名字 -->
         <param name="actionName">Demo1Action</param>
                     <!-- action所在的命名空间 -->
          <param name="namespace">/</param>
      </result>
</action>
重定向到Action:
<!-- 重定向到Action -->
<action name="Demo4Action" class="cn.itheima.a_result.Demo4Action" method="execute" >
     <result  name="success"  type="redirectAction">
           <param name="actionName">Demo1Action</param>
           <param name="namespace">/</param>
      </result>
</action>
访问servletAPI方式

通过ActionContext下面2种都是通过这种方式得来的
public String execute() throws Exception {
        //request域=> map (struts2并不推荐使用原生request域)
        //不推荐
        Map<String, Object> requestScope = (Map<String, Object>) ActionContext.getContext().get("request");
        //推荐
        ActionContext.getContext().put("name", "requestTom");
        //session域 => map
        Map<String, Object> sessionScope = ActionContext.getContext().getSession();
        sessionScope.put("name", "sessionTom");
        //application域=>map
        Map<String, Object> applicationScope = ActionContext.getContext().getApplication();
        applicationScope.put("name", "applicationTom");

        return SUCCESS;
    }
通过ServletActionContext 因为纯Java操作 不推荐使用
//并不推荐
    public String execute() throws Exception {
        //原生request
        HttpServletRequest request = ServletActionContext.getRequest();
        //原生session
        HttpSession session = request.getSession();
        //原生response
        HttpServletResponse response = ServletActionContext.getResponse();
        //原生servletContext
        ServletContext servletContext = ServletActionContext.getServletContext();
        return SUCCESS;
    }
并不推荐使用原生的 request域
因为ActionContext 域 周期和request周期一样
通过实现接口方式 依次类推 通过拦截器实现Config...
//如何在action中获得原生ServletAPI
public class Demo7Action extends ActionSupport implements ServletRequestAware {  这个里面的方法
    private HttpServletRequest request;

    public String execute() throws Exception {
        System.out.println("原生request:"+request);
        return SUCCESS;
    }
    @Override
    public void setServletRequest(HttpServletRequest request) {
        this.request = request;
    }
}
Action生命周期
1.每次请求到来时,都会创建一个新的Action实例
2.Action是线程安全的.可以使用成员变量接收参数
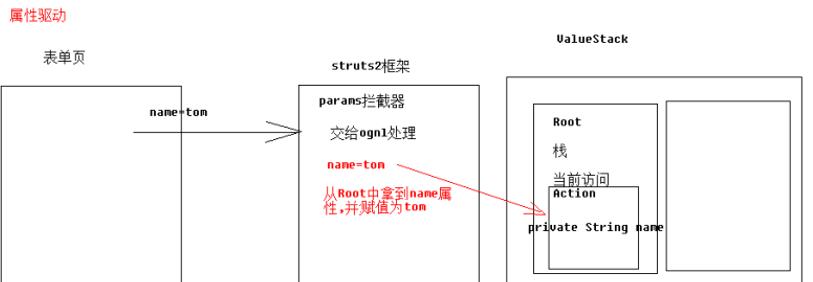
属性驱动获得参数(不常用)

//准备与参数键名称相同的属性
private String name;
//自动类型转换 只能转换8大基本数据类型以及对应包装类
private Integer age;
//支持特定类型字符串转换为Date ,例如 yyyy-MM-dd
private Date birthday;
对象驱动
<input type="text" name="u.name" /> user 是和后端的 名字相同 也可以使用get方法验证 localhost/Hello?u.name=wl & u.age=8
也是需要加上 前缀
private Users u;
    public Users getU() {
        return u;
    }
    public void setU(Users u) {
        this.u = u;
    }
模型驱动
<input type="text" name="name"> 不用加上 前缀
private Users u = new Users();
    @Override
    public Users getModel() {
        return u;
}
集合类型参数封装
List http://localhost:8080/strut-first/Hello?list[0]=2&list[1]=5
<input type=”text” name=”list”/>
<input type=”text” name=”list[3]”>
private List<String> list;
Map
<input type=”text” name=”map[‘haha’]”/>
private Map<String,String> map;
注意:struts和hibernate包在合并时.javassist-3.18.1-GA.jar包是重复的,删除版本低的.
OGNL表达式
OGNL:对象视图导航语言. ${user.addr.name} 这种写法就叫对象视图导航.
OGNL不仅仅可以视图导航.支持比EL表达式更加丰富的功能.
使用OGNL准备工作
导包: struts2 的包中已经包含了.所以不需要导入额外的jar包
OGNLContext ognl上下文对象
Root:返回值任何对象 都可以作为root
Context:map 里面都是 键值对
public void fun1() throws Exception{
        //准备Root
        User rootUser = new User("tom",18);
        //准备Context
        Map<String,User> context = new HashMap<String,User>();
        context.put("user1", new User("jack",18));
        context.put("user2", new User("rose",22));
        OgnlContext oc = new OgnlContext();

        oc.setRoot(rootUser);//将rootUser作为root部分
        oc.setValues(context);将context这个Map作为Context部分
        Ognl.getValue("", oc, oc.getRoot()); }
基本取值
//取出root中的属性值
    public void fun2() throws Exception{
        User rootUser = new User("tom",18);
        Map<String,User> context = new HashMap<String,User>();
        context.put("user1", new User("jack",18));
        context.put("user2", new User("rose",22));
        OgnlContext oc = new OgnlContext();
        oc.setRoot(rootUser);
        oc.setValues(context);//取出root中user对象的name属性
        String name = (String) Ognl.getValue("name", oc, oc.getRoot());
        Integer age = (Integer) Ognl.getValue("age", oc, oc.getRoot());
    }
//取出context中的属性值
    public void fun3() throws Exception{
        User rootUser = new User("tom",18);
        Map<String,User> context = new HashMap<String,User>();
        context.put("user1", new User("jack",18));
        context.put("user2", new User("rose",22));
        OgnlContext oc = new OgnlContext();
        oc.setRoot(rootUser);
        oc.setValues(context);//取出context中键为user1对象的name属性
        String name = (String) Ognl.getValue("#user1.name", oc, oc.getRoot());
        String name2 = (String) Ognl.getValue("#user2.name", oc, oc.getRoot());
        Integer age = (Integer) Ognl.getValue("#user2.age", oc, oc.getRoot());
    }
//为属性赋值
    public void fun4() throws Exception{
        User rootUser = new User("tom",18);
        Map<String,User> context = new HashMap<String,User>();
        context.put("user1", new User("jack",18));
        context.put("user2", new User("rose",22));
        OgnlContext oc = new OgnlContext();
        oc.setRoot(rootUser);
        oc.setValues(context);//将root中的user对象的name属性赋值
        Ognl.getValue("name=\'jerry\'", oc, oc.getRoot());
        String name = (String) Ognl.getValue("name", oc, oc.getRoot());
        String name2 = (String) Ognl.getValue("#user1.name=\'wl\',#user1.name", oc, oc.getRoot());
    }
赋值 多个赋值可以串联
调用方法
  public void fun5() throws Exception{
        User rootUser = new User("tom",18);
        Map<String,User> context = new HashMap<String,User>();
        context.put("user1", new User("jack",18));
        context.put("user2", new User("rose",22));
        OgnlContext oc = new OgnlContext();
        oc.setRoot(rootUser);
        oc.setValues(context);

        //调用root中user对象的setName方法
        Ognl.getValue("setName(\'lilei\')", oc, oc.getRoot());
        String name = (String) Ognl.getValue("getName()", oc, oc.getRoot());

        String name2 = (String) Ognl.getValue("#user1.setName(\'lucy\'),#user1.getName()", oc, oc.getRoot());
    }
调用静态方法
public void fun6() throws Exception{
        User rootUser = new User("tom",18);
        Map<String,User> context = new HashMap<String,User>();
        context.put("user1", new User("jack",18));
        context.put("user2", new User("rose",22));
        OgnlContext oc = new OgnlContext();
        oc.setRoot(rootUser);
        oc.setValues(context);

        String name = (String) Ognl.getValue("@cn.itheima.a_ognl.HahaUtils@echo(\'hello 强勇!\')", oc, oc.getRoot());
        //Double pi = (Double) Ognl.getValue("@java.lang.Math@PI", oc, oc.getRoot());
        Double pi = (Double) Ognl.getValue("@@PI", oc, oc.getRoot());
    }
创建对象(List,Map)
//ognl创建对象-list|map
    public void fun7() throws Exception{
        User rootUser = new User("tom",18);
        Map<String,User> context = new HashMap<String,User>();
        context.put("user1", new User("jack",18));
        context.put("user2", new User("rose",22));
        OgnlContext oc = new OgnlContext();
        oc.setRoot(rootUser);
        oc.setValues(context);

        //创建list对象
        Integer size = (Integer) Ognl.getValue("{\'tom\',\'jerry\',\'jack\',\'rose\'}.size()", oc, oc.getRoot());
        String name = (String) Ognl.getValue("{\'tom\',\'jerry\',\'jack\',\'rose\'}[0]", oc, oc.getRoot());
        String name2 = (String) Ognl.getValue("{\'tom\',\'jerry\',\'jack\',\'rose\'}.get(1)", oc, oc.getRoot());

        //创建Map对象
        Integer size2 = (Integer) Ognl.getValue("#{\'name\':\'tom\',\'age\':18}.size()", oc, oc.getRoot());
        String name3  = (String) Ognl.getValue("#{\'name\':\'tom\',\'age\':18}[\'name\']", oc, oc.getRoot());
        Integer age  = (Integer) Ognl.getValue("#{\'name\':\'tom\',\'age\':18}.get(\'age\')", oc, oc.getRoot());
    }
OGNL 可以赋值和取值动作一起进行
@@PI 相当于 @java.lang.Math@PI
如果添加的参数struts"看不懂".就会作为参数附加重定向的路径之后.
如果参数是动态的.可以使用${}包裹ognl表达式.动态取值
OGNL与Struts2的结合

查看值栈中两部分内容(使用DEBUG标签)在jsp页面
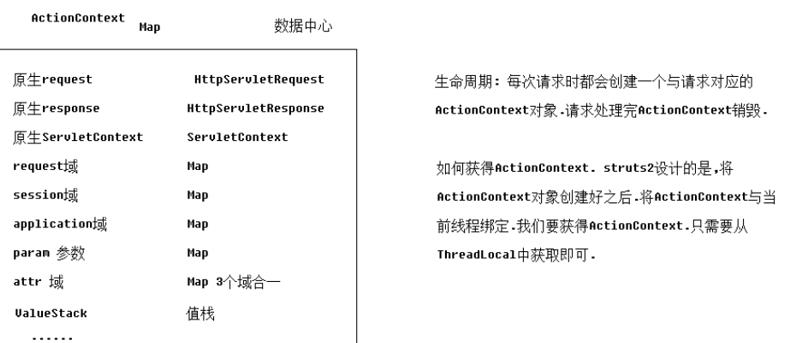
Root: 默认情况下,栈中放置当前访问的Action对象 Context部分就是ActionContext数据中心

struts2与ognl结合体现
参数接收


如何获得值栈对象,值栈对象与ActionContext对象是互相引用的
配置文件中使用

${ognl表达式}
扩展:request对象的getAttribute方法 wrappedRequest

查找顺序
以前的Servlet 是线程不安全的,Tomcat只会创建一个实例对象
怎么解决各个人传递的值不一致问题? 将参数放到 doGet方法里面
而Action 是线程安全的 ,所以可以直接将 参数放到成员变量中 而不用担心数据共享问题
每次请求Action时都会创建新的Action实例对象
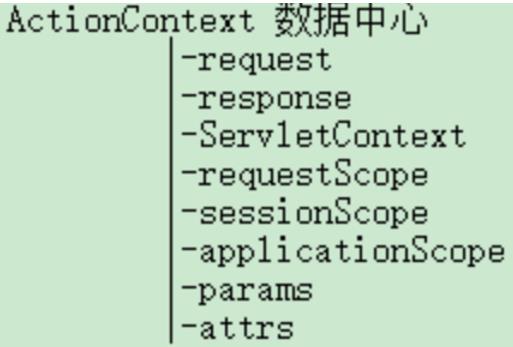
ActionContext 所有对象都可以获取 也是一个Map
原生request/reponse/servletCContext
域对象 Map
attr 域 三个域 key相同以小的为准
默认值 这些配置都在 struct-default.xml中
include 可以引入其他 struct配置文件
开发模式
有轮训线程在轮训
消耗更多的IO
以上是关于struts2学习1的主要内容,如果未能解决你的问题,请参考以下文章
免费下载全套最新011Struts2视频教程+教学资料+学习课件+源代码+软件开发工具