hibernate关联映射
Posted
tags:
篇首语:本文由小常识网(cha138.com)小编为大家整理,主要介绍了hibernate关联映射相关的知识,希望对你有一定的参考价值。
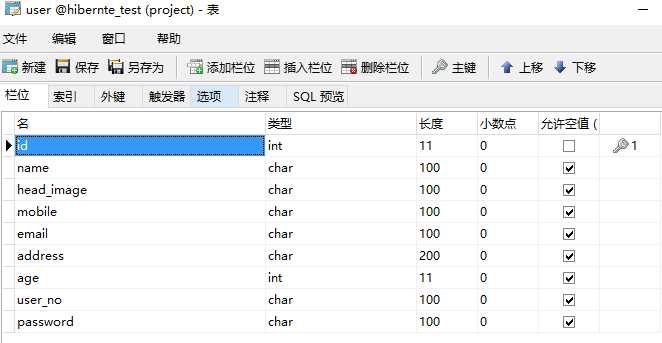
首先,建立user表,news表


建立User,News类
package com.example.hibernate;

import java.util.Set;

public class User {

    private int id;
    private String name;
    private String head_image;
    private String mobile;
    private String email;
    private String address;
    private int age;
    private String user_no;
    private String password;
    private Set<News> newsSet;


    public int getId() {
        return id;
    }
    public void setId(int id) {
        this.id = id;
    }
    public String getName() {
        return name;
    }
    public void setName(String name) {
        this.name = name;
    }
    public String getHead_image() {
        return head_image;
    }
    public void setHead_image(String head_image) {
        this.head_image = head_image;
    }
    public String getMobile() {
        return mobile;
    }
    public void setMobile(String mobile) {
        this.mobile = mobile;
    }
    public String getEmail() {
        return email;
    }
    public void setEmail(String email) {
        this.email = email;
    }
    public String getAddress() {
        return address;
    }
    public void setAddress(String address) {
        this.address = address;
    }
    public int getAge() {
        return age;
    }
    public void setAge(int age) {
        this.age = age;
    }
    public String getUser_no() {
        return user_no;
    }
    public void setUser_no(String user_no) {
        this.user_no = user_no;
    }
    public String getPassword() {
        return password;
    }
    public void setPassword(String password) {
        this.password = password;
    }
    public Set<News> getNewsSet() {
        return newsSet;
    }
    public void setNewsSet(Set<News> newsSet) {
        this.newsSet = newsSet;
    }


}
package com.example.hibernate;

import java.util.Date;

public class News {


    private int id;
    private String title;
    private User user;


    public News(String title) {
        super();
        this.title = title;
    }

    public int getId() {
        return id;
    }
    public void setId(int id) {
        this.id = id;
    }
    public String getTitle() {
        return title;
    }
    public void setTitle(String title) {
        this.title = title;
    }
    public User getUser() {
        return user;
    }
    public void setUser(User user) {
        this.user = user;
    }

}
配置映射文件:
<?xml version="1.0"?>
<!DOCTYPE hibernate-mapping PUBLIC
    "-//Hibernate/Hibernate Mapping DTD 3.0//EN"
    "http://www.hibernate.org/dtd/hibernate-mapping-3.0.dtd">

<hibernate-mapping>

    <class name="com.example.hibernate.User" table="user" >

        <id name="id">
            <generator class="native"/>
        </id>

        <property name="name" column="name" />
        <property name="head_image" column="head_image" />
        <property name="mobile" column="mobile" />
        <property name="email" column="email" />
        <property name="address" column="address" />
        <property name="age" column="age" />
        <property name="user_no" column="user_no" />
        <property name="password" column="password" />


        <set name="newsSet" table="news" cascade="save-update,delete">
             <key column="user_id"></key>
             <one-to-many class="com.example.hibernate.News"/>
         </set>
    </class>

</hibernate-mapping>
<?xml version="1.0"?>
<!DOCTYPE hibernate-mapping PUBLIC
    "-//Hibernate/Hibernate Mapping DTD 3.0//EN"
    "http://www.hibernate.org/dtd/hibernate-mapping-3.0.dtd">

<hibernate-mapping>


    <class name="com.example.hibernate.News" table="news">

        <id name="id">
            <generator class="native"/>
        </id>

        <property name="title" column="title" />

        <many-to-one name="user" column="user_id" class="com.example.hibernate.User"></many-to-one>

    </class>

</hibernate-mapping>
配置hibernate.cfg.xml
<?xml version=‘1.0‘ encoding=‘UTF-8‘?>
     <!DOCTYPE hibernate-configuration PUBLIC
        "-//Hibernate/Hibernate Configuration DTD 3.0//EN"
        "http://hibernate.sourceforge.net/hibernate-configuration-3.0.dtd">
     <!-- 正文开始 -->
 <hibernate-configuration>
     <!--下面是数据库的基本连接信息,对一个应用来说,设置一个session-factory节点就够了,除非我们中间使用了多个数据库-->
     <session-factory>
         <!--用户名 -->
         <property name="connection.username">root</property>
         <!--url信息 -->
         <property name="connection.url">jdbc:mysql://localhost:3306/hibernte_test</property>
         <!--数据库方言信息-->
         <property name="dialect">org.hibernate.dialect.MySQLDialect</property>
         <!--密码 -->
         <property name="connection.password">1111</property>
         <!--数据库驱动信息 -->
         <property name="connection.driver_class">com.mysql.jdbc.Driver</property>

         <property name="hibernate.show_sql">true</property>

         <!--指定Hibernate映射文件路径 -->
         <mapping resource="com/example/hibernate/User.hbm.xml" />
         <mapping resource="com/example/hibernate/News.hbm.xml" />
     </session-factory>
</hibernate-configuration>
编写测试类:
package com.example.hibernate;

import java.util.HashSet;

import org.hibernate.Session;
import org.hibernate.SessionFactory;
import org.hibernate.Transaction;
import org.hibernate.cfg.Configuration;
import org.hibernate.service.ServiceRegistry;
import org.hibernate.service.ServiceRegistryBuilder;
import org.junit.After;
import org.junit.Before;
import org.junit.Test;


public class MyTest {

    SessionFactory sessionFactory;
    Session session;
    Transaction transaction;

    @Before
    public void init(){
        Configuration configuration = new Configuration().configure();
        ServiceRegistry serviceRegistry = new ServiceRegistryBuilder().applySettings(configuration.getProperties()).buildServiceRegistry();
        sessionFactory = configuration.buildSessionFactory(serviceRegistry);
        session = sessionFactory.openSession();
        transaction = session.beginTransaction();
    }

    @Test
    public void save(){
        User user = new User();
        user.setAddress("福建厦门鼓浪屿");
        user.setAge(10);
        user.setEmail("[email protected]");
        user.setHead_image("ïmg1.jpg");
        user.setMobile("123224324");
        user.setName("王天才");
        user.setPassword("11111");
        user.setUser_no("11111");
        user.setNewsSet(new HashSet<News>());

        News news1 = new News("测试一");
        News news2 = new News("测试二");

        news1.setUser(user);
        news2.setUser(user);

        user.getNewsSet().add(news1);
        user.getNewsSet().add(news2);

        //会多执行多余语句,切记需要添加inverse(本程序未添加)
        session.save(user);
    }

    @After
    public void destroy(){
        transaction.commit();
        session.close();
        sessionFactory.close();
    }

}
以上是关于hibernate关联映射的主要内容,如果未能解决你的问题,请参考以下文章