微信小程序自定义tabbar,实现不同角色不同的tabbar
Posted
tags:
篇首语:本文由小常识网(cha138.com)小编为大家整理,主要介绍了微信小程序自定义tabbar,实现不同角色不同的tabbar相关的知识,希望对你有一定的参考价值。
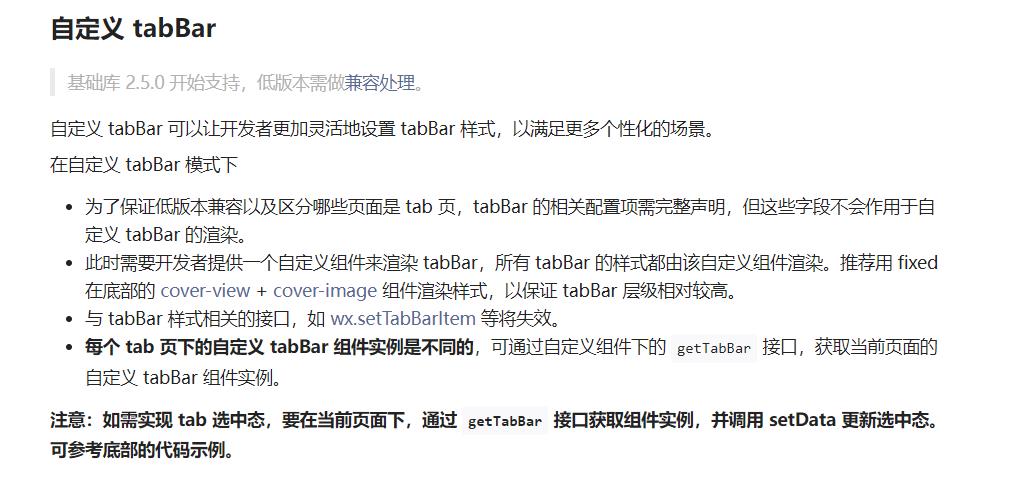
参考技术A 参照微信小程序官方文档, 自定义tabbar ,但该文档只是实现了自定义tabbar,没有实现不同角色不同的tabbar,且官方文档中的custom-bab-bar组件中的setData方法存在在真机上不能重新渲染的bug,可能是由于缓存造成的。本项目仓库: customtabbar 。
主要是在tab的页面组件中调用getTabBar接口后再调用setData方法,从而实现了tabbar的重新渲染。
微信小程序自定义导航栏,实现不同用户角色登陆后显示不同的tabbar(避坑版)
在我们开发小程序的过程中,会遇到权限登录问题,不同的角色登录后显示的底部导航栏tabbar是不一样的。网上看到了很多的博客,多多少少会有些坑,会遇到问题。今天这篇博客就可以一次性解决。
了解概念
使用方法
app.json中声明custom字段为true
“custom”: true
"tabBar":
    "custom": true,
    "selectedColor": "#3161ff",
    "list": [

        "pagePath": "pages/index/index",
        "text": "检查",
        "iconPath": "./assets/tabbar/check.png",
        "selectedIconPath": "./assets/tabbar/check_select.jpg"
      ,

        "pagePath": "pages/approval/index",
        "text": "审批",
        "iconPath": "./assets/tabbar/approval.png",
        "selectedIconPath": "./assets/tabbar/approval_select.png"
      ,

        "pagePath": "pages/mine/index",
        "text": "我的",
        "iconPath": "./assets/tabbar/me.png",
        "selectedIconPath": "./assets/tabbar/me_select.png"

    ]
  ,
根目录添加入口文件
在根目录新建文件夹,名为custom-tab-bar(名字一定不能改)
在custom-tab-bar文件夹点击右键,新建Component,名字是index(这个也不能改,都是官方要求的,改了无法显示了)
编写代码
custom-tab-bar/index.wxml
<!--custom-tab-bar/index.wxml-->
<view class="tab-bar">
  <view class="tab-bar-border"></view>
  <view wx:for="selectList" wx:key="index" class="tab-bar-item" data-path="item.pagePath" data-selected="item.selected" bindtap="switchTab">
    <image class="cover-image" src="selected === item.selected ? item.selectedIconPath : item.iconPath"></image>
    <view class="cover-view" style="color: selected === item.selected ? selectedColor : color">item.text</view>
  </view>
</view>
custom-tab-bar/index.wxss
/* custom-tab-bar/index.wxss */
.tab-bar
  position: fixed;
  bottom: 0;
  left: 0;
  right: 0;
  height: 48px;
  background: white;
  display: flex;
  padding-bottom: env(safe-area-inset-bottom);


.tab-bar-border
  background-color: rgba(0, 0, 0, 0.33);
  position: absolute;
  left: 0;
  top: 0;
  width: 100%;
  height: 1px;
  transform: scaleY(0.5);


.tab-bar-item
  flex: 1;
  text-align: center;
  display: flex;
  justify-content: center;
  align-items: center;
  flex-direction: column;


.tab-bar-item .cover-image
  width: 44rpx;
  height: 44rpx;


.tab-bar-item .cover-view
  margin-top: 8rpx;
  font-size: 24rpx;
custom-tab-bar/index.js
// custom-tab-bar/index.js
Component(
  /**
   * 组件的属性列表
   */
  properties:

  ,

  /**
   * 组件的初始数据
   */
  data:
    selectedColor: "#3161ff",
    allList: [
      [
          "pagePath": "/pages/index/index",
          "text": "检查",
          "iconPath": "../assets/tabbar/check.png",
          "selectedIconPath": "../assets/tabbar/check_select.jpg",
          "selected": "index"
        ,

          "pagePath": "/pages/mine/index",
          "text": "我的",
          "iconPath": "../assets/tabbar/me.png",
          "selectedIconPath": "../assets/tabbar/me_select.png",
          "selected": "mine"

      ],
      [
          "pagePath": "/pages/index/index",
          "text": "检查",
          "iconPath": "../assets/tabbar/check.png",
          "selectedIconPath": "../assets/tabbar/check_select.jpg",
          "selected": "index"
        ,

          "pagePath": "/pages/approval/index",
          "text": "审批",
          "iconPath": "../assets/tabbar/approval.png",
          "selectedIconPath": "../assets/tabbar/approval_select.png",
          "selected": "approval"
        ,

          "pagePath": "/pages/mine/index",
          "text": "我的",
          "iconPath": "../assets/tabbar/me.png",
          "selectedIconPath": "../assets/tabbar/me_select.png",
          "selected": "mine"

      ]
    ],
    selectList: []
  ,
  /**
   * 生命周期方法
   */
  attached()
    this.setData(
      selectList: this.data.allList[1]
    )
  ,
  /**
   * 组件的方法列表
   */
  methods:
    switchTab(e)
      // console.log(e.currentTarget.dataset);
      let path = e.currentTarget.dataset.path;
      let selected = e.currentTarget.dataset.selected
      // console.log(e.currentTarget.dataset.selected);
      wx.switchTab(
        url: path,
      )


)
在每个Page的js文件中的onShow方法里,添加如下代码
pages\\approval\\index.js
onShow()
    if(typeof this.getTabBar === 'function' &&
    this.getTabBar())
      this.getTabBar().setData(
        selected: "approval"
      )

  ,
以此类推
pages\\index\\index.js
onShow()
    if(typeof this.getTabBar === 'function' &&
    this.getTabBar())
      this.getTabBar().setData(
        selected: "index"
      )
pages\\mine\\index.js
 onShow()
    if (typeof this.getTabBar === 'function' &&
      this.getTabBar())
      this.getTabBar().setData(
        selected: "mine"
      )

  ,
这里面selected的值对应的就是allLIst数组中的selected字段,选中哪个,哪个就会实现颜色改变切换。
解释说明
这里我们做的是自定义导航栏,所以在custom-tab-bar/index.wxml显示。
for循环的是选中的数组,渲染出该数组的image和文字
通过custom-tab-bar/index.js中attachec生命周期选中的selectList: this.data.allList[1]/selectList: this.data.allList[0]实现不同tabbar切换
的selected字段,选中哪个,哪个就会实现颜色改变切换。
解释说明
这里我们做的是自定义导航栏,所以在custom-tab-bar/index.wxml显示。
for循环的是选中的数组,渲染出该数组的image和文字
通过custom-tab-bar/index.js中attachec生命周期选中的selectList: this.data.allList[1]/selectList: this.data.allList[0]实现不同tabbar切换
因为这个是小demo还没做角色信息啥的,等真正做开发的时候就可以把获取过来的角色id进行判断,判断是渲染哪个list
以上是关于微信小程序自定义tabbar,实现不同角色不同的tabbar的主要内容,如果未能解决你的问题,请参考以下文章