保姆级手把手教学 数学建模美赛信件格式latex模板(overleaf)
Posted 铖铖的花嫁
tags:
篇首语:本文由小常识网(cha138.com)小编为大家整理,主要介绍了保姆级手把手教学 数学建模美赛信件格式latex模板(overleaf)相关的知识,希望对你有一定的参考价值。
可能是最后一次打美赛了,感觉有的东西不整理整理有点对不起自己的经历。感觉为这个比赛付出过挺多的,这几次参赛的经历也从各种方面提升了我的能力,相信未来的自己也还会怀念这段时光。
个人认为美赛的难点之一就是优质资源难得,不知道自己的整理算不算优质资源,但是还是希望可以为他人提供一点帮助。毕竟自己淋过雨,所以要抢别人的伞(bushi
关于信件方面,感觉网上零零碎碎的整理还是非常多的,但是有很多不符合我个人的预期,方便起见,自己整理了一份。
文章目录
效果图
话不多说,先上效果图。
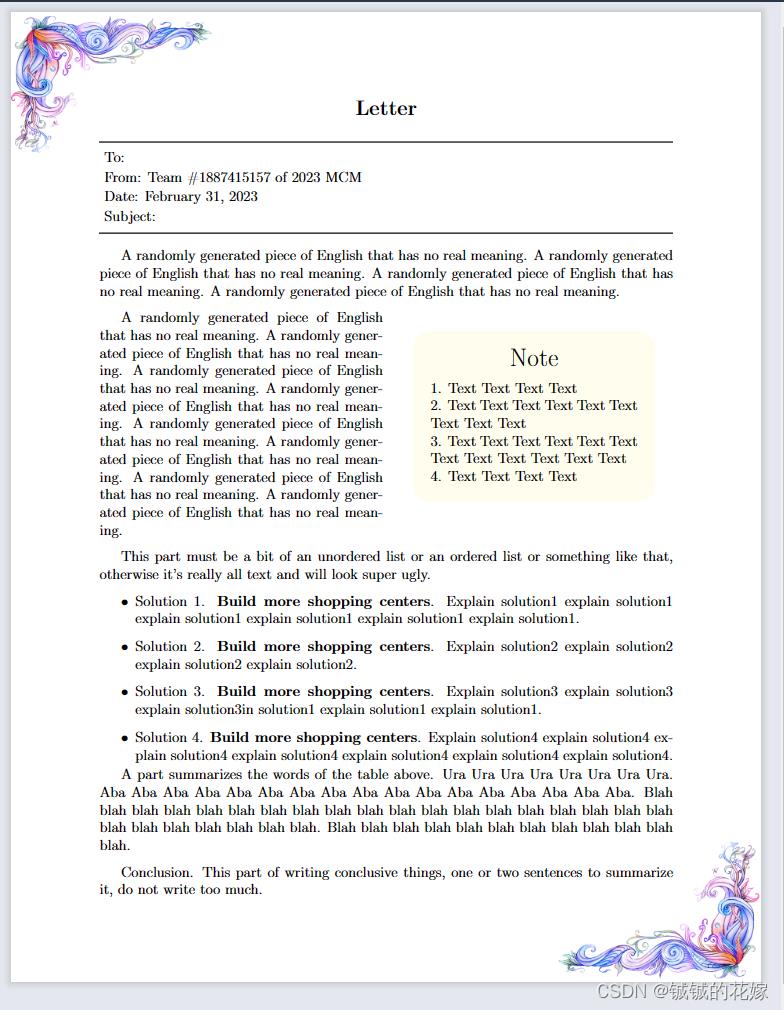
就是说没有很好看,但是也不算难看,比直接干巴巴地放一整页字强太多了。
注意点
这部分按要素来吧,这部分主要分为这几个要素难点:
- section去掉序号并居中显示
- 信件格式设计:横线加行间距
- 花边(wallpaper)
- 文本框显示(tcolorbox实现)
- 文本框嵌入至文本(wrapfig)
- 去页眉页脚
- 无序列表(itemize)=> 没什么难度,但是感觉在letter里面还是非常重要的
实现细节
section
之前的章节一般是张这样的
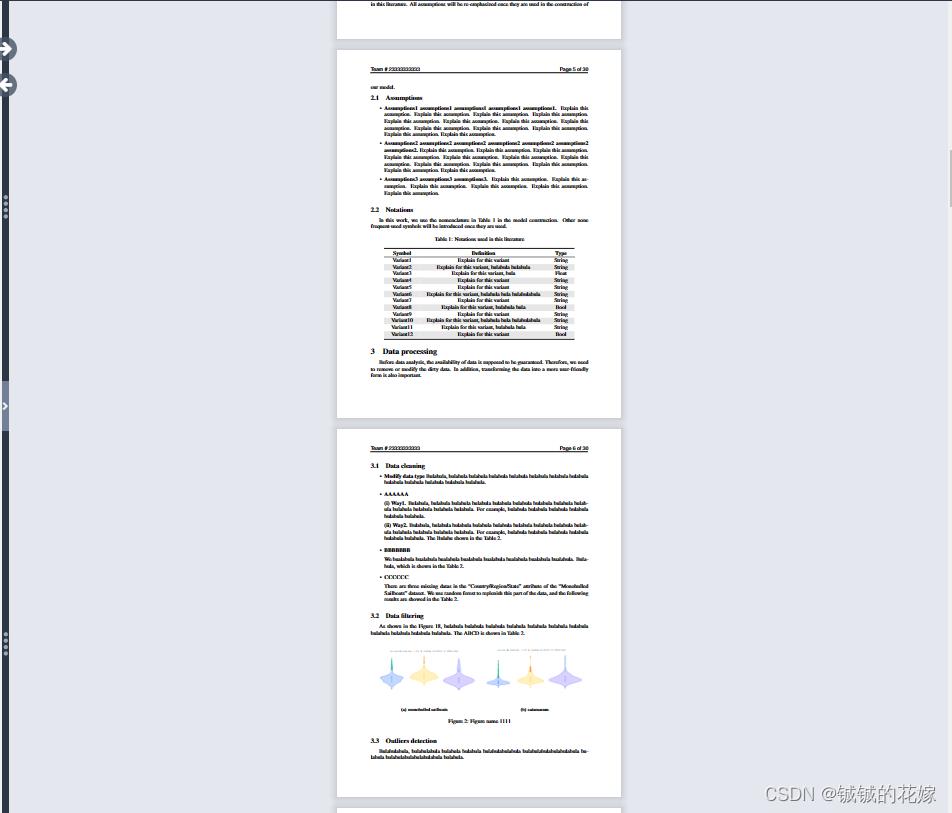
\\section 和 \\subsection 前都有序号且是左边定格显示
我们操作下:
\\centering\\section*Letter
% center居中
% *去标号
信件格式设计
信件一般有个开头,我们用这种双横线中间夹信息的方式表示

需要注意的是行间距需要缩短一点,因为横线和这几行字已经占了很多空间了,如果每行信息还是按照段间距的空位来写的话,实在是没有空间留给后文了。
\\noindent\\rule\\textwidth1pt

\\vspace-0.2cm

\\noindent \\ To:

\\vspace-0.2cm

\\noindent \\ From: Team \\#1887415157 of 2023 MCM

\\vspace-0.2cm

\\noindent \\ Date: February 31, 2023

\\vspace-0.2cm

\\noindent \\ Subject:

\\vspace-0.4cm

\\noindent\\rule\\textwidth1pt
花边
原来只是想放代码的,然后发现有的读者不会 ps……
那顺便也教一下
- 从网上抓一个比较好看的花边图片,记得稍微高清点,放ps里

- 裁剪工具只留一个花边
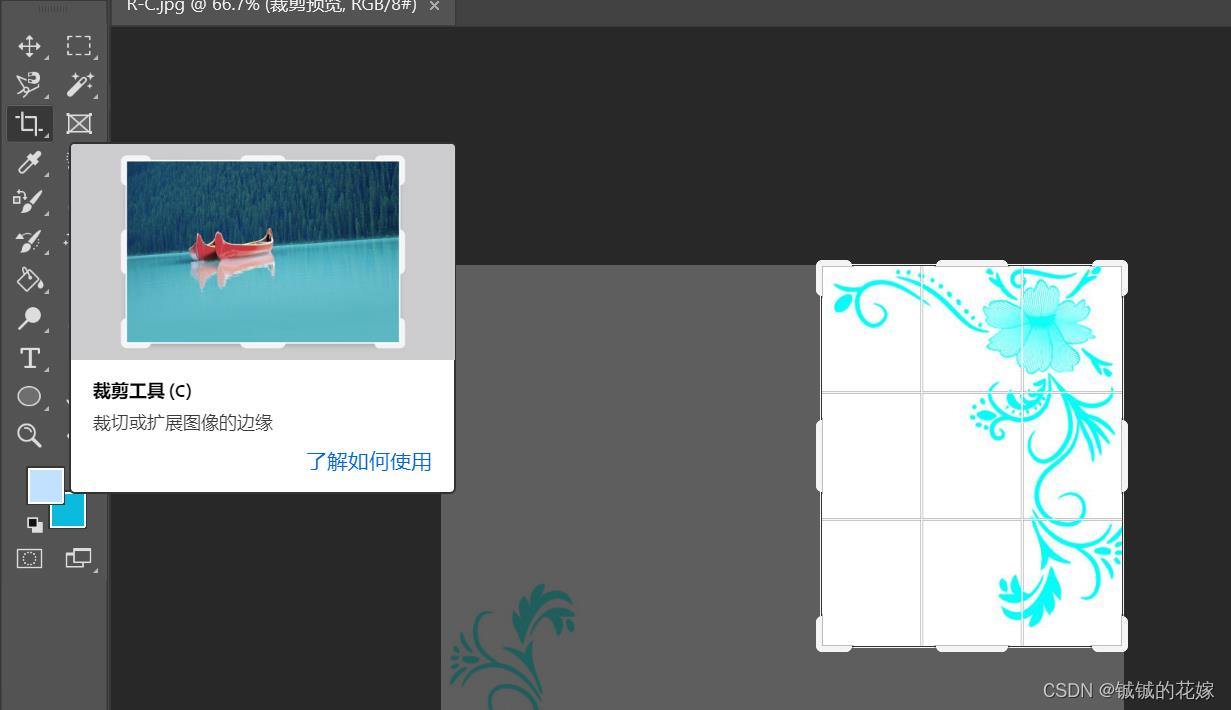
- 魔术橡皮擦把白色的地方变透明
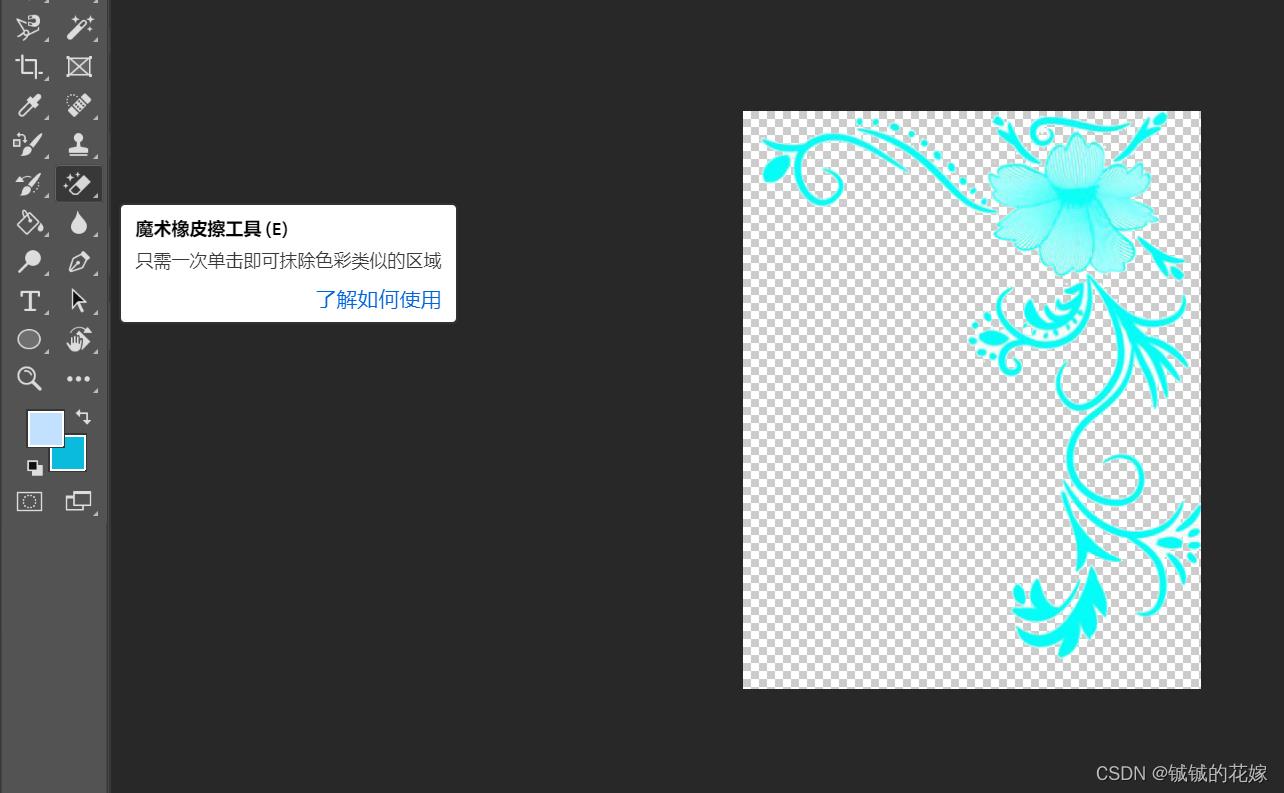
- 创建一个白色的大概 38:50 的画布,然后魔术橡皮擦一下
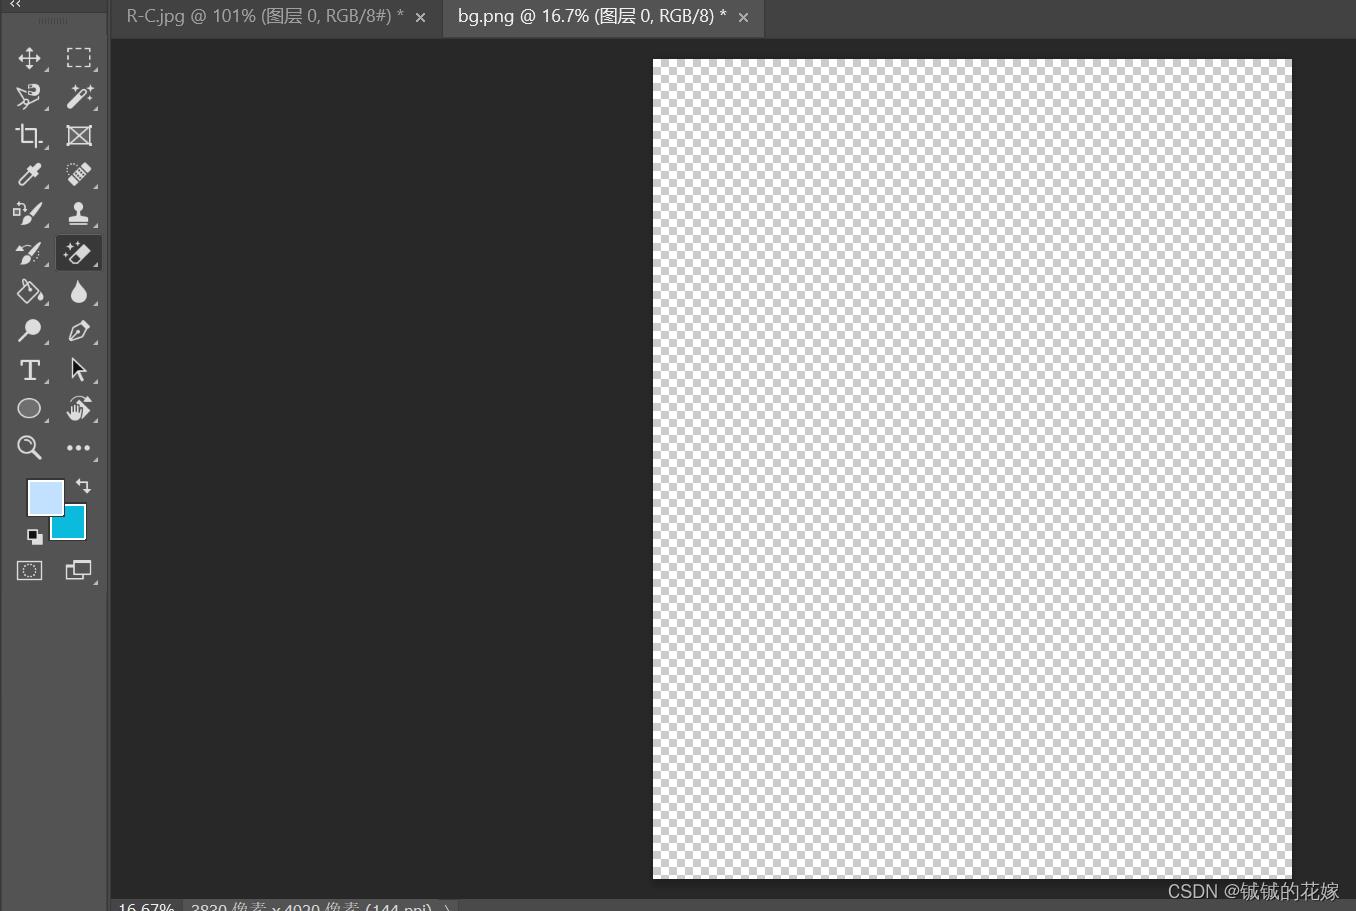
- 放花边,调大小
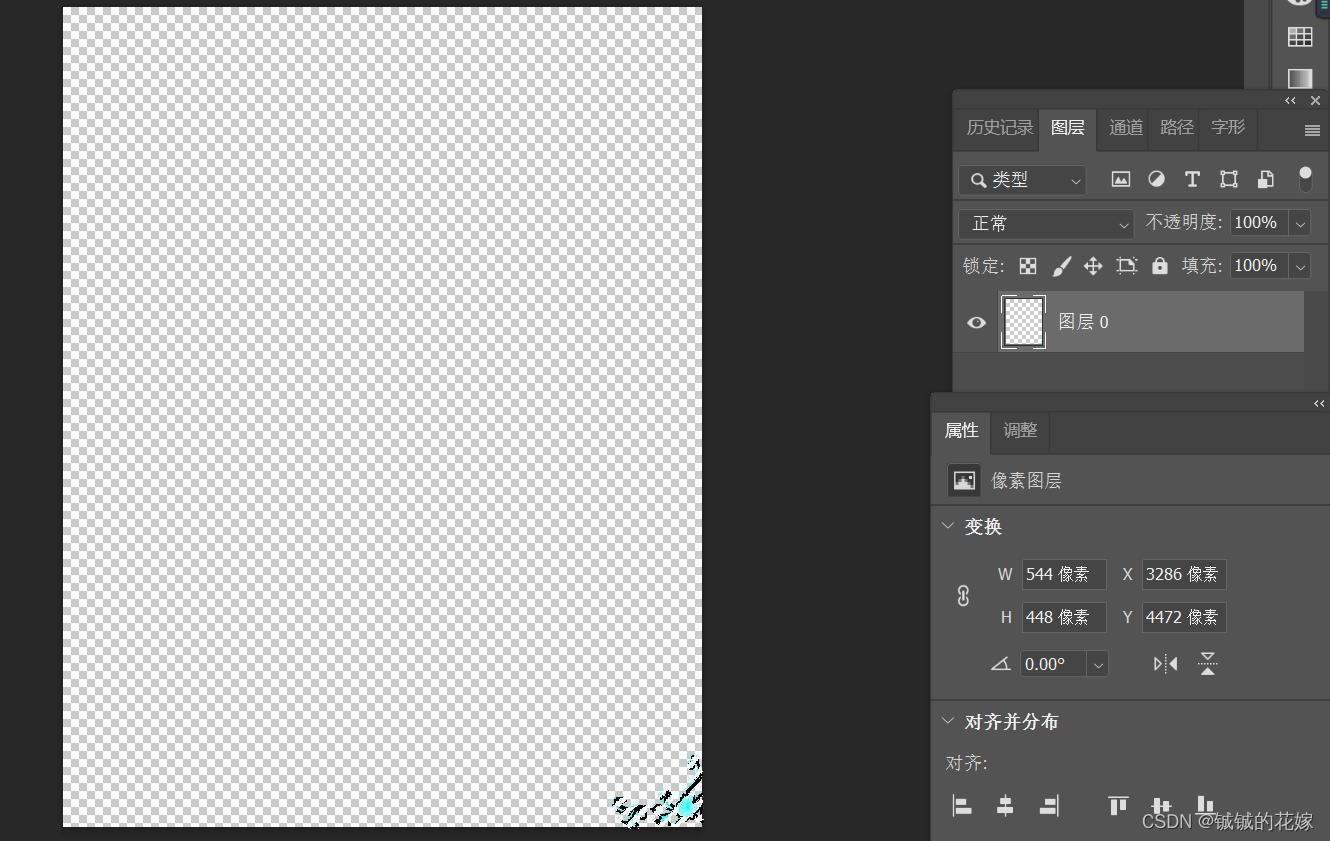
- 再搞一个,转180度,放对角
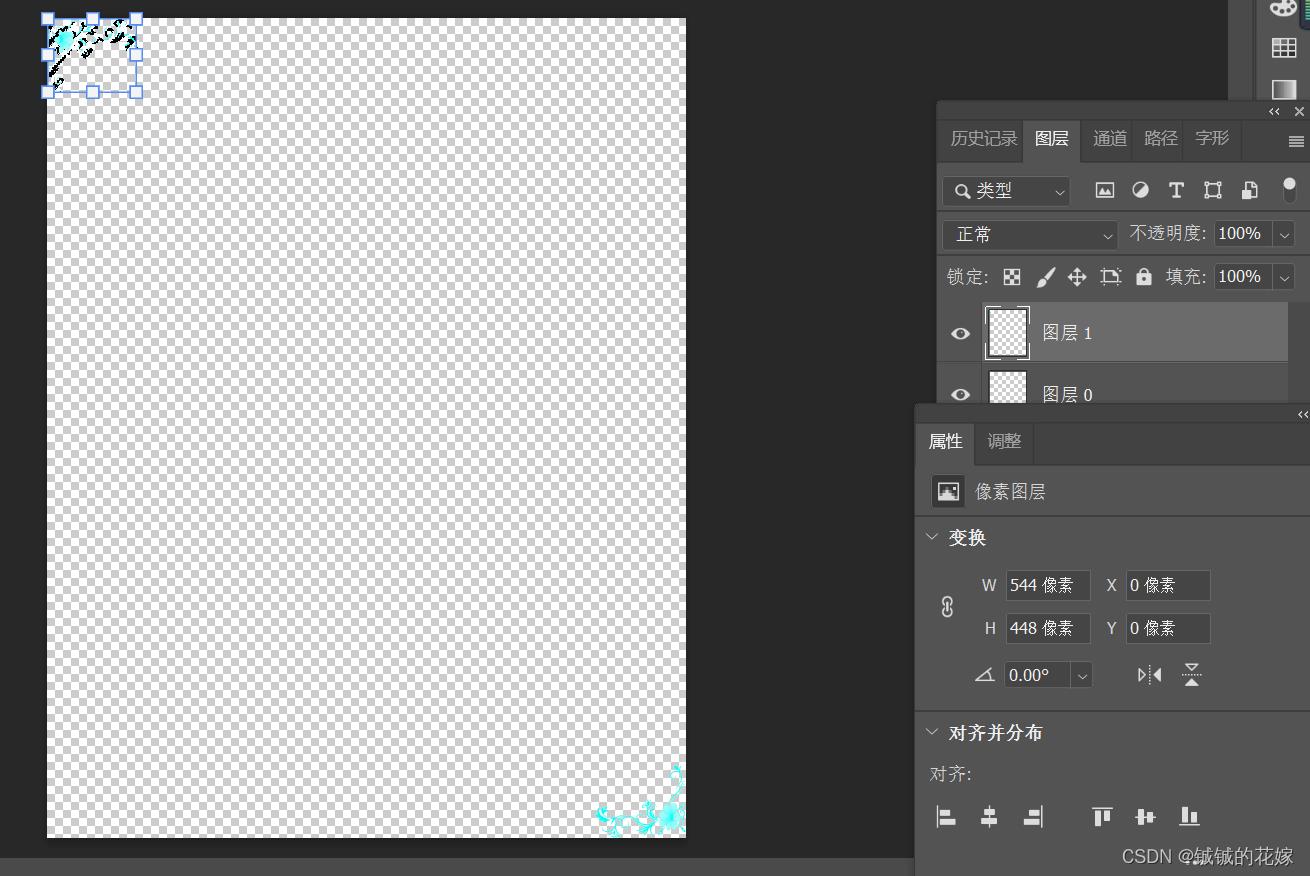
- 合并图层并导出
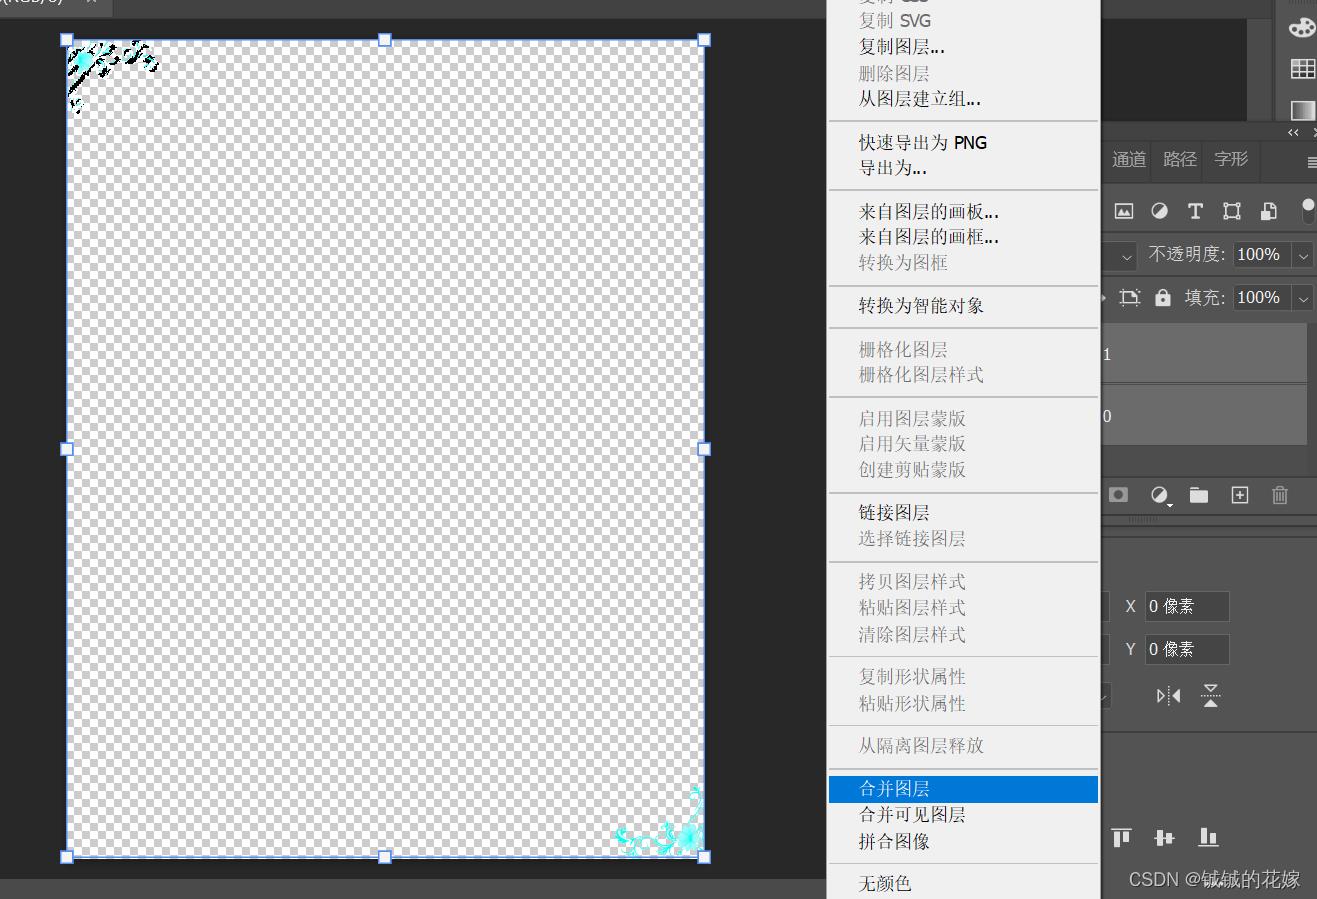
最后把这个上传overleaf,把结果上传overleaf,剩下的交给代码。
%背景
\\usepackagewallpaper
\\begindocument

% 占据页面1.0(100%)大小,居中显示
\\ThisCenterWallPaper1images/bg\\(38_50\\).png

\\enddocument
文本框
一个比较奇怪的需求吧,不过确实可以用来突出重点,感觉也可以用在其他的几种文体里面,格式创新,方便突出重点。
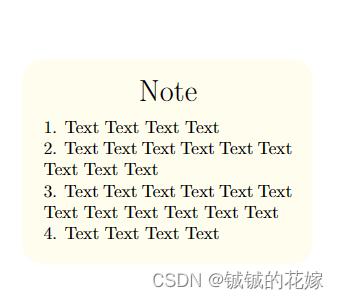
引入包
\\usepackagefancyhdr
\\usepackagetcolorbox
生成黄底文本框,手动调整下行间距段间距。
\\begintcolorbox
    [
    colback=yellow!9!white,%gray background
    colframe=white!75!white,% black frame colour
    width=7cm,% Use 8cm total width,
    % title=,
    arc=5mm, auto outer arc,
    boxrule=0.5pt,
    ]

    \\vspace0.2cm

    \\begincenter
        \\fontsize20pt1\\selectfont
        Note
    \\endcenter

    \\vspace-0.2cm

    1. Text Text Text Text

    2. Text Text Text Text Text Text Text Text Text

    3. Text Text Text Text Text Text Text Text Text Text Text Text

    4. Text Text Text Text
    \\vspace0.3cm
\\endtcolorbox
文本框嵌入
不能让这个文本框单独占一行,这样空间不足,正文不够写了。
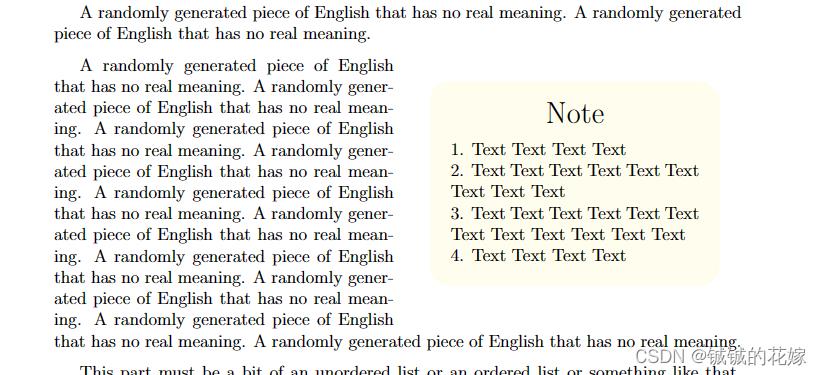
先导入包
%图文混排
\\usepackagewrapfig
在想在右边插入文本框的文字前加入 \\beginwrapfigure\\endwrapfigure 代码段。
\\beginwrapfigurer8cm%靠文字内容的右侧
\\centering
\\begintcolorbox
    [
    colback=yellow!9!white,%gray background
    colframe=white!75!white,% black frame colour
    width=7cm,% Use 8cm total width,
    % title=,
    arc=5mm, auto outer arc,
    boxrule=0.5pt,
    ]

    \\vspace0.2cm

    \\begincenter
        \\fontsize20pt1\\selectfont
        Note
    \\endcenter

    \\vspace-0.2cm

    1. Text Text Text Text

    2. Text Text Text Text Text Text Text Text Text

    3. Text Text Text Text Text Text Text Text Text Text Text Text

    4. Text Text Text Text
    \\vspace0.3cm
\\endtcolorbox
%
% \\caption\\footnotesize 运动健康
\\endwrapfigure
A randomly generated piece of English that has no real meaning. A randomly generated piece of English that has no real meaning. A randomly generated piece of English that has no real meaning. A randomly generated piece of English that has no real meaning. A randomly generated piece of English that has no real meaning. A randomly generated piece of English that has no real meaning. A randomly generated piece of English that has no real meaning. A randomly generated piece of English that has no real meaning. A randomly generated piece of English that has no real meaning. A randomly generated piece of English that has no real meaning.

This part must be a bit of an unordered list or an ordered list or something like that, otherwise it's really all text and will look super ugly.
去页眉页脚
一句话就好了,不过仅仅只针对这一页
\\pagestyleempty
无序列表
这个真的没什么难度,但是必须要做。
原因很简单,美赛大段文本不会有人愿意看的。如果这段文本不能在5秒之内抓住评委的眼球,大概率直接被忽略掉。如果一篇文章出现超过4页这样的文本,那就是策略上是重大失误。
相比于前面20页左右的正文,信件显得尤为重要。
为什么?
- 美赛强调创新。因为信件是成果的罗列,是我们的研究对现实的贡献,一些有意思的结果、创新的点子,都可以在这里展示,相当于文章中独立的一块展示你的作品的优点和现实意义的地方
- 美赛的评委来自各个领域。以C题为例,C题为数据分析类方向的题目,但是评委不一定是大数据专业或者机器学习方向的从业者,所以前面的部分实际上对他们来说可理解性不强,那他们看一篇文章最重要的点在哪里?摘要和信件。这两个是最通俗易懂的部分,也是很能反应团队作品亮点的地方。
那么为了方便评委抓住大段文字的重点,是不是这样的无序列表就显得尤为重要了?
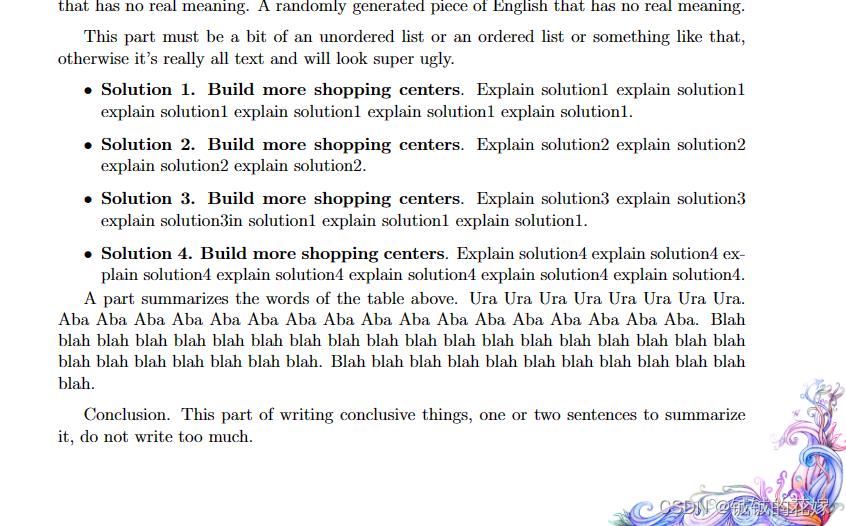
直接把文章的亮点甩评委脸上,喂到他嘴里。
代码如下
\\beginitemize
\\item \\textbfSolution 1. \\textbfBuild more shopping centers. Explain solution1 explain solution1 explain solution1 explain solution1 explain solution1 explain solution1.
\\item \\textbfSolution 2. \\textbfBuild more shopping centers. Explain solution2 explain solution2 explain solution2 explain solution2.
\\item \\textbfSolution 3. \\textbfBuild more shopping centers. Explain solution3 explain solution3 explain solution3in solution1 explain solution1 explain solution1.
\\item \\textbfSolution 4. \\textbfBuild more shopping centers. Explain solution4 explain solution4 explain solution4 explain solution4 explain solution4 explain solution4 explain solution4.
\\enditemize
% 缩短下距离,为后面的文本再省出点空间
\\vspace-0.4cm
代码(可直接食用)
博主latex功底一般,很多排版的细节都是靠 \\vspace 啊之类的方法暴力解决的。
\\documentclassmcmthesis
\\pagestyleempty


%背景
\\usepackagewallpaper
\\usepackagefancyhdr
\\usepackagetcolorbox

% 设置字体
% \\usepackagefontspec

%图文混排
\\usepackagewrapfig


\\begindocument
\\centering\\section*Letter
% 只在这页添加图片
\\ThisCenterWallPaper1images/bg\\(38_50\\).png

\\newcommand\\tnewroman\\fontspecTimes New Roman
\\newcommand\\adobegothicstdb\\fontspecAdobe Gothic Std B
\\newcommand\\Centaur\\fontspecCentaur


\\noindent\\rule\\textwidth1pt

\\vspace-0.2cm

\\noindent \\ To:

\\vspace-0.2cm

\\noindent \\ From: Team \\#1887415157 of 2023 MCM

\\vspace-0.2cm

\\noindent \\ Date: February 31, 2023

\\vspace-0.2cm

\\noindent \\ Subject:

\\vspace-0.4cm

\\noindent\\rule\\textwidth1pt

A randomly generated piece of English that has no real meaning. A randomly generated piece of English that has no real meaning. A randomly generated piece of English that has no real meaning. A randomly generated piece of English that has no real meaning.

\\beginwrapfigurer8cm%靠文字内容的右侧
\\centering
\\begintcolorbox
    [
    colback=yellow!9!white,%gray background
    colframe=white!75!white,% black frame colour
    width=7cm,% Use 8cm total width,
    % title=,
    arc=5mm, auto outer arc,
    boxrule=0.5pt,
    ]

    \\vspace0.2cm

    \\begincenter
        \\fontsize20pt1\\selectfont
        Note
    \\endcenter

    \\vspace-0.2cm

    1. Text Text Text Text

    2. Text Text Text Text Text Text Text Text Text

    3. Text Text Text Text Text Text Text Text Text Text Text Text

    4. Text Text Text Text
    \\vspace0.3cm
\\endtcolorbox
%
% \\caption\\footnotesize 运动健康
\\endwrapfigure
A randomly generated piece of English that has no real meaning. A randomly generated piece of English that has no real meaning. A randomly generated piece of English that has no real meaning. A randomly generated piece of English that has no real meaning. A randomly generated piece of English that has no real meaning. A randomly generated piece of English that has no real meaning. A randomly generated piece of English that has no real meaning. A randomly generated piece of English that has no real meaning.

This part must be a bit of an unordered list or an ordered list or something like that, otherwise it's really all text and will look super ugly.


\\beginitemize
\\item Solution 1. \\textbfBuild more shopping centers. Explain solution1 explain solution1 explain solution1 explain solution1 explain solution1 explain solution1.
\\item Solution 2. \\textbfBuild more shopping centers. Explain solution2 explain solution2 explain solution2 explain solution2.
\\item Solution 3. \\textbfBuild more shopping centers. Explain solution3 explain solution3 explain solution3in solution1 explain solution1 explain solution1.
\\item Solution 4. \\textbfBuild more shopping centers. Explain solution4 explain solution4 explain solution4 explain solution4 explain solution4 explain solution4 explain solution4.
\\enditemize

\\vspace-0.4cm

A part summarizes the words of the table above. Ura Ura Ura Ura Ura Ura Ura Ura. Aba Aba Aba Aba Aba Aba Aba Aba Aba Aba Aba Aba Aba Aba Aba Aba Aba. Blah blah blah blah blah blah blah blah blah blah blah blah blah blah blah blah blah blah blah blah blah blah blah blah blah blah. Blah blah blah blah blah blah blah blah blah blah blah blah.

Conclusion. This part of writing conclusive things, one or two sentences to summarize it, do not write too much.

\\enddocument
通俗易懂的Latex教程文档
本篇文档可以搭配视频讲解使用。
讲解视频:
通俗易懂的Latex教程(附数学建模国赛美赛模板)
完整视频:https://www.bilibili.com/video/BV1aT4y1f74w
这是一份面向刚入门数模,想要快速上手Latex排版的同学的Latex教学文档。
在线编辑网站overleaf:https://www.overleaf.com/
我所使用的环境:TeX Live (自带编辑器TeXworks)
编辑器:TeXstudio
TeX Live和TeXstudio的安装
首先来看看TeX Live和TeXstudio的安装。
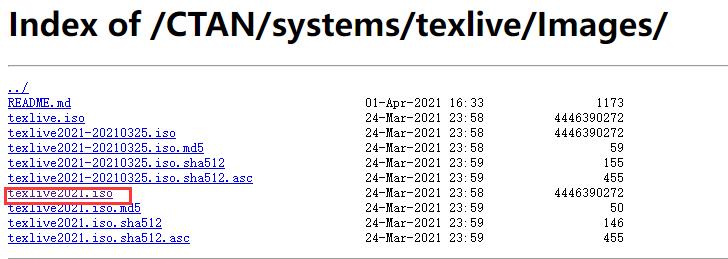
TeX Live安装镜像下载:
https://mirrors.ustc.edu.cn/CTAN/systems/texlive/Images/
点击下载texlive2021.iso文件
TeXstudio的安装包下载:
http://texstudio.sourceforge.net/
国外服务器下载较慢,特此放上我备份的文件链接
texlive: https://pan.baidu.com/s/1LPuqPjdl6AI8-AZTCIGBEg?pwd=8888
TeXstudio:https://pan.baidu.com/s/1Rzlij_NH5eAZ0FB1J8gKFw?pwd=8888
下载之后的安装配置可以参考博文:
https://blog.csdn.net/UCB001/article/details/112546694
Latex基本框架
\\documentclassarticle
\\usepackage[UTF8]ctex

\\begindocument
文件内容
\\enddocument
标题
Latex标题层级:
- section
- subsection
- subsubsection
- paragraph
- subparagraph
一级标题
\\section一级标题内容
二级标题
\\subsection二级标题内容
三级标题
\\subsubsection三级标题内容
sub:下一级
目录
\\tableofcontents
分页
\\newpage
列表
无序列表:
\\beginitemize
	\\item 第一点内容
	\\item 第二点内容
	\\item 第三点内容
\\enditemize
有序列表:
\\beginenumerate
	\\item 第一点内容
	\\item 第二点内容
	\\item 第三点内容
\\endenumerate
字体设置
字体加粗:
\\textbf加粗的字体
斜体:
\\textit倾斜的字体
下划线:
\\underline
行内缩进:
\\hspace0.65em
段内间隔:
\\vspace2ex
图片
需要使用两个宏包
\\usepackagefloat %设置图片浮动位置的宏包
\\usepackagegraphicx %插入图片的宏包
\\usepackagesubfigure %插入多图时用子图显示的宏包
单张图片:
\\beginfigure[H]
	\\centering
	\\includegraphics[width=8cm]../pic/p.png% 图片相对位置
	\\caption这里是图片的标题 % 图片标题
\\endfigure
多张图片(以两张图片为例):
\\beginfigure[H]
	\\centering
	\\subfigure[子图一的标题]				% 图片1([]内为子图标题)
		\\includegraphics[width=0.45\\textwidth]../pic/p.png% 子图1的相对位置
	\\subfigure[子图二的标题]				% 图片2
		\\includegraphics[width=0.45\\textwidth]../pic/p.png% 子图2的相对位置
	\\caption总图标题		% 总图标题
\\endfigure
多张图片(以三张图片为例):
\\beginfigure[H]
	\\centering
	\\subfigure[子图一的标题]				% 图片1([]内为子图标题)
		\\includegraphics[width=0.3\\textwidth]../pic/p.png% 子图1的相对位置
	\\subfigure[子图二的标题]				% 图片2
		\\includegraphics[width=0.3\\textwidth]../pic/p.png% 子图2的相对位置
	\\subfigure[子图三的标题]				% 图片2
		\\includegraphics[width=0.3\\textwidth]../pic/p.png% 子图3的相对位置
	\\caption总图标题		% 总图标题
\\endfigure
注:图片的标题是在下面,表格的标题是在上面。
图片添加注释:
方式一:和下面表格添加表注一样,该方式只能在图片下方进行添加
...
\\endfigure

\\begintablenotes
	\\footnotesize
	\\item 注:由于篇幅有限,这里仅展示部分数据。
\\endtablenotes
方式二:直接在figure内部进行添加,文字大小/位置自定义
\\beginfigure[H]
	\\centering
	\\includegraphics[width=8cm]../../所用图片/12.png
	\\leftline插入图片注解
	\\caption问题一流程图
\\endfigure
注:这里的\\leftline是设置当行内容左对齐,其他对齐方式拓展如下:
一行对齐:左对齐\\leftline内容 居中\\centerline内容 右对齐\\rightline内容
多行或者段落对齐:
左对齐 \\beginflushleft...\\endflushleft
居中 \\begincenter...\\endcenter
右对齐 \\beginflushright...\\endflushright
公式
带公式标号:
\\beginequation

\\endequation
不带公式标号:
$$ 公式内容 $$
或者:
\\[公式内容\\]
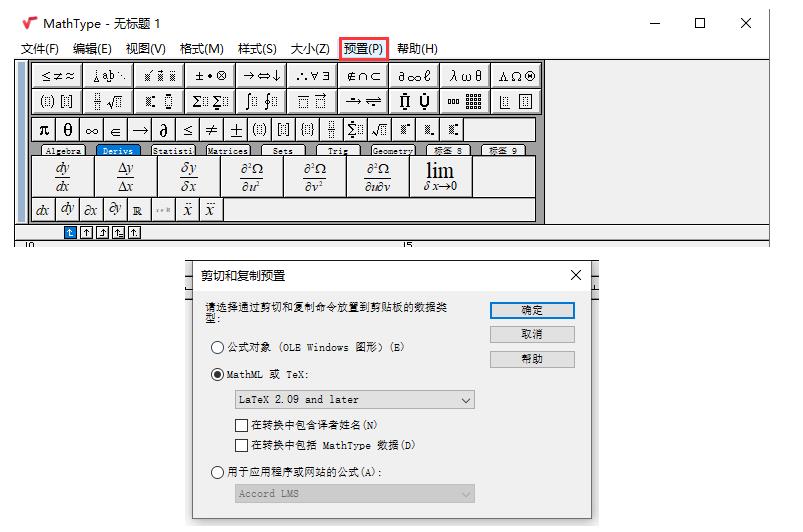
公式复制神器:MathType
剪切和复制预置
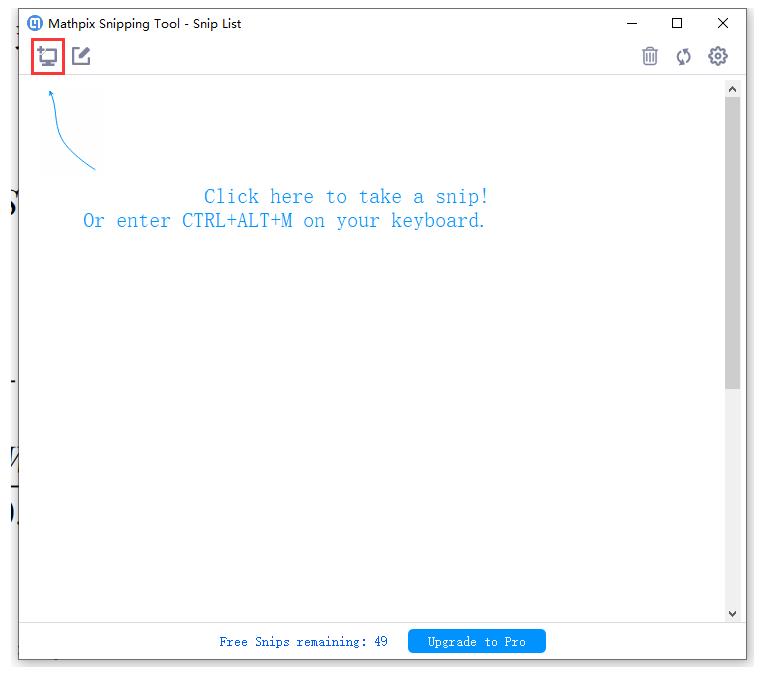
公式识别神器:Mathpix
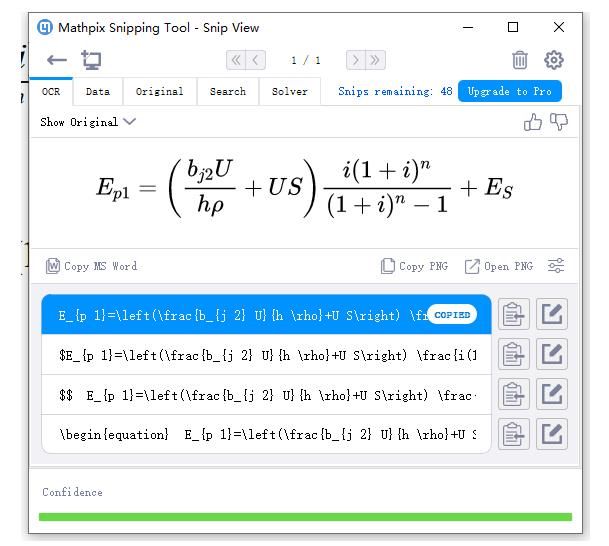
注:有时候公式中会出现加粗的字母,这时候识别的公式会报错,此时需导入宏包:
\\usepackageamsmath
表格
符号说明:
\\begintable[H]
	\\centering
	\\caption符号说明
	\\begintabularcc
		\\hline
		\\makebox[0.3\\textwidth][c]符号	&  \\makebox[0.4\\textwidth][c]意义 \\\\ \\hline
		$L_n$	    & 经度\\\\ \\hline
		$L_a$	    & 纬度 \\\\ \\hline
	\\endtabular
\\endtable
注:c表示水平居中,l表示左对齐,r表示右对齐,|表示竖线,hline表示横线。
表格表注插入
引入宏包:
\\usepackagethreeparttable
在endtabular上插入:
	\\begintablenotes
		\\footnotesize
		\\item 注:由于篇幅有限,这里仅展示部分数据。
	\\endtablenotes
表格过宽自适应页面
遇到可以表格过宽跳出页面的情况,可在tabular外面套一层
\\resizebox\\linewidth!tabular
使用案例:
\\begintable[H]
	\\scriptsize
	\\captionTable of evaluation indicators
	\\resizebox\\linewidth!
	\\begintabular|c|c|ccc|
		\\hline
		\\rowcolor[HTML]DAE8FC
		Target layer                                                                                                             & Guideline layer                                                                                         & \\multicolumn3c|\\cellcolor[HTML]DAE8FCIndicator layer                                             \\\\ \\hline
		\\color[HTML]000000                                                                                                   &                                                                                                         & \\multicolumn1c|territorial area+                                & \\multicolumn1c|D1  & 0.0703 \\\\ \\cline3-5
		\\color[HTML]000000                                                                                                   & \\multirow-2*\\begintabular[c]@c@Natural factors\\\\ C1 = 0.1145\\endtabular                 & \\multicolumn1c|territorial sea area+                            & \\multicolumn1c|D2  & 0.0442 \\\\ \\cline2-5
		\\color[HTML]000000                                                                                                   &                                                                                                         & \\multicolumn1c|restrictive decrees+                             & \\multicolumn1c|D3  & 0.1004 \\\\ \\cline3-5
		\\color[HTML]000000                                                                                                   & \\multirow-2*\\begintabular[c]@c@Policy factors\\\\ C2 = 0.2008\\endtabular                  & \\multicolumn1c|taxation policies+                               & \\multicolumn1c|D4  & 0.1004 \\\\ \\cline2-5
		\\color[HTML]000000                                                                                                   &                                                                                                         & \\multicolumn1c|investment in recycling technology+              & \\multicolumn1c|D5  & 0.1004 \\\\ \\cline3-5
		\\color[HTML]000000                                                                                                   &                                                                                                         & \\multicolumn1c|number of waste treatment plants+                & \\multicolumn1c|D6  & 0.1003 \\\\ \\cline3-5
		\\color[HTML]000000                                                                                                   & \\multirow-3*\\begintabular[c]@c@Economy factors\\\\ C3 = 0.3011\\endtabular                 & \\multicolumn1c|share of secondary and tertiary sectors(in GDP)- & \\multicolumn1c|D7  & 0.1004 \\\\ \\cline2-5
		\\color[HTML]000000                                                                                                   & \\begintabular[c]@c@Population factors\\\\ C4 = 0.0473\\endtabular                                & \\multicolumn1c|population density-                              & \\multicolumn1c|D8  & 0.0473 \\\\ \\cline2-5
		\\color[HTML]000000                                                                                                   &                                                                                                         & \\multicolumn1c|plastics demand-                                 & \\multicolumn1c|D9  & 0.0354 \\\\ \\cline3-5
		\\color[HTML]000000                                                                                                   & \\multirow-2*\\begintabular[c]@c@Plastic alternatives factors\\\\ C5 = 0.1358\\endtabular    & \\multicolumn1c|Cross-Price Elasticity of Demand+                & \\multicolumn1c|D10 & 0.1004 \\\\ \\cline2-5
		\\color[HTML]000000                                                                                                   &                                                                                                         & \\multicolumn1c|civic education level+                           & \\multicolumn1c|D11 & 0.1004 \\\\ \\cline3-5
		\\multirow-12*\\color[HTML]000000 \\begintabular[c]@c@Plastic \\\\ \\\\  Waste \\\\   \\\\ Reduction\\endtabular & \\multirow-2*\\begintabular[c]@c@Environmental awareness factors\\\\ C6 = 0.2008\\endtabular & \\multicolumn1c|government publicity level+                      & \\multicolumn1c|D12 & 0.1004 \\\\ \\hline
	\\endtabular
	\\begintablenotes
		\\item[1] Note: + for positive indicators (developmental indicators), - for negative indicators (restrictive indicators)
	\\endtablenotes
\\endtable
表格添加颜色
直接用网格网站添加颜色会报错,此时需导入宏包:
\\usepackage[table]xcolor
绘制三线表
绘制三线表可以灵活运用\\toprule,\\midrule两个添加线的指令
使用案例:
\\begintable[H]
	\\centering
	\\captionTable of properties of different plastics
	\\begintabularc c c
		\\toprule
		\\textbfType & \\textbfAverage life-time(year) & \\textbfProduction rate(billion/year) \\\\
		\\midrule
		PETE & 0.5 & 1.06 \\\\
		LDPE & 2.3 & 0.94 \\\\
		PS & 1.4 & 0.89 \\\\
		\\bottomrule
	\\endtabular
\\endtable
注:生成三线表时,可能会报错,此时需引入宏包:
\\usepackagemultirow
实用网站:
2、https://www.tablesgenerator.com/
参考文献
\\beginthebibliography9%宽度9
	\\bibitem1 姜启源,谢金星,叶俊.数学模型(第四版)[M].北京:高等教育出版社,2011.
	\\bibitem2 参考文献2.
\\endthebibliography
引用参考文献
首先设置:
\\newcommand\\upcite[1]\\textsuperscript\\textsuperscript\\cite#1
引用:
\\upcite1
特殊符号的插入
插入格式:
$..$
符号大全:
https://www.caam.rice.edu/~heinken/latex/symbols.pdf
附录:插入美化的代码块
导入两个宏包:
\\usepackagelistings
\\usepackagexcolor
使用模块(代码内容替换成自己的内容即可):
\\lstsetlanguage=python

\\lstset
	numbers=left,
	numberstyle= \\tiny,
	keywordstyle= \\color blue!70,
	commentstyle= \\colorred!50!green!50!blue!50,
	frame=shadowbox, % 阴影效果
	rulesepcolor= \\color red!20!green!20!blue!20 ,
	escapeinside=``, % 英文分号中可写入中文
	breaklines=true,
	xleftmargin=2em, aboveskip=1em,
	framexleftmargin=2em

\\noindent 对sonar数据集分类的代码如下:
\\beginlstlisting
代码内容
\\endlstlisting
注,若代码中有中文注释,需作如下调整:
在菜单栏中的“选项”,进行下图设置
设置页面为A4纸大小
latex默认的页面较窄,通过下面的代码能将页面设置成A4纸大小。
\\usepackagegeometry
\\geometry
	a4paper,
	total=170mm,257mm,
	left=20mm,
	top=20mm,
注释
Texstudio快捷键
多行注释:Ctrl+T
多行解注释::Ctrl+U
模板使用
模板可在群文件中进行下载。使用详情见视频。
国赛模板
美赛模板
交流群:710413249
问题Q&A
下面整理了一些群友常问的问题,这里做一个统一回答和记录。
1.TeXstudio怎么设置为中文
选项->设置TeXstudio
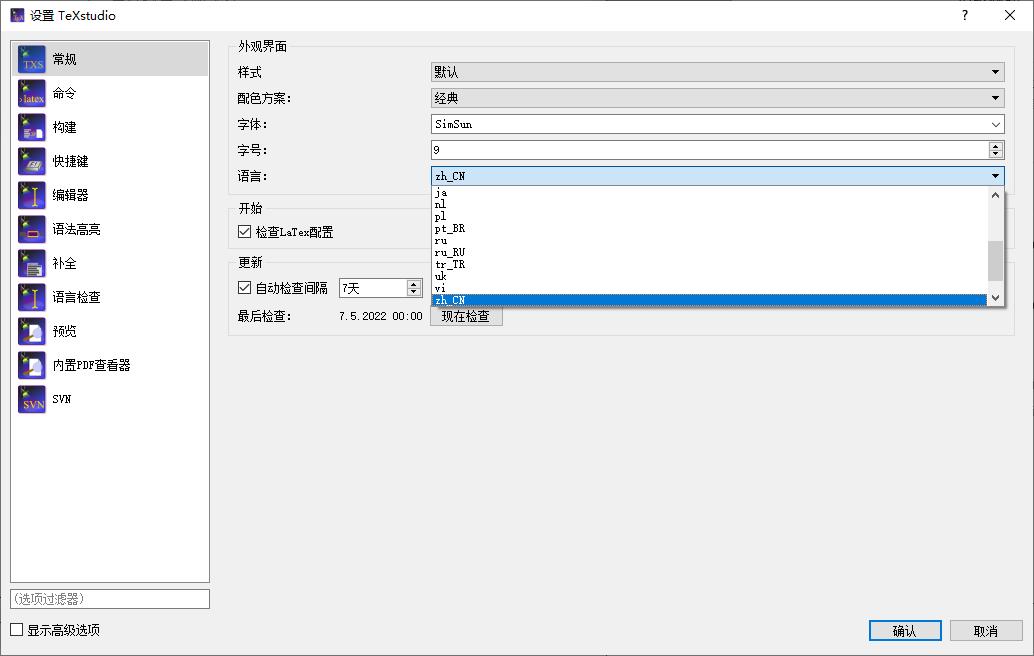
2.报错File `cumcmthesis.cls’ not found.
这个报错的意思是找不到cumcmthesis.cls这个文件,这个文件是配置文件,里面设置了各章节的结构/类型,使用模板需保证其在和.tex的同文件夹下。

3.想修改页码怎么办?
有的比赛规定摘要页不包括页码,从正文第一页开始标号。
这里可以在\\beginabstract下方添加命令
\\thispagestyleempty
这个命令表示清空当前页的页码号
然后再在正文第一页的section中添加命令
\\setcounterpage1
这个命令表示页码从当前页从1开始重新计数
4.如何取消标题序号?
Latex默认会添加标题,可通过在标题后面加*的方式,取消标题序号
例如:
\\section* Introduction
5.如何添加副标题?
副标题就是在题目下面加一行小字,以美赛模板为例,可在title这里这样进行修改:
\\titleA Glimpse of Music Change through Influence Networks
\\normalsize this is subtitle
更多字号参考:
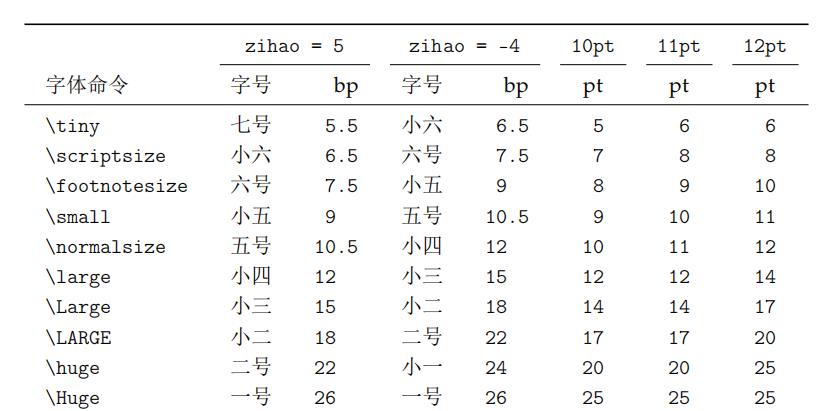
6.国赛模板目录标题重合Bug?
正常来说国赛模板没问题,不过在Section超过10个之后,会存在目录序号和标题重合的问题,如图:

模板没有考虑到有人的小节会超过10个,遇到这种问题时,首先要想想是否是自己的论文过于细分了,数模通常来说不会超过五个问题,加上一些模型假设、灵敏度分析这类的内容,总数也不会超过十个。如果遇到超过5个的问题,可以按照我经验分享里提到的小技巧,将多个问题进行合并。
言归正传,如果实在无法压缩,还是有办法解决这个问题。
方法一:在后面重合的标题前加空格
注意Latex中直接加空格是无效的,可以用\\quad符号来表示1em的水平空格
例如:
\\section$\\quad$模型的三次推广
效果如下:

方法二:统一设置目录中Section和序号之间的间距
在\\documentclass下面添加命令:
\\dottedcontentssection[2em]\\normalsize2.5em4pt
效果如下:

这样做会连带把模板中的字体也进行修改,个人觉得不如方法一美观。
7.国赛模板如何修改目录间距/更改目录字体大小?
如果说,修改目录间距/修改字体大小的目的是为了让目录显示在一页上,那可以采用问题4的技巧,取消某些小标题的序号,因为模板默认情况是比较美观的,修改可能会破坏美感。
如果实在需要修改,也可以采用下面的办法。
在国赛模板的配置文件cumcmthesis.cls中最下方注释了有关目录样式的设置。可以通过图示中的方式进行修改。
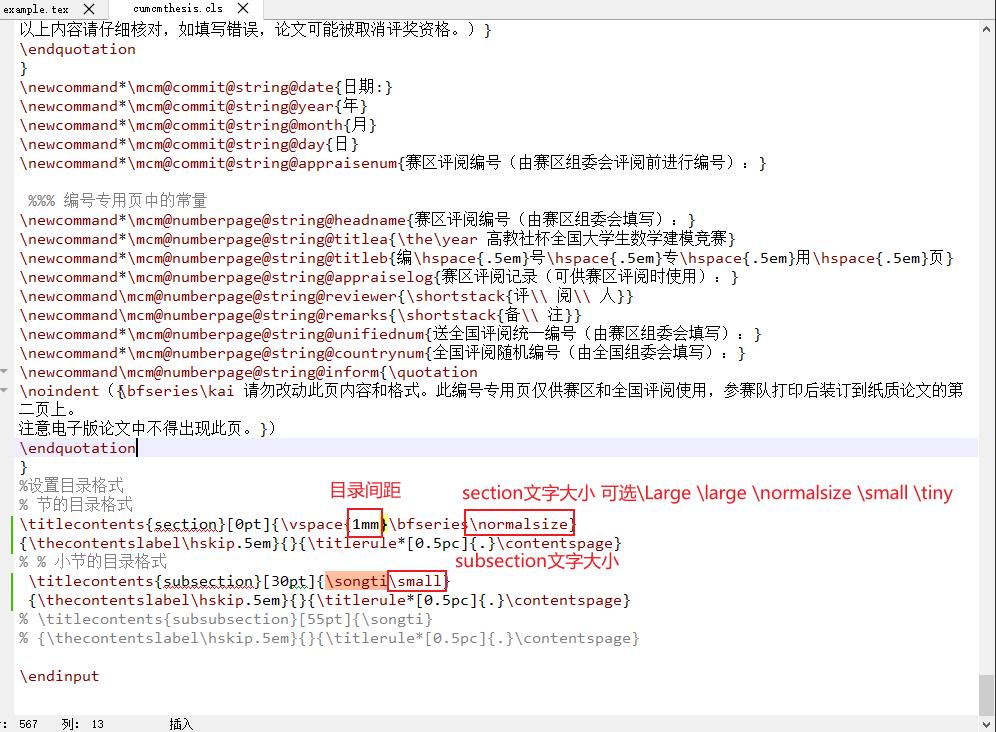
另外附上Latex中字体大小设置选项:
从小到大顺序依次为:
\\tiny, \\scriptsize, \\footnotesize, \\small, \\normalsize, \\large, \\Large, \\LARGE, \\huge, \\Huge
8.国赛模板参考文献如何根据引用顺序自动生成
原模板参考文献为手动添加,要实现自动按引用顺序生成需使用到BibTeX这种引用格式。
使用方式,在参考文献部分添加两句
\\bibliographystyleunsrt
\\bibliographyreference
第一句的unsrt指定的是引用类型,还有其它可选形式:
- plain-此格式的参考文献的条目的编号是按照作者的字母顺序
- unsrt – 基本上跟 plain 类型一样,此格式的参考文献的条目的编号是按照引用的顺序,而不是按照作者的字母顺序
- alpha – 类似于 plain 类型,当参考文献的条目的编号基于作者名字和出版年份的顺序
- abbrv – 缩写格式
第二句的reference是对应reference.bib文件
引用时,新建reference.bib文件,在内部复制BibTeX的格式的参考文献。例如,在百度学术/谷歌学术上,点击引用,可直接导出这种格式信息。正文引用时,使用\\upcitexxx,xxx对应BibTeX@article中第一个内容。
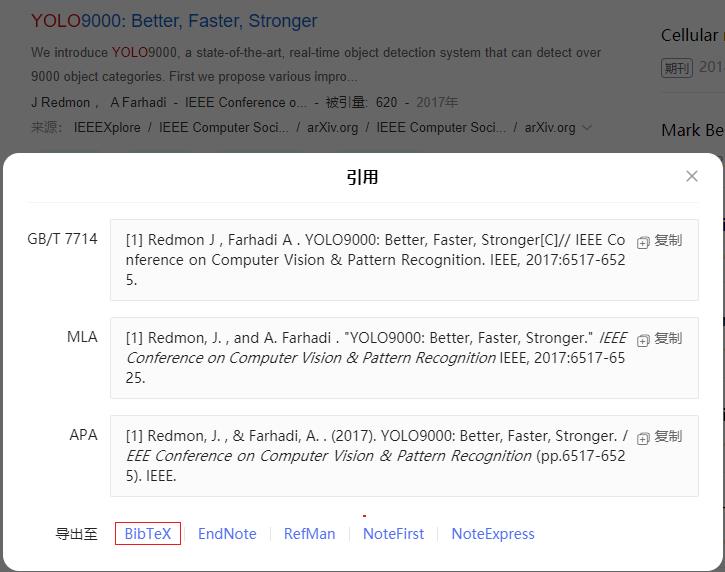
注,知网无法直接导出这种格式,需借助Zotero等工具转换。
国赛模板已更新,可在群文件->论文模板下载Latex国赛模板v2.0(新增bib文献添加方式).zip
9.“如图x所示”这个x能否自动对应图表标号
在论文中,如果调换图的顺序,图的标号会自动变化,有没有办法让论文里的文字也对应图的标号发生变化。方法是在图里面添加\\labelfig:value,这个value为自定义的变量名,在外面用\\reffig:value引用即可,示例:
如图\\reffig:value所示:
\\beginfigure[H]
	\\small
	\\centering
	\\includegraphics[width=8cm]../../img/1.png
	\\caption图表标题
	\\labelfig:value
\\endfigure
10.国赛模板如何设置标题左对齐?
国赛模板的标题样式设置在配置文件cumcmthesis.cls中,如需设置左对齐,请删除文件中这行的\\centering

删除之后,再次编译即可。

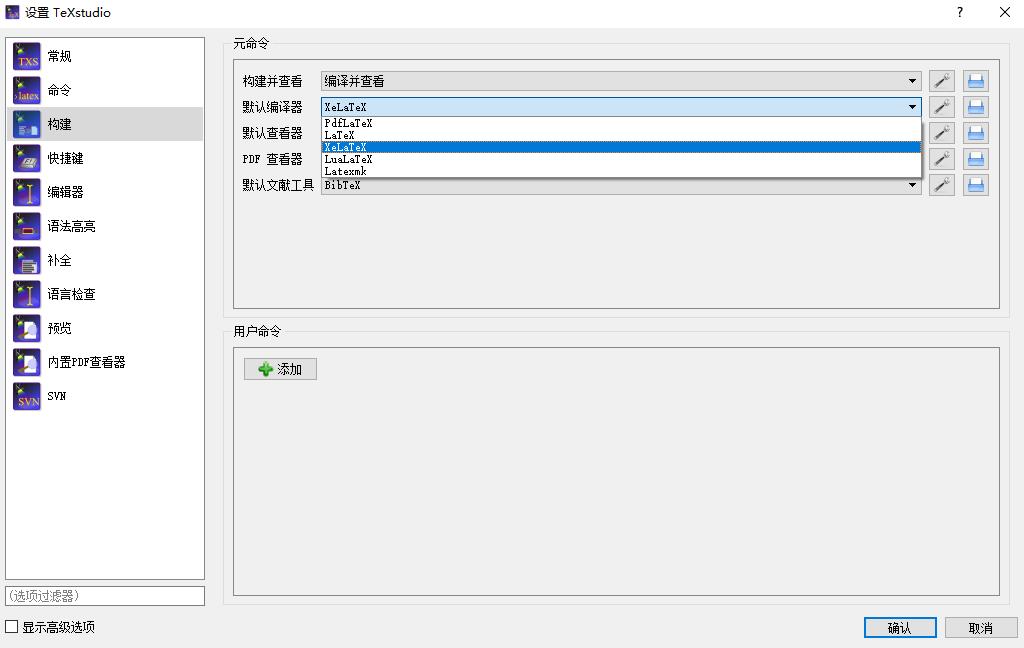
11.报错:RequireXeTex
在编译国赛模板时,有的编译器会报这样的错误,报错截图如下:
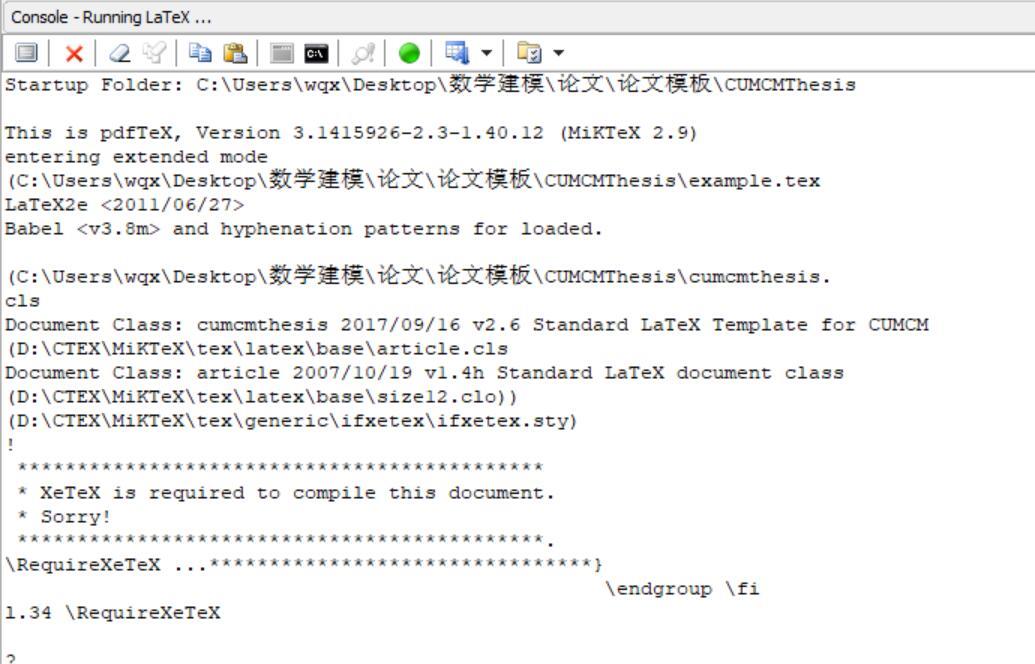
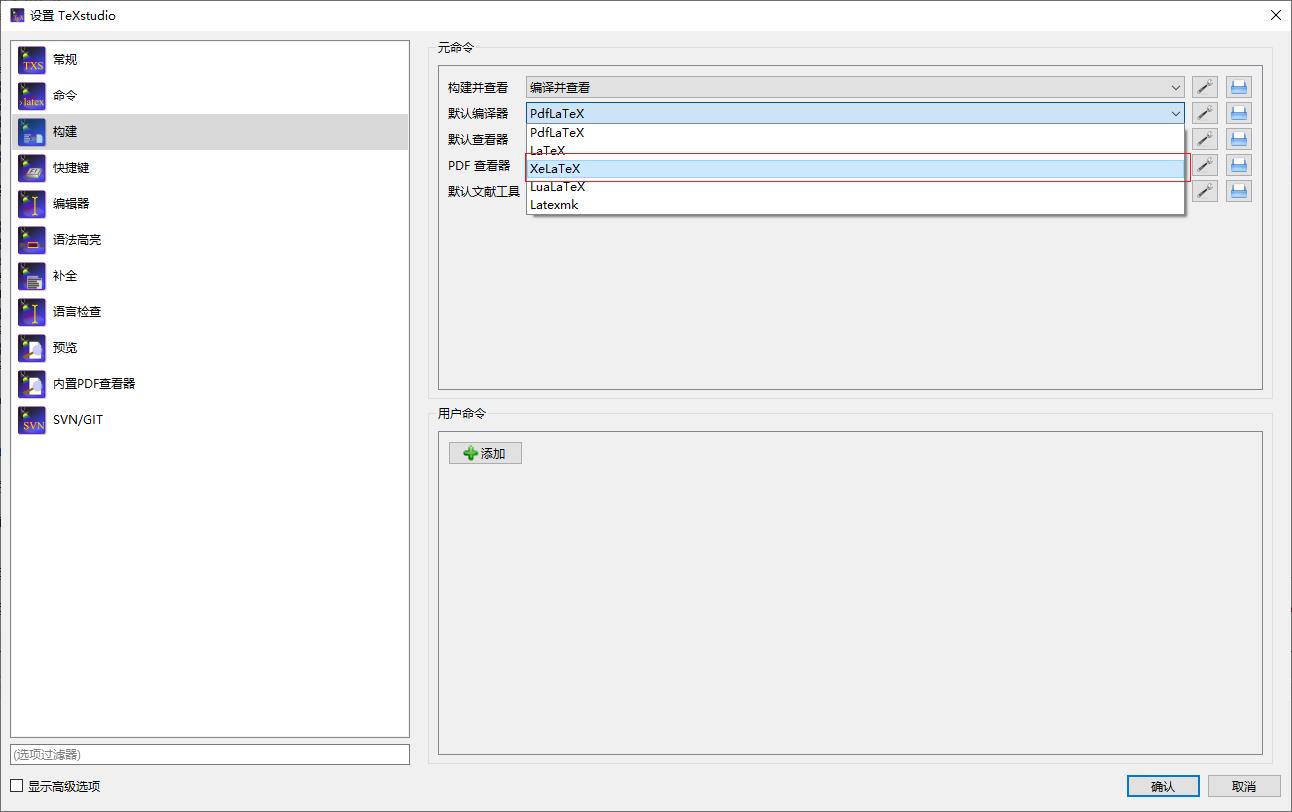
这个报错是由于编辑器默认使用的是pdfTex,需要将编译器改成XeTex,在Texstudio中可以通过选项->设置Texstudio来进入到下面的设置界面,overleaf上也同理。
12.国赛模板如何将大标题中的“一”改为“1”?
请修改配置文件中的这个位置,这里的\\chinese代表中文的一、二、三,如需改为阿拉伯数字,将其替换成\\arabicsection

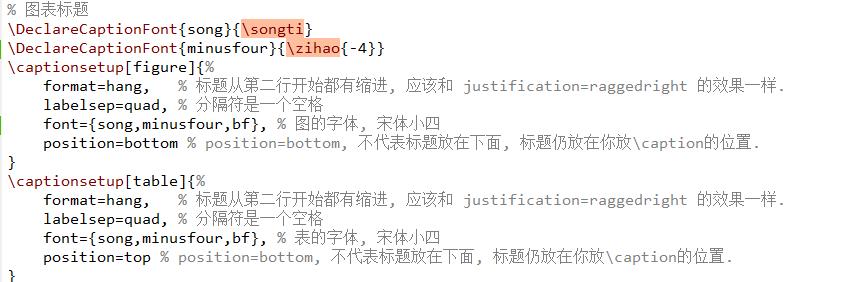
13.国赛模板如何修改图表/表格标题字体大小?
配置文件的这个部分设定了图表/表格标题均为宋体小四,大小由一个变量minusfour进行控制,如需调大字体,可以将-4改为-3,反之则调小。
写在最后
希望群友能踊跃提问,群内已开匿名功能,如果不好意思提问,可以匿名提问,正是在提出问题和解决问题的过程中,这篇文档能够得以更加丰富。
以上是关于保姆级手把手教学 数学建模美赛信件格式latex模板(overleaf)的主要内容,如果未能解决你的问题,请参考以下文章