GUI(念法 gu yi)
AWT
- AWT(Abstract Window Toolkit 抽象窗口开发包,在C# 或者 linux窗口开发类之上又封装一层,达到跨平台的目的)包括了很多类和接口,用于GUI 的编程。
- GUI 的各种元素(如:窗口,按钮, 文本框等)由 Java 类来实现。
- 使用 AWT 所涉及的类一般在 java.awt 包及其子包中。
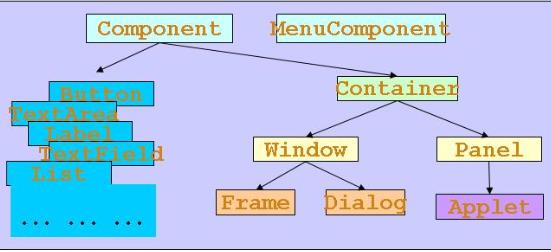
- Container(容器) 和 Component(组件)是 AWT 的两个核心类。
- AWT 是java比较旧的开发包,新的开发包叫 javax.Swing。

Component 和 Container
- Java 的图形用户界面的最基本组成部分是 Component,Component 类及其子类的对象用来描述以图形化的方式显示在屏幕上并能与用户进行交互的 GUI 元素,例如,一个按钮,一个标签等。
- 一般的 Component 对象不能独立的显示出来,必须将其放在某一 Container 对象才可以显示出来。
- Container 是 Component 的子类,Container 子类对象可以容纳别的 Component 对象。
- Container 对象可以使用方法 add(...) 向其中添加 Component 对象。
- Container 是 Component 的子类,因此 Container 对象也可以被当做 Component 对象添加到其他 Container 对象中。
- 两种常用的 Container。Window:其对象表示自由停泊的顶级窗口。Panel:其对象可以容纳其他 Component 对象,但是不能独立存在,必须被添加到其他 Container 中(如 Window)。
Frame
- Frame 是 Window 的子类,由 Frame 或其子类创建的对象为一个窗体。
- Frame 的常用构造方法:Frame(); Frame(String s) // 创建标题栏为字符串 s 的窗口。
- 成员函数略。(注意 Frame还继承了父类 Window 的成员方法,一些常用的方法在 Window 里面。)
示例1:
import java.awt.*;
public class TestFrame {
	public static void main( String args[]) {
		Frame f = new Frame("My First Test");
		f.setLocation(300, 300);
		f.setSize( 170,100);
		f.setBackground( Color.blue);
		f.setResizable(false);
		f.setVisible( true);
	}
}
示例2:(推荐)
import java.awt.*;

public class Test {
    public static void main(String args[]) {
        MyFrame f1 = new MyFrame(100,100,200,200,Color.BLUE);
        MyFrame f2 = new MyFrame(300,100,200,200,Color.YELLOW);
        MyFrame f3 = new MyFrame(100,300,200,200,Color.GREEN);
        MyFrame f4 = new MyFrame(300,300,200,200,Color.MAGENTA);
    }
}

class MyFrame extends Frame{
    static int id = 0;
    MyFrame(int x,int y,int w,int h,Color color){
        super("MyFrame " + (++id));
        setBackground(color);
        setLayout(null);
        setBounds(x,y,w,h);
        setVisible(true);
    }
}
Panel
- Panel 对象可以看成可以容纳 Component 的空间
- Panel 对象可以拥有自己的布局管理器
- Panel 的构造方法。Panel() // 使用默认的布局管理器初始化。 Panle(LayoutManager layout) // 使用指定的布局管理器初始化。
- Panel 类拥有从其父继承来的一些常用成员方法。
示例1:
import java.awt.*;

public class Test {
    public static void main(String args[]) {
        Frame f = new Frame("Java Frame with Panel");
        Panel p = new Panel(null);
        f.setLayout(null); // 少了此句话,将不显示Frame的背景,全部由Panel覆盖
        f.setBounds(300,300,500,500);
        f.setBackground(new Color(102,95,51));
        p.setBounds(50,50,400,400);
        p.setBackground(new Color(204,204,255));
        f.add(p);
        f.setVisible(true);
    }
}
示例2:
import java.awt.*;

public class Test {
    public static void main(String args[]) {
        new MyFrame("MyFrameWithPanel",300,300,400,300);
    }
}


class MyFrame extends Frame{
    private Panel p1,p2,p3,p4;
    MyFrame2(String s,int x,int y,int w,int h){
        super(s);
        setLayout(null);
        p1 = new Panel(null); p2 = new Panel(null);
        p3 = new Panel(null); p4 = new Panel(null);
        p1.setBounds(0,0,w/2,h/2);
        p2.setBounds(0,h/2,w/2,h/2);
        p3.setBounds(w/2,0,w/2,h/2);
        p4.setBounds(w/2,h/2,w/2,h/2);
        p1.setBackground(Color.BLUE);
        p2.setBackground(Color.GREEN);
        p3.setBackground(Color.YELLOW);
        p4.setBackground(Color.MAGENTA);
        add(p1);add(p2);add(p3);add(p4);
        setBounds(x,y,w,h);
        setVisible(true);
    }
}
PS: Panel 的 setBounds 方法中设置的位置大小是相对于相对装入的 Frame 窗口位置和大小的。
布局管理器
- Java 语言中,提供了布局管理器类的对象可以管理 Component 在 Container 中的布局,不必直接设置 Component 位置和大小。
- 每个 Container 都有一个布局管理器对象,当容器需要对某个组件进行定位或判断其大小尺寸时,就会调用其对应的布局管理器,调用 Container 的 setLayout 方法改变其布局管理器对象。
- AWT 提供了至少 5 种布局管理器类:
- FlowLayout
- BorderLayout
- GridLayout
- CardLayout
- GridBagLayout
FlowLayout
-
FlowLayout 是 Panel 类的默认布局管理器。
-
FlowLayout 布局管理器对组件逐行定位,行内从左到右,一行排满后换行。
-
不改变组件的大小,按组件原有尺寸显示组件,可以设置不同的组件间距,行距以及对齐方式。
-
FlowLayout 默认的对齐方式是居中。
-
FlowLayout 的构造方法:
new FlowLayout(FlowLayout.RIGHT, 20, 40); // 右对齐,组件之间水平间隔20像素,垂直间隔40像素。
new FlowLayout(FlowLayout.RIGHT); // 右对齐,组件之间水平和垂直间隔为缺省值(5像素)。
new FlowLayout(); // 缺省为居中对齐,组件之间水平和垂直间隔为缺省值(5像素)。
示例1:
import java.awt.*;

public class Test {
    public static void main(String args[]) {
        Frame f = new Frame("Flow Layout");
        Button button1 = new Button("Ok");
        Button button2 = new Button("Open");
        Button button3 = new Button("Close");
        f.setLayout(new FlowLayout(FlowLayout.CENTER));
        f.add(button1);
        f.add(button2);
        f.add(button3);
        //f.setSize(100,100);
        f.pack(); // pack打包,刚好包住 f 里面的组件,自适应。
        f.setVisible(true);
    }
}
示例2:
import java.awt.*;
public class Test {
    public static void main(String args[]) {
        Frame f = new Frame("Java Frame");
        FlowLayout l =
                new FlowLayout(FlowLayout.CENTER, 20, 40);
        f.setLayout(l);
        f.setLocation(300,400);
        f.setSize(300,200);

        f.setBackground(new Color(204,204,255));
        for(int i = 1; i<=7; i++){
            f.add(new Button("BUTTON"));
        }

        f.setVisible(true);
    }
}
BorderLayout
- BorderLayout 是 Frame 类的默认布局管理器。
- BorderLayout 将整个容器的布局划分成:
- 东(EAST)
- 西(WEST)
- 南(SOUTH)
- 北(NORTH)
- 中(CENTER) 五个区域,组件只能被添加到指定的区域。
- 如果不指定组件的加入位置,则默认加入到 CENTER 区。
- 每个区域只能加入一个组件,如果加入多个,则先前的加入的组件会被覆盖。
示例:
import java.awt.*;
public class Test {
    public static void main(String args[]) {
        Frame f;
        f = new Frame("Border Layout");
        Button bn = new Button("BN");
        Button bs = new Button("BS");
        Button bw = new Button("BW");
        Button be = new Button("BE");
        Button bc = new Button("BC");

		f.add(bn, BorderLayout.NORTH);
		f.add(bs, BorderLayout.SOUTH);
		f.add(bw, BorderLayout.WEST);
		f.add(be, BorderLayout.EAST);
		f.add(bc, BorderLayout.CENTER);

        f.setSize(200,200);
        f.setVisible(true);
    }
}
GridLayout
- GridLayout 布局管理器将空间划分成规则的矩形网格,每个单元格区域大小相等。组件被添加到每个单元格中,先从左到右填满一行后换行,再从上到下。
- 在 GridLayout 构造方法中指定分割的行数和列数。(如:GridLayout(3, 4); // 整个空间分为3行4列。)
示例:
import java.awt.*;
public class Test {
    public static void main(String args[]) {
        Frame f = new Frame("GridLayout Example");
        Button b1 = new Button("b1");
        Button b2 = new Button("b2");
        Button b3 = new Button("b3");
        Button b4 = new Button("b4");
        Button b5 = new Button("b5");
        Button b6 = new Button("b6");
        f.setLayout (new GridLayout(3,2));
        f.add(b1);
        f.add(b2);
        f.add(b3);
        f.add(b4);
        f.add(b5);
        //f.add(b6);
        f.pack();
        f.setVisible(true);
    }
}
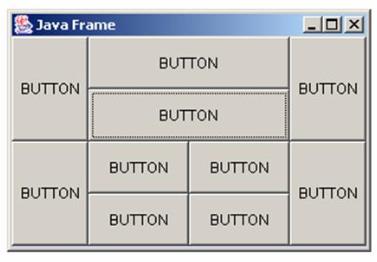
问题:请使用 Container 的嵌套实现下面布局?

代码:(实现原理:Panel 嵌套 Panel)
import java.awt.*;
public class Test {
    public static void main(String args[]) {

        Frame f = new Frame("Frame");
        f.setLayout(new GridLayout(2,1));
        f.setBounds(400,200, 500, 300);

        Panel p1 = new Panel(new BorderLayout());
        Panel p2 = new Panel(new BorderLayout());
        Panel p11 = new Panel(new GridLayout(2,1));
        Panel p22 = new Panel(new GridLayout(2,2));

        p11.add(new Button("BUTTON"));
        p11.add(new Button("BUTTON"));
        p1.add(p11, BorderLayout.CENTER);
        p1.add(new Button("BUTTON"), BorderLayout.WEST);
        p1.add(new Button("BUTTON"), BorderLayout.EAST);

        for(int i=0; i<4; i++) {
            p22.add(new Button("BUTTON"));
        }
        p2.add(p22, BorderLayout.CENTER);
        p2.add(new Button("BUTTON"), BorderLayout.WEST);
        p2.add(new Button("BUTTON"), BorderLayout.EAST);


        f.add(p1);
        f.add(p2);

        f.setVisible(true);

    }
}
布局管理器总结
- Frame 是一个顶级窗口,Frame 的缺省布局管理器为 BorderLayout
- Panel 无法单独显示,必须添加到某个容器中,Panel 的缺省布局管理器为 FlowLayout.
- 当把 Panel 作为一个组件添加到某个容器后,该 Panel 仍然可以有自己的布局管理器。
- 使用布局管理器时,布局管理器负责各个组件的大小和位置,因此用户无法在这种情况下设置组件的大小和位置属性,如果试图使用 Java 提供的 setLocation(), setSize(), setBounds() 等方法,则都会被布局管理器覆盖。
- 如果用户确实需要亲自设置组件大小和位置,则应取消该容器的布局管理器,方法为:setLayout(null);
事件监听
- Button 事件监听
- 创建自己的类 MyMonitor 实现 ActionListener 接口
- 向 Button 对象中注册 MyMonitor 对象。
- 在 Button 对象有 ActionEvent 事件对象产生的时候,自动调用 MyMonitor对象中实现 ActionListener 接口的函数actionPerformed 方法
示例:
import java.awt.*;
import java.awt.event.*;

public class Test {
    public static void main(String args[]) {
        Frame f = new Frame("Test");
        Button b = new Button("Press Me!");
        Monitor bh = new Monitor();
        b.addActionListener(bh);
        f.add(b,BorderLayout.CENTER);
        f.pack();
        f.setVisible(true);
    }
}

class Monitor implements ActionListener {
    public void actionPerformed(ActionEvent e) {
        System.out.println("a button has been pressed");
    }
}
TextField 类
-
java.awt.TextField 类用来创建文本框对象。
-
TextField 常用方法:
// 构造方法
TextField ()
TextField (int columns) // 文本框长度
TextField (String text)
TextField (String text, int columns)// 方法
public void setText(String t)
public String getText()
public void setEchoChar(char c) // 设置回显字符
public void setEditable(noolean b)
public boolean isEditable()
public void setBackground(Color c)
public void select(int selectionStart, int selectionEnd)
public void selectAll() // 不知怎么用?
public void addActionListener(ActionListener e) // 添加动作监听器 -
TextField 事件监听
- TextField 对象可能发生 Action(光标在文本框内敲回车)事件,该事件对应的事件类是 java.awt.event.ActionEvent.
- 用来处理 ActionEvent 事件是实现了 java.awt.event.ActionListener 接口的类的对象。
- ActionListener 接口定义有方法: public void actionPerformed(ActionEvent e);
- 实现该接口的类要在该方法中添加处理该事件(Action)的语句。
- 使用 addActionListener(ActionListener l) 方法为 TextField 对象注册一个 ActionListener 对象,当 TextField 对象发生 Action 事件时,会生成一个 ActionEvent 对象,该对象作为参数传递给 ActionListener 对象的 actionPerformed 方法 在方法中可以获取该对象的信息,并作出相应的处理。
示例1:
import java.awt.*;
import java.awt.event.*;

public class Test {
    public static void main(String[] args) {
        new TFFrame();
    }
}

class TFFrame extends Frame {
    TFFrame() {
        TextField tf = new TextField();
        add(tf);
        tf.addActionListener(new TFActionListener());
        // tf.setEchoChar(\'*\');
        pack();
        setVisible(true);
    }
}

class TFActionListener implements ActionListener {
    @Override
    public void actionPerformed(ActionEvent e) {
        TextField tf = (TextField)e.getSource();
        System.out.println(tf.getText());
        tf.setText("");
    }
}
示例2:
import java.awt.*;
import java.awt.event.*;

public class Test {
    public static void main(String[] args) {
        new TFFrame();
    }
}

class TFFrame extends Frame {
    TextField tf1, tf2, tfsum;
    Label lb = null;
    Button btn = null;

    TFFrame() {
        tf1 = new TextField(10);
        tf2 = new TextField(10);
        tfsum = new TextField(15);
        lb = new Label("+");
        btn = new Button("=");
        btn.addActionListener(new TFActionListener(this));
        setLayout(new FlowLayout());
        add(tf1);
        add(lb);
        add(tf2);
        add(btn);
        add(tfsum);

        pack();
        setVisible(true);
    }
}

class TFActionListener implements ActionListener {

    private TFFrame tf;

    TFActionListener(TFFrame tf) {
        this.tf = tf;
    }

    @Override
    public void actionPerformed(ActionEvent e) {
        int t1 = Integer.parseInt(tf.tf1.getText());
        int t2 = Integer.parseInt(tf.tf2.getText());
        tf.tfsum.setText("" + (t1 + t2));
    }
}
private TFFrame tf;
TFActionListener(TFFrame tf) { this.tf = tf;}
当我们需要获取其他的对象的时候,传递的不是另一个对象的成员变量,而是将整个对象的引用传递过来,这种编程模式叫做 “门面模式” 。网上有详细解释。
内部类
- 好处
- 可以方便的访问包装类的成员。
- 可以清楚的组织逻辑,防止不应该被其他类访问的类访问。
- 何时使用
- 该类不允许或者不需要其他类进行访问时。(比如:各种事件的监听器)
示例:
import java.awt.*;
import java.awt.event.*;

public class Test {
    public static void main(String[] args) {
        new TFFrame("Frame of sum");
    }
}

class TFFrame extends Frame {
    TextField tf1, tf2, tfsum;
    Label lb = null;
    Button btn = null;

    TFFrame(String s) {
        super(s);
        tf1 = new TextField(10);
        tf2 = new TextField(10);
        tfsum = new TextField(15);
        lb = new Label("+");
        btn = new Button("=");
        btn.addActionListener(new TFActionListener());
        setLayout(new FlowLayout());
        add(tf1);
        add(lb);
        add(tf2);
        add(btn);
        add(tfsum);

        pack();
        setVisible(true);
    }

    class TFActionListener implements ActionListener {
        @Override
        public void actionPerformed(ActionEvent e) {
            int t1 = Integer.parseInt(tf1.getText());
            int t2 = Integer.parseInt(tf2.getText());
            tfsum.setText("" + (t1 + t2));

        }
    }
}
内部类:将 class TFActionListener implements ActionListener 放到了 TFFrame 类的内部。
Graphics 类 paint 方法
- 每个 Component 都有一个 paint(Graphics g) 方法,用于实现绘图目的,每次重画该 Component 的时候,都会自动调用 paint 方法。
什么叫重画该 Component 的时候?
打比方说 Component 是一个窗口,那么改变窗口大小的时候,最小化最大化窗口的时候,切换到其他界面再切回来的时候都会重画窗口,都会导致 paint 方法自动被调用。
- paint 时 Container 接口的方法,需要重写。
示例:
import java.awt.*;

public class Test {
    public static void main(String[] args) {
        new PaintFrame().launchFrame();
    }
}

class PaintFrame extends Frame {

    public void launchFrame() {
        setBounds(200,200,640,480);
        setVisible(true);
    }

    public void paint(Graphics g) {
        Color c = g.getColor(); // 作用为保护现场
        g.setColor(Color.red);
        g.fillOval(50, 50, 30, 30);
        g.setColor(Color.green);
        g.fillRect(80,80,40,40);
        g.setColor(c); // 作用为恢复现场
    }

}
鼠标事件适配器
- 抽象类 java.awt.event.MouseAdapter 实现了 MouseListener 接口,可以使用其子类作为 MouseEvent 的监听器,只要重写其相应的方法即可。
- MouseAdapter 存在的意义(就是为了不全部写出接口方法的实现,MouseAdapter 以空方法实现了MouseListener 接口,我们可以继承 MouseAdapter ,然后只重写我们想要重写的方法即可,不需要全部写出接口中的方法。)
- 不止有 MouseAdapter 还有 xxxAdapter
示例:
import java.awt.*;
import java.awt.event.*;
import java.util.*;
public class Test{
    public static void main(String args[]) {
        new MyFrame("Draw Point");
    }
}

class MyFrame extends Frame {
    ArrayList points = null;
    MyFrame(String s) {
        super(s);
        points = new ArrayList();
        setLayout(null);
        setBounds(300,300,400,300);
        this.setBackground(new Color(204,204,255));
        setVisible(true);
        this.addMouseListener(new Monitor());
    }

    @Override
    public void paint(Graphics g) {
        Iterator i = points.iterator();
        while(i.hasNext()){
            Point p = (Point)i.next();
            g.setColor(Color.RED);
            g.fillOval(p.x,p.y,10,10);
        }
    }

    public void addPoint(Point p){
        points.add(p);
    }
}

class Monitor extends MouseAdapter {
    public void mousePressed(MouseEvent e) {
        MyFrame f = (MyFrame)e.getSource();
        f.addPoint(new Point(e.getX(),e.getY()));
        f.repaint(); // 当有鼠标点击时重绘,保证在界面未重画的时候,强制重画界面
    }
}
repaint() 方法调用了 -- update() 调用了 --paint() 方法。基本上所有的 GUI 图形绘制都是采用这样的方法。
Window 事件 和 匿名类
-
Window 事件所对应的事件类为 WindowEvent,所对应的事件监听接口为 WindowListener。
-
WindowListener 定义的方法:
void windowActivated(WindowEvent e) // 窗口激活时
void windowClosed(WindowEvent e) // 窗口已经关闭时
void windowClosing(WindowEvent e) // 窗口正在关闭时
void windowDeactivated(WindowEvent e) // 窗口未激活时
void windowDeiconified(WindowEvent e) //当窗口从最小化更改为正常状态时调用。
void windowIconified(WindowEvent e) //当窗口从正常状态更改为最小化状态时调用。
void windowOpened(WindowEvent e) // 第一次调用窗口可见。 -
与 WindowListener 对应的适配器为 WindowAdapter。
示例:
import java.awt.*;
import java.awt.event.*;
public class Test {
    public static void main(String args[]) {
        new MyFrame55("MyFrame");
    }
}
class MyFrame55 extends Frame {
    MyFrame55(String s) {
        super(s);
        setLayout(null);
        setBounds(300, 300, 400, 300);
        this.setBackground(new Color(204, 204, 255));
        setVisible(true);
        //this.addWindowListener(new MyWindowMonitor());

        this.addWindowListener(
            new WindowAdapter() {
                public void windowClosing(WindowEvent e) {
                    setVisible(false);
                    System.exit(0);
                }
            });

    }
  /*
  class MyWindowMonitor extends WindowAdapter {
  	public void windowClosing(WindowEvent e) {
  		setVisible(false);
  		System.exit(-1);
  	}
  }
  */
}
其中:
this.addWindowListener(
new WindowAdapter() {
    public void windowClosing(WindowEvent e) {
        setVisible(false);
        System.exit(0);
    }
});
/*
  class MyWindowMonitor extends WindowAdapter {
  	public void windowClosing(WindowEvent e) {
  		setVisible(false);
  		System.exit(-1);
  	}
  }
  */
为匿名类。
在实际的项目中看到一个很奇怪的现象,Java可以直接new一个接口,然后在new里面粗暴的加入实现代码。就像下面这样。那么问题来了,new出来的对象没有实际的类作为载体,这不是很奇怪吗?
思考以下代码的输出是什么?
Runnable x = new Runnable() {
    @Override
    public void run() {
        System.out.println(this.getClass());
    }
};
x.run();
实际答案是出现xxxx$1这样一个类名,它是编译器给定的名称。
键盘事件的测试程序
import java.awt.*;
import java.awt.event.*;
public class Test {
    public static void main(String args[]) {
        new MyFrame("Key Frame");
    }
}

class MyFrame extends Frame {

    MyFrame(String s) {
        super(s);
        setBounds(300, 200, 200, 200);
        addKeyListener(new MyKeyListener());
        addWindowListener(new MyWindowListener());
        setVisible(true);
    }

    class MyKeyListener extends KeyAdapter {
        @Override
        public void keyPressed(KeyEvent e) {
            if(e.getKeyCode() == KeyEvent.VK_UP) {
                System.out.println("UP!");
            }
        }
    }

    class MyWindowListener extends WindowAdapter {
        @Override
        public void windowClosing(WindowEvent e) {
            System.exit(0);
        }
    }
}