Unity-ugui之扩展Image组件Filled模式支持九宫格
Posted CrisFu
tags:
篇首语:本文由小常识网(cha138.com)小编为大家整理,主要介绍了Unity-ugui之扩展Image组件Filled模式支持九宫格相关的知识,希望对你有一定的参考价值。
目录
本文内容
开发过程有个很常见的需求:进度条的进度变化是裁剪的方式显示。很好实现,Image的IamgeType选择Filled模式即可。但是呢,Filled模式不支持九宫格,即我们进度条显示要多长,就需要出多长的资源,这样子就会导致资源量很大。
本文主要是让Filled模式支持九宫格。
内容及效果
原Sliced模式效果
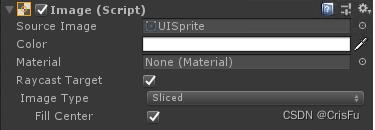


Sliced模式的原理为对九宫格进行缩放,可以从上几图看到,当进度为 0 -1之间时,右侧的三宫格会一致显示;但是当进度为0时,留下左右六宫格内的内容,无法做到完全消失。显然无法满足裁剪的方式。
原Filled模式效果
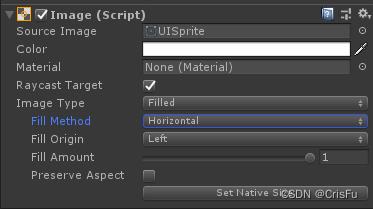


Filled模式如上几图所示,满足裁剪的方式,但不支持九宫格图片。想要解决该问题,美术则需要根据进度的具体长度出对应匹配长度的资源。虽然这样能解决问题,但是又会带来资源量过大的问题,有多少种进度条就需要出多少个资源,并且稍微修改一点UI中的显示长度,就又需要重新修改资源。显然也无法满足我们的需求。
Filled模式支持九宫格效果
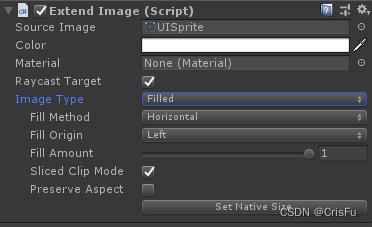


如上几图,当我们扩展了Image组件后,让Filled模式支持九宫格图片后,既能支持裁剪,又能节省资源。
内容分析

ExtendImage脚本继承自Image,通过覆写OnPopulateMesh函数,如果是Filled模式、图片有九宫格信息并且使用九宫格裁剪模式就执行我们自定义的裁剪方式。

根据九宫格定义顶点数组和uv数组。(因为是九宫格,所以长度为4)

初始化uv数组。
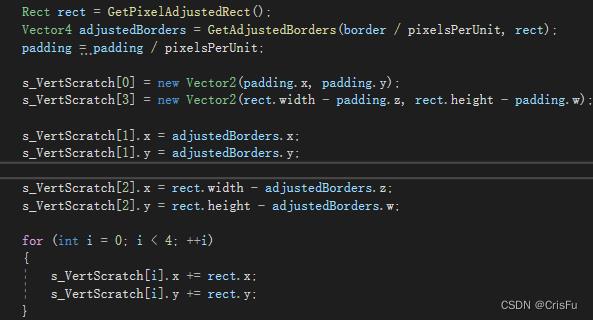
根绝Rect计算出进度为1时所有顶点的位置。

计算出xy的总长,和九宫格各部分占据的比例。
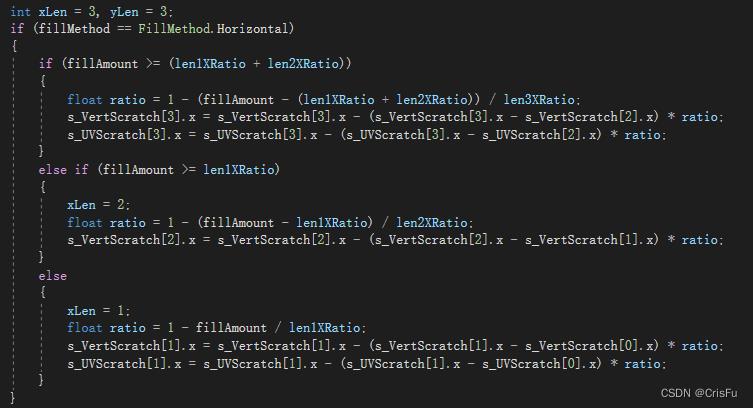
通过上边获取到的各宫格占据的比例,我们即可根据fillAmount计算出需要保留几宫格和最后一个宫格的定点和uv值,如上图(y方向同理)。
至此即完成了Filled模式下支持九宫格图片的需求。
代码
ExtendImage
using UnityEngine;
using UnityEngine.UI;

namespace ExtendUI

    [AddComponentMenu("UI/ExtendImage")]
    public class ExtendImage : Image

        [SerializeField]
        private bool m_SlicedClipMode = false;

        protected override void OnPopulateMesh(VertexHelper vh)

            switch (type)

                case Type.Filled when m_SlicedClipMode && (fillMethod == FillMethod.Horizontal || fillMethod == FillMethod.Vertical) && hasBorder:
                    GenerateSlicedSprite(vh);
                    break;
                default:
                    base.OnPopulateMesh(vh);
                    break;


        private Vector2[] s_VertScratch = new Vector2[4];
        private Vector2[] s_UVScratch = new Vector2[4];

        private void GenerateSlicedSprite(VertexHelper toFill)

            var activeSprite = overrideSprite ?? sprite;

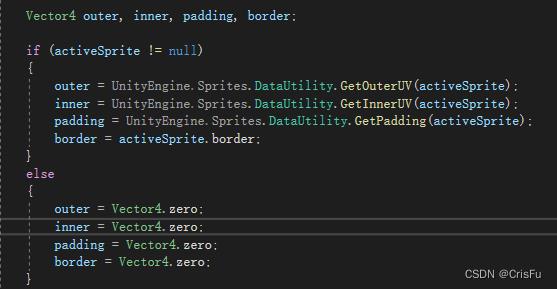
            Vector4 outer, inner, padding, border;

            if (activeSprite != null)

                outer = UnityEngine.Sprites.DataUtility.GetOuterUV(activeSprite);
                inner = UnityEngine.Sprites.DataUtility.GetInnerUV(activeSprite);
                padding = UnityEngine.Sprites.DataUtility.GetPadding(activeSprite);
                border = activeSprite.border;

            else

                outer = Vector4.zero;
                inner = Vector4.zero;
                padding = Vector4.zero;
                border = Vector4.zero;

            Rect rect = GetPixelAdjustedRect();
            Vector4 adjustedBorders = GetAdjustedBorders(border / pixelsPerUnit, rect);
            padding = padding / pixelsPerUnit;

            s_VertScratch[0] = new Vector2(padding.x, padding.y);
            s_VertScratch[3] = new Vector2(rect.width - padding.z, rect.height - padding.w);

            s_VertScratch[1].x = adjustedBorders.x;
            s_VertScratch[1].y = adjustedBorders.y;

            s_VertScratch[2].x = rect.width - adjustedBorders.z;
            s_VertScratch[2].y = rect.height - adjustedBorders.w;

            for (int i = 0; i < 4; ++i)

                s_VertScratch[i].x += rect.x;
                s_VertScratch[i].y += rect.y;


            s_UVScratch[0] = new Vector2(outer.x, outer.y);
            s_UVScratch[1] = new Vector2(inner.x, inner.y);
            s_UVScratch[2] = new Vector2(inner.z, inner.w);
            s_UVScratch[3] = new Vector2(outer.z, outer.w);

            float xLength = s_VertScratch[3].x - s_VertScratch[0].x;
            float yLength = s_VertScratch[3].y - s_VertScratch[0].y;
            float len1XRatio = (s_VertScratch[1].x - s_VertScratch[0].x) / xLength;
            float len1YRatio = (s_VertScratch[1].y - s_VertScratch[0].y) / yLength;
            float len2XRatio = (s_VertScratch[2].x - s_VertScratch[1].x) / xLength;
            float len2YRatio = (s_VertScratch[2].y - s_VertScratch[1].y) / yLength;
            float len3XRatio = (s_VertScratch[3].x - s_VertScratch[2].x) / xLength;
            float len3YRatio = (s_VertScratch[3].y - s_VertScratch[2].y) / yLength;
            int xLen = 3, yLen = 3;
            if (fillMethod == FillMethod.Horizontal)

                if (fillAmount >= (len1XRatio + len2XRatio))

                    float ratio = 1 - (fillAmount - (len1XRatio + len2XRatio)) / len3XRatio;
                    s_VertScratch[3].x = s_VertScratch[3].x - (s_VertScratch[3].x - s_VertScratch[2].x) * ratio;
                    s_UVScratch[3].x = s_UVScratch[3].x - (s_UVScratch[3].x - s_UVScratch[2].x) * ratio;

                else if (fillAmount >= len1XRatio)

                    xLen = 2;
                    float ratio = 1 - (fillAmount - len1XRatio) / len2XRatio;
                    s_VertScratch[2].x = s_VertScratch[2].x - (s_VertScratch[2].x - s_VertScratch[1].x) * ratio;

                else

                    xLen = 1;
                    float ratio = 1 - fillAmount / len1XRatio;
                    s_VertScratch[1].x = s_VertScratch[1].x - (s_VertScratch[1].x - s_VertScratch[0].x) * ratio;
                    s_UVScratch[1].x = s_UVScratch[1].x - (s_UVScratch[1].x - s_UVScratch[0].x) * ratio;


            else if (fillMethod == FillMethod.Vertical)

                if (fillAmount >= (len1YRatio + len2YRatio))

                    float ratio = 1 - (fillAmount - (len1YRatio + len2YRatio)) / len3YRatio;
                    s_VertScratch[3].y = s_VertScratch[3].y - (s_VertScratch[3].y - s_VertScratch[2].y) * ratio;
                    s_UVScratch[3].y = s_UVScratch[3].y - (s_UVScratch[3].y - s_UVScratch[2].y) * ratio;

                else if (fillAmount >= len1YRatio)

                    yLen = 2;
                    float ratio = 1 - (fillAmount - len1YRatio) / len2YRatio;
                    s_VertScratch[2].y = s_VertScratch[2].y - (s_VertScratch[2].y - s_VertScratch[1].y) * ratio;

                else

                    yLen = 1;
                    float ratio = 1 - fillAmount / len1YRatio;
                    s_VertScratch[1].y = s_VertScratch[1].y - (s_VertScratch[1].y - s_VertScratch[0].y) * ratio;
                    s_UVScratch[1].y = s_UVScratch[1].y - (s_UVScratch[1].y - s_UVScratch[0].y) * ratio;


            toFill.Clear();

            for (int x = 0; x < xLen; ++x)

                int x2 = x + 1;

                for (int y = 0; y < yLen; ++y)

                    if (!fillCenter && x == 1 && y == 1)
                        continue;

                    int y2 = y + 1;


                    AddQuad(toFill,
                        new Vector2(s_VertScratch[x].x, s_VertScratch[y].y),
                        new Vector2(s_VertScratch[x2].x, s_VertScratch[y2].y),
                        color,
                        new Vector2(s_UVScratch[x].x, s_UVScratch[y].y),
                        new Vector2(s_UVScratch[x2].x, s_UVScratch[y2].y));


        static void AddQuad(VertexHelper vertexHelper, Vector2 posMin, Vector2 posMax, Color32 color, Vector2 uvMin, Vector2 uvMax)

            int startIndex = vertexHelper.currentVertCount;

            vertexHelper.AddVert(new Vector3(posMin.x, posMin.y, 0), color, new Vector2(uvMin.x, uvMin.y));
            vertexHelper.AddVert(new Vector3(posMin.x, posMax.y, 0), color, new Vector2(uvMin.x, uvMax.y));
            vertexHelper.AddVert(new Vector3(posMax.x, posMax.y, 0), color, new Vector2(uvMax.x, uvMax.y));
            vertexHelper.AddVert(new Vector3(posMax.x, posMin.y, 0), color, new Vector2(uvMax.x, uvMin.y));

            vertexHelper.AddTriangle(startIndex, startIndex + 1, startIndex + 2);
            vertexHelper.AddTriangle(startIndex + 2, startIndex + 3, startIndex);


        private Vector4 GetAdjustedBorders(Vector4 border, Rect adjustedRect)

            Rect originalRect = rectTransform.rect;

            for (int axis = 0; axis <= 1; axis++)

                float borderScaleRatio;

                if (originalRect.size[axis] != 0)

                    borderScaleRatio = adjustedRect.size[axis] / originalRect.size[axis];
                    border[axis] *= borderScaleRatio;
                    border[axis + 2] *= borderScaleRatio;


                float combinedBorders = border[axis] + border[axis + 2];
                if (adjustedRect.size[axis] < combinedBorders && combinedBorders != 0)

                    borderScaleRatio = adjustedRect.size[axis] / combinedBorders;
                    border[axis] *= borderScaleRatio;
                    border[axis + 2] *= borderScaleRatio;


            return border;
ExtendImageEditor
using UnityEditor;
using UnityEditor.AnimatedValues;
using UnityEditor.UI;
using UnityEngine.UI;

namespace ExtendUI

    [CustomEditor(typeof(ExtendImage), true), CanEditMultipleObjects]
    public class ExtendImageEditor : ImageEditor

        private SerializedProperty m_Sprite;
        private SerializedProperty m_Type;
        private SerializedProperty m_PreserveAspect;
        private SerializedProperty m_UseSpriteMesh;

        private AnimBool           m_ShowImgType;
        private SerializedProperty m_FillMethod;
        private SerializedProperty m_SlicedClipMode;

        protected override void OnEnable()

            m_Sprite         = serializedObject.FindProperty("m_Sprite");
            m_Type           = serializedObject.FindProperty("m_Type");
            m_PreserveAspect = serializedObject.FindProperty("m_PreserveAspect");
            m_UseSpriteMesh  = serializedObject.FindProperty("m_UseSpriteMesh");
            m_FillMethod = serializedObject.FindProperty("m_FillMethod");
            m_SlicedClipMode = serializedObject.FindProperty("m_SlicedClipMode");
            m_ShowImgType = new AnimBool(m_Sprite.objectReferenceValue != null);
            base.OnEnable();


        public override void OnInspectorGUI()

            serializedObject.Update();
            SpriteGUI();
            AppearanceControlsGUI();
            RaycastControlsGUI();

            m_ShowImgType.target = m_Sprite.objectReferenceValue != null;
            if (EditorGUILayout.BeginFadeGroup(m_ShowImgType.faded))
                TypeGUI();
            EditorGUILayout.EndFadeGroup();

            SetShowNativeSize(false);
            if (EditorGUILayout.BeginFadeGroup(m_ShowNativeSize.faded))

                EditorGUI.indentLevel++;

                if ((Image.Type) m_Type.enumValueIndex == Image.Type.Simple)

                    EditorGUILayout.PropertyField(m_UseSpriteMesh);

                if ((Image.Type)m_Type.enumValueIndex == Image.Type.Filled)

                    if ((Image.FillMethod)m_FillMethod.enumValueIndex == Image.FillMethod.Horizontal ||
                        (Image.FillMethod)m_FillMethod.enumValueIndex == Image.FillMethod.Vertical)
                        EditorGUILayout.PropertyField(m_SlicedClipMode);


                EditorGUILayout.PropertyField(m_PreserveAspect);
                EditorGUI.indentLevel--;

            EditorGUILayout.EndFadeGroup();
            NativeSizeButtonGUI();


            serializedObject.ApplyModifiedProperties();


        private void SetShowNativeSize(bool instant)

            var type           = (Image.Type) m_Type.enumValueIndex;
            var showNativeSize = (type == Image.Type.Simple || type == Image.Type.Filled) && m_Sprite.objectReferenceValue != null;
            base.SetShowNativeSize(showNativeSize, instant);
React Native 组件之Image
Image组件类似于iOS中UIImage控件,该组件可以通过多种方式加载图片资源。
使用方式,加载方式有如下几种:
/**
 * Sample React Native App
 * https://github.com/facebook/react-native
 * 周少停
 * image 加载的三种方式+设置图片的内容模式
 */

import React, { Component } from ‘react‘;
import {
  AppRegistry,
  StyleSheet,
  Text,
  Image,
  View,
} from ‘react-native‘

class Project extends Component {
  render() {
    return (
      <View style={styles.container}>
        <Text>加载工程中图片</Text>
       <Image source={require(‘./imgs/1111.png‘)} style={{width:120,height:120}}/>
        <Text>加载Xcode中asset的图片</Text>
       <Image source={require(‘image!520‘)} style={{width:120,height:120}} />
        <Text>加载网络中的图片</Text>
       <Image source={{uri:‘https://unsplash.it/600/400/?random‘}} style={{width:120,height:200}}/>
        <Text>设置加载图片的模式</Text>
        <Image source={{uri:‘https://unsplash.it/600/400/?random‘}} style={{width:120,height:200,resizeMode:Image.resizeMode.cover}}/>
        <Image source={{uri:‘https://unsplash.it/600/400/?random‘}} style={{width:120,height:200,resizeMode:Image.resizeMode.contain}}/>
        <Image source={{uri:‘https://unsplash.it/600/400/?random‘}} style={{width:120,height:200,resizeMode:Image.resizeMode.stretch}}/>
      </View>
    );
  }
}

const styles = StyleSheet.create({
  container: {
    flex: 1,
    marginTop:20,//上边距
    flexDirection:‘column‘,//主轴方向 垂直
    justifyContent: ‘flex-start‘,//控件在主轴上的对齐方向
    alignItems: ‘flex-start‘, //控件在侧轴上的对齐方向
    backgroundColor: ‘#F5FCFF‘,
  }
});

AppRegistry.registerComponent(‘Project‘, () => Project);
/**
 * Sample React Native App
 * https://github.com/facebook/react-native
 * 周少停 2016-09-13
 * Imaage的常见属性
 */

import React, { Component } from ‘react‘;
import {
  AppRegistry,
  StyleSheet,
  Text,
  View,
  Image
} from ‘react-native‘;
//导入json数据
var BadgeData = require(‘./BadgeData.json‘);

//定义一些全局变量
var Dimensions = require(‘Dimensions‘);
var {width} = Dimensions.get(‘window‘); //屏宽
var cols = 3 //总列数
var boxW = 100; //单个盒子的宽度&高度
var vMargin = (width - cols*boxW)/(cols + 1);//盒子中间的水平间距
var hMargin = 25;

class Project extends Component {
  render() {
    return (
      <View style={styles.container}>
       {/*返回包的数据*/}
        {this.renderAllBadge()}
      </View>
    );
  }
  //返回所有的包
  renderAllBadge(){
    //定义一个数组,装每个包的信息
    var allBadge = [];
    //遍历json数据
    for(var i=0;i<BadgeData.data.length;i++){
      //去除单独的数据对象
      var badge = BadgeData.data[i];
      //直接装入数组
      allBadge.push(
        <View key={i} style={styles.outViewStyle}>
            <Image source={{uri:badge.icon}} style={styles.imageStyle} />
            <Text style={styles.mainTitleStyle}>
               {badge.title}
            </Text>
        </View>
      );
    }
    //返回数组
    return allBadge;
  }
}

const styles = StyleSheet.create({
  container: {
    flex: 1,
    marginTop:20,//上边距
    flexDirection:‘row‘,//主轴方向,水平
    alignItems:‘flex-start‘,//定义控件在侧轴上的对齐方式
    flexWrap:‘wrap‘,//是否换行
    backgroundColor: ‘#F5FCFF‘
  },
  outViewStyle: {
    backgroundColor:‘gray‘,
    alignItems:‘center‘,
    width:boxW,
    height:boxW,
    marginLeft:vMargin,
    marginBottom:hMargin
  },
  imageStyle:{
    width:80,
    height:80
  },
  mainTitleStyle:{
    color:‘white‘
  }
});

AppRegistry.registerComponent(‘Project‘, () => Project);
以上是关于Unity-ugui之扩展Image组件Filled模式支持九宫格的主要内容,如果未能解决你的问题,请参考以下文章