Laya中使用Navmesh寻路
Posted CP.Y
tags:
篇首语:本文由小常识网(cha138.com)小编为大家整理,主要介绍了Laya中使用Navmesh寻路相关的知识,希望对你有一定的参考价值。
Laya中使用NevMesh寻路
关于Laya中的NevMesh
Laya中使用NevMesh寻路主要依赖的是Unity的Navigation导出网格图和Astar算法,所以一般在Laya中行走区域是固定的,没办法即时更改地图的行走区域。
使用步骤
添加工具代码
- 没有python环境的要先安装一下python环境。进入python官网/下载,然后按提示安装。安装进程中注意勾中将python目录添加到环境变量的选项,忘记的话要手动添加。
- 打开NevMesh.js GIT资源库。下载到本地。
- 在下载的NevMesh文件里找到python目录,将其复制到根目录下的空文件夹里,方便后续在命令行中使用。
- 在Unity中先导入LayaAir3D工具。然后在下载的NevMesh文件里找到unity目录,将目录下的NavMeshExport.cs复制到Unity工程下的Editor文件夹里(或者新建工具目录)。
制作寻路模型
-
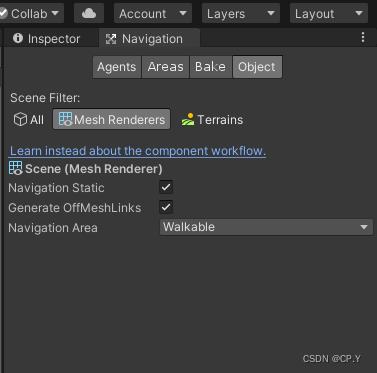
在Unity的window选项中打开Navigation面板,点击Object选择Mesh Renderers,在Hierarchy面板里勾选地图的模型,也可以直接勾选All。
-
然后在Bake面板调整地图参数,平面地图最好将Step Height设置为0避免在Laya中有些区域无法到达导致卡死,Agent Radius是角色的半径,与可行走区域有关。最后点击右下角的Bake生成地图的Navmesh数据。
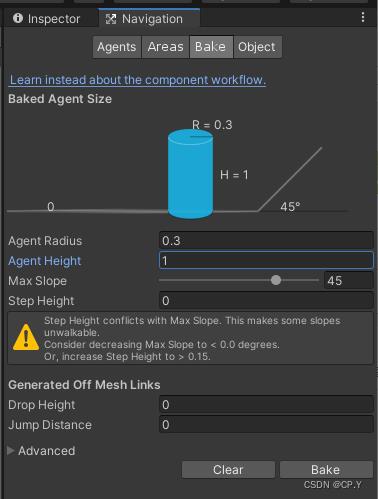
蓝色部分就是Bake好的可行走区域。与墙体的距离可以通过Agent Radius控制。
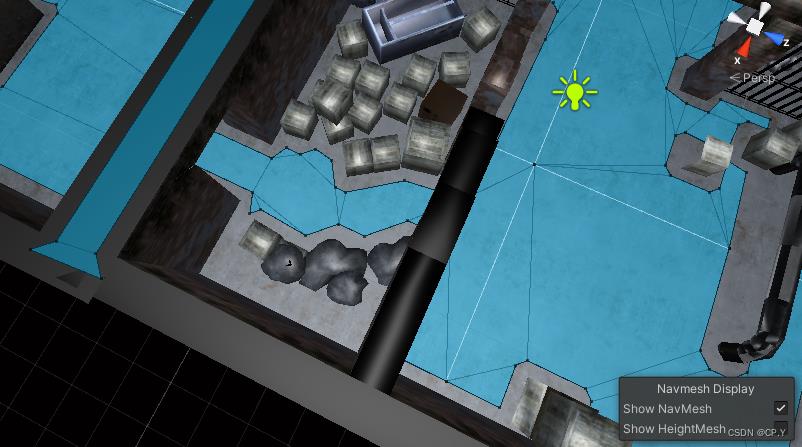
-
点击状态栏的LayaAir3D - NavMesh - Export,会在Assets目录下新建ExportNavMesh文件夹。里面的obj文件就是生成的Navmesh模型啦。
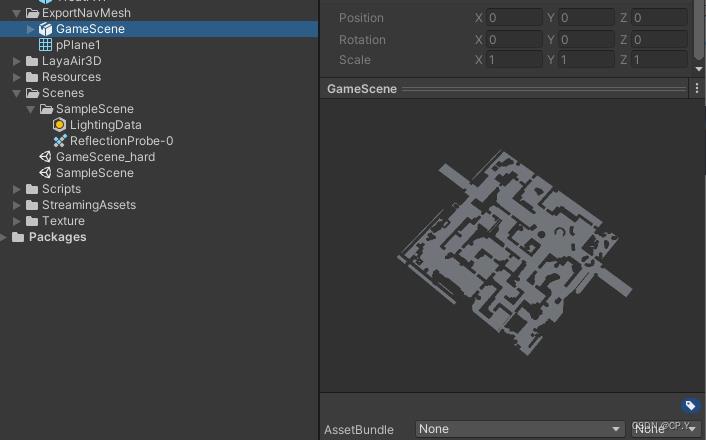
-
这个obj文件可以发给建模生成碰撞模型给Laya使用(如果不想使用Mesh Collider或者很多Box Collider的话)。
-
找到粘贴好python工具的文件夹,将上述生成好的obj文件复制到文件夹下。打开命令行,切换到python文件夹。
-
使用命令python convert_obj_three.py -i xx.obj -o xx.json。(不会可以百度python convert_obj_three的用法)xx.obj是寻路模型的名称,xx.json是生成的json文件名称。
-
将生成的json文件复制到Laya里。遇到无法正确读取的情况的话可以先转换为js文件xx.js,再在Laya中新建json将数据全部复制进去。
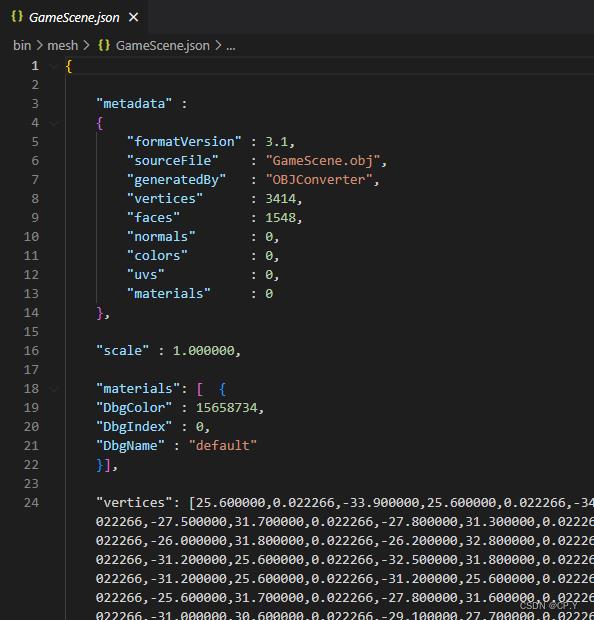
在Laya中使用寻路
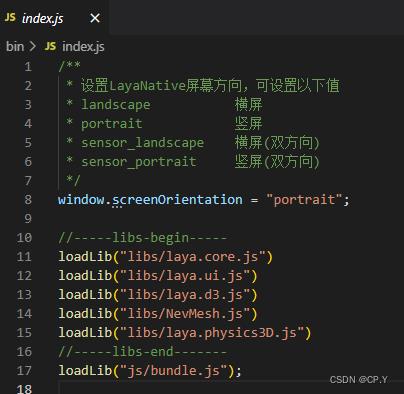
- 在下载的NevMesh文件里找到bulid目录,将NevMesh.js放到项目bin/libs文件夹中,将NevMesh.d.ts放到项目libs文件夹中,在bin/index.js中增加loadLib(“libs/NevMesh.js”),注意必须要在loadLib(“js/bundle.js”)前面load。
- typescript中的路径生成的代码如下,NevMesh文件里scr目录有其他的代码可供参考
import configMgr from "../mgr/ConfigMgr";

export default class NavMeshAgent extends Laya.Script
	constructor()
		super();


	public navMeshGroup;
	public updateRotation;
	public _pathPending;
	public _path;
	public _pathp;
	public _pathlen;
	public _remainingDistance;
	public destination;
	public speed;
	public steeringTarget;
	public _velocity;
	public out;

	onAwake(): void
		this.navMeshGroup = null;
		this.enabled = false;
		this.updateRotation = false;
		this._pathPending = false;
		//路线进行中
		this._path = null;
		this._pathp = 0;
		this._pathlen = 0;
		this._remainingDistance = 1;
		this.destination = null;
		this.speed = 1;
		this.steeringTarget = new Laya.Vector3();
		this._velocity = new Laya.Vector3();
		this.out = new Laya.Vector3();


	onUpdate()
		if (this.enabled)
			var now = (this.owner as Laya.Sprite3D).transform.position;
			if (this._path)
				var v = new Laya.Vector3;
				var tp = null;
				for (var i = this._pathp; i < this._path.length - 1; i++)
					var p0 = this._path[i];
					var p1 = this._path[i + 1];
					// configMgr.commonData.deltaTime = 1;
					this._pathlen = this._pathlen + this.speed * configMgr.commonData.deltaTime;
					var tlen = Laya.Vector3.distance(p0, p1);
					// console.log("运算值:", this._pathlen, tlen);
					if (this._pathlen > tlen)
						this._pathlen -= tlen;
						this._pathp++;

					else
						tp = p0.clone();
						p1.cloneTo(this.steeringTarget);
						Laya.Vector3.subtract(p1, p0, v);
						Laya.Vector3.normalize(v, v);
						Laya.Vector3.scale(v, this._pathlen, v);
						Laya.Vector3.add(p0, v, tp);
						break;


				if (tp == null)
					this._pathPending = false;
					tp = this._path[this._path.length - 1];
					this._path[this._path.length - 1].cloneTo(this.steeringTarget);
					this.enabled = false;

				((this.owner as Laya.Sprite3D).getChildAt(0) as Laya.Sprite3D).transform.lookAt(new Laya.Vector3(-tp.x, -tp.y, -tp.z),
					new Laya.Vector3(0, 1, 0),
					true);
				(this.owner as Laya.Sprite3D).transform.position = tp;
			 else
				this.out.x = now.x + this.velocity.x * Laya.timer.delta / 1000;
				this.out.y = now.y + this.velocity.y * Laya.timer.delta / 1000;
				this.out.z = now.z + this.velocity.z * Laya.timer.delta / 1000;
				if (this.navMeshGroup == null)
					this.out.cloneTo(now);
					(this.owner as Laya.Sprite3D).transform.position = now;


	get remainingDistance()
		if (this.destination && this.owner)
			return Laya.Vector3.distance(this.destination, (this.owner as Laya.Sprite3D).transform.position);

		return this._remainingDistance;

	set remainingDistance(value)
		this._remainingDistance = value;


	get velocity()
		return this._velocity;

	set velocity(value)
		this._velocity = value;
		this.destination = null;


	get path()
		return this._path;

	set path(value)
		this._path = value;
		if (value)
			this._pathPending = true;
		 else
			this._pathPending = false;

		this._pathp = 0;
		this._pathlen = 0;
- 初始化NavMeshAgent
public playerNavMeshGroup;
initNavmeshCom()
        // 设置寻路组件
        this.agent       = this.sprite.addComponent(NavMeshAgent);
        this.agent.speed = 3;
        // 加载寻路的json文件
        let json      = Laya.loader.getRes(configMgr.commonData.navUrl);
        let zoneNodes = NevMesh.buildNodesByJson(json);
        // 设置组,多个组件同时使用不会重复
        NevMesh.setZoneData(this.nodeName, zoneNodes);
		this.playerNavMeshGroup = NevMesh.getGroup(this.nodeName, this.sprite.transform.position);
- 生成路径点
// $targetPos为目标点位置
findPath($targetPos : Laya.Vector3)
        $targetPos.y = this.ownerPos.y;
        let startPos       = new Laya.Vector3(this.ownerPos.x, this.ownerPos.y, this.ownerPos.z);
        let calculatedPath = NevMesh.findPath(startPos, $targetPos, this.nodeName, this.playerNavMeshGroup);
        // console.log("路径结果:", $targetPos, calculatedPath);
        if (calculatedPath && calculatedPath.length)
            var debugPath = (calculatedPath);
            // console.log("start",this.sprite.transform.position.x, this.sprite.transform.position.y, this.sprite.transform.position.z);
            var p = [];
            for (var i = 0;i < debugPath.length;i++)
                p.push(new Laya.Vector3(debugPath[i].x,debugPath[i].y+.1,debugPath[i].z));


            // this.agent.path为生成的路径点数据,用于寻路逻辑去使用
            this.agent.path = [this.sprite.transform.position].concat(p);

        	// curNavPath为路径数组,curPathI为走到的路点下标,更换路线时一起重置。个人的使用方法。
            // this.curPathI   = 0;
            // this.curNavPath = null;
            // this.curNavPath = new Array();
            // // 移除相同的点
            // this.curNavPath = this.removeSamePos(this.agent.path);
图解NavMesh寻路中的漏斗算法
NavMesh是广泛使用的一种寻路技术,将地图中可走的部分生成连续的多边形/三角形网格,寻路在网格中进行,主要包含两步:1、根据网格的邻接信息构造图,使用A*之类的寻路算法计算出从起点到重点需要走过的多边形/三角形集合;2、使用漏斗算法/拉绳子算法,将多边形列表转换为一条最优的路店。本文主要讲一下对于三角形列表的漏斗算法原理。
诸位读者如果搜索过网络,会发现有一年GDC有人讲了这个算法,也有几篇博客翻译了这个GDC的演讲slides,但多半都是仅仅翻译一遍slides的水平,没有真的把算法说明白,导致笔者在实现这个算法的时候遇到了很大的困难,好在最后还是弄懂了。
阅读本文需要一定的前置知识,您需要知道NavMesh及其对应的三角形网格,以及单位在NavMesh中寻路的三角形列表中间结果。
算法结果
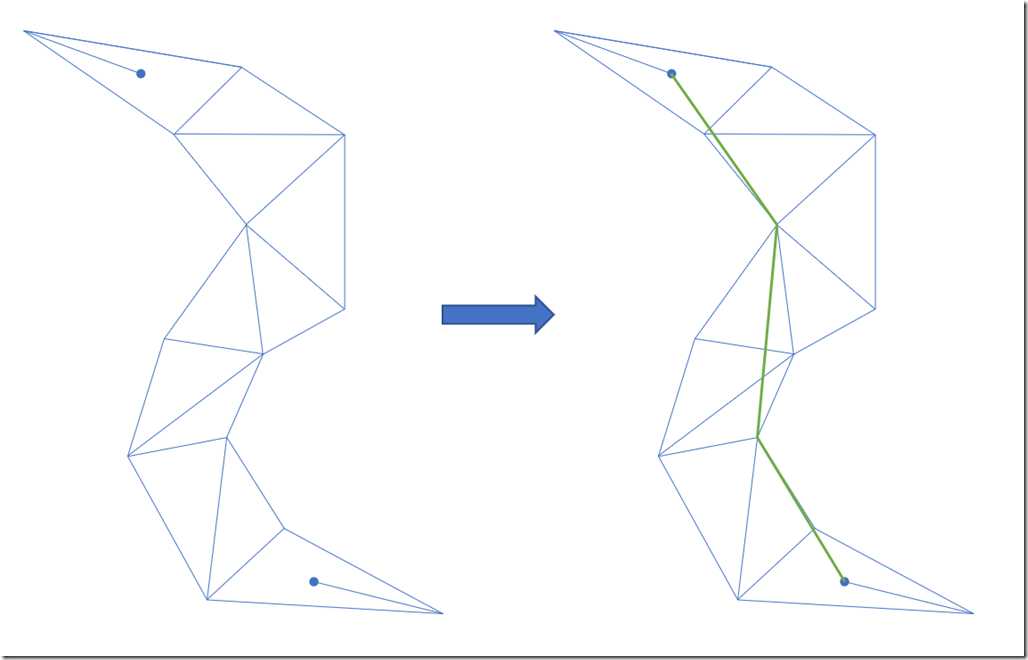
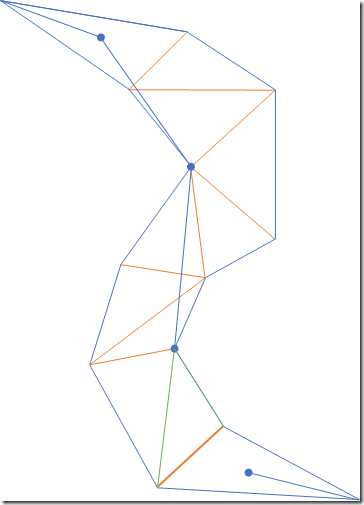
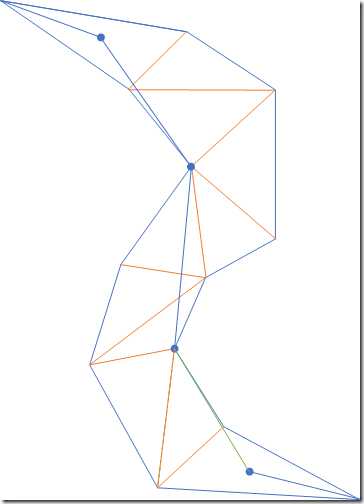
如图所示,假定左边的三角形列表是从寻路算法生成的从起点到终点需要经过的三角形,两个蓝色圆点分别是起点和重点;右边绿色的粗线就是算法的结果,是从起点到终点需要经过的最短路径。
算法过程
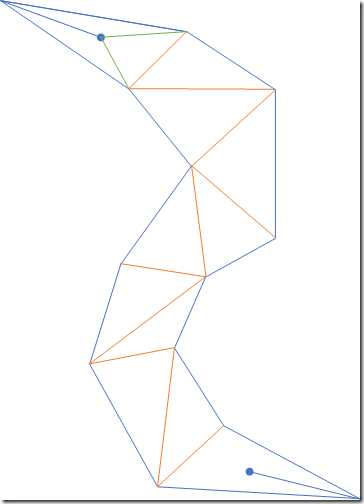
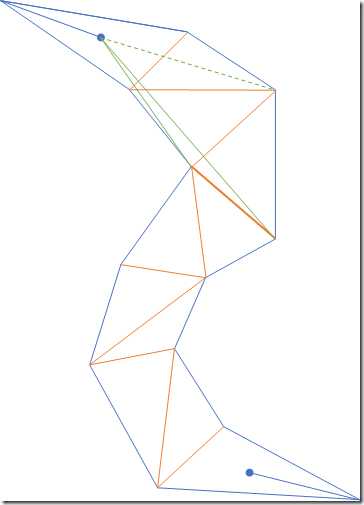
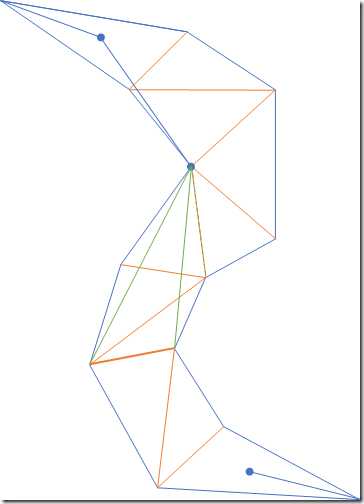
- 首先计算出三角形列表中的邻接边列表,所谓邻接边就是两个三角形公用的边,然后从起点开始,构造到第一条邻接边的漏斗,算法正式开始。
黄色的边均为邻接边,两条绿色的边为初始的漏斗,姑且约定两条“漏斗边”的“起点”为蓝色圆点,方便后文的描述
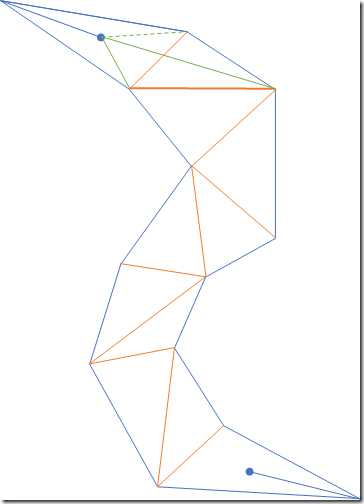
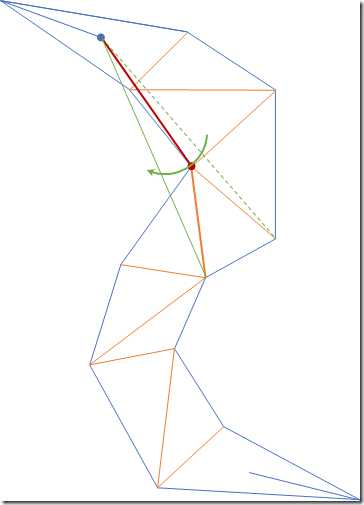
- 将两条漏斗边的终点移动到下一条邻接边,对于途中的情况,左边的边没有动(但逻辑上算移动了),右边的边向内收紧了。
分别考虑两条边的角度变化,当漏斗变窄(或不变化)时,本次移动是有效的,否则需要对那条边回退操作,对于图中情况,移动是有效的
可见图中的漏斗变窄了
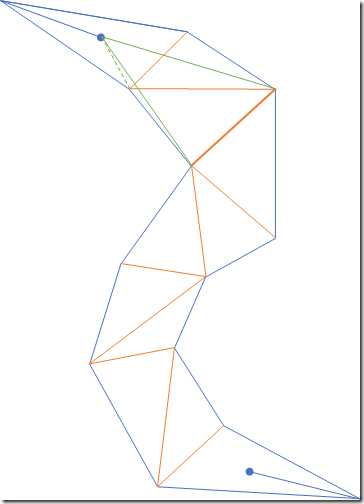
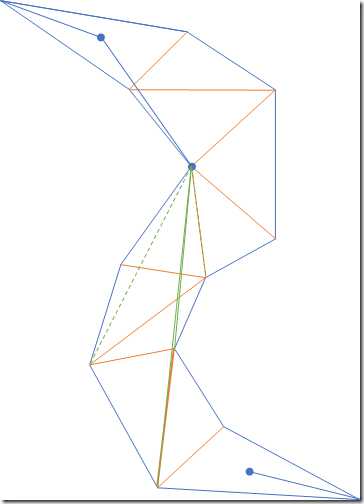
- 继续将漏斗边的终点移动到下一条邻接边,漏斗继续收紧,移动有效,之后的两步操作都和上图情况相同
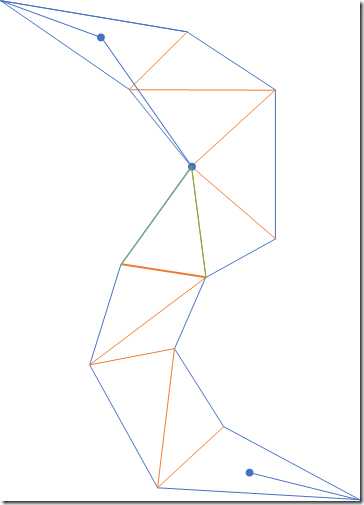
- 下一步操作出现了第一种特殊情况,漏斗边终点移动到下一条邻接边时,漏斗口的角度变为了负数(原来右边漏斗边转到了左边去),这种情况下,被盖过去的那条边的终点就成为了结果中的第一个点。
同时,将漏斗起点移动到该点,以当前漏斗起点所在三角形的出邻接边构造漏斗,继续算法
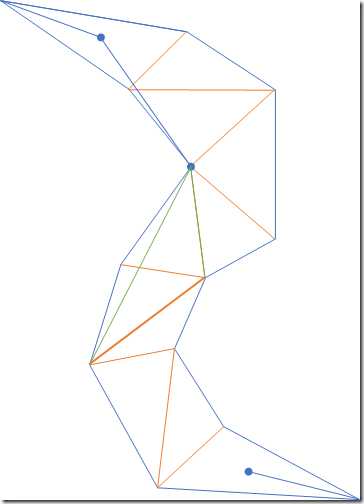
- 使用之前描述的规则继续收紧漏斗口
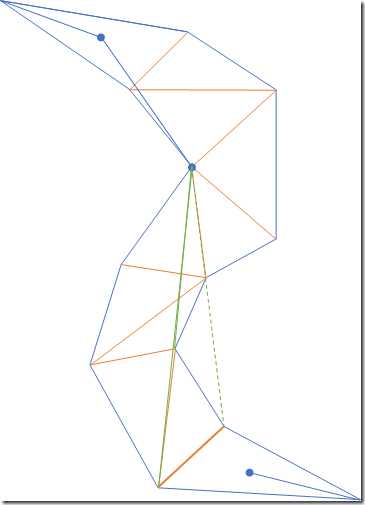
- 继续移动漏斗,这一次会发现左边的漏斗边没有移动,而右边的漏斗边会使漏斗口变大,右边的移动是无效的。这次移动只有左边发生了移动(虽然起点和终点一样)
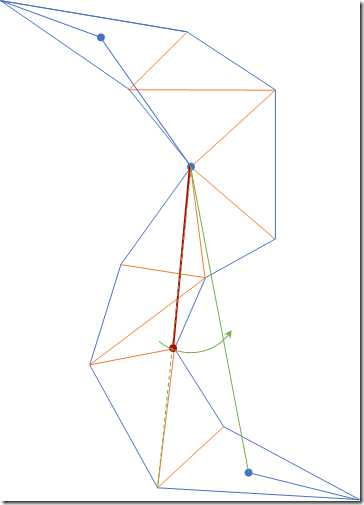
- 下面是算法的结束情况,算法已经移动到了最后一条邻接边,但是从现在的漏斗底直接连一条线到终点肯定是不可行的。随后我们以终点一个点,当作一条两条端点相同的边。用它继续前进漏斗口。
右边的漏斗边如果移动,会使漏斗口变大,因此不移动,左边的漏斗边移动,会盖过右边的漏斗边,因此右边的漏斗边终点成为了结果中的另一个点。
- 同样,以该点所在三角形的出邻接边重新构造漏斗,继续算法,很快就会发现漏斗口到终点,收到了最小,算法结束。
以上是关于Laya中使用Navmesh寻路的主要内容,如果未能解决你的问题,请参考以下文章
